Last Post: 05/28/2009
Retrieved: 05/21/2011
Updated: 05/22/2016
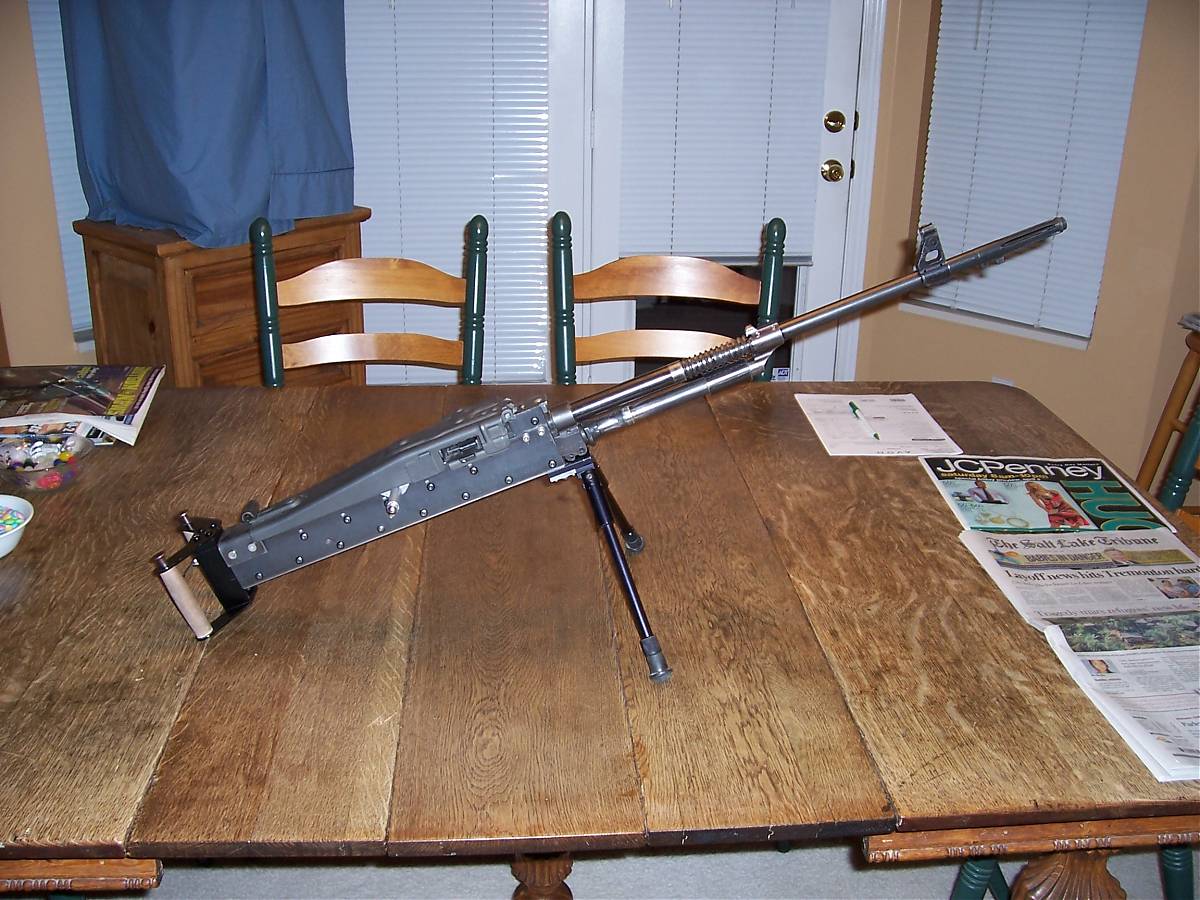
Here is the first pictures of my MG47ES belt feed. It is convertible from gripstick and butt stock to spade grips in about 1 min. All FCG is inside the receiver. Still need to fit an upper hand guard.

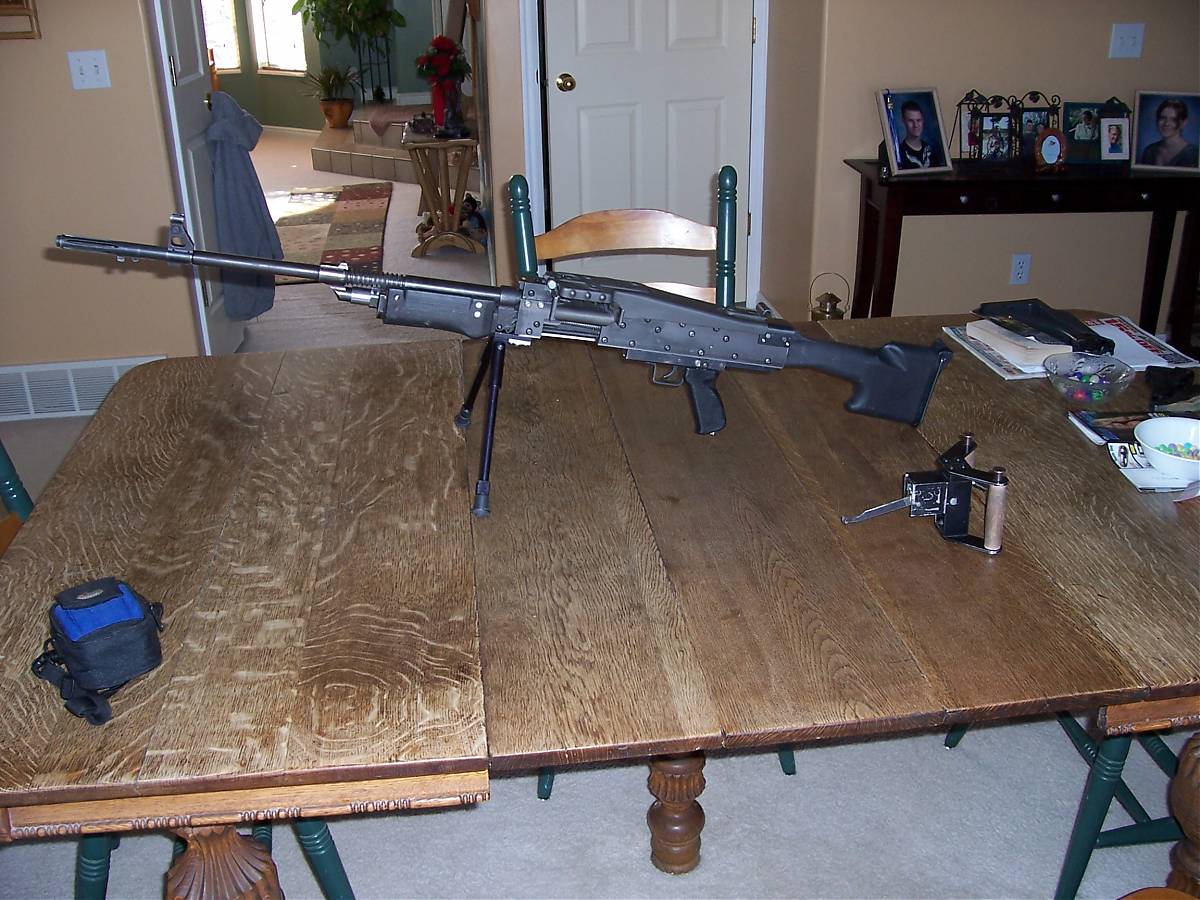
The MG47ES is a NO-WELD / NO-MACHINING build! I am working on a video tutorial and drawings so any builder with a drill press, a MAPP gas torch & silver solder, a Dremel, and 10-32 drill & tap set can build one from either an AK-47 or a RPK kit and material from Home Depot.
Sorry it's taken so long but I wanted to be sure it could be done no weld no machining.
Receiver material; $10 Home Depot or Speedy Metals
Top Cover assy & feed tray: $85 RTG Roberts
Gas Tube: $5 peedy Metals or Aircraft Spruce
Gas Tube Joint; $5 Speedy Metals or Aircraft Spruce
Return Spring Extension; $5 Home Depot, Speedy Metals or Home Depot
Fire Control Group; $32 U.S. AK G2 Tapco or Gun Broker
M60 Return Spring; $12 Gunp Parts Corp.
Misc Fasteners, Screws or Rivets & Other Material ; $15
Butt Stock, Gripstick, Handguards; G3, Cetme, FAL, Or Scratch built ? Tapco,
Gun Broker, or $ ?
Rails: $10; Home Depot
Total less AK Or RPK Front end Kit. Approx. $180
Romey AK Kit; $135-$160, RPK Kit; $160 - $250
Spade Grip Material; $10 Speedy Metals
MG1/3 Belt Links; $6.50 for 50 links, RTG Roberts
Misc. tools req'd; drill press $50 harbor freight, Dremel tool and stones $25 Harbor Freight, MAPP gas and torch; $40 Home Depot, silver solder: $15 Home Depot or any welding supply house. misc drills and taps: $15.00 Home Depot. No mill, lathe or welder.
Typically our MG-47 builds have been using the permanent 50 round belts for the MG-42.
These are the parts I got from Robert / RTG parts:

I went with the MG-3 top cover and feed tray instead of the MG-1, but the links are the same... Not sure how well the disintegrating ones will work. I just noticed everyone else is using the standard ones.
So, for the bolt rails (upper on an AK) that the carrier slides on... Did you use 1/16" (0.065) or 1/8" (0.120) angle iron?
IIRC, 1/16" (0.065) steel should work for rails without having to be milled down like the 1/8" steel, right? Or did some of you just widen the rail channel in your bolt carrier(s)?
It looked like most everyone milled down their steel tubing on the original style to fit the rail gaps in the carrier, but cntrailrider's friend who built one - his appears to have a wider rail channel on what appears to be a highly modified / custom bolt carrier.
I'm thinking for stability / longevity sake, I'm likely going to just build mine in the original welded format. But I'm eagerly awaiting your most excellent tutorial so I can perhaps borrow bits and pieces of ideas from your 47ES build tutorial.
The rails are 1/16. The rail slot in th BC did not have to be widened.
The FCG is modified AK. AK FCG fits inside a standard width AK receiver so there is extra room in the wider and deeper ES receiver. There is just enough room between the TC inside and the receiver outside to get a cocking handle bracket in between. Cocking with the TC open would not actuate the feed mechanism and the belt would not advance and feed round into the chamber.
Another quick question... How does your cocking handle work? It appears as though you'd likely have to open the top cover to pull the bolt carrier back in some way... How did you do that?
The FCG is modified AK. AK FCG fits inside a standard width AK receiver so there is extra room in the wider and deeper ES receiver. There is just enough room between the TC inside and the receiver outside to get a cocking handle bracket in between. Cocking with the TC open would not actuate the feed mechanism and the belt would not advance and feed round into the chamber.
That's what I was kind of wondering about the charging handle. I knew it wouldn't actuate the feed mechanism with it open... I was thinking you had some way to lock the bolt carrier back with the TC open, feed a belt into position in the tray, close the TC, and THEN release the bolt carrier to chamber... I thought that would be overly complex, and you MUST have thought of some better way to do it... (which you did).
That makes more sense...
Also, so that means this receiver is also taller as well as wider than the original MG-47.
What advantages do you see from using a wider receiver (if you were to make one in a weld-build)? Is it just more room for recoil spring assembly options, or what other justifications (although I realize it's necessary in its screw- build form to be larger), but are there any additional benefits/advantages?
I kind of like the thin, compactness of your MG-47 weld build receiver in that it's smaller, lighter, and thus not so unwieldy. Not to mention there isn't the trunion shimming requirement either.
Could I do this with a piece of RECTANGULAR stock to get more vertical receiver space, but still keeping it skinny enough to keep it lighter and keep soem bulk down? I'm thinking 1 1/2" W x 2 1/2" H x 0.12 Thick (Maybe grind/file/sand/mill down to ~0.06" on one side), and then cut the rail for the bolt?
Since I don't have a mill, it'd be tough to get the one side down to 0.60 with any relative consistency along the length of the receiver... But the 2.5" high tube should allow me sufficient clearance for an AK trigger group, and the bolt carrier... Maybe even with 0.05" to spare, LoL!
For mine, I've been thinking of somehow adapting an H&K G3 style cocking handle along the length of the receiver with a bolt hold-open of some form.
iNuhBaD
If you use 1-1/2 x 2-1/2 x 1/8 tubing how are you going to mount the BC guide rails? I measured a Romy BC at 1.251 wide, a Yugo M70 BC at 1.257 wide and a Chinese AK BC at 1.291 wide. 1-1/2 x 1/8 wall tubing is approximately 1.125 wide inside. That doesn't leave any room to bolt, rivet or spot weld in the BC rails unless you point the leg of the rail up in the receiver, then you don't have room for the ejector and bolt head guide rail. 1-1/2 x 1/16 wall tubing would give you room for 1/16 thick angle to make your rails from. You could still use AK FCG in the thinner wall tubing. But 1/8 wall gives you a very stiff receiver. Cntrailrider had to attached some stiffing rails to the sides of his 1/16 wall receiver because the side force required to actuate the feed cam would deflect the receiver. Check CTR's posts to see what he did exactly.
Here is a few more pictures of the ES on a 1919 M2 tripod I made. Also is a picture of the FCG tray that slides into receiver between the corner angles and is held in place by a couple of 1/4 pins. If the BC rails look like shelf brackets it's because they are made from shelf brackets. Normally I would bend them up with a pan brake but not everybody has one even thou you can get a small one from HF for less than $30 I believe.
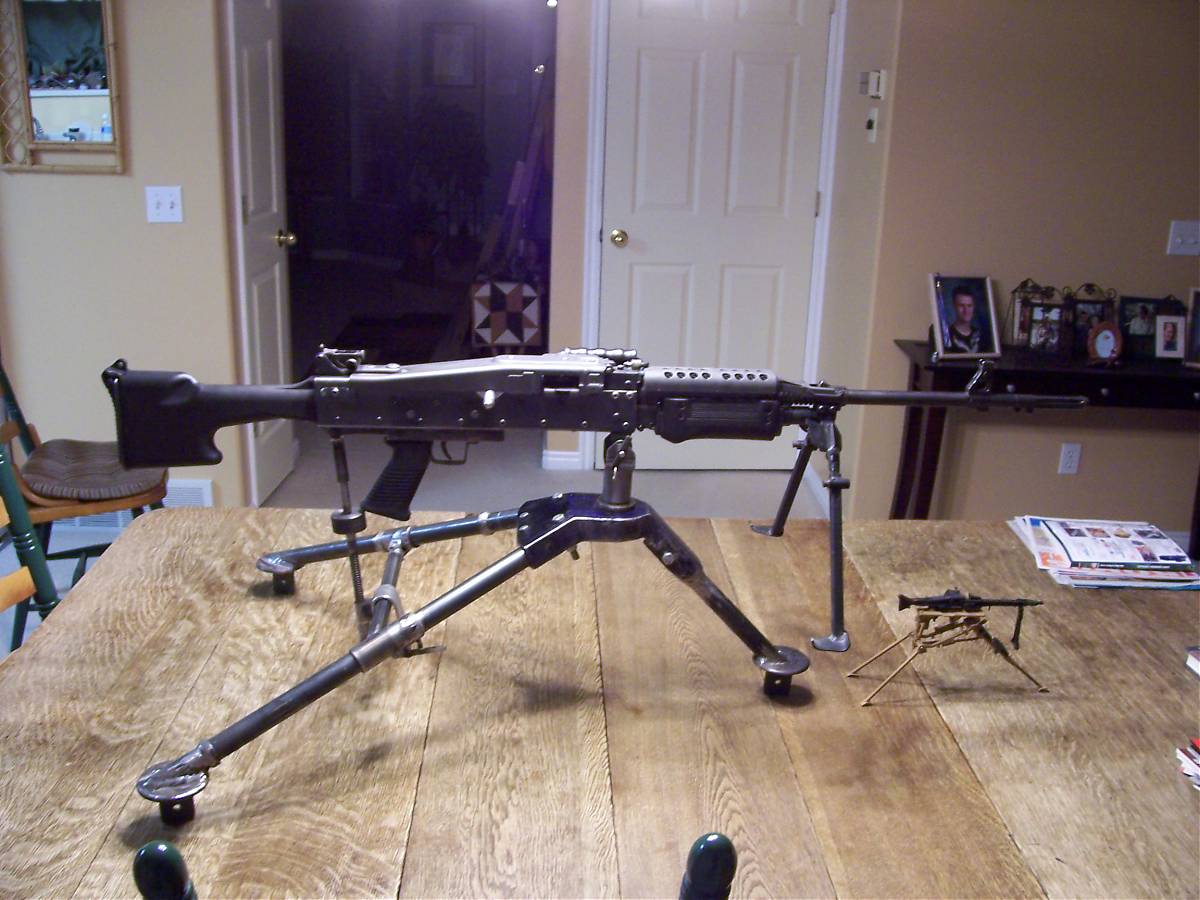
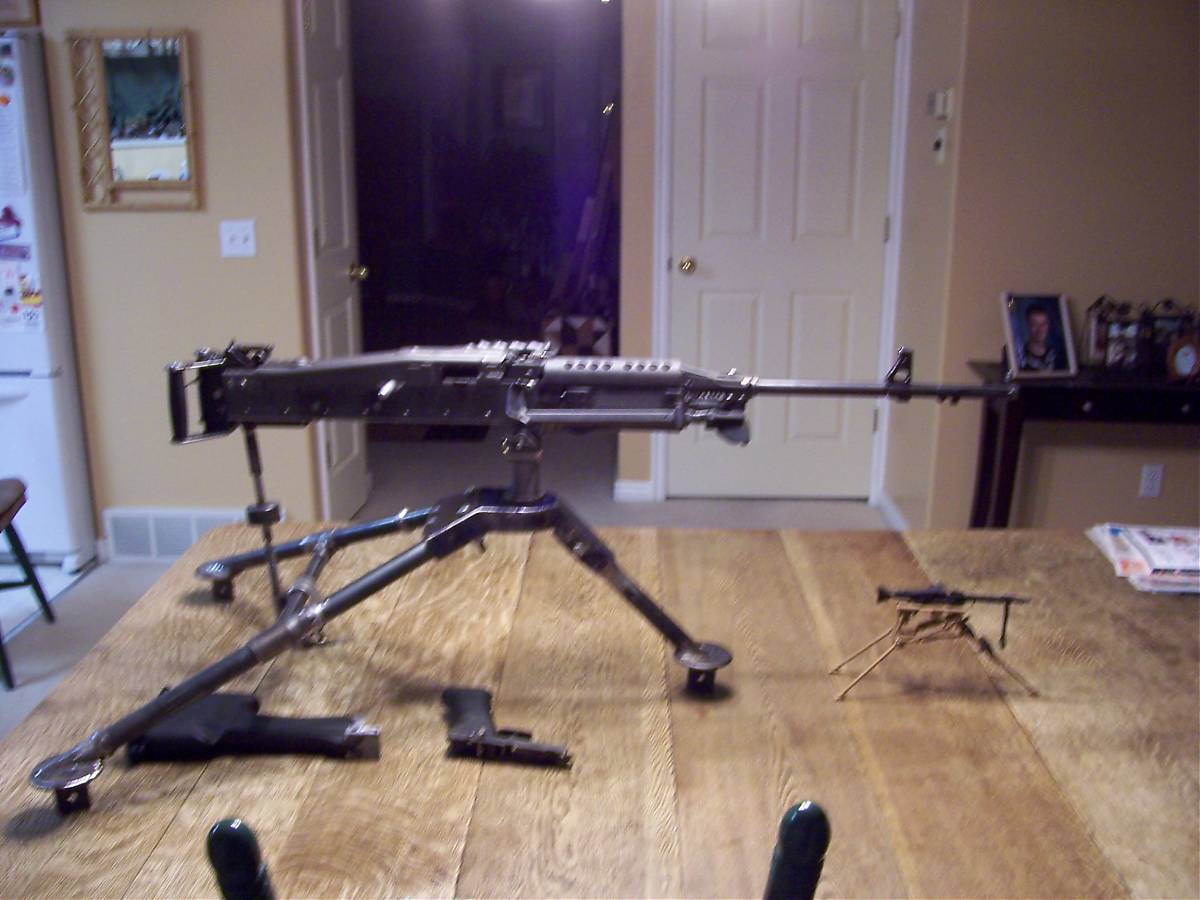
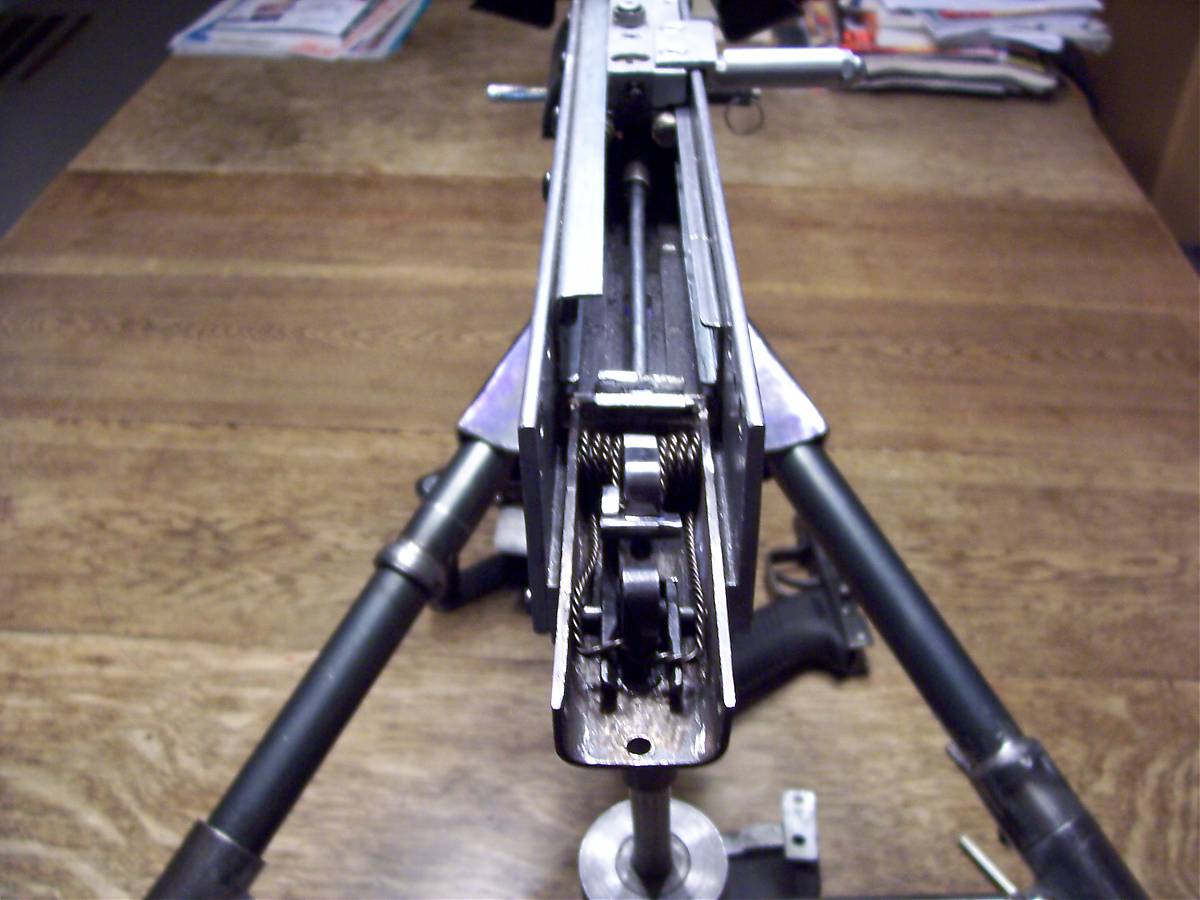
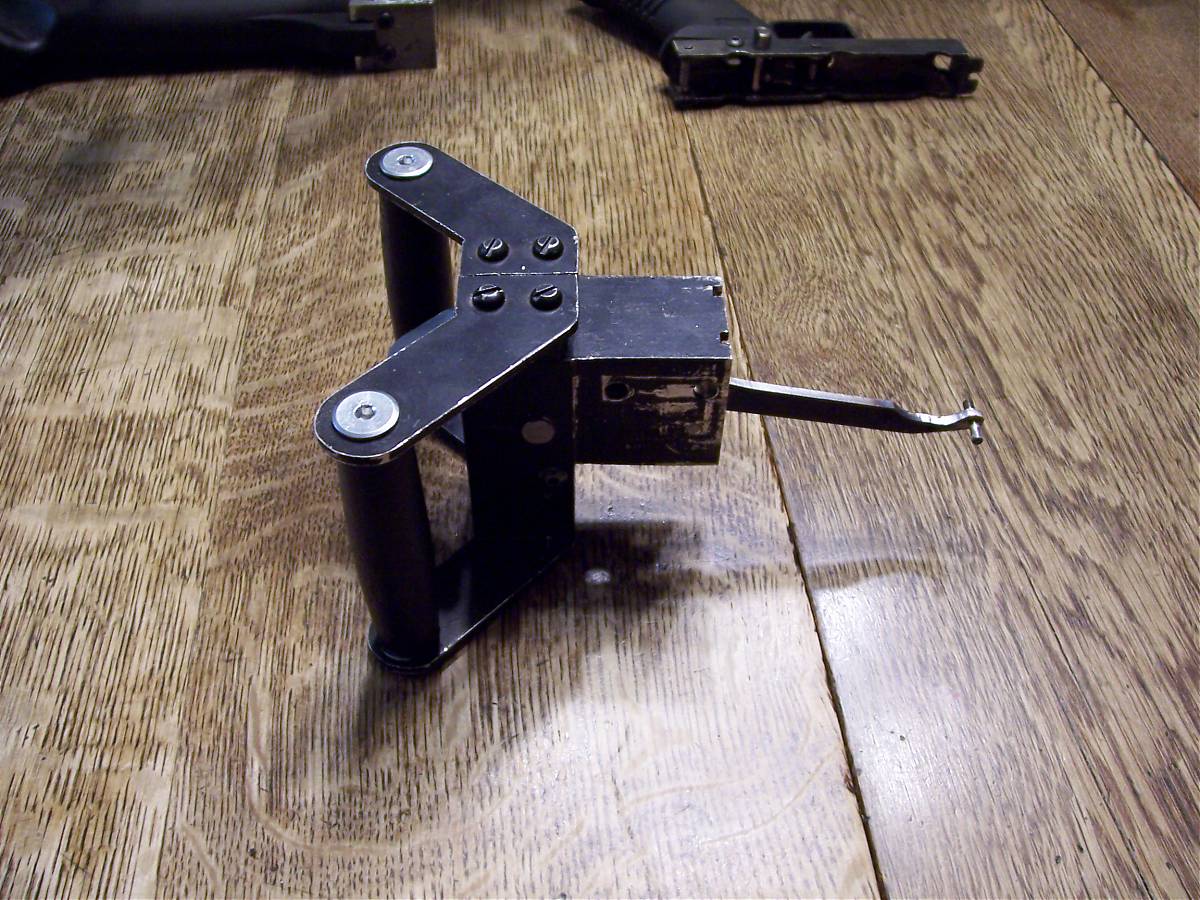
Butt stock is made by Tapco for a FAL, SAW249 style. Rear ladder sight is from a SMLE jungle carbine from Gun Parts Corp. (Numrich).
The lower rail of the "U" shaped shelving steel has no real function but it helps hold the internal FCG tray down in place until the cross pins are inserted.
The MG47 gripstick is scratch built to look like a MG42 gripstick and houses a complete FAL FCG. The gripstick on the MG47ES is a simple tube that only houses a trigger bar and the grip its self is SAW style AK47. The main FCG is internal just like in a AK47.
MG-3 is actually a little more difficult to get cycling smoothly. The springs are newer, more stiff, and it also has a lower 'pawl' lever on the feed tray that is to keep cartridges/belts from sliding back out of the feed tray (which is a little on the 'strong' side in that his has a fair bit of resistance when pushing it down)...
SO, it'd likely be easier to get a MG-1 assembly to operate more smoothly. I chose the MG-3 for two reasons...
1. I hope to reduce the amount of pressure/resistance and 'binding' on the lower feed pawl in the feed tray, as I find it does a VERY GOOD job of holding belts in place (would be good for feed tray testing).
2. Robert RTG Parts was out of stock on MG-1 topcovers and feed trays, and I didn't want to have to wait for him to get more in stock, or miss out on this kind of build.
Every thing on the barrel is as it comes from the factory including the front trunnion (except the front sight) and is installed onto the receiver upside down. (trunnion, barrel, gas block, piston, gas tube, rear sight, upper and lower hand guards and retainer are all inverted). The front sight is install pointing up when everything else is pointing down. Rear sight is pointing down and is removed. A new rear sight arrangement is installed on the top cover or off of the back of the receiver. MG47 uses a K98 rear sight on the top cover and the ES version uses a SLME jungle carbine rear sight mounted on the rear receiver bridge.
iNuhBaD
On the ES I just cut the rails short but left a very small projection on the upper rail surface that just fit into the BC slot about 1/8" to assure that they lined up. I then adjusted the rear of the rail so it lied parallel to the top of the receiver. Shim the sides of the trunnion as required to fit snug between the inside of the receiver. Assuming that the inside dimension of your receiver is 1 1/2", use .025" thick shim on each side.
The ejector need to be made out of at least 4130 or 4140. Steel with less than .03% carbon will not harden by just heat and quench. It must be case hardened. Just heating a piece of sheet you would by at Home Depot is most likely 1018/1020 or .018% to .02% carbon max and will not harden. Use an standard AK ejector, turn it upside down and mount it on the right side above the BC guide rail.
The drawings for the MG47ES are done and ready to publish. PM or e-mail me for info.
While working on the tutorial for the MG47ES I discovered 2 dimensions that should be revised on sheet 4, Bolt Carrier Extension.
1; On the lower left end view the .21" dimension from the bottom to the center of the .25 diameter bolt holes should be .175".
2; The over all dimension of the bolt carrier extension should b 3.875" long and not 4" long.
Please make these changes to your drawings. Any one that wants a revised copy of sheet 4, e-mail me and I will e-mail you back a revised sheet 4. Sorry for the inconvenience, it can be made to work with the dimensions on the drawing but will work better with the revised dimension. LAKER
I have used the regular FCG pins in the FCG tray but with the heads cut off. Same with the gripstick pin except the head is not cut off. I have also used a 3/16" diameter round drill rod when I didn't have the regular pins. The inside wall of the receiver keeps them in place except the gripstick pin needs a retainer inside the gripstick housing. I have used a small hairpin clip for that. LK
I used a m60 recoil spring (from Numrich) and started at 16" and trimmed so it still would feed and not be so strong that it would short cycle. Each build is a little different so you will have to experiment a little.
I tried 2 different M60 springs and the old style single wound looks like the one to use. The new style double wound spring is a little wider and won't fit in the gas piston extension without opening it up a little. I might do that as it is a stronger spring.
With the extra parts I made to do the MG47ES tutorial I am making a MG47BP (bull pup belt feed). AK based with a RPD top cover because it is shorter. With the internal ES style FCG and return spring I can cut about 3" off the rear of the receiver and end up with a really short gun. Still staying with a 16" AK barrel and a 26" overall length so I won't be required to SBR it. I will post pictures tomorrow if I can get to it. Still got a few details to figure out like how to put on a G3 style cocking handle and get the trigger bar from the grip stick that's ahead of the FT to the internal FCG. Since both my MG47 and MG47ES are big heavy beasts I decided to try CTR's route and build as light and short of belt feed as I can.
Where did you find a 12mm OD bearing X 5mm ID X 5mm width. I have had no luck locally or online. An MG42 bolt actuating pin measured .465" and the top cover feed "track measured about .485". Closest thing around here is: 11mm X 5mm X 5mm.
I used a 1/2" OD x 3/16" ID X 3/16" wide and ground down the OD to 12MM and it fit fine over a No. 10-32UNF screw. The thickness I left at 3/16". I believe I saw a 12mm OD x 5mm ID x 5mm thick bearing in McMaster-Carr though. An 11mm OD bearing should work, it doesn't have to fit exactly snug. CTR didn't use a bearing, just a stud that fit in the track.
A cap screw (I believe 5/16") works fine and is less complicated. Take your TC to the hardware store and get one that fits the track. Also easier to move it if your timing is off. To re-position, just weld the hole shut, re-drill and re-tap.
Steve has built 3 with a cap screw, I have built 2 with a bearing. My bullpup is going to have a cap screw. Simpler like Steve says.
For the bolt carrier guides, there is a .650 height measurement. Could I use some .625 outside dimension DOM tubing cut down for the rails. Will there be any problem with losing the .025, going from .650 to .625? It would allow me to use off the shelf tubing and not the shelf brackets
The only thing it should effect is that there will be a bit more side play of the bolt carrier and I am not sure if the extra side play will give you enough the side to side movement of the feed cam. You could use .75 outside dimension DOM tubing cut down to .65. With .625 DOM tubing you will lose a little with the corner radius also. .75 outside DOM tubing is a standard size also.
What procedure did you use to anneal the rear of the bolt carrier in order to drill it? Could it be done with a MAPP torch?
Also, when you revised the bolt carrier extension length shorter, do I also need to make the firing pin extension that much shorter as well? It seems too long at its current length made as per the print.
To anneal the end of the BC I used a MAPP torch and heated the rear 1" portion only to a dull red and let air cool. Clamp the BC in a vice around the bolt cam section so the vice acts as a heat sink so you don't anneal the cam section as well.
The firing pin extension sould be shortend also to the point that when the hammer strikes it the bolt is fully rotated into the locked position.
I will have to correct that on the drawings. Thanks for catching that.
I am getting ready to install the barrel trunnion. I am using a regular Hungarian non-bulged trunnion. The front of the trunnion obviously needs to be flush with the front of the receiver.
My question is this, at what vertical height should it be placed? A measurement from the barrel centerline to the top of the receiver, or a measurement from the top surface where the bolt carrier stops (on the right side because the trunnion is reversed) at the trunnion to the top of the receiver on the right side would be of great help
From the top surface where the bolt carrier stops (on the right side because the trunnion is reversed) at the trunnion to the top of the receiver on the right side would be approx. 7/8". If you have your rails installed a better way is to attach the gas tube, put the bolt in the BC and slide it in on the rails until the bolt head enters the trunnion and locks around a fired case then fit the trunnion to the rails and not the receiver top. If the rails are not installed, use the 7/8" dimension to mount the trunnion and fit the rails to the locked bolt head and BC.
Hope that helps. Getting the trunnion and rails at the right height to each other is probably the most critical and difficult part of the build.
SS, I have both the tutorial and the blueprints, however the reciever material on the blueprints say to use 1.5" flat bar, whereas the tutorial says to use one piece of 1.5" bar with two of the 2" bar's as the sides of the receiver.
If I am reading it right i need one of the 1.5" for the bottom of the receiver, and 2 of the 2" ones for the side walls?
You need one piece of 1.5" flat bar for the bottom and two pieces of 2" flat bar for the sides per the receiver detail drawing. I have to fix the list of materials. Your are the only one that pointed out that error. Thank you. I didn't realize that it there was a discrepancy.
feeding problems
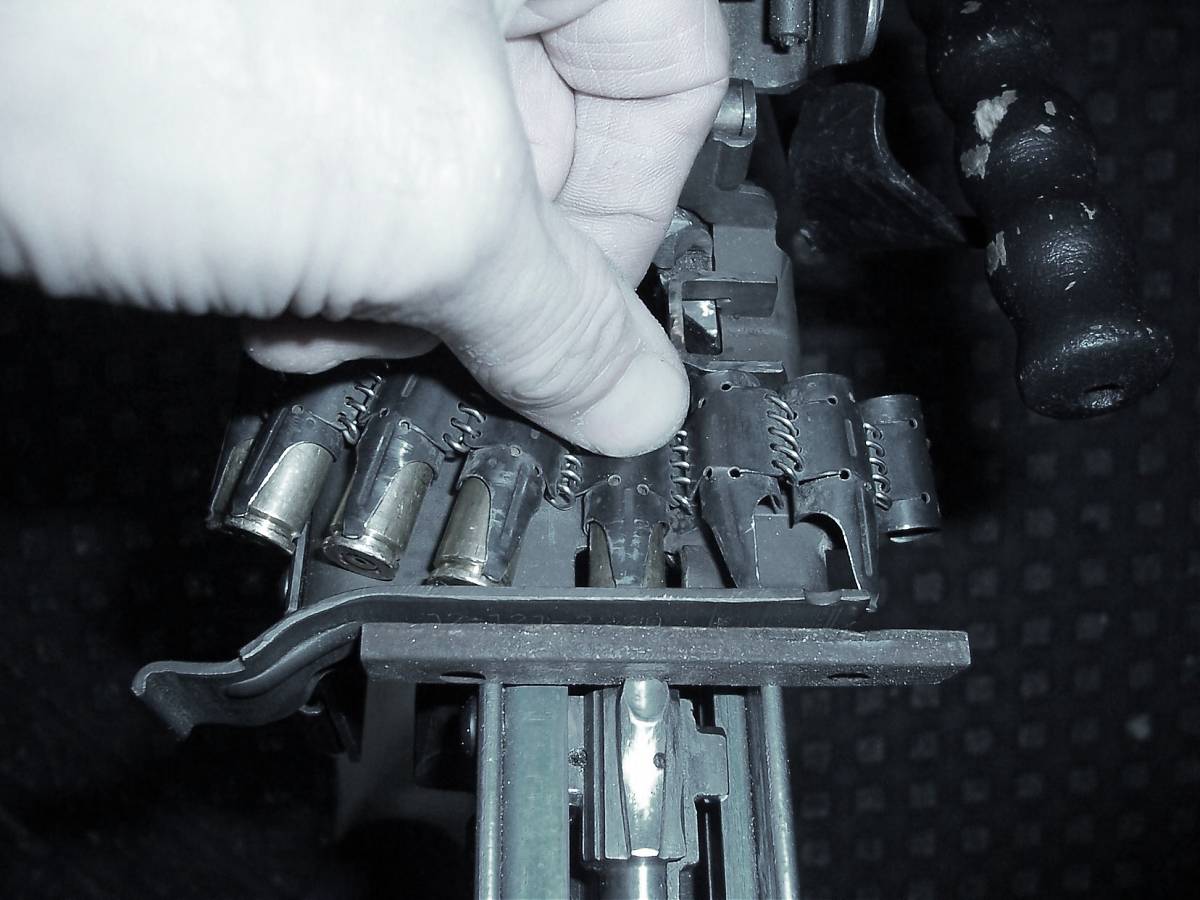
I have my feed tray and top cover mounted. When I attempt to cycle ammo through by hand the rounds do not want to drop down. They just want to go straight forward and run into the cartridge guide. I have looked everything over and I just can't seem to figure it out.
You might need to bend the tip of the cartridge depressor down slightly. It is heat treated so you should heat it to a dull red before you try bending it. Be sure you remove it from the top cover assembly before you do. You don't want to anneal the cartridge depressor spring. First try beveling the feed ramp or what I think you are referring to as the cartridge guide so the tip of the bullet is deflected down into the mouth of the chamber. A Dremel tool works great for that. After you bevel it, polish it with a Dremel polishing tip.
Well thank you for the tips. CNC trailrider said that I should post some pics of the problem so here they are I am afraid that my problem is severe enough that beveling the feed ramp is not enough. Also how much of it can I remove and still be safe? The bright area on the cartridge depressor is were I TIG it back together after I cut it too short. In your opinion will it hold being welded or shout I get a new plate?


As or right now I have the original depressor spring in place.


You can bevel the cartridge guide a lot with out compromising the trunnion strength. I will post some pictures of mine so you can see how much I have beveled it. I will also post a picture of my cartridge depressor and feed tray modifcation. By opening up the slot in the feedtray allows the cartridge to sit lower so the bullet nose is below the cartridge guide. My feed tray is opened up enough so that the connecting springs of the links rest on the feed tray. Bending down the cartridge depressor tip guides the bullet below the cartridge guide. Having to TIG weld the tip back on, if done right, so you have complete penetration of your weld, should be no problem strength wise.
Also, from what I can see in your pictures looks good although you are going to have to remove the portion of the left guide rail that is sticking down into the ejection port. Otherwise you are going to have ejection problems. Just leave enough for the cap screw above it to have a complete threaded hole.
It looks like you may have not narrowed the stripping lug on the bolt enough. This will also cause the cartridge and links to ride up high in the feed tray and not line up so the nose of the bullet is below the cartridge guide. The stripping lug should be narrowed so it is narrower than the gap in the links. Otherwise it will lift the cartridge and link up and cause the same problem.
Here is some pictures of the feed ramp and how the cartridge & link set down in the feed tray slot. You can also see how the stripping lug of the bolt head has been narrowed. A good picture of this is in the tutorial. You may have to weld a small block to the top of the cartridge guide and blend a bevel into the guide to get it to deflect the cartridge down into the chamber depending on what your trunnion looks like. I did on this trunnion. If you do, a piece of 1/4" key stock works and just use minimal weld so you don't anneal the trunnion locking lug areas. You can see that the block is welded along the top and sides but the welds are away from the locking lugs. Don't weld the block to the top of the locking lugs. I also beveled and polished the top of the chamber a small amount to remove the sharp edge. Be sure you don't bevel into the chamber more than about 1/8" though.
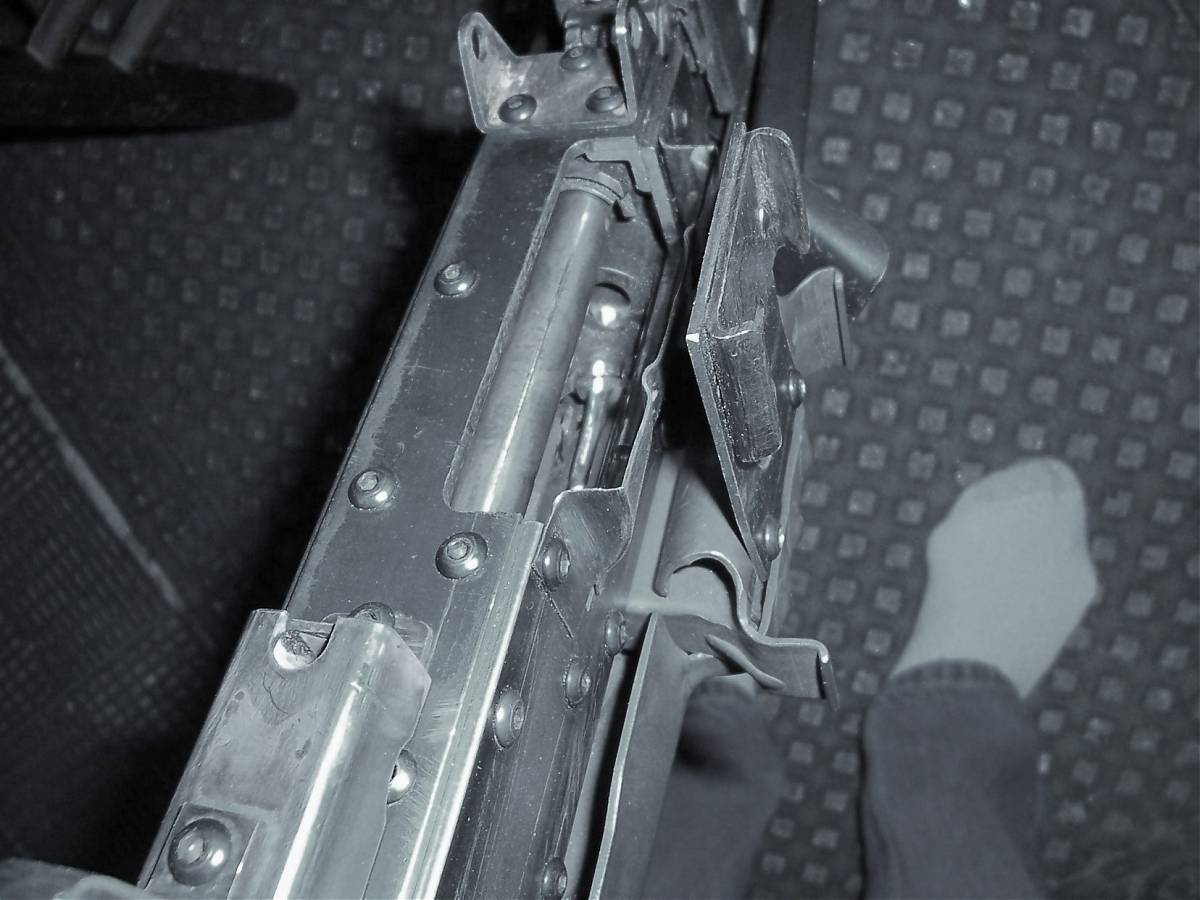
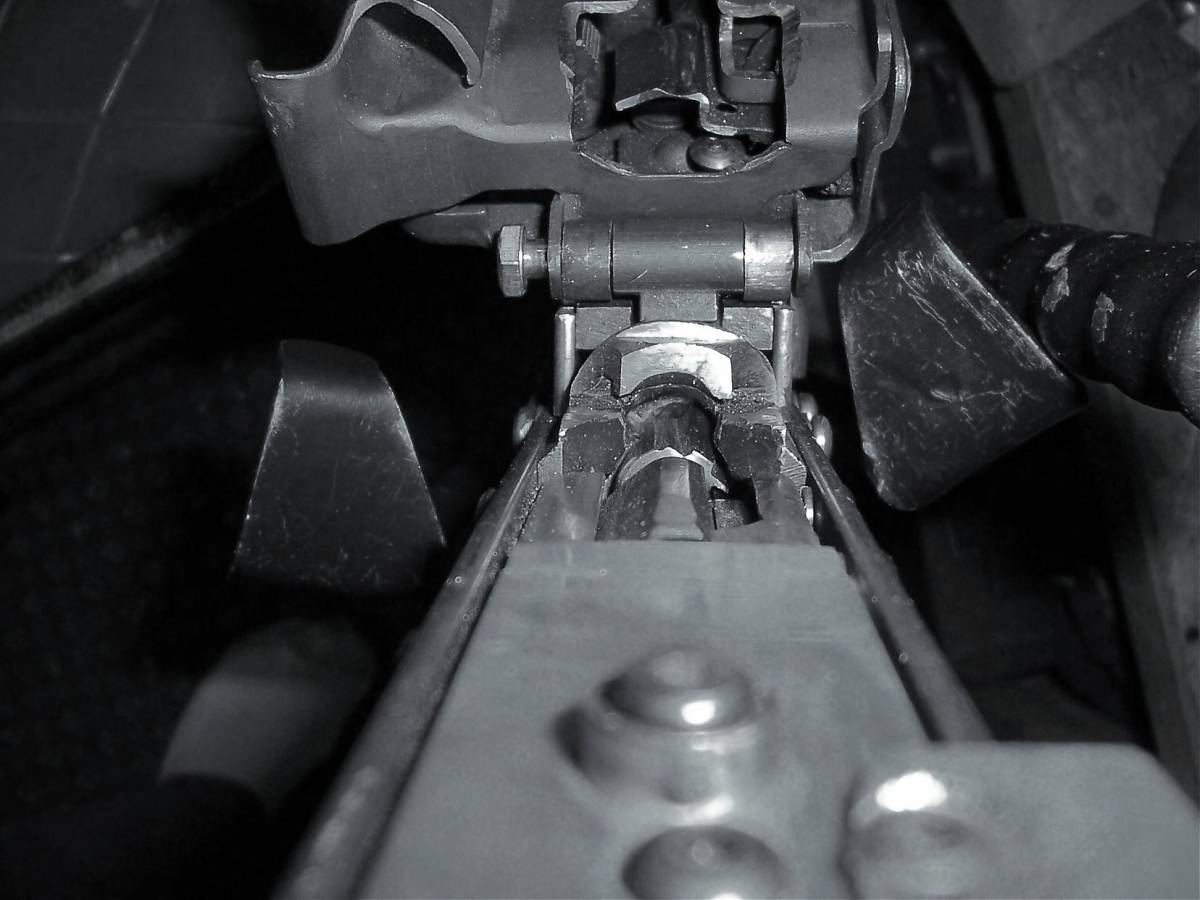

Thanks for the quick reply. I think that you are right on about the stripping lug now that you mention it. I must say it is amazing the work that you put into the tutorial and then to be so willing to help me now both you and cntrailrider are amazing people. I was worried that the slot that I had put in my feed tray was to wide but now I know that I am on the right track. I will probably add the piece of 1/4 inch than there will be no were else for the round to go except for in the chamber. Have a wonderful Easter all!
Well I trimmed the stripping lug, beveled the feed tray edges a bunch more and beveled the cartridge guide. My other problem was that I had the feed pawls in the wrong position causing the round to sit cocked in the feed tray instead of being in line with the chamber. It is the greatest feeling in the world to see that round get stripped out and see it fly out the front of the trunnion. I had a couple of other questions. For loading conventional MG such as the M249 SAW and M240 is bolt locked to rear open top cover place rounds against cartridge stop close cover.
I do understand that both of these weapons fire from the open bolt. The reason for locking the bolt to the rear before loading thou is to insure that the feed stud on the bolt will line up with the feed guide rail. I realize that the MG47 fires from the closed bolt. So how do you go about loading it and maintain alignment between all moving parts. Also when using a standard AK barrel do you still make the bolt carrier extension 6.13 long? I have not purchased my barrel yet so I have no idea what the dimension for the gas block is. One last question what did you use to make the brass deflector?
Leave the first 3 links empty and hook the first link on the little tab on the right side of the feed tray. Be sure that the feed cam is pushed all the way to the left and if your feed stud is right on center you should be able to close the top cover with the bolt forward and locked. Then pull the bolt all the way to the rear and release it. It should advance a cartridge into the slot in the feed tray part way on the rear stroke and the rest of the way on the forward stroke just before the stripping lug strips it from the belt and feeds it into the chamber.
The bolt carrier should be the same length for a standard AK barrel or a RPK barrel. For a shorter barrel that has the gas block different than 10 1/2" from the face of the chamber to the shoulder that stops the gas block you will have to adjust the length as necessary. I made the brass deflector from a curved piece of 18 ga sheet and just soft soldered the radiused ends to it.
Well I finished turning my gas piston this evening. I wanted to use some Stainless Steel hydraulic tubing that had a thinner wall so I needed a larger piston. The piston is a little longer and larger of course. I hope that helps me out on down the road. I also threaded the inside of the piston so I could just screw it on instead of brazing.


Well I got my recoil spring and AR hammer spring today. I installed the AR spring in the top cover and put the recoil spring in. She feeds ammo all by herself now and yes it feels great. Thank you again CNT SS and Doubletapme for all of your help to get me to this point. I know that I still have a long way to go but thanks to you guys I know that I can make it.
Can a person use a trunnion without a bullet guide seeing how the trunnion is upside down anyway?
The bullet still needs to be guided into the mouth of the chamber and just stripping the cartridge from the belt links doesn't guide the bullet reliably so I would have to say no, it most likely would not work.