
Last Post: 05-20-2016
Captured: 01-20-2010
Updated: 05-20-2016
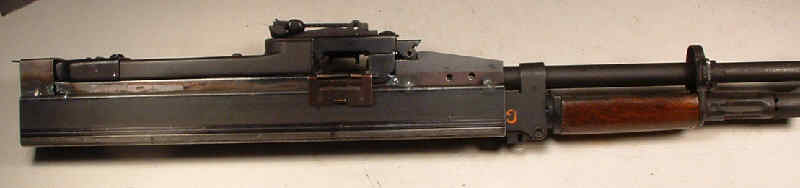
I just recentlly finished a beltfeed ak-47 base fire arm with a scratch built receiver, a MG-3 top cover/belt feed mechanism, FAL fcg, scratch built stock, grip frame & grips and forearm, k98 rear sight and m60 return spring. You can see photos of it on PHOTOBUCKET, search for 300 WSM FAL or SHARPSSHOOTER5090.
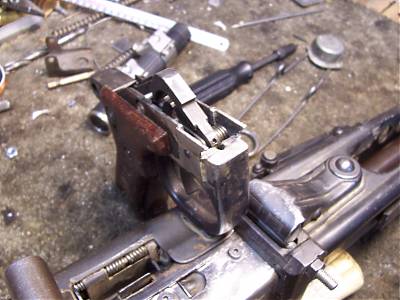
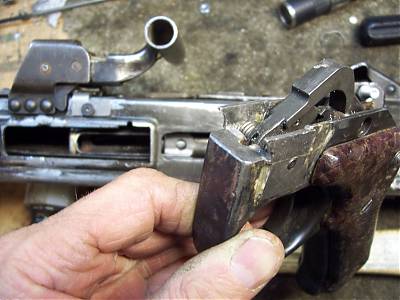
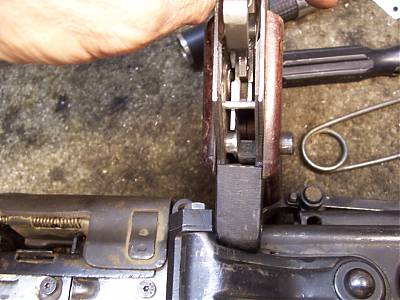
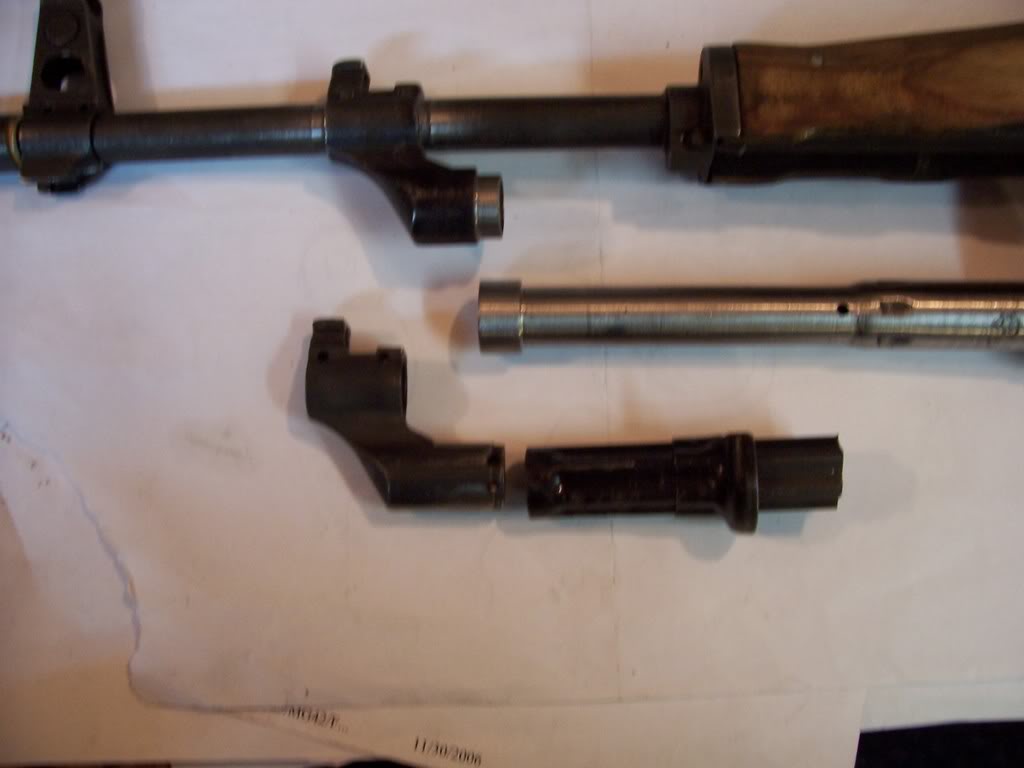
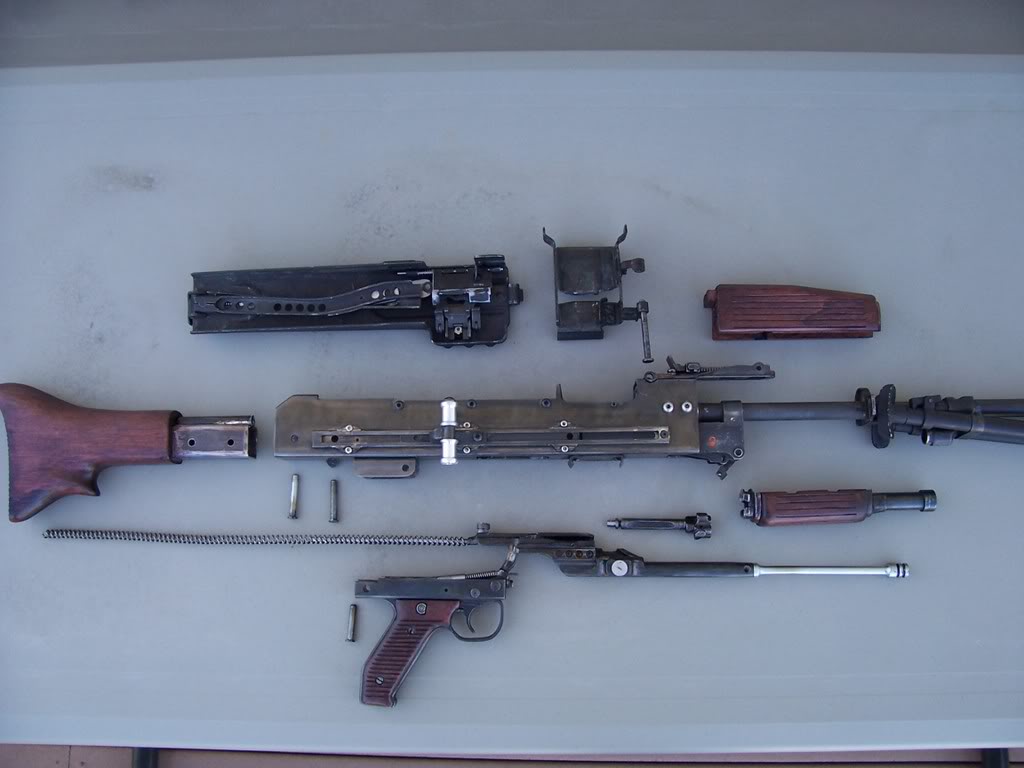
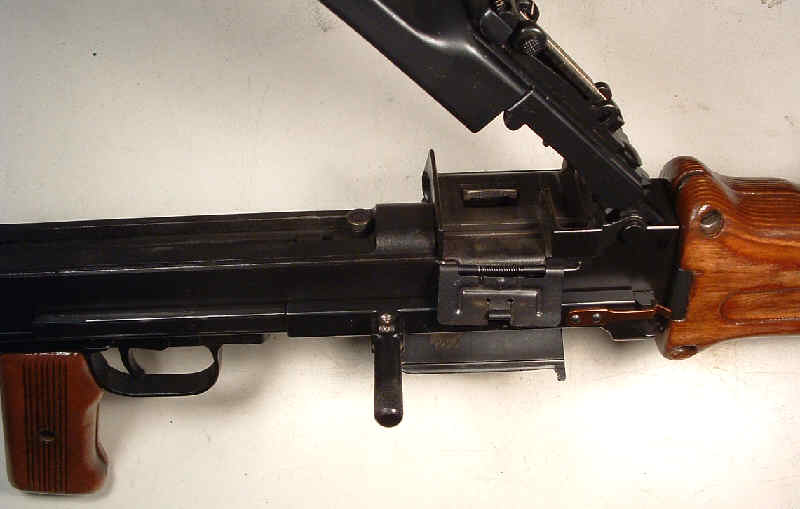
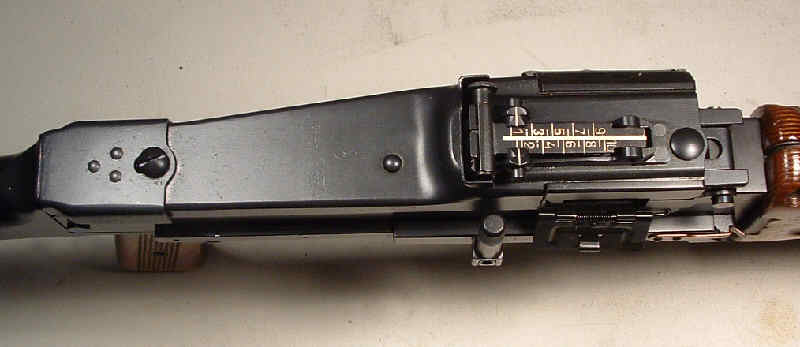
The barrel, trunion, bolt, and bolt carrier are ak-47. The receiver is scratch built from 1 1/2' by 2' rectangular steel tubing. The bolt carrier has a piece welded on the back of it for a M60 return spring to connect to. The weld piece also has a slot machined into the bottom for an extended FAL hammer to swing into to stike a spring retun extended AK firing pin. On top of the welded piece is mounted a roller that rides in the feed cam slot of a MG-3 top cover/feed mechanism.
The gas tube is made out of a 12 ga barrel section and a larger gas piston is silver soldered to the originial AK gas piston to give the bolt carrier extra push to operate the beltfeed. The belt is MG3 which holds the 7.62x39 cartridge not as tight as a RPD belt. The gas relief holes in the gas tube are drilled at the end of the gas piston stroke to make the system a long stroke piston, again to give the bolt carrier extra push to operate the feed mechanism.
It ejects down low to the left and the ejected cartridges just miss the SAW- 249 50 round cloth cartridge bag. Rear sight is K98. There is a front barrel extension fitted to the AK barrel to keep the pressure up longer in order to aid in operating the feed mechanim. The butt stock, pistol grip assy and the forearm are scratch built. The FCG is FAL. Flash hider is L1A1. The gas port is drilled out to .187 dia. The bipod is import RPK style. The feed tray is also scratch built.
I saw that on the MG42 forum - and I must say that is absolutely AWESOME! My hat's off to you - that is something I'd like to do myself.
RELIABLE CYCLING
I want to install a longer barrel in order to keep the pressure in the barrel/gas piston up longer to more reliablly cycle the bolt carrier all the way back. Right now, it moves back just enough to cycle but not always. I have opened up the gas port but the pressure drop off too quickly because of the shortness of a standard AK barrel. The barrel appears longer but thats because there is an extension on the front that is larger than the bore and a point of pressure loss.
You must have read my mind - I was going to suggest a longer barrel, but thought it might be taken as nitpicking.
Now that you mention it!...
You could do well, I think, with a 24" barrel which is a standard RPK size. Give it a longer piston, like a PSL/Dragunov piston length, and give it a longer gas tube. That would increase velocity a considerable amount, something like around 200-400 FPS, and that would no doubt help.
You could use any 7.62x54R sized barrel, which means any Mosin barrel rebuild option that is out there. Chamber it up and lathe it to the right diameters, "done".
The problem - obviously - is that you have is that the 7.62x39 just doesn't have that much power, and you've reverse-engineered a recoil-operated system into a gas-operated system. That in itself shouldn't be too great a concern, considering the FN Minimi, and the Stoner 63, and the fact that there is a 5.56 version of the MG-42 which was a Spanish design IIRC.
Do you know the muzzle velocity?
I wonder if you can benefit from a muzzle booster, like an AKSU (aka Krinkov) style booster? Would be worth a try, that expansion chamber was designed to boost velocity on the AK-74 based design, so in theory it would help your design as well.
I also wonder if you have the "hammer hump" problem? That seriously robs my .308 bullpup of power to the point that it doesn't always reliably feed. Grind the hump and try it- you never know.
Also, what kind of piston do you have? Home made? Original factory? Reason I ask is that if the piston bleeds enough gas by being narrow enough to make a poor seal, it will let enough gas bleed-off to affect functionality. I had an AK-74 malfunction due to a piston I made being too narrow diameter. Possibly a longer piston head would help, I don't know.
All good points. An RPD works with the low power 7.62x39 so this should work also if I get all the variables right. The gas tube is made from a 12 ga. barrel and the gas piston has only .005 to .010" diameter clearance and is about .875 " long. The stroke is as long as the beltfeed cam allows and the gas releaf hole in the gas tube is right at the end of the stroke. I wish I knew what the internial pressure curve v.s. barrel length is. I am not sure that the standard gas block placment from the breach is optimal or needs to move either forward or aft. I do need to make a tighter seal of the gas tube to the gas block though.
I am definitely losing some pressure there. The hammer cocking hump is just large enough to assure reliable re-cocking. I have some thought of installing a roller on the hump to reduce friction. I have only tried it with the 124 gr bullets but I am going to try the 154 gr soft point bullets. The heaver bullets should have higher pressure if the powder charge is the same.
SHARPSSHOOTER5090 - This is a nice build and I see myself coming back to this thread over and over. It is definitely a very nice build that looks well thought out.
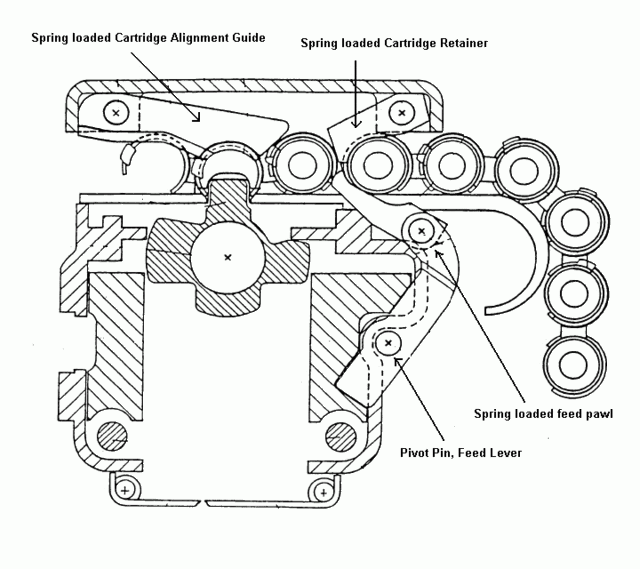
Are the links push through or pull out? How do the loose cartridges get moved
to the chamber?
The links are MG3 8mm/308 non-disintegrating push through with a standard MG3 beltfeed mechanism.
Hey SS I had a thought - I remember someone, and I think it was Kevin_M4, who had a loose gas block on their Saiga conversion, and silver soldered it onto the barrel. That may be a quick-and-dirty way to help your loose gas block issue.
The fact that it bleeds gas around the port will definitely cause lower barrel velocity, obviously resulting in less energy to cycle the weapon.
Another thought, and I learned this from my MG42 build, and that is to degrease everything, use a Sharpie or two and cover all the moving parts in black, and cycle the action by hand. The chafe marks are where rubbing is taking place, and in theory there should be very few places that rub. I found several areas that rub using this method. The areas were small, and I ignored them until I polished them one by one, and the net effect was a smoother action.
Hopefully this helps out. The piston size should still be considered as a to- do item, but if you do these things first it may not matter.
Hcpookie,
The gas leak I had was between the gas block and the gas tube not between the gas block and barrel. That is still a press fit and gas tight. Last week end I bored out the end of my gas tube and soldered in a brass bushing. I machined out the I.D. of the bushing to be a zero clearace to the gas block nose. I now requires a few taps from a hammer to get the gas tube in place. That should stop the gas leak there. Ther other thing I did was remove the L1A1 flash hider and built a Krinkov style booster/gas accumulator to hold the gas pressure up a little longer. I also bought a Yugo RPK barrel which is about 4" longer that the standard AK barrel and am going to install that along with the Krinkov booster/flashhider cone. Hopefully I can try it this week and will post the results.
I may need to install a roller on the hammer cocking hump on the bolt carrier as there is some resistance when the hammer is pushed to the re-cocking position as the bolt carrier rides over the hammer.
I just received a Yugo RPK barrel and gas block that I might put on my beltfeed. This barrel is 21 inches v.s. 16 inches of the standard Romey Ak-47 barrel. Hopefully the longer barrel will keep the gas pressure up enough to reliabally cycle the bolt carrier all the way back every time. I built and installed a Krikov style booster and tightened up the joint between the gas block and gas tube but have not had a chance to try it. I took it to the range to test but somebody was shooting a 50 BMG with API bullets and caught the dry grass at the range on fire and they closed it before I had a chance to try the modifications. Since then I also installed a roller on the bolt carrier to so the hammer rolls over it to cock instead for sliding on steel to steel. Back to the range to try it as soon as I get a chance. I hope I don't have to put on the RPK barrel as it means that it will esentially will not be a belt feed Ak-47 but a home made RPK. That's OK but I started the project out to see if a beltfeed could be made based on cheap AK-47 parts. (Although the fat RPK barrel will look a lot better than the skinny AK-47 barrel.)
It does have a surprising amount of recoil for a 14 lb 7.62x39. I attribute that not to true bullet recoil but to the bolt and bolt carrier hitting the bolt stop. I need to make a more effective buffer than just a 1/8" piece of rubber. Maybe a spring setup. One other option is to make the gas block regulatable like a FAL. Before I sealed up all the gas leaks the bolt would not go back with enough force to reliably cycle the belt feed mechanism, now it is almost to much. And yes, it does throw you off target somewhat but then again so does a MG-42.
One other thing I have to change is to raise both the front and rear sights. They are just to low to re-aquire in a hurry.
Thats an awesome build. I am a little puzzled about the recoil though. Would
it lessen the recoil if You moved the vent hole on the gas tube forward a
little to bleed off pressure at the rear of the piston stroke so that the
carrier isn't slamming into the buffer as hard? I've never even looked at belt
fed so I don't know what all is involed, but it seems logical? Maybe?
You are probably right. Right now the gas bleed off hole is right at the rear most travel of the bolt carrier. My 300WSM FAL has multiple gas relief holes in the gas tube and a sleeve that I can slide fore and aft to cover and uncover the holes. I think I will try your suggestion and do the same thing.
The other thing I think I will do is drill and tap a hole in the gas block that intersects the gas port. I can then put in a tapered screw and adjust the gas port hole area. You can buy a similar gas regulator block system for a Mini-14.
LOL that same thing happens on my MG42. You know the new MG3 covers have a
spring that braces the cover open.
Another video:
Last night I moved the rear sight to the back of the feed cover and soldered a peep sight aperture to it to increase the sight radius and make it easier to see the front sight after each shot. The excessive recoil causes you to loose the sight picture easily with a blade and partridge slot type rear sight.
It sure sounds like the gas hole is too big. Maybe you should install a valve
to adjust the amount of gas going to the operating piston.

You might be able to use a surplus one from a WWII machine gun.
I think I will remove the booster cone and put the L1A1 flash hider back on as it now functions fine without the booster cone. That should lessen the recoil a bit. I am also going to drill some gas relief holes in the gas tube about 1/2" forward of the ones in the tube now. That should allow the bolt carrier to slow down a bit befor it hits the bolt stop/buffer.
Drilling holes on the gas cylinder might work. I did the same thing to an M-1
Garand thirty years ago, and it helped.
A valve is a better way to go, for better troubleshooting instead of jumping in to conclusion first, try it on before drilling these relef holes which is a one way step, not to mention that your gun is a first experiment that requires a lot of trying and experiments before you get it tuned up to get the best of it.Finally got around to removeing the booster cone and re-installed the L1A1 flash hider. Also, I drilled a gas relief hole about 1/2" farther forward of the current location. It made quite a differance in the apparent recoil. As soon as I get back out to the desert, I will take a long video of loading, charging and long rapid fire. Next, I want to try one of those 10/22 gatling gun trigger cranks that actuate the trigger 4 times per handle revolution and see how fast I can get it to cycle. Before that though, I need to open up the back of the ejection port. I might also install a longer buffer to limit the rear travel of the bolt carrier so the bolt doesn't out run the ejecting case. That might stop the ejected case from hitting the back the ejection port and occasionally bouncing back in.You may try different tension on your retention spring too, the improper tension may cause instability of the gun I guess, I assume that you don't have enough tension.
I am a-building! Received a new Miller 'Econotig' today. I have been without gas for too long - my little non-gas MIG (HF) even did a few HK cocking tubes with aluminum foil to shield the splatter (at times it's taken 3 attempts) but where there's a will there's a way.
Sharpshooter - I have devised a way to make a 'bracket' to extend the the rear of the bolt carrier for mounting feed stud & recoil spring guide. An "L" shaped piece, mounted alongside the 'recoil spring tube' which runs back (behind the hammer arc) then goes up, with the top bent over in the rear. Screwed on the carrier (for adjustment, then welded) to mount the 'feed stud' on top of the bent-over back of the 'L'. Could not have done this without you leading the way - will keep you posted -
That sounds like a good solution without having to mill a piece welded to the back of the bolt carrier like I did. I see no reason that shouldn't work fine. Glad to see that somebody can make use my lead.
I was wondering if the M60 recoil spring is strong enough without the buffer
assembly to absorb recoil from the bolt at the end of the recoil movement.
MG47 Buffer
With out the buffer the bolt carrier slaps the back of the receiver (butt stock assembly) very hard. If the M60 spring was longer, it would probably act as a buffer. I cut if off when I was having trouble with the bolt carrier getting full stroke. The problem was a gas leak at the gas tube to gas block joint. With the leak stopped, I get too much pressure and I need to install a gas regulator to cut the gas pressure down so the bolt carrier just stops at the rear most travel. With that, a buffer would not be necessary.
Just finished mine and will attempt to post some pics.
[picture 404]
[picture 404]
[picture 404]
[picture 404]
MG3 topcover, MG1 tray, MG42 gripstick with AR FCG (tight fit!) G3 stock, inspired by Sharpshooter. Sleeved a Chinese barrel to save pennies but won't to that again. Lathe MIG grinder/Dremel (no mill) and determination; about $300 into it. I'm hoping ejected casings will clear the RPD drum. Still need to devise a 'safe' in the gripstick. It weighs 13 lbs 14 oz w/o the drum.
Cold-rolled BC extension, 5/16" cap screw feed stud, epoxy to fit the stock, non-reciprocating MG42 cocking-handle fixed to a plate, with a 'step' up front to engage BC.
[picture 404]
Bolt stripping lug tapered slightly, standard piston but ultra-tight gas tube (light mallet-fit) gas port .191 (hitting milk jugs @ 150 yrds consistently) chrome-lined Chinese barrel. Front sight post protrudes 1/8" above the ears for correct elevation using the HK drum sight.
Topcover/feed tray combo for $85, empty gripstick for $12
http://www.robertrtg.com/mg1topcover.html
Robert is the best to deal with. Also sells DM1 links/belts and starter tabs as cheap as anywhere. I believe there's about to be a rush on them. When I ordered an MG1 combo, it was the first time he was ever out of them (they couldn't figure out why) so I settled on an MG3 TC to get started
Pookie -
Hearing that from you is gratifying. I have been an admirer of your builds (esp your .308 bullpup) for several years. Feel free to use any pics I've posted.
[picture 404]
The BC slides freely and it's headspaced. 4130 gas tube was too long - port too close to the muzzle (would only eject w/o with the recoil spring) Shortened it to standard size; has a TIGHT SEAL (mallet-tapped) with the GB. Sleeved a chromed-lined Chinese barrel to an oddball trunnion; used a misc rear sight block which had no sight leaf. Perfect candidates for as cheap as I am.
[picture 404]
I mimicked a pressure plate with my fingers, and pushed the BC to chamber the cartridge. Had already seen Sharpshooter's vids, and now was convinced I could build this. Did it for a couple hours - amazed that it was this simple. TRIM YOUR TRUNNION CONSERVATIVELY.
[picture 404]
1/16" wall on the bottom, 1/8" wall on top. When complete, there wasn't much 'top' left. Above post shows reinforcing rails made from 1/2" ange iron, file- fit to center the TC 'skirts' firmly.
[picture 404]
Starting to take shape
First attempt (of 3) building an "L" BC extension - too heavy to cycle, hardly enough hammer clearance. Seperated the RS guide, and later made a cocking handle 'plate' (above, in earlier post) for the handle, with a 'step' that engages the front of the BC when cocking. It's non-reciprocating, like a G3.
[picture 404]
Top Honors go to Sharpshooter for turning a wild thought into reality - I can't imagine how much effort went into making this design work. I just copied his. First saw it 11-09-07 and had to have one. Thanksgiving trip was already planned, to visit an AK-builder friend in UT for a parkerizing party and camaraderie. so now a visit with Sharpshooter was on the agenda. Took a bottle of Crown along (to bribe him) and my half-done receiver. I would consider this "THE BUILD DESIGN of 2007"
As soon as mama lets me buy another AK kit, I'll make a tutorial with pictures and circles and arrows and a paragraph on the back of each one explaining what it's all about to be use in a court of law against me, Oh wait, that's a line from "ALICE'S RESTAURANT". Disregard that last statment. I will make a tutorial of a simpler build using my ideas, Cntrailrider's and one other build that I know is been done. I will shelve my RPK based build and go for the cheaper "Romy" kit build for now.
So, where are you guys finding .065 or .06 wall 1.5 x 1.5?http://www.speedymetals.com/s-205-square-tube.aspx
Doubletapme designed and built the first 9mm Suomi-drumfed AKs. They are really fun builds!
I sent him pics of my MG47 build as it progressed, hoping he'd jump onboard - and here's what he built.
[picture 404]
[picture 404]
[picture 404]
[picture 404]
[picture 404]
[picture 404]
[picture 404]
[picture 404]
[picture 404]
[picture 404]
[picture 404]
[picture 404]
[picture 404]
[picture 404]
*Receiver and lower is semi-only* so please, no tangent remarks on that, please.
Doubletapme is a REAL machinist (unlike myself) as the pics show. You see what he did differently, inside.
Here's some video of my first testfires.
[video 404]
[video 404]
I switched alot of things as I went, but yes I had to cut the drum bracket off the MG3 tray for the ejection port.
I can run either feed tray. MG3 tray has the spring-loaded cartridge stop (easier handcycling & test-feed during the build) but the MG1 tray seems to feed/shoot better. Remember I am running a stock piston - don't have excess pressure to waste, driving springs, generators, appliances etc.
Bought my tubing at the local steel supply for about $30 (enough for two) I call first, @ $3 a gallon.
Doubletapme built this ingenious twin-spring set-up.
[picture 404]
[picture 404]
A BF Pistol build is possible.
cntrailrider +sharpsshooter
I am ordering the things I need this week.
Please check me on this:
Romy kit (have)
MG 1 feed tray assembly (robertrtg)
Links and drum? what links are the ones cntrailrider is using?
Stock (have)
1.5"x1.5" tubes .120 thick How long?
pistol grip Cetme (have)
In the post they use 8mm links, just wondering what mods were done to us rpd links. Same spacing etc.
Cheapest place for RPD?
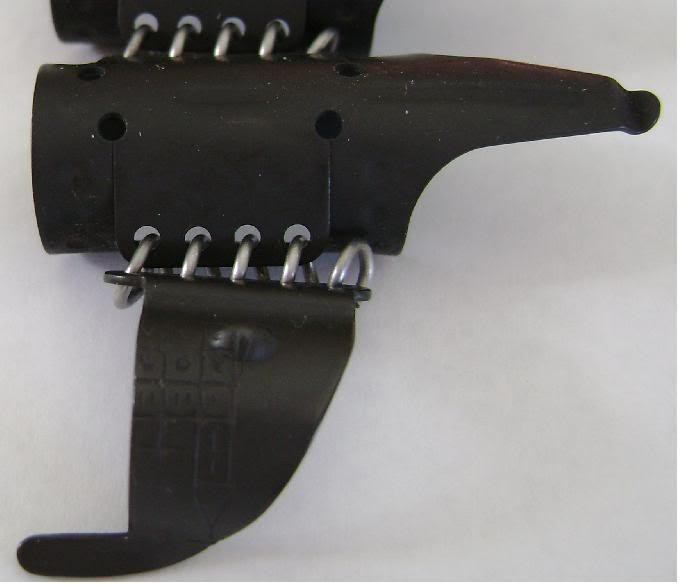
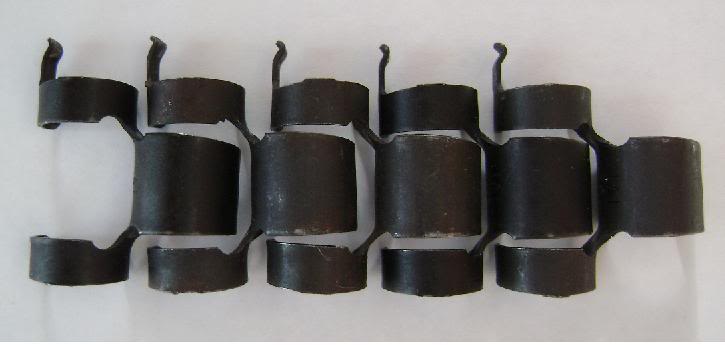
what links are the ones cntrailrider is using?The links are German DM1 links made for German 7.62 Nato beltfeds like MG1, MG3, HK21, etc. They are sold by RobertRTG and fit the MG1 cover combo perfectly. The RPD links are a different pitch and will not work with the MG1 cover.
I have a few thousand M60 links, is the pitch the same as MG42, MG1, MG3?
My MG47 has a Romey barrel, bolt carrier and bolt, homemade gas piston, gas tube made out of a Revelation 12 ga barrel, FAL fire control group, L1A1 flash hider, MG3 top cover, K98 rear sight, MG53 belt links, M60 return spring, homemade butt stock, gripstick, and forearm, SAW 249 belt pouch, Chinese bi- pod.
My receiver tube is 15 3/8" long 1-1/2" x 1-1/2" x .120 wall square tube.
Ok, so you have to crush the links a bit to hold 762x39?
Could you measure the pitch of the links youre using when you have a minute?
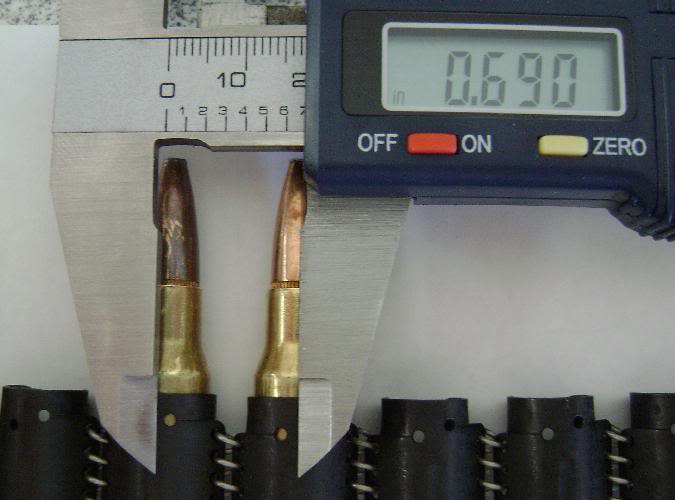
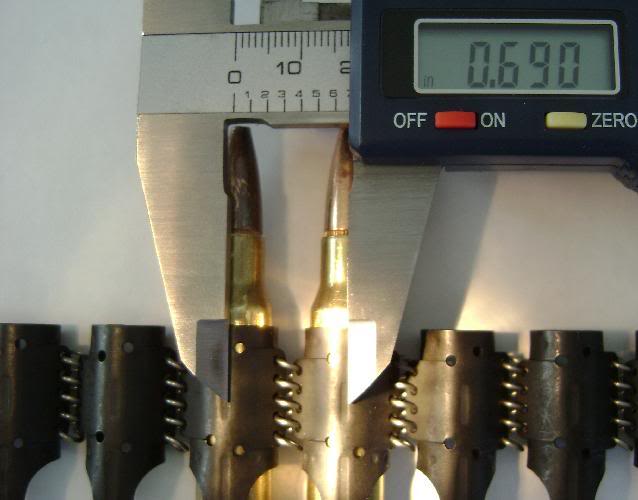
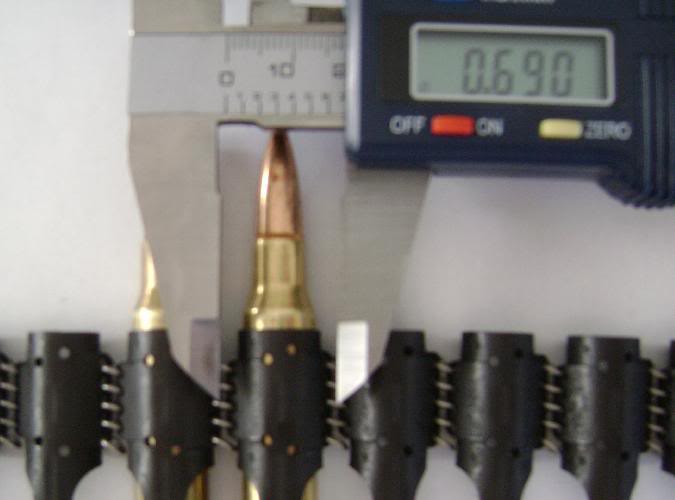
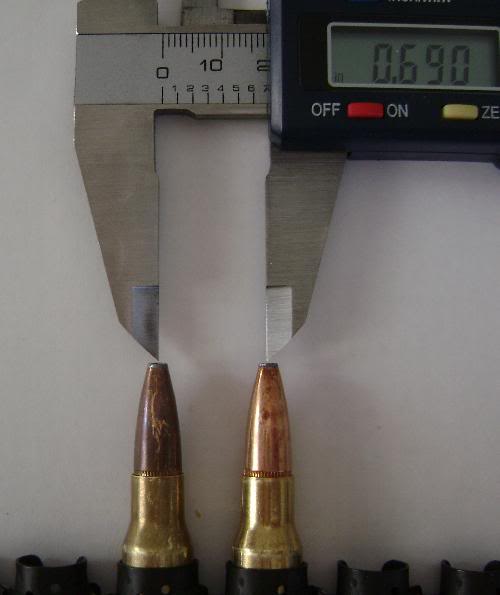
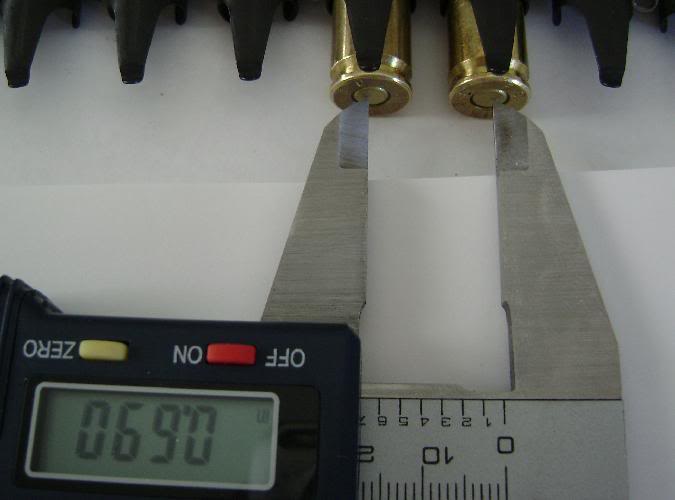
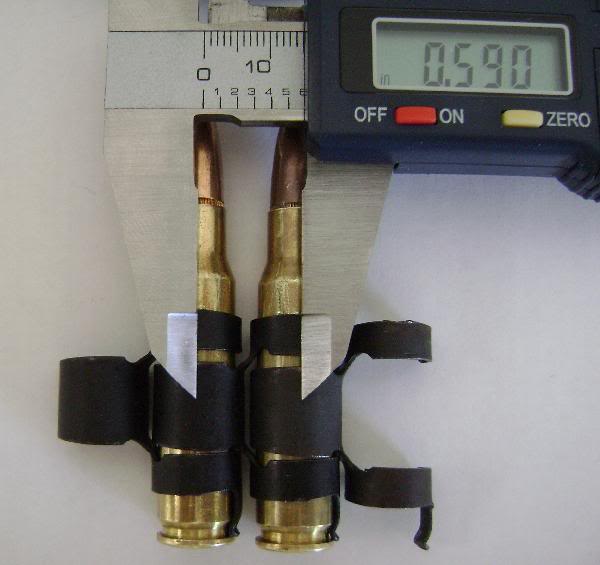
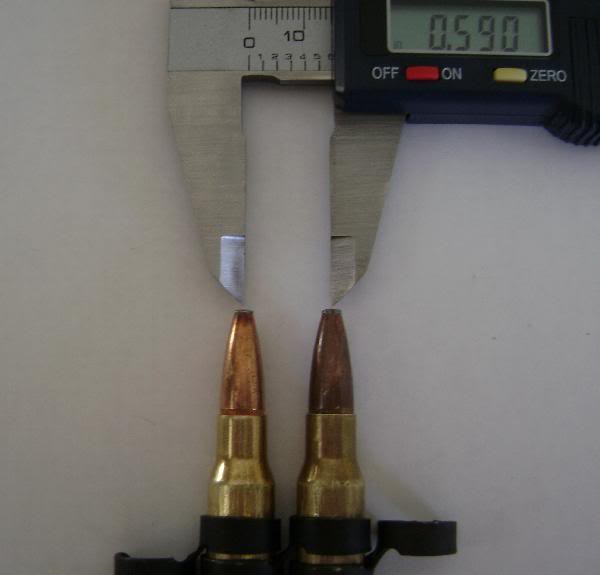
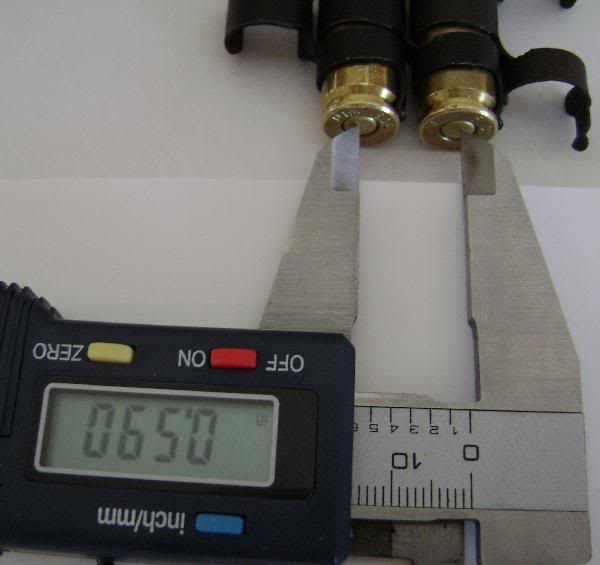
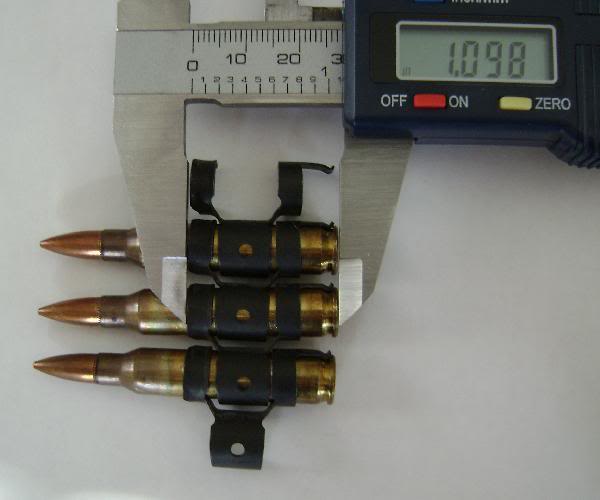
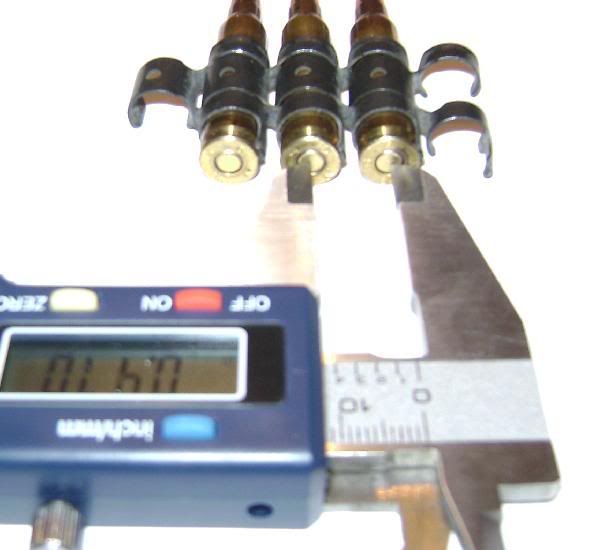
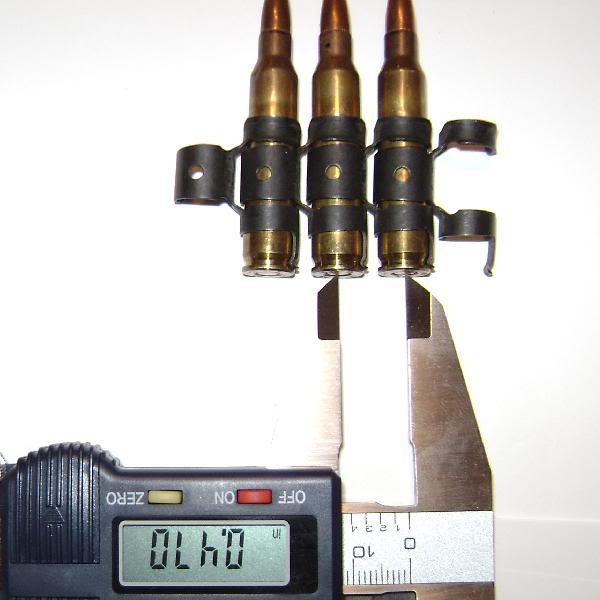
VZ58 7.62x39 fit fine into mg3 links without not crushing, just not as tight as 8mm/308. The MG3 link pitch is approximately .66"
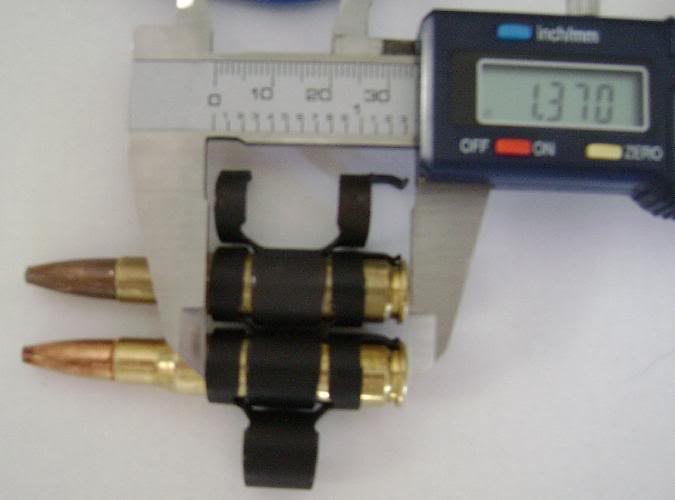
The link question is not about pitch, its about length as they are all using regular sized similiar cartridge cases. The links are a certain length and the feed trays are designed with a bullet stop/link stop that helps keep the bullet from lurching forward and cant off center thus causing jamming. The Link/bullet stop holds the last spent link in place when the bolt strips a round out of the belt. If you have shorter belts than the one designed for the feed tray you are going to get one jam after the other. You will have to modify the bullet/link stop position to the RPD Link length. That's why they are successfully using the 7.92 x 57mm parts together, only the 7.62 bullet is short... not the belt links.
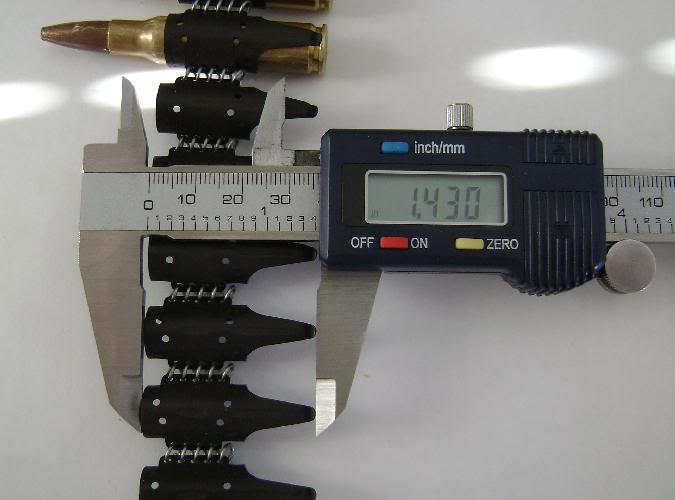
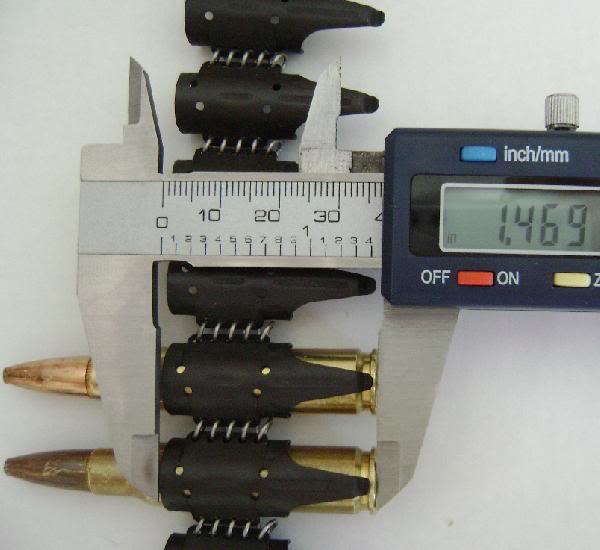
DMI Link= 1.437" Pitch 0.66 (2nd confirmed above)
NATO 7.62 Link = 1.333" Pitch same 0.66"
NATO 5.56 Link = 1.058" Pitch is 0.500" (1.097" with round inserted)
RPD links = 1.196" loaded x Pitch 0.66" (RPD info by Sharpshooter5090)
and that's not loaded with rounds, you have to measure the length needed with loaded belts.
So what is the bullet stop/Link stop length for the guns using MG1/3/42/53 parts? compared to the loaded link length? and there is your tolerance to add
edited to add: The RPD Pitch would be close to the above 0.66 since the rounds are not "AS TIGHT" as 7.92/308... so you're talking thousandths of an inch difference and the MG1/3/42/53's have bullet guides to center the cartridge in the feed slot once the feed pawls move it into position. So the Pitch would be of minimal concern... the link length however is paramount to stripping without jamming.
RPD link length measured from the base of a cartridge inserted in the link to the square shoulder of the link that will bare on the link stop on the feed tray is 1.196. There are 2 types of RPD links, one that snaps into the extractor groove and one the is bent over the back of the cartridge. Thats why the measurement is from the base of the cartridge.
So do RPD work? M60 work? Do you have to do anything to the DMI to hold the 39?
Even though I have both types of RPD links and M60 links I have not yet tried them. Will some time, just haven't had the chance.
RPD Belt noted 1.196" using extractor groove type. A suspect the pitch is very close to 0.66" based on your statements of "not as tight" as 308 etc.?
Give us the 2nd type length for complete info too.
and the length of the MG3 belt loaded, please.
What is the bullet stop width (from rear inside feed tray to bullet stop) for the DMI Links on the MG1/3/42/53 Feed tray?
RPD link length measured from the base of a cartridge inserted in the link to the square shoulder of the link that will bare on the link stop on the feed tray is 1.196. There are 2 types of RPD links, one that snaps into the extractor groove and one the is bent over the back of the cartridge. Thats why the measurement is from the base of the cartridge. The length is from the base of a cartridge inserted in the link. It is the same measurment from the base of the cartridge to the square shoulder on either type of link. The measuement I gave is not from the extractor groove, it is from the base of the cartridge. The pitch is .66 on both types of RPD links.
Thanks SHARPSSHOOTER5090, I understood you about top of link to base of cartridge.
So what's the width of the link slot in the feed tray? (Bullet stop end to rear inside feed tray, where the links push through and fall out)
Sounds like there would be minimal play for any of the belts using intermediate rounds.
My homemade feed tray measures 1.535 while my MG53 feedtray measures 1.510, a bit shorter.
OK so to educate the ignorant: (that would be me)
You can cut out and replace a stop on these?
So the more critical thing is the pitch must match?
How are you securing x39 rounds in the 308 links?
When I try it in the M60 links the rounds are way too small.
M60 links are too big. You have to use MG3 belts even though MG3 shoots the same 7.62 NATO.
M60 links only work in an MG3 with an MG3 feed cover and feed tray. They will not work with the earlier MG1 & 2 parts.
Yes the DMI links are tight fitting compared to the M13 links for sure;
DMI inner dimension is 0.400," M13 link is 0.458" very noticable to the eye even and Sharpshooter says the M43 rounds are not as tight even in the tighter DMI link.
All 3 types have the 0.66" Pitch
DMI Link= 1.437" , Pitch 0.66, Inner dimension 0.400"
NATO 7.62 Link = 1.333" ,Pitch 0.66", Inner dimension 0.458"
RPD links = 1.196" (loaded) x Pitch 0.66" ID ? (RPD info by Sharpshooter5090)
MG53 Feed Tray Bullet Stop link space: 1.510" , MG47: 1.535"
Hey Sharpshooter what do you get for an ID for the RPD link? I just measured width across widest point inside using my digi-caliper.
Anyone want to load up a DMI (MG1 etc.) link a post a length loaded? Also a loaded M13 (M60) link loaded? I have all the links but no rounds for them. Top of link to base of cartridge.
Do you need two recoil springs to have enough force to strip the round or is there another reason for 2 springs?
M60 links 1.367" from base of round to front edge of link. there are a couple that are 1.371" link but that is the exception.
I have another set of links that came of the M240 and some off the M249. The M60 and 240 appear the same.
Since the drum is interfering with the clearing of spent rounds ejected low left, how about a pic of the underside clearance between drum and receiver? I have an idea.
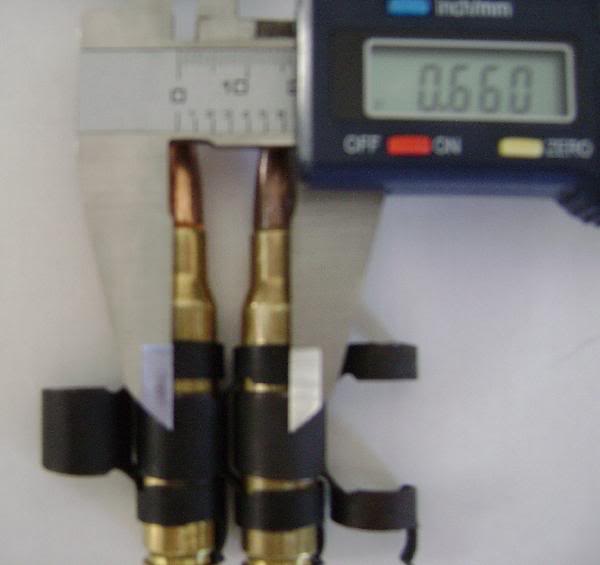
The I.D. of my RPD links is .373 to .378.
Originally Posted by MkCanuck9rSo there's a .022" to .027" difference.
DMI Link= 1.437" , Pitch 0.66, Inner dimension 0.400" RPD links = 1.196" (loaded) x Pitch 0.66" ID ? (RPD info by Sharpshooter5090) Quote: The I.D. of my RPD links is .373 to .378
Would that be to tight to extract the round from and RPD link? I don't think it would be.
RPDs extract the 7.62x39 round from the that tight of link but to push one out of the link by hand is very hard. They must have very strong return springs.
DM6 Link= 1.437"; Pitch 0.66; Inner dimension 0.400"
NATO 7.62 Link = 1.371"(loaded); Pitch 0.66"; Inner dimension 0.458" (Loaded by vz58)
RPD links = 1.196" (loaded) x Pitch 0.66" ID .373 to .378 (RPD info by Sharpshooter5090)
(Note: Measurements taken from top of link to base of Cartridge, thus "loaded")
MG53 Feed Tray Bullet Stop link space: 1.510";
MG47 Feed Tray Bullet Stop link space: 1.535"
Links unloaded;
DM6 Link = 1.437"; Pitch 0.66";Inner dimension 0.400"
M13 Link = 1.333"; Pitch 0.66"; Inner dimension 0.458"
RPD Link = ?.???"; Pitch 0.66"; Inner dimension .378" nominal
M27 Link = 1.058"; Pitch is 0.500" (1.097" with round inserted)(5.56 NATO)
vz58 i used the larger size. The M60 and M240 use the same M13 link design as does NATO which i have here (cdn made). The M249 link is just a reverse engineered M13 Link to fit 5.56 NATO Rounds and renamed M27
SS: Thanks for the RPD I.D. would it be safe to say most are .378"?
SS: One more measurement? DM Link loaded with M43?
Sounds like if you want to use the RPD Links you better use the dual Return Spring option to have positive stripping force, a good fitting bullet stop (to link length) and a feed tray modified to size of round length to hold everything from flopping all over and causing jams.
edited to add all the data and change DMI to DM6 as this is the MG3 Belts. DM1's are WWII-MG1. There is suppose to be a pitch difference between them. It appears i have the DM6 variant.
I have spent the last 30 min or so playing with a receiver and bolt. I like the idea of a drum but since the rounds eject between the belt and the drum you could have issues.
You can get the MG47 to BOTTOM eject and even a little bottom right eject. OK OK I know your saying I forgot about the gas piston. No I haven't, think BREN, the piston is on 2 arms running on either side of the receiver with a big open hole in the middle. The standard ejector and extractor will throw the round to the lower left but the receiver wall is in the way. The round is knocked off the extractor and aided by gravity falls between the two rails for the gas piston and out of the receiver. Now the question is will there be enough room under the receiver and above the drum?? Dunno need to see a pick.
But if you had a rounded chute to slide the case more bottom right I think it would consistanly eject down and slightly right.
Pics of the receiver and drum anyone?
MkCanuck9r you are right, I just pulled a couple of cases of belted 308 out and every case has M13 on them in one place or another.
Quote:
The link question is not about pitch, its about length as they are all using regular sized similiar cartridge cases.
All 3 types have the 0.66" Pitch
They are definately different pitch as well as length. If the DMI is .66 pitch and the RPD is .59 pitch then there is about .07" difference. I am not saying you could not get it to work with some modification. I'm just saying you would likely have to make modifications to deal with reliability issues. The Stoner 63 links and SAW M27 links are almost identical in every dimension except for pitch. Yet if M27 links are used in the Stoner it has such adverse affects on reliability that they are not considered interchangable.
Quote:
Do you need two recoil springs to have enough force to strip the round or is there another reason for 2 springs?
My reason for using two springs was that I wanted full length springs contained within the receiver. I accomplished that by locating the springs to the sides and swinging the hammer between them. The dual springs also allow greater momentum in both directions of the bolts travel to overcome heavy belts and improve reliability. My buttstock is quick detachable and the weapon functions with or without the buttstock attached. I have a tendency to make parts overly complicated but I can't help it because I enjoy machining and love uniqe weapons.
Quote:
Since the drum is interfering with the clearing of spent rounds ejected low left, how about a pic of the underside clearance between drum and receiver? I have an idea.
I made a short ejection chute that directs the spent rounds straight down but I have not tested it yet.
MkCanuk, grab a bolt, receiver and round. (no carrier) now put the bolt and round togther in the receiver and chamber. Get a CD case or something flat and put it on the extractor side with the gun upside down. Pull back sharply on the bolt and wala! The round strikes the ejector and the mouth comes down, hits the cd and ejects straight down with force. It will work if the drum is not in the way. Now if there is room between the grip and drum make it eject there by moving the ejector further back.
I am thinking of using a M44 barrel. I can shorten and turn it down can anyone suggest someone to cut a x39 chamber?
doubletapme thanks for the RPD update
DM6 Link = 1.437"; Pitch 0.66"; Inner dimension 0.400"
M13 Link = 1.371"(loaded); Pitch 0.66"; Inner dimension 0.458" (Loaded by vz58)
RPD link = 1.196" (loaded) x Pitch 0.59" ID .378 nominal
(Note: Measurements taken from top of link to base of Cartridge, thus "loaded")
MG53 Feed Tray Bullet Stop link space: 1.510";
MG47 Feed Tray Bullet Stop link space: 1.535"
Links unloaded;
DM6 Link= 1.437"; Pitch 0.66";Inner dimension 0.400"
M13 Link = 1.333"; Pitch 0.66"; Inner dimension 0.458"
RPD Link = ?.???"; Pitch 0.59"; Inner dimension .378" nominal
M27 Link = 1.058"; Pitch is 0.49" (1.097" with round inserted)(5.56 NATO)
Edited to add: I checked and double checked, even using extra light and magnifying glass all the Links i have and the numbers are correct (+/- 0.003). I used a digital caliper to get the results. DM6, M13 and M27 is all i have. 0.49" on the M27 will consistantly center on c2c of links, center of bullet tips and center of primers.
Having built several belt feds, 1919s, MG34s, MG42s and an FN30, I can tell you that the link pitch is important. MG3/42 belts are readily available for less than RPD belts that are different and more than likely won't worth in an MG1/2 feed asembly. also the only variant of the MG42 the MG3 is the only one to use links. M60 links work but only with an MG3 feed cover and feed tray, covers and trays from an MG 1 & 2 won't strip or feed them.
Ok since I am going to order tomorrow if possible..
MG3 tray and upper is $90+45=135
MG1 tray and upper is =$85
Will the MG3 links work in the MG1? using the 762x39
Will the RPD links work in a MG1 tray?
Should I spend the extra for the MG3 or not?
Anyone who KNOWS please advise.
To use M60 links you need the MG3 feed cover AND MG3 feed tray. Combinations of trays and covers will not work for links. I have already been through that with my MG42.
Also keep in mind that while the M60 links work, the MG42/1,2,3 belts work better.
The belts are readily available and are cheap. Personally I think a non disintegrating link belt is better than links. They are a PITA to load and pick up off the ground.
As I stated in a previous post you need to use the links that the feed mechanism was designed for. Kind of like loading an AR15 mag with 5.45 ammo and trying to use it in an AK.
I failed to mention one more thing. Will MG3 belts and M13 links use the same tray and cover? I don't mind having to modify the cartrige stop if ness.
FYI, some of the cover/link/belt info can be found on the FAQ posts on the MG42 website:
VZ, the MG3 is the only MG42-style cover that can use the M60 links in addition to the German design links and belts.
Hcpookie, outstanding site cleared things up nicely.
Looks like a MG3 tray and cover and M60 links=M13 links
Looks like a MG3 tray and cover and M60 linksLike someone said already, that combination works for .308 but 7.62x39 fits too loosely. I would recommend you go with the MG1 top cover, feed tray, and belts because we already know that combo works with 7.62x39.
Yup gotta agree... stick with what is proven. MG1 Cover, Tray and DM1 Belts.
MG3 uses DM6 and M13 links, but I have already shown that the M13 link.
Inner dimension is 0.058" larger than DM6 links (0.400) so the M43 cartridge would be a sloppy fit indeed, if they don't fall out.
Note that SS used a homemade feed tray made to fit the shorter length M43 cartridge, but you can just put in a spacer in the MG1 tray to fill in the space.
MkCanuck -
No been busy with other stuff. Drum report may take awhile. I made an additional drum bracket, rotated about 60 degrees to feed from 9:00 (instead of 11:00) for more clearance. '42 gripstick is mounted about 1/2" further aft so that should help too.
DM1 links are proven to work. No reason to get off track.
$95 for a '42 gripstick drilled to accept AR FCG @ Weaponeer - a used stripped gripstick from Robert is $12, you drill your own holes; needs some milling which can be done using large bits on a press.
Ok, MG1 tray and cover.
DM1 link (didn't see on Robert's web site?)
May go with the 42 stick as i have a milling machine.
Need to find a spare front trunnion.
Ok, RPK parts kits from Inter-Ordinance are on their way,
Steel from Speedy Metals.
Feed tray and top cover from Robert's RTG.
Can we get some dimensions from the guys that have gotten the guns to work good, ie: what is the dimension from the bottom of the receiver to where the feed tray rests?
I have noticed that on subsequent builds it appears that there are upper rails inside as well but appear milled (don't know how that is) but any advice would be great.
Going to use CETME semi auto trigger housings on my builds and attempt to concoct some type of AR-15 dust cover because it would appear hat since ther'e a heck of a gap between the rounded bolt and the square receiver that might catch some dirt.
My build will hopefully end with a SAW style butstock and a quad-rail Picatinny handguard system. Have also been thinking about welding a scope rail onto the side for quick attachment of Euro style mounts for an EOTECH.
Where should I get belts?
Do you gurus think I will have a problem if I just use a stock RPK barrel setup and gas tube? I notice most have customized theirs. I plan on adopting a duel recoil spring setup utilizing two AK springs.
I also plan on trying to construct it with some hard mounting points so it will attach to my MG3 tripod.
Two last questions, one regarding the welding together of the two 1.5" square tubes. On the finished guns the sides look so smooth, are the welds ground down and blasted to blend in or are they just hidden in the pictures?
Can I headspace the barrel into the trunion without the trunion being riveted/screwed into the homemade receiver?
[picture 404]
It can be headspaced as soon as the trunnion is mounted and the BC is sliding on the 'lower' rails (tube cut-out) and locking up. My receiver length is 15- 3/16". Be sure to go long.
[picture 404]
Trim/grind/mill the trunnion & FT (conservatively) until it chambers. You won't need to trim it this far. Experience = litany of mistakes. I have lots of experience. Positioning the FT so it chambers is critical. I carefully modified the slot. Use your fingers as a pressure plate. When mine first chambered, I got light-headed, realizing this build was going to work. A beltfed = alternative mechanical feeding device.
[picture 404]
Recess, cut to position the tray where it chambered best (MG3 drum latch was removed later)
[picture 404]
Now you have a very close estimate of where the TC will be positioned. At this point I joined the halves
[picture 404]
Cut then file so feed lever movement will just barely clear the sides.
I opened up the top rear and replaced the latch section, later. Study SharpShooter's closely.
Then it's time for the BC extension, and making a belt of 7.62x39 feed & chamber through a .308 feed mechanism. It's starting to look like a gun and the fun has be-GUN
----------------------------------------------
[picture 404]
The length of your BC extension will be determined by what FCG/lower you choose. Mock up your lower, extend the hammer to reach the FP, measure arc, then determine BC ext. length. I know no short-cuts. It needs to clear the BASE of the feed stud, and that will be TIGHT. Where you position your lower will determine whether you can use a drum (ejection path) The further aft, the more options for belt storage - taking the hammer arc/feed stud clearance into consideration.
----------------------------------------------
MG42Gripstick w/AR15 FCG - my first & successful conversion (skipping way ahead here)
[picture 404]
The existing trigger axis pin hole can be used (it's already the same size) for an AR15 trigger - but it will be a VERY tight fit.
[picture 404]
Opened the lower using a drill press and large bits. Outside E-clips hold the long hammer pin in place. Pin in the rear is a trigger stop, until I get a F-S selector made. Movement is about 1/4". If the trigger pivoted any further, trigger slap would result. Tight fit.
[picture 404]
Hammer (extended) is concave on top for BC clearance. It's very tight - uses the front hangar hooks, and mounts flush with the tops of grip panels.
[picture 404]
The MG47 is a very aggressive build. I don't know of any short-cuts, other than the logical sequence I've shown here.
Test fired mine with the RPD drum today in 30 - 40 MPH winds (sandstorm) and all casings cleared it and the belt. It didn't jam but I got sand-blasted head to toe. Vid hopefully this weekend.
Gonna deal with the ejection issue down the road, right now deliberating how to go about installing the upper rail(s). Do you guys suggest one upper rail on the left as in the recent build photos, or two? I was going to mill down some bar stock and then spot weld them inside. Do you think a small angle would be better with a screw/rivet set up?. Also, what have folks been using as a makeshift mounting point for the feed tray other than a cross pin. ie: what are the ears made out of?
ctlaw74, seems to me if you do what cntrail did (rotate the drum 90 deg) that is the absolute simplest way to get it to work. (as far as ejection goes).
Here's video with the drum, which came loose but you'll get the idea. Ejected casings do clear it. Disconnector sticks; needs polished, hence the jerky trigger finger.
http://media.putfile.com/Before-the-bracket-came-loose
 Originally Posted by glock
cool now if I can just rack my puny brain on how to build this. I'm far from
being able to mill or weld yet.
Thinking aloud here.
You may be able to rivet the receiver. Maybe. Looking back at Sharps' original receiver pics.
You could get 1.5 x 2 tubing and something smaller that fits inside for the rear buttstock mount. Get some 1" tubing, or equivalent, for the rails.
The mount point for the top cover could be done with a shim that you place in- between the mounting hardware (rivets or bolt) and the tubing. You may be able to use just a piece of square stock that fits in-between the mount holes on the top cover. Drill holes on the sides of the tubing and dremel it to shape. Then
Bolt or rivet the trunion to the front of the tubing.
Bolt or pin the buttstock tubing to the receiver. That way you can disassemble it later.
Rivet (or bolt?) the rails onto the sides in the same way that you would on a completely screw-together AK build. Rails could be cut from square .064" tubing.
Have I missed anything? Cut the ejection hole and hole for the charging handle.
Again, thinking out loud. There could be some engineering challenges I missed, but this could be the basis of a "no-weld" build. You'd still have to come up with a trigger group and mount for it. But you could attach the mount with rivets even.
Sharps, all of my prototypes are too labor intensive! That's why I can't bring myself to redo parts of my 308 bullpup build yet. It is frustrating that you have to redo something you may have spent so much time getting right the first time.
I have been reconsidering the 5.45 belt feed RPK. I have some SAW links and I've already decided that yes, it can be done and look similar to the Russian prototype, but the problem today is finding an affordable SAW top cover.
I know that there was a 5.56 MG3 design that never really did get into production. Or if it did, I don't know how far it got.
Another source may be the HK belt feed parts. The HK21 is at its heart, basically a G3 converted to belt feed.
Pirate, or anyone, do you think that you could facilitate a caliber conversion based on the use of brand new feed pawls?
Here's my thought - take for example an MG3 top cover. Keep all the parts EXCEPT the feed pawls. Measure and machine new feed pawls based on the new cartridge's links. In this case, the SAW links.
Question - would the travel arm need to be replaced as well?
ETA - I have somehow misplaced the pics of the RPK beltfeed prototypes. One of them had a coil-wound drum. Does anyone have a copy of those pics?
Pookie, basically the pitch of the belt determines the location of the feed pawls and the travel of them. it is not so much the shape.
The problem here is that cheap feed covers ie the 1919 or MG3 are too big for most of the applications you want to try. the hk21 is extremely hard to find and expensive.
If you are really hell bent on a X39 build bite the bullet and buy a RPD kit. I was going to buy a top cover and feed tray at Knob Creek but didn't and have kicked myself for not getting it.
This is for Pookie, Glock and anyone else who wants to do a 5.45 or 5.56mm build.
It eliminates the need for a purchased top cover but you will need to do more work, but its a simple system. The Israelis developed it for their LMG, you just make the bolt carrier like Doubletapme, but with a ramp on the side to activate the lever which is pinned on the side of the receiver. Pitch is what you make it to work with your links/ammo combo.
I flipped the pic for you to see what I mean.
This one shows the Negev is designed to take Galil Mags as well.
Here's the Bolt Carrier system. As you can see its very similiar to Doubletapme's design;
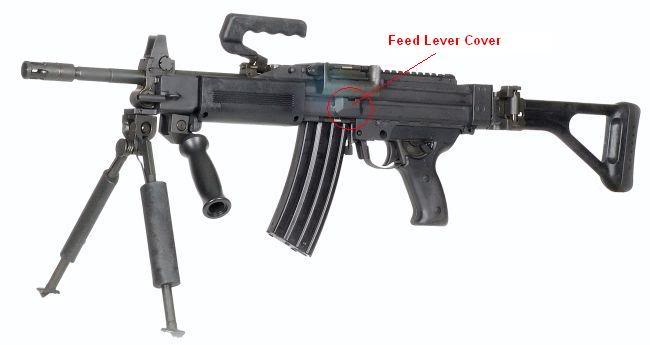
Here is a pic of the Negev LMG with the Feed Lever Cover RED Circled to show you where its located for LHF.
...just reverse it to the RHS for RHF.
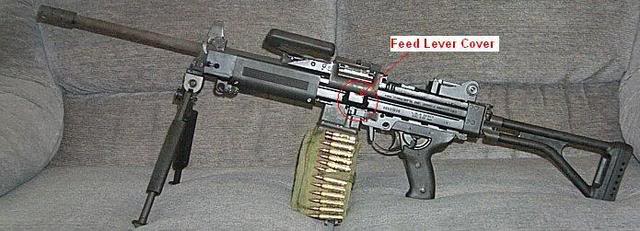
As you can see the feed cover is just a box with cartridge retainer and Alignment pawls, no need for big engineering computations. Find the pitch for your belt/ammo and make your feed arm to match.
I have been taking pics of DM links loaded, M13 links loaded as well as 5.56 M27 links loaded with digi-caliper for this thread to help out anyone wanting to build one like this.
I will post those pics as soon as i finish the 5.56 pics... some didn't turn out clear enough for publication.
edited to add;
One more pic to show feed lever cover, plus show the cool Negev with Mag inserted
That Negev feed pawl is Kalashnikov's PKM design adapted to a smaller scale and I'm sure the feed actuator is a different shape. Looks like the same idea as that prototype belt-fed RPK.
I'm not scrambling for a SAW-style belt fed at this point. Yes, I have fit 5.45 ammo into the SAW links and it fits, and yes, 5.45 ammo is cheap right now. But I have too many irons in the fire. I've got to make progress on some other builds before I consider a 5.45 belt-fed.
What was the name of that other belt fed 5.56 that also has a drum? The one from Taiwan or Korea or something? Seems there were parts kits for that from Orin (aka 7.62x51) at one time. That one seems pretty straight-forward in concept.
My tray is less than 1/4" above the new 'upper' rails - one with ejector tip. Position your tray on top of the bottom tube with clamps, and cycle your BC, adjusting FT height (I used two 3-way C-clamps) until the bolt will chamber rounds. Look close at my trunnion and tray pics - save them to file and zoom in. Where it's positioned in the pic is where I got it to feed best. Look at the 3rd pic in post 193; the back lip of the tray is flush with the top of the upper tube. That will get you very close.
[picture 404]
Here's another pic of the front - placement relative to the trunnion PLUS the recess in the back (for the bolt-stripping lug / almost touching) is the starting point.
[picture 404]
Before reinforcement rails & 'bridge' were added.
Quote:
 Originally Posted by hcpookie
That Negev feed pawl is Kalashnikov's PKM design adapted to a smaller scale
and I'm sure the feed actuator is a different shape. Looks like the same idea
as that prototype belt-fed RPK.

I'm not scrambling for a SAW-style belt fed at this point. Yes, I have fit
5.45 ammo into the SAW links and it fits, and yes, 5.45 ammo is cheap right
now. But I have too many irons in the fire. I've got to make progress on some
other builds before I consider a 5.45 belt-fed.

What was the name of that other belt fed 5.56 that also has a drum? The one
from Taiwan or Korea or something? Seems there were parts kits for that from
Orin (aka 7.62x51) at one time. That one seems pretty straight-forward in
concept.
As i posted earlier the feed pawl is indeed a Kalashnikov type but according to reports i read it is taken from early post war Czech MG designs...but you can definately see where the Isreali's got the idea having thousands of captured PKM's and RPD's.
Good to hear the 5.45 will fit in M27 Links... thanks for that... care to post some pics for comarision... I am posting dozens in a minute Glock can use that info for a belt fed MG47 in 5.45x39mm using the feedlever design.
The gun you are thinking about is the Ultimax 100 Mk4. It is not belt fed, only drums and mags like a RPK... so you would mount your drum on top on a MG47.
http://www.ultimaxsaw.com/Ultimax%20100%20Models.html
Negevs are awesome guns and i saw that parts kit two years ago and it still hasn't sold... why spend $5000 on it when you can use SharpShooter's concept, add the Negev type lever/cover and build one for $500.00 or less using whatever belts you have that fit the ammo of your choice.
OK, belts. I have spent a long time getting these, the 5.56 took the longest to get good pics of. I must have taken 200 pics all together to get this handful. These were taken to help anyone wanting to build a MG47 in 5.45/5.56 using a AK74 parts kit, SharpShooter's design concept and adapting it to use a RH Feed Lever via Negev type feed lever posted ealier.
I cannot take pics of RPD Belts loaded as I don't have any, sorry. I only had DM6 links (I take them to be DM6 as they are definitely not DM1s), NATO M13 links and NATO M27 links.
7.62 x 51mm NATO was used in the DM6 and M13 links as I have no M43 rounds.
5.56 x 45mm NATO (IMI made) was used in the M27 links.
Digital caliper used to measure. Brand new and zeroed.
DM6 Link Pics
Linking Tab end. NOTE markings
Links measured length
Links measured Length loaded
Links C2C
Links C2C lighted to show grooves match up
Link coil connectors C2C
Links C2C bullet tips
Links C2C primers
M13 links loaded with 7.62 NATO
M13 links alone
M13 Links loaded length
M13 links loaded C2C Pitch 66 TOO WIDE
M13 links loaded C2C Pitch 0.59"
M13 links C2C Bullet Tips
M13 links C2C Primers
5.56 X 45mm NATO pics
(I found with 0.470" I could place the caliper anywhere on the link pairs and get a perfect match)
M27 links loaded length
M27 links C2C left of hole
M27 Links C2C right of hole
M27 links C2C offset as fed by pawls
M27 links C2C bullet tips (seems the hardest to take for some reason)
M27 links C2C primers
M27 links C2C primers 2
Hope someone can use this info for MG47 feed lever type build.
Quote:
 the UK59 has a lever feed system that is real simple also.
 That's the Czech Gun quoted as being the concept the Isreali's took from
You guys are exactly right. The Negev feed system is almost an exact copy of the Czech VZ59/UK59 with a short feed lever acting on the near side of the bolt carrier. They just reversed it for LHF and flipped the retainer pawl from the feed tray to the top cover. I am in the middle of building a UK59 right now and can take pics of the feed mechanism. I will just have to figure out how to post them.
The top cover/feed mech comes apart without tools. You will become intimately familiar with its workings by the time you get your MG47 working
Reinforcment rails seal the gaps between the WIDE TC skirts / receiver, and keep everything enclosed.
Have been thinking of milling the sides of the top cover and narrowing it through most of the length.
The left side can be cut back about .302" the right about the same. I will prob use a .25" endmill and cut it and then reweld. the gap then will be significantly smaller.
After looking at all the parts, I think that the ejector would have to be flipped in a standard AK receiver. The feed tray looks like it will have to almost touch the ejector rail to have the bolt lug stick far enough into the tray to strip a round. I wonder if you couldn't even get away with spot welding the ejector to the bottom of the feed tray.
One more question on gettting the feed tray set right. Cntrailrider said that he tapered the stripping lug on the bolt to fit the tray. What about the back of the carrier or does it just slide under the tray and not enter the slot?
I had to narrow the back of the carrier also but my feed tray is different than Cntrailrider's. If the bolt and bolt carrier slips between the slot in the feed tray and the open slot on the bottom of the belt link, no problem, but if it doesn't you will have to narrow it. I have a MG1 feed tray at home a romey bolt and bolt carrier and will see if what has to be modified tonight. If you don't here from me by Sunday evening, I will be in Toronto for a week on business and maybe Cntrailrider can answer your question.
[picture 404]
Locked up, ready to fire - note small clearance cuts for links, and shortened cartridge stop - tedius Dremeling. Top face of BC face sets about 1/16" or less beneath flat surface of tray. Previously mentioned - stripping lug was built up about 1/16" it would chamber hand-cycling, but not in semi/shooting, until that was built up. Bolt would slip by without stripping the round. You will encounter a few other things like this that become educational.
Enlarge your slot conservatively or they'll drop through. Takes a little tinkering till you get it right. You'll know.
[picture 404]
Remove the .308 mouse-trap spring - too strong to feed. Set-screw held weaker replacement coil spring in place, until I learned NO PRESSURE PLATE SPRING was needed - lucky find - couldn't believe it.
WARNING: The first time it consecutively feeds two rounds, you will experience a euphoric sense of light-headedness. That is normal.
A fifth screw on the bottom also holds my trunnion (and bipod) and some more could be added up top (hinge area) using spacers, if you're concerned about strength. A good front-rail-to-trunnion-fit will accomplish secure alignment, eliminating strength & saftey concerns. Cap screws = larger sockets = more torque. No reason for stream-lined buttonheads.
I had to remove the front end at least a dozen times until it was finished and working properly. A lot of that was due to the sleeved Chinese barrel (saving pennies here) and bringing the gas tube back to standard length. My block is off a '74 and that helped, being able to 'over-port' it with a 90 degree/vertical hole. So good thing it was screwed. I suppose it could be plug-welded hmmm when finished, if cosmetics were that great a concern. My 'upper' rails are welded.
This is the perfect project for using up those leftover spare parts laying around, rather than buying everything new. My total cost was under $300, including the more expensive MG3 topcover & tray (MG1s were sold out at the time) which I had to 'ruin' by removing the drum latch, in the end.
Just got my first TIG (Miller Econotig) so some things are getting a re-do (reinforced FCG holes (gripstick walls are thin) did a better job on the extended hammer, extended the cocking plate / added a 'slot guide'; improving the cocking handle mount is next) then it will be on to a pistol attempt. Plus I have a stack of HK flats sitting here. As one builder put it, 'It never ends, Thank God'. Also made a nice fire/safe selector which will get flourescent red nail-polish.
Thread's been pretty quiet, and I take that as a good sign - bet the grinders are running & the dust is flying - we'll soon be seeing new pics of other builds, and getting more technical build-related questions.
Just got back home to find a trunnion waiting for me.
I have all my parts except the bolt and carrier (on the way)
Need to tighten a bolt on my mill though before I can use it (its 300lbs down, around and behind everything...)
May get to cutting tomorrow!
parts:
MG1 cover
MG1 feed tray
MG1 links
RPD drums
Yugo trunnion (slab side)
finned Yugo RPK barrel (I am thinking of fluting it on the front end)
Yugo bolt and carrier
Have not decided on FCG.
Parts kit is almost ready for the build, but need to tap the trunion and of course do the BC mods. Won't do that until I have the trunion in the receiver and the BC riding on rails.
Upper and lower metal cut to 15-3/8" today on the band saw. I'm using the 1/16" tubing. Am I going to have to mill the top rails for the BC? Looks pretty thick to me!
MP43 yes it will be too thick, File or mill down.
Ctlaw -
The gas port hole can be drilled perpindicular to the barrel (if block is removed) easier/minimizes bit breakage. Can use a filament light through the port to confirm it lines up. Some folks drill them through the block, diagonally with it in place. Mine is out to .191 which seems awfully large, but accuracy has not suffered. I was concerned about that. Make your super- tight-fitting gas tube last. You can headspace as soon as you get your trunnion in and the BC sliding on the rails - that's where the simplicity of a screw build helps alot. Eventually someone will figure out rivets, using home tools. I like your idea about a self-opening dust-cover for the ejection port.
Sniper -
I cut my tube/rails with a hand grinder (no mill here) then coarse file to fit BC; underneath too, to remove the full-length burr. Are you using 1/8" wall on top?
Remember that square cut-out in the rear of SharpShooter's receiver? Feed stud. I need to unscrew mine whenever I remove the BC. That is ripe for new ideas.
Sniper
I built mine for all 1/8" tubing and I think you will have less welding problems that way. Cntrailrider used a combination (CTR correct me if I am wrong) and had some warpage issues from welding.
Either way will work.
Main reason I used 1/16 on the bottom was the RAILS - it's already the right thickness for the BC to slide on. Also easier cutting the cocking slot, ejection port & FCG holes without a mill. I used a cutting wheel, Drmmel and files.
It did warp when joined, and twisted that out when I removed the TOP of the rear (TC latch area) then went back over my less-than-perfect joining-welds and filled in the pits. Some very small pits are still visible if you look closely. The reinforcement rails remedied strength concerns, center the TC skirts firmly (full length) and close that gap.
SS's didn't need R-rails, using all 1/8", but both of his UPPER rails are full-length too. My ejector rail is a standard short one that came with a flat.
1/8" on top gives a stronger anchor for the TC hinge and latch area. It's still theory at this point, but I believe 1/16 throughout would need R-rails for sure.
Taper the stripping lug - it needs to fit through the links - and open the slot almost to where the round will fall through. Round is suspended by the belt, positioned & guided by the pressure plate.
VZ58
The shortest simpliest path to the chamber, like a pistol-caliber conversion, increases the 'likelihood' the round will chamber. To say this is 'experimental' would be an understatement, since using a .308 feed tray already increased that distance of cartridge travel. The MG1/3 TC will not feed 7.62x39 without a few mods to the (brittle ! hardened) pressure plate as well, since the round is weaker, and a 'slicker feed path' must be created, in order to cycle. Front lip must be bobbed to clear the trunnion; rear 'lip guide' must be almost straight to reduce feed resistance, even w/o the spring. These two mods are inter-related. The cartridge stop on the feed tray must be lowered (as well shortening the 'arc stop' on the pressure plate) so the pressure plate can swing lower, to guide the smaller rd, yet not too low that it blocks the next rd-to-be-fed. It is work & thought intensive to accomplish, and I don't know a set formula that works.
Not to dim anyone's hopes, but this is by no means a simple 1st or even 5th AK project. It was a very steep learning curve, after building several other beltfeds - borrowing knowledge from every build I've ever done. I know Emory is a slightly different catagory of builder, and an exception (bonified 1919 CII guru)
Mentally approach it as a conveyor-fed mag. The rest is a scratch-built-rcvr AK. or as Doubletapme put it, "A beltfed using some AK parts."
2nd pic, post 91 is the starting point; 4th pic shows position of feed tray, where chambering was accomplished
The bolt and carrier has to be narrow enough to pass between the open bottom of the belt link. If it doesn't, it will hang up on the link and bend the crap out of the link. The bolt and carrier must be narrowed!
Does anyone know where to find the U style RPD belts that retain the cartridge at the extractor groove? All I have found is the other style. Has anyone tried 5.45 in the U style RPD belt?
Numrich has both styles, however they send you some of one kind and some of the other when you buy their RPD drum. I have some of both and will trade for mg3 links if you want.
One last question. I bought the thicker wall reciever stock and after I remove the middle section I planned on milled down the rails a tad to the bolt will slide easily on them instead of milling the bolt carrier grooves wider. Is that the way to go? Also is it OK if I mill the trunnion a little on the sides to fit it in the receiver tubing?
That's the way I did it, thinned the rails down to fit the bolt. I milled the inside of the receiver for the front trunion but with what little you have to take out, I don't see why you couldn't slightly mill the trunion if it's only around .020 per side.
Just thought about another variable that nobody's addressed, wha Distance is the trunion from the front edge of the receiver. IE: How far into the lower half does it go?
Can somebody give me a measurement from the front of the 15 3/8" receiver to the trunion screw/rivet?
Looks like SS's FT is flush with the front. I recessed the front trunnion in an effort to hide the rear sight block as much as possible, yet be able to flip the tube retaining lever. 2XTM didn't use a RSB and his also appears to be flush. Type of handguard you use (placement, retainer) will come into play when determining FT position.
Pics 1, 3 & 5 in post 91 shows my FT location - the distance between the holes = distance back, for the front hole. Be careful about 'choosing' a set receiver length - don't paint yourself into a corner, when it comes to BC extension & recoil spring length & guide/tube. It's easy to fall into the 'cosmetics & proportions' trap, and wind up with a beautiful dummy gun that won't cycle. Longer spring is easier. How SS compacted it into that short stock is beyond me.
Am dealing with a whole new set of variables on the RPD version, right now, with the shortened barrel & gas system. Can see this is gonna take awhile IF it works.
Sounds like you're on the right track. Flip-down grenade sight would be ideal for this. My port is .191 I can't offer any knowledge on the FAL FCG but the AR will work - very tight getting it low enough though, and the hammer spring is borderline strong enough to get primer ignition, even with a weighted hammer.
Here's what I used to smooth the 'step' in my gas tube.
[picture 404]
So the piston can find it's way into the TIGHT section, in front of the enlargement for the BC 'snout'/where there piston attaches. It was a pain assembling, during the build, before that 'step' inside was smoothed (drilled mine out to 5/8" for the snout)
A different approach would be to turn the snout down.
Well I'm committed. Cut the bolt handle off last night and cut open the bottom section and attempted to mill the top (new bottom) rails down to fit the carrier. I used the thicker steel. That leads me to some new questions. Milled the rails to the proper thickness and had to mill a micro amount off the side of the bolt carrier itself to slide freely into the lower section. Same for the trunion. I am noticing that once the top is opened up it has a tendency to bow out which would cause the rail dimensions to open up as well. Chocked up in the vice it is still OK, but wondering about how that gets addressed later on in the build when the top half is added.
BIG question. How critical is it that the rails are perfectly parellel? IE: equal dimensions. I am doing my best but it is a real beatch to get them perfect. Carrier slides freely and doesn't seem too loose. I know it's an AK but am not sure of how loose things can be. I am going to use stock AK rails/ejector for my new top ones so that should work right?
Please tell me I have some wiggle room. Otherwise this bottom will become the new top and I spent quite a bit of time practicing milled rails to the proper height.
If it feeds and the bolt carrier doesn't fall out, OK If you look at my receiver with the top cover open you will see that the open top of the receiver is tied together right behind the feed tray and at the rear of the receiver. CTR welded 1/2 x 1/2 x 1/8 angles to each side to stiffen up the open top of the receiver.
You can squeeze that bow out using spacers in each end, and a vise; should be fine.
Trunnion placement will be more critical than rail width - took a bit of hand/dremmel fitting before the bolt would lock/unlock easily with the trunnion SECURE & ALIGNED. Thickness of the rails determine HEIGHT of trunnion in relation to BC, I had to open up the rcvr-alignment-slots in the side of my trunnion to place it where it would work, even using 1/16" wall lower tube.
SS do you have the 'standard wiggle' in your piston-to-BC connection? That looseness gave me some play to work with, esp with the tight gas tube seal.
Yes I have a a bit of wiggle where the piston screws into the BC. I have a tight gas tube also. By the way, you were able to use the standard gas piston diameter, I recall, but made a new tight gas tube that sealed off the gas relief holes at the gas block. Or am I up in the night.
Yes stock piston, and turned a new tube to eliminate the gas relief holes, and seal much tighter. Also turned the lip on the gas block, for a deeper tube-to- gas-block interlock. It is a mallet fit. Had to open up the rear to 5/8" so the BC 'snout' could enter ONLY as deep as needed; the rear tube HG retainer is press fit; bevel & bottom lip required fitting. It would not cycle, unless the piston had adequate wiggle - the tube is THAT TIGHT. Next one will get the BC snout turned down, but there's little dia to work with, before cutting through.
I looked at your mill; old school quality, and the ticket out of dremmel world. SLC->ELP presents some logistics problems; how big a hurry are you for the space?
I am planning on milled down the rear sight block ears and top
so it can fit recessed into the lower tube section. I was thinking about
removing the "hinge" pin for the gas tube and perhaps using some sort of
cotter pin set up. Any thoughts?
Thanks for asking that question, I was wanting to remove the hinge pin also. I planned on using a bolt and grinding a flat side in the middle, running it all the way through and using an E-clip on the one end after I cut the threads off.
I would like to confirm the information, I think I have already, and fill in the following blanks on the three guns that have been built so far:
Gas port size in the barrel:
SS: .1875"
CNT: .191"
DBLTAP: ??
Gas Piston Diameter:
SS: ????
CNT: .545" std. AK
DBLTAP: ?????
Type of Recoil Spring(s):
SS: single, shortened M60
CNT: single, ????
DBLTAP: dual, ?????
Distance from gas block port, to bleed off holes in gas tube:
SS: ?????
CNT: ????
DBLTAP: ????
Any updated testing/feedback in this area? I recall that SS had solved the lack of power and then had a bit too much after sealing the gas tube. And CNT, had enough power to run the gun, but no reserve to speak of. Has DBLTAP's gun been run yet? My first piece is a bit of a departure from SS's base MG47 design, and the gas/recoil spring balance will likely be a PIA to get worked out.
M60 spring, braided or single strand (both work) about 14 - 14.5" long. 1/2" makes a BIG difference using a stock piston. Too LITTLE spring, and the bolt won't strip & lock closed. Receiver rails are 'friction free' to where BC can be slid with pinky. Start with long spring and trim. Hand cycling will help break it in and locate resistance spots to smooth out
No gas tube relief holes, yet no pressure to spare. Delicate balance between spring length & being able to cycle, using stock piston w/ concaved head, 2- ring seal. I should try a third seal cut in the piston head and see if it changes anything. There is enough space to cram another cut in there.
My gas tube is made out of a 12 ga. barrel section, about .729" in diameter. My gas relief port is 1/2' forward of the rear most travel of the gas pistion head. It is 1/8" in diameter.
Well I got an RPD cover and tray and was looking it over tonight. From what I can tell the origonal receiver would have been about 1 1/4" (+/-).
Would it be possible to use a 1 1/4" square tube or even a 1 1/4" x 1 1/2"?
Never mind about the 1 1/4" question, I just looked at the MG47 Pistol thread and I think the pics answered my question.
Emory,
I can't wait to see what you come up with. Sorry it took so long to post those dimensions.
gas port .185"
gas piston diam. .648"
recoil springs and guides = standard AK
the springs were cut and stretched
gas port to bleed holes 4.5"
My rifle is running good except I have an occasional empty case not clear the ejection port. I am fairly sure the cases are hitting the upper edge of the ejection port as they exit and sometimes bounce back. I am going to open that area a little so they eject clean. I still need to put it on paper and see how acurate it is too.
How did you guys "lock" the trunion in the lower half? There are no rivet
holes down there so I didn't know whether it's held in place only after
welding the 2 halves together or if there were other ways of keeping it in the
lower part before welding.
The trunion only attaches to the upper half after the 2 pieces are welded together. I believe though, that Cntrailrider threaded a screw into the sight block from the lower half. Not a bad idea, just helps to tie the trunion in better. I think if you do that you should do it after the two halves of the receiver are at least tack welded together.
I spent a few hours on this this weekend and made some good progress. I need to add the filler under the feed cover on the left side next, then correct the cover latch in the rear. I am planning on installing the ejector on the bottom of the feed tray.
 Originally Posted by vz58
HCpookie you are right as this is ever evolving , I am working on a downward
eject but am limited on time for the next 2 weeks. I have something worked
out, except I would like to keep the rpd drum, which gets in the way of the
drum.
Yeah there isn't much room down there is there? The trick, I think, would be to mount the drum to the side like with an MG42 saddle drum. The MG3 tray would work with the plastic MG3 drums, so that should be no problem for a single 50-round belt.
Getting 100 rounds would be a different story, but then again I'm not sure that that is a necessity. 50 rounds for "mobile" patrols, and 100+ rounds in a box on the tripod for "fixed emplacements"
The Russian PKM design puts the ejection port behind the drum area, but it is a slightly different design since it is a "puller" vs. a "pusher" feed mechanism. That would mean relocating the ejector way back behind the feed mechanism, which would work as long as the receiver goes back that far.
Quote:
 Originally Posted by glock
cool i'm a lefty you offering a belt fed kit ? :x
It would not be a stretch to put an AK together that looks like a Bren, with a magazine on TOP of the receiver, for lefties. Or for this "low power" round, you could probably cut the notch in the bolt on the other side. I plan to do something like that for my wife. Maybe. If ever I get around to it.
I made a 50 round drum magazine that mounts from the feed tray like a MG42. Made it out of a 4" dia. backpacking cooking pot with a intergal hinged and lid latch. Will post pictures as soon as I find where I hid them on my computor. Sits well above the side ejection port and the rounds never touch it.
Hcpookie, yes you can eject down after the drum, looked into that but that is where the FCG is.
Well I had another fun experience of trying to hillbilly an MG47 together with the smallest number of tools possible... Today I cut the upper tubing section for the receiver. I used my small band saw to cut off one side of the 1/8" thick tubing so it's now a U channel. Just going by eye, I was pretty surprised how it came out. It needed miminal cleanup with the grinder and files.
[picture 404]
I lightly trimmed the right side "ear" of the trunion and it now fits in the lower section without pushing it out. It was a neat feeling when the top fit down over the trunion on top of the lower piece.
[picture 404]
Have one trunion hole located and drilled so only 3 more to go. So now I'm just about ready to fit my feed tray.
[picture 404]
Sniper -
Nice job on your trunnion fit; middle pic illustrates it well. You're on the right track.
When you join/weld top & bottom together, the outside will want to contract, creating an 'hourglass-like' cross-section, because it's welded only on the outside. Inside rail width may become to narrow for the BC to slide on. Outside of your rcvr may be slightly concave, full length.
2XTM may jump in here and share how he did his without warping.
I plan to do my smaller version clamping the top side-to-side so it doesn't bow out, and a full length spacer inside, extra long & hanging out the rear (something to grap onto for removal after the welds cool; it will get tight). Mine got work intensive, going back and making the BC fit again, because of warpage, after it had been sliding so nicely. Hands got tore up filing the rails. Very tight in there, especially after the 'upper' rails were in. Ejector spur and rear corners of the rails are SHARP. Might want to smooth up those corners with a wire wheel.
Short welds, alternating sides, will help keep the rcvr from getting too hot, causing end-to-end twist. I believe the shorter the beads, the less problems. If you have a steel welding table to can clamp it to, so much the better
An ejection chute may be a better idea. A "chute" could be as simple as a sheet metal wedge.
I'm using an ejection chute made from a piece of scrap sheet metal. The spent cases are deflected straight down and are not in the way at all. I have a bracket on the chute to mount my SAW ammo bag. I did have several spent cases not eject clean but I am sure it is due to the cases hitting the upper edge of the ejection port. I will get the port opened and post a range report soon.
[picture 404]
I've mounted my fed tray as per post 247 picture /Yugo trunnion bulged/milled to fit in the 1/16 lower. Post 286, 2nd picture, you took out the mouse trap spring (mine is out) and you show the piece flipped up and I think we are looking at the bottom of that piece. On mine there is another piece that keeps it from going up like yours is in the picture. I don't know what you call that (pressure plate?) but in my top cover I will need to shortened the piece to make it fit smoothly with the feed ramp. Is that correct or did you have a different top cover?
I can get it to feed one round, but I think I need to mount the top cover to get that guide piece to guide the rounds nose down and off the belt?
I took out the mouse trap spring and replaced it with a much lighter and bent AR-15 trigger spring and shortened the nose on the pressure plate so you could just close the top cover and the nose of the pressure plate would just slide under the feed ramp. Steve's is slightlly different. He has no pressure plate spring what so ever but his still works. He also used a MG3 or MG1 not sure which feed tray. Mine is homemade. Both methods seem to work. Don't know what DTM has done.
Been busy in the basement lately. I apoligize in advance for no photos yet.
Got my tubing .120 wall tubing cut, ground and milled and fit the trunion. I had to mill a lot out of the lower and the top tubing to get the trunion to fit inside and it really doesn't sit on the rail groves of the trunion as I had to mill the sides of the tunion down as well to fit. It does not look like the setups I see here and am kind of perplexed. Could the trunion be oversized? (width) It is an RPK trunion from an IO kit (which the barrel has still not arrived yet. I had the top and bottom tubes welded together today by a shop friend. Pretty rough but he said finish the build up and hell fill in the gaps and sand/gind the sides smooth.
New question is with the top welded on how do you go about cutting off the cented for the feed tray? I mean specifically how low do you go from the top? What is the height from the top of the bottom rail? The one that is integral from the bottom half of the tubing cut? As I do not have any "new" upper rails installed all I can measure up from are the rails from the bottom tube. Any sugestions and help would be greatly appreciated. I plan on fixing the trunion in place in the next few nights, (need to tap it) and once located then begin to cut the top to set the feed tray.
A few random questions to help get answers so I can sleep at night...
1.) If using an MG42 grip with AR fire controls, is it a custom hammer which is extended, or does it reach the firing pin OK as is?
2.) what is the proper thread pitch and length of screws/tap I should get to tap and affix my trunion?
A RPK trunion is alot wider than an AK trunion. RPK trunion is about 1.450 wide while an AK is about 1.27 wide. On my MG47 the bottom of the feed tray is about .25 above the height of the bottom rail.
I used #10-32 button head cap screws to attach my trunion. 3/8" long is plenty long and you may have to file them slighty shorter to clear the barrel.
Get carbon steel (black as opposed to high speed steel, silver, taps) you can break up a carbon steel tap if you break it off in the hole where it is very difficult to break up a HSS tap. But carbon steel taps are easier to break off.
Tube will align the piston so it slides smoothly.
Helps to clamp blocks on the tube inside & out when adjusting FT height for trunnion trimming, so you can measure change in position as you go. AK recoil spring helps too, after you get the 'upper' left rail in, for cycling tests. I made a small removable single-screw mount to anchor the rear of the spring guide. Upside-down height just happens to work out perfect.
Everyone else -
Been getting alot of emails & PM's about how far to measure here and there for cutting. And no, it can't be built using a flat.
SS's, 2XTM's and mine are all built with different measurements. The BC's won't interchange, the FCG's won't interchange, the pistons nor rear ends won't even come close to interchanging, and I doubt the TC's would either, since each has been modified. But we followed the exact same build sequence, which reveals the next measurement as you go. Trunnion aligned & mounted in the tube is the heart & the start. Headspaced barrel is next. BC sliding and locking / unlocking is next. Then comes feed tray positioning (means trunnion milling/ grinding) to where it will chamber. The B/BC must chamber the cartridge smoothly from the tray before going any further; the remainder of the build depends on this. THEN the upper tube can go on. Now you'll know how far down to cut it because your already-milled trunnion (which you already KNOW works & chambers from the FT, because you did it, right?) serves as the reference. Still using a no-handled standard upside-down BC to test chambering, but no ejector, so you can still get the cartridge out, right? Then cut off your top (carefully, just so the feed lever can move w/o touching the top sides) but NO LOWER than necessary, so the TC is level, since it's already pinned up front to the FT. Time for the hinge, and more fitting. Then the 'upper' LEFT rail goes in, and the RIGHT ejector rail. By now you've laid out the ejection port, copied from your other AK's (position related to the trunnion) and how/what direction the ejector is deflecting the cartridge out of the bolt. Would be a good time to mount a temporary recoil spring, to test chambering & ejecting, since your fingers won't cycle it the same as a spring will. Cocking slot, handle, and cocking plate come about now because your fingers are a bloody pulp. Everything will pretty much follow this order, though you may have installed your upper rails earlier - if you do it after the rcvr is trimmed for the TC, it's not so tight in there, and you'll have a better idea of how HIGH the attachment sides of the (upper) rails need to be. ie you won't be cutting off welds that held the 'upper' rails in place. I made that mistake, as well as everywhere I asked 'right?'. So there was alot of re- doing things.
AFTER the bolt is locking up in both sets of rails, logic will show where the hammer should swing to strike the rear of the bolt / firing pin, and that determines WHERE your lower (with whatever FCG you use) will need to be mounted, meaning how far front/back on the rcvr, and how long the hammer needs extended to reach the firing pin (and whether it will COCK the hammer ie it's not done for 'looks' and a drum may not fit); that determines how long the BC extension needs to be, so the hammer arc will clear the rear (unless you're going with twin-springs). Clearance between the hammer & feed stud will be closer than you can imagine. RCVR should remain longer than needed, until after the BC extension is built, so you can determine BC travel distance and spring length necessary to cycle it and the feed lever, to feed your belt. These measurements are contingent on the hammer length. You can't just pick a FCG, then use measurements from other builds because it won't work. An MG42 gripstick w/ AR FCG is a very VERY tight fit, as emphasized before. Very. You must thoroughly understand how these all interrelate if your build is to work, and you may need to make three BC ext's before it works, like I did.
While the above was underway, you've been dreaming up a stock, a stong pin- attachment method, and figuring how you'll mount the recoil spring guide tube IN the stock (unless you're a twin-springer) so the take-down pins won't interfere. That is the final stage! You've progressed from AK builder, almost to beltfed refiner, on your journey
At the risk of sounding repetitive, everything depends on the previous step, but it can work, if you do it one step at a time, in the logical sequence. If you just start cutting, jumping ahead, and copying measurements from someone else's without undestanding how they interrelate, you will probably wind up with a really neat-looking dummy gun for the mantle, which COULD have worked. In the meantime, SS has been working on a universal build solution
Best advice would be stick with what's already been proven to work, and get it under your BELT, before hot-rodding your own super-coolest design. Unless you've successfully designed & built other guns. Understanding the build sequence, and reading the entire thread many MANY times over (10 won't do it - 30 might, 50 = more realistic) is the key. BTW I put my entire 10 day Holiday vacation in mine + about 5 more days @ about 16 - 18 hrs per day. So this was not a 'casual build'; the 2nd has been coming together much faster; here the sequence has been outlined as a present for those who don't think like Spock, so TC's & tubing aren't going to waste
So it's not to sound like a know-it-all, which I sure ain't so don't mis-take it as such. But this is more like chess than checkers. Experience working with/building 1919's & other beltfeds certainly helps - don't try this one as your first AK build
Thanks for the advice Steve. I started out wondering "where does this go, what's that measurement, how EXACTLY did you do this..." Now that I'm well into one, I see that each step depends on the one before it and there is no template (yet). But in reality it's not too bad once you take the first step and force yourself to think. And rethink, and remeasure. There's a lot of thinking and checking in this project compared to most builds.
Well tonight I did what I had been dreading. I cut the trunion and feed tray. This is the first part that I really thought I could screw this thing up. From what I've seen so far of meshing the two things together, I think that once you start you can "work it" so everything lines up and you just go one step at a time. That's basically how this whole build has gone so I'm quite pleased.
[picture 404]
[picture 404]
The trunion has been trimmed to allow the feed tray to sit as far forward as possible.
[picture 404]
[picture 404]
[picture 404]
The feed tray has been opened up to get it close to where it needs to be for feeding. I didn't take all the material that needs to be removed yet so I have some wiggle room.
Tomorrow I'll look at opening up the slot for the cartridges and then use some C clamps and scrap pieces to position the feed tray where I think it needs to go. After that it'll be hold my breath time and see if I can get it to chamber a round. Gulp.
After reading through this thread about 8 times, I've decided to try my hand at one of these builds! They are certainly SWEEEEEET guns!
I've built a couple AKs, and a couple ARs, I'm a certified AR-15 armorer, and did some understudying with a 'smith on 1911 Smithing. I like the metal working required with this build, and I'm VERY confident that I can complete one of these guns!
That said, I do have a couple questions:
1.) Does the STANDARD Romy-G AK barrel, gas tube, and piston work sufficiently to cycle the action on one of these? Or will I need to modify the gas system if I choose to use the normal AK barrel and gas block?
2.) What kind of recoil spring assembly works best? I've been thinking of using a modified AK recoil spring assembly in conjunction with a REAL M-60 buttstock that I might be adding to this rifle.
You'll need to build a much tighter tube if you're going with a stock piston. Also turn the lip on the gas block so it interlocks/seals MUCH tighter. That's emphasized earlier in the thread, so you've only got about 20 more re-reads to go!
I used an M60 spring - start no shorter than 16" / it may wind up being as short as 14.5"
Port was opened up to .191" (posts 88,203,358 you've got ALOT more reading to do!)
I used an MG3 TC (because Robert was out of MG1 combos at the time) and MG1 or MG3 tray. Either will work but an MG3 will need the drum mount cut off. Go with the MG1.
Tubing came from http://www.aircraftspruce.com/catalo...tubing_un1.php
.75" OD /.56" ID /.095" wall (mic your piston for the tightest fit) will seal a standard piston (about .55") quite nicely @ $5.30 per foot
Use DM1 links - they work. TC's WILL REQUIRE MODIFICATION. Remember, you're changing the caliber they were intended to feed. It will be a LESSON in BELTFED MECHANICS. All the info is in the thread already. There is no shortcut; it will require thought, careful tinkering, and time/work. Don't expect it to happen overnight. Previous beltfed experience will help on this - so will four hands (cycling it by hand, coupled to the tray, open but upside down, so you can see what it's doing - what's rubbing; what needs trimmed) Position your angle iron reinforcement rails JUST LOW ENOUGH so the feed lever can move freely. IF you run full-length 'upper' rails, reinforcement rails MAY not be needed. Build and install the 'upper rails' according to the main rails like you would on any other AK (positioned according to the trunnion & bolt) only upside down, and much longer. However the ejector rail could be standard length - you will discover whether you need extra side- reinforcement rails when you begin feeding. If it feeds 50 or 100 then suddenly doesn't feed, you may have rcvr flex, and need extra side- reinforcement; like an HK21 requires. 2XTM's left 'upper' rail is oversize, which may have eliminated the need for reinforcements; his ejector rail is also full length; mine is not
When you begin building, you'll make your rail choices then build accordingly. The end will justify the means
Cntrailrider (Steve) is doing an excellant job responding to the questions asked by builders of a MG47. He built the second one after my prototype with improvements as well as those of Doubletapme. Like Steve has said several times, most of the information is in previous posts but with over 440 posts it can be a chore finding it. He and Pirate are also the ones to ask about question with RPD top cover builds as mine is MG3 based and I have never built one with a RPD top cover. I am currently working on a second MG1 top cover/FT build with a no machining, no welding receiver, designed for those builders who do not have machining or welding expereance. I will post the info on the build when I get all the bugs worked out. I don't what anybody to get off on the wrong foot and have to stop and re-do something.
Steve's advice about reading and re-reading all the prevous posts several times is one of the best that can be given. The current MG47 is very labor intensive and not for the first time novice builder.
Question, Could I get a count of how many MG47's of either MG1/3 and RPD based builds are currently being built please. Just courious as to how many are being done and any pictures of your builds would be helpfull to new builders.
Thanks to all who are building and improving on the original MG47design. The responce and following of this thread still amazes me.
I have everything coming for a build. I am working on an idea that utilizes a separate block which will go behind the carrier. This block will have a pin that goes into the recoil spring hole on the bolt carrier and will have slots to ride on the lower rails. The dual spring recoil system will be guided by this block. The bearing to operate the top cover lever will be mounted on the top.A firing pin extension will be mounted in the block and will be spring loaded. I am planning on milling the block out of aluminum with a steel plate screwed to the top which will ride the lower rails and will mount the tc bearing. The recoil rod guides will be bushed with bronze to reduce friction. This will allow me to mount my trigger group farther back and will eliminate any hammer clearance problems. Rough drawing below.
[picture 404]
Interesting idea.
 Is the spring loaded firing pin extension piece going to hit the original
firing pin?
Thats the idea. My thinking is to use as many unmodified parts as I can. Easy replacement if something breaks.
I have been thinking of a similar design. A block that rides behind (or is part of) the bolt carrier. A transfer firing pin with a spring to prevent slam fires. Duel recoil springs. The TC actuator bearing mounts on top.
The different points I have thought of are; keeping the recoil springs contained between the receiver and the bolt carrierand; and using steel. To do this I would grind the "top" of the bolt carrier away like Pirate has done on the MG47jr thread. This would be replaced with a solid rib about 0.30" wide and deep enough to contain two standard AK recoil springs between the bolt carrier and the floor and sides of the receiver. Think Negev configuration. The front of the bolt carrier would need a plate for the springs to push against.
I think heat treated steel should be used. The back of the block would need to tolerate hitting the hammer on recoil. The tranfer firing pin would also need to be heat treated to take the beating.
The recoil springs would have about 5" of contained space to compress into versus 6 1/2" on the standard AK carrier. Maybe that's enough?
Work on the standardized no machining, no weld belt feed, receiver is progressing. Got most of the receiver done yesterday. This is a prototype build again so it is a screw build. Could be a rivet/spot weld build once all details are worked out and dimensional plans are drawn up. Pirate style tutorial is in the works as I build. Idea is a universal belt feed build that any Ak builder with some build experance can tackle with normal AK builder tools. This presents a whole new set of ideas and details to work out different than the original MG47.
Many good ideas on BC spring and feed roller mounts have been presented and all new ideas are greatly appreciated. There is no one correct way to do a build like this.
Steve, Emory and all others, thanks for your prase of a simple idea I tackled just to see if I could do it, make all the hours of thought and work more rewarding. Gunco member response still amazes me. I had posted it on a few other forums but got nothing but lectures on posting in the wrong forums, typing with all caps lock on or a few misspelled words, etc. Deleted most of my posts on other forums as a results. FAL forum is one with particularly critical members who are more interested in being comentary editors than the info in the post content. Gunco has always been receptive to the content of all the posts with out regard to the some times incorrect format.
This update might not look like it, but I spent at least 15 hours this weekend on the project. Lovely how you can go down one road thinking you're ok but missing some details that are extremely important. (Big thanks here to Steve for steering me in the right direction!)
[picture 404]
I hadn't tapped the trunion holes yet, so I did that in anticipation of having the 2 halves together soon.
[picture 404]
Removed the front sight.
[picture 404]
Installed the barrel...
[picture 404]
...and the pin.
[picture 404]
Then I realized that the assembly won't fit into the upper section because of the rear sight ramp. So that was trimmed a little and then fit right in.
[picture 404]
Still need to resize some other pics from work on the feed system, stay tuned.
Yeah let's not mention the F (feed) word for a while... For several hours on Saturday I had the barreled receiver mocked up in the vice with C clamps holding the feed tray on. It wouldn't chamber a round from the belt with the top cover on or off. Finally in desperation I emailed Steve and politely asked him to do me a favor and end my life, but instead he and I talked about some of my parts and he got me squared away. Turns out there's a few mods to the feed tray and top cover that are hard to see in the pics and the sucker WILL NOT feed without them!
Here's a pic of the mocked up feeding system:
[picture 404]
Feed tray mods (opened slot, lowered cartridge stop, trimmed to fit around trunion):
[picture 404]
Pressure plate mods:
[picture 404]
So now I think I'm finally getting close to being able to have one chamber itself. Honestly, I have way more time in just the feed tray than a complete AK build including demilling the parts set all the way up to refinishing!
Looking at some of your pictures I'm not sure that your feed tray shouldn't be a bit farther forward. Ideally, the nose of the bulled should be about where it is when using a stick magazine. That requires cutting off a part of the cartridge stop and the cross bar just aft of the hinge. That places the cross bar in front of the up right piece of the trunion where the front of a stick magazine clips in not behind it. Also, you may have to slightly bevel the upper edge of the feed ramp so the cartridge lip does not hang up no the square edge. I can send you a picture tomarrow evening so you can see what I mean. Everything Steve recommends still is required.
This is an image of the relationship of my MG1 FT to the trunion.
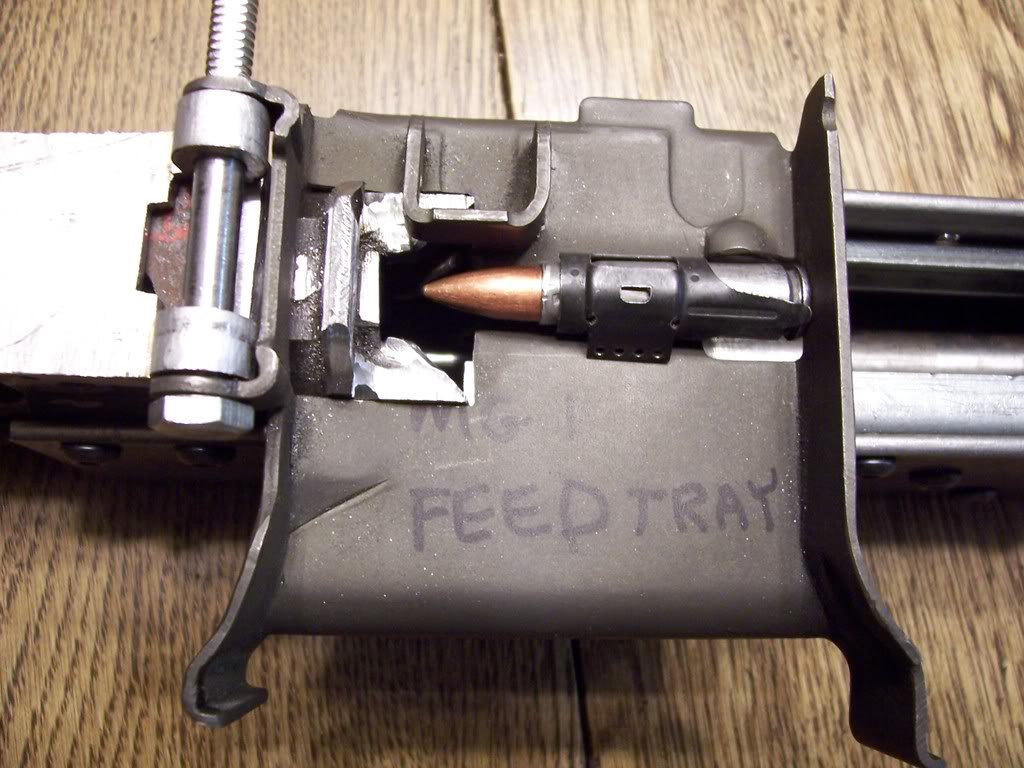
Did you thin the back of the pressure plate to allow for the tapered 7.62x39
round?

Is that the only mod to the pressure plate?
To answer your questions, yes and no. Complete pressure plate mods are as follows:
1. Cut off front of bullet guide (top of pic)
2. Cut off a section of pressure plate "arc stop" so it can swing down lower (left side of pic).
3. Flatten out rear so bullet can slide underneath (shiny part of pic). MAKE SURE you heat up the pressure plate cherry red before bashing it with a hammer. Mine started to crack a little even with heat.
Edit ** I DO NOT KNOW if this will do it, or if more is necessary. The nose of the round has to immediately start going down so the pressure plate has to be the heart of this build. I'm wondering if I'll need a way of keeping the pressure plate down or if it will work as is. Just this part of my MG47 build cost me Friday night, all of Saturday, and a good part of Sunday! Thank goodness I cleaned up the shop; now my son can come out and play while daddy yells at gun parts.
SS, thanks for the advice on the feed tray. Yours is well forward of CNT's so now I'm not sure which way to go. Last night I had the top cover and feed tray working with belted 7.62x39 ammo (Steve, I think I found a good belt). This was by themselves, not on the receiver. Maybe I'll mock it all up again today and see if it'll chamber as is.
The problem I see with moving the feed tray farther forward is that I have to get that pesky round going DOWN even faster than it is now. My feed ramp is untouched because I know if the Dremel hits it once, when it finally stops it'll all be over but the cryin'.
If you can get it to work the way you have the FT now, by all means use it that way. I know I had to modify the feed ramp on my prototype MG47 to get it to work, but that doesn't mean that other geometeries won't work. The one difference in my setup and Steve's is that I replaced the pressure plate spring with an AR-15 trigger spring and I believe he has no spring at all.
You guys are getting into the heart of the build. I don't remember why I didn't position my FT front further - I believe it was to minimize mods to / cutting of the pressure plate. SS - I really like where your tray is positioned. Shorter cartridge path = simpler operation. Plus, the OAL of the finished product is 1/2" shorter.
I broke the left rear ear off my plate too. It cracked during bending, then when I tried to weld/mend it, it completely burned off. So I welded a reinforcement 'splice' on the top, tried my best to fill it in (without burning it off again!) and got it working. Craig - yours looks neater than mine for sure
[picture 404]
I never intended to post this pic - remember we're going for function here, not looks So when it worked, that's where I left it.
This is the 'balancing act' between the nose of the cartridge, and the rear- ear. Each affects the other (see-saw effect) while guiding the cartridge into the ramp/chamber, and the ear must not block the incoming links. If an empty belt can't be hand-pulled through the feed mech, you can't expect the pawl to PUSH it through. Fully functioning, with least resistance, is the goal. I did most of those mods OUT of the gun, with the tray pinned to the TC, hand cycling the feed lever. It requires two people, using all six hands.
The fact that it feeds best (when shooting - not hand-cycling) with no spring behind the plate was an accidental discovery
[picture 404]
This was my original set-up, after removing the 'mouse trap' spring, which also held the feed-pawl assy in place. 7.62x39 is not a strong enough cartridge to operate the stronger springs the TC was designed with.
[picture 404]
I had to drill & tap for a screw to hold the feed pawl in place, and added a set-screw to keep the coil spring positioned. The THICKNESS of that washer is CRITICAL to the operation, since it also acts as a pressure plate 'top stop', and regulates resistance. One turn of the screw would make a difference. It's since been replaced with an EXACT LENGTH FINE-THREAD BUTTONHEAD, permenantly adjusted. This cannot be over-emphasized. Make a note of it.
It would feed great, hand-cycling at this point, but wouldn't feed shooting. I kept going to a weaker/shorter spring, and finally, on a whim, tried no spring at all. IT WORKED PERFECT and I HAD ARRIVED SUCCESS!
Hmmm, which one of you was supposed to tell me about the feed pawl being able to come apart without the spring? I just read Steve's reply, got a lump in my throat, and checked my top cover. Yep, the feed pawl had nothing holding it in. Since I have been playing (testing) with it upside down until this point, I hadn't noticed that the mouse trap spring did 2 things.
At least I know now - coulda got ugly later on. Thanks again!
Sorry about that - wasn't meant to be an intentionally kept secret here. For your pressure plate, a longer pivot pin/rod with an L on the end (inserted from the rear) will aid the many times you'll be removing / replacing it.
Reference post #261 & #287
By the time the TC mods are complete and it's all working, you'll be able to disassemble and re-assemble it in the dark, or blindfolded, easily. Springs and all. No joke.
WOOPS! Sorry
I am not sure why mine feeds fine with very light AR-15 trigger spring on the pressure place and Steve's works only if there is no spring at all. Maybe it has something to do with the farther forward position of my feed tray or the that my feed tray is home made. The other thing is I have a much larger gas piston to push the BC back faster and a very strong M60 return spring to slam it forward faster. The spring length is very critical and maybe Steve's is very slightly shorter or weaker. Fine tuning seems to be a important part of building these things.
When in the cycle does the next round get fed to the right and into the tray slot? Is it immediately after the feed lug passes behind the cartridge that the cartridge gets advanced?
I am having the feed lug hit the shoulder of the round as the bolt comes back and the round gets moved to the right.
Of course mine is 308 and is a longer round.
I may have to mill a new track for the stud.
Never mind found the problem and corrected it.
Not to hijack, but just an update on MG47 Jr / RPD47 - I believe this one's just about in the bag.
New video: Starting to work still has some ejection problems - Putfile.com
[video 404]
When making a 'cocking plate' - be careful it doesn't jam beside/beneath the BC 'step' and the side/bottom of the rcvr when cocking. A larger step on the plate, enlongated towards the inside, helps. Mine started slipping off the BC step, and jamming about half-way back
PS While Gunco was getting overhauled, I posted pics over at AKfiles.com which show some details - build sequence and critical areas are exactly the same as an MG47.
The AK Files Forums - MG47
http://www.gunco.net/forums/redirect-to/?redirect=http%3A%2F%2Fwww.akfiles.com%2Fforums%2Fshowthread.php%3Ft%3D33297%26page%3D3
[thread 404!?]
Got the full length gas tube made for the no machine, no weld MG47ES. Feeds manually, need to fit the return spring as soon as I get a M60 spring. Tried other springs including the STD AK return spring but not strong enough. Pictures and a build tutorial as soon as it is functioning.
Craig
I will post a picture of the thinned stripping lug next to a unloaded belt
link and you can see how much it has to be thinned.
If possible could you furnish the dimensions for the distance from the rear of the original bolt carrier to the center line of the feed roller/stud on your carrier extensions, and the distance from the inside rear ( base of the cartridge) of the feed trays to the feed roller/stud. I am doing the carriers for both of my MG47 Pattern MG1 and the RPD fed guns and a "Ball Park" range for a starting location would help take some of the trial and error out of it. I finally got the timing worked out on the "Pinneapple Upside Down MG23.5" gun but I had to make and move the cams and feed arms three times to get it. I'd like to "Cheat" a little on these if at all possible.
On my original MG47 prototype with a MG1 top cover and a homemade feed tray, the feed stud is on the the bore/bolt carrier centerline and is about 1-5/8 aft for the base of a cartridge as it sits on the feed tray. The fact that my feed tray is homemade shouldn't make any difference as the base of the cartridge and inside rear of the feed tray is the same as if using a MG1/3 feed tray. That is, the back of my feed tray is exactly the same position relative to the top cover as a MG1/3 feed tray is. Make sense?
I'm having trouble getting the bolt to strip from the links. I opened ther feed tray until a loaded round without a link will almost drop through when in the back position and drops through about half way down the tray. The links seem to bind on the feed lips as the bolt passes thru the link. Do I need to narrow my bolt more?
Dvanncvann -
Look at the very tiny clearance cuts along the slot, in this pic - post #287
[picture 404]
They keep the link from pinching the cartridge tighter. If the cuts are squared on the front it will help keep the link from skidding forward (even though the stop is right there). The link gets tighter in the feed slot when the cartridge begins to nose down (can jam) unless it has clearance to expand. There's another pic which shows those cuts too. It was one of the problems I ran into. Hope that helps
Steve
Found it - post #84, 4th pic. Save it and ZOOM IN. You will see the cuts, the pressure plate, hammer extension, feed lever cuts (for the bridge). You'll also see the buggered up feed ramp and sloppy mending job. When it works, I leave it alone. Was trying to fix something that wasn't broke
Dvanncvann
The stripping lug on the bolt head has to be thinned enough that it will freely pass between the lips of an empty link. Thats when the gap in the link is tightest. Also, you need to put a 1/16" radius on the front edges of the stripping lug so it does not catch the edge of the links. The thining of the bolt heat should have a slight taper rearward so as the bolt head move back that it doesn't catch on the links also. This is a picture of how MP43Sniper did it.
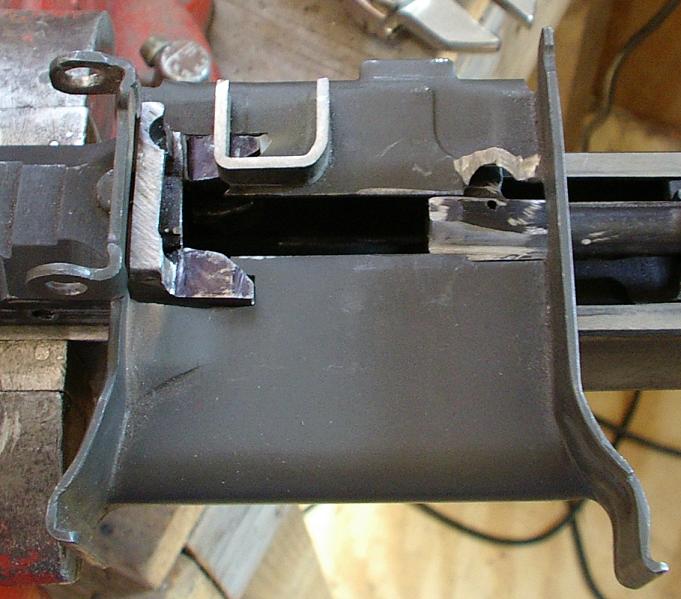
That's exactly how I did my feed tray. I just wanted to ask the experts before I cut my bolt any more. It easy to take off but hard to put back.
Narrow your bolt more, but also don't be afraid to open the feed tray slot. I spent way too much time on mine making a bigger radius from front to back, only to open it up the whole way to the rear for the cartridge to be able to drop in. You don't want any binding and that's what'll happen when you start feeding trials if the slot isn't big enough.
Yesterday was ANOTHER 2-3 hours on the feed tray and bolt. I wish I would've kept track of my time on this one to know how much I have into it. It's still worth it though, don't get me wrong.
For BC ext length, it depends on what kind of FCG you use. Hammer length determines the length of your extension, so the hammer arc isn't blocked. The purpose of the BC ext is to somehow get your feed stud positioned up there, without obstructing the hammer arc. An "L" around the hammer arc was the simplist thing I could think of
Mine extend 4"(MG47) & 4.25"(Jr.) behind the BC. It's also contingent on where your hammer axis pin is located. Lower = longer BC ext since your hammer will be longer to reach the bolt/FP. Then your receiver length is contingent on how long your BC ext is. Receiver length is one of the last things to be determined. I broke down how everything inter-relates in post #422
I have one more question i didn't see in the thread. do you leave part of the
old gas tube in place so the BC piston stem can go in the tube or do you do
something else. cause with the gas tube i ordered the ID is not enough
obiously for the BC to enter. so i was going to cut mine and leave enough for
the BC to enter and the rest will be the new tighter ID part. Am i on the
right track? seems like this would work.
That's exactly what you have to do. If you grind a slight bevel on the outside of the new tube and stand the old rear portion of the bolt carrier in a vise, then heat the end of the old gas tube red with a torch, propane or mapp gas works, then pound the new tube into the old one about 1/2". If you clean the I.D. of the old tube to clean shinny metal and do the same with the O.D. of the new tube first and flux them both then you can silver solder them together. Make sure the tubes are concentric and the gas piston and BC nose enters the gas tube before you solder them together.
You can get propane, MAPP gas, silver solder and a torch at Home Depot if you don't already have one.
I enlarged the rear of my new tighter tube to 5/8" *JUST DEEP ENOUGH* for the BC snout to fit inside. Don't go too far, or you will compromise the (length of the) sealed pressure area. Then sand the inside step, so you can *insert the piston PAST that step* - like threading a needle. Assembly was very tedius before sanding that inside step. This deserves emphasis
Steve
PS I was re-editing my alternative technique, when SS was posting his solution. I like his 'inserted tube w/bevel idea - simpler (I believe he meant heat the old tube, instead of the BC?)
KZ -
Just got both springs side by side, and the Browning spring looks like the perfect low-cost solution. 1919 spring is 15" long, and the springs in my MG47 & Jr run between 14.5" & 16". OD of M60 = 5/16" & OD for Browning spring = about 3/8".
1919 springs are listed as DRIVE SPRING @ OOW for $4 Browning 1919A4-parts from Ohio Ordnance Works.
...I've got my feed tray, top cover, a set of links, and a link starter now...
I decided to go with the MG-3 Top Cover & Feed Tray, and they've arrived yesterday!
[picture 404]
[picture 404]
After having played with so many belt-fed guns, reading the forums, etc. It's not until you OWN the parts, and have them in your hands that you finally realize how LITTLE one understands of the detailed operation of the various springs, and other parts of the feed mechanism.
I've now got the belt-feed parts, and don't yet know which kit I'll build this on... Do I use my Romy-G kit??? Or do you recommend I pickup an RPK kit?
I'm thinking of sticking with the Romy-G, but after 90 rounds in mags, my other Romy-G AKs get so hot they could nearly cook off a round! This makes me worry about turning the RomyG into a belt-fed gun.
What say you, oh wise men of experience?
I'm moving along on the MG47 but had some questions. I got the FT mounted and removed the mousetrap spring in the cover and drilled and tapped the stud for a stop I made no other mods to the TC started feed testing with a ak spring clamped in the rec. i was able the back out the stop screw about an 1/8" and it will chamber a bullet every time so should i skip the other mods to the TC for now or do you think i'm going to have prob. down the road.
If it chambers, I'd say go with what you got. My TC is located back further in relation to the trunnion than yours, and all those TC mods I did may be unnecessary. That would be a big breakthrough. Have you been doing any belt- feed tests? Or only chambering?
Only chambering from a belt, but the TC is definitely grabbing and stabilizing the belt so I see no reason it wont feed the belt. I will work on the BC extention next so I can test cycle the whole system. I also think I left a little more of a stub on the pressure plate than in the other pics I've seen and even condidered heating and bending it a little more to help guide the bullet cause at first it was feeding to high and jamming then I just kept unscrewing the stop and it fed so i did it 3-5 more times to make sure it wasnt a fluke and it worked.
I would have to agree with CNTR, if it chambers, go with it. I bent the stub on the pressure plate quite a bit on the MG47ES so the tip of it is even or just below the feedramp on the trunion. I also ground a groove in it to help keep the cartridge centered in the FT slot. I did not install a stop screw like CNTR but was considering it until I got the right combination of Ar-15 Trigger spring pressure by bending it to replace that way to strong MG3/1 pressure plate spring. The ES chambers and feeds fine now from the belt, just spent half a day getting it to do that. I think CNTR's stop spring might be easier and more tunable but the the original MG47 works with a AR spring and no stop screw. I might install a stop screw anyway and try them both to see if one method is more reliable than the other.
The MG47ES almost worked but the bolt was hanging up at the rear of the stroke because I had the feed roller just off of center enough (not supposted to be, just sloppy workmanship) to bind in the feed came at the rear of the stroke. I didn't realize what was happening until I way on my way home. Got it fixed now and will try it again next weekend. I think it should work, got plenty of rearward travel and if I just gave the BC a slight nudge forward it would feed fine. I clued in on it when I realized I couldn't open the top cover when the BC was at the rear. Moved the feed roller to where it should be and there is no binding and I can open the top cover with the BC held at the rear.
The ES is easier to build than the MG47 and should allow a whole new group of builders an opportunity to make a belt feed. As soon as I am sure it is working fine with no feed or ejection problems I will post pictures and details.
Did shoot the MG47 and it performed flawlessly. No miss feeds, use my drum magazine, ejected great. My son can shoot it almost as fast as a full auto. Really happy with it. I am sure I can get the ES to perform the same. I will try to post the pictures of the MG47 shooting as soon as I get them downloaded from the video camera.
Looks good except you may have to put a sleeve around the gas tube to gas block connection to plug the gas vent holes. You will need all the gas pressure you can get to push the BC all the way back to cycle the feed mechanism. You may have to file the gas block round to get the sleeve to seal tight.
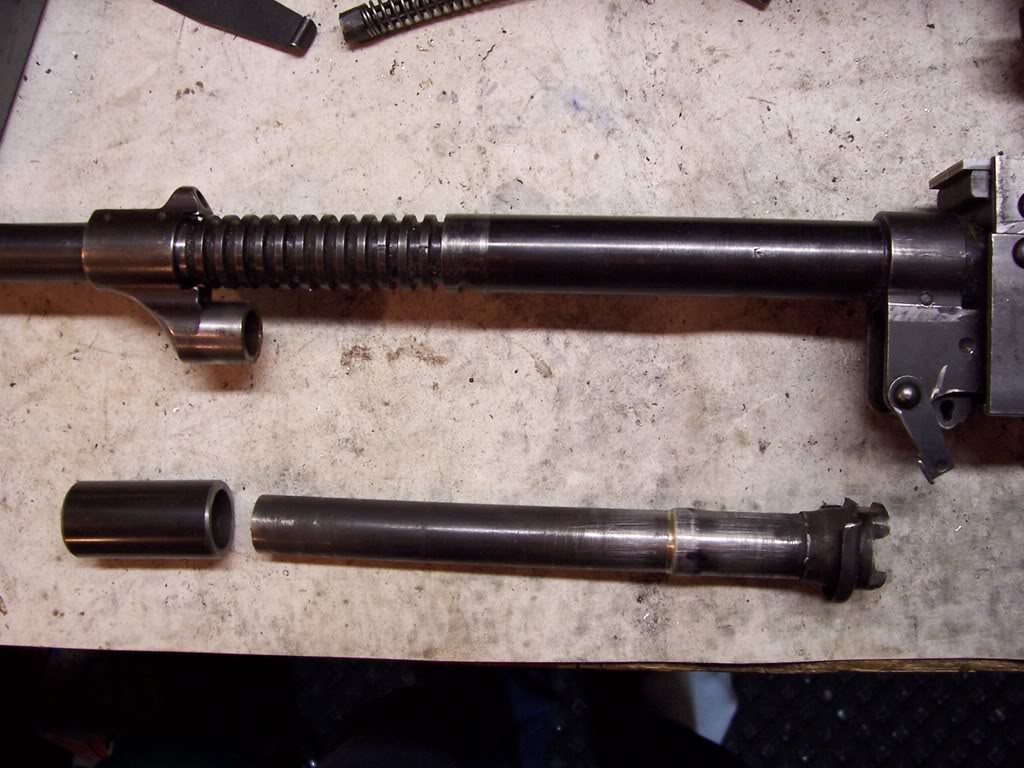

It is a tight cone type fit like the old Ford style spark plugs. I do plan on welding those holes up I can back them with copper and plug weld them shut. I also have thought about a sleeve as well, just like yours. I was wondering if someone was going to notice the holes were still there. I still have to pull that off and drill out the gas port so I figured I'll weld it then. I'm also going to remove the handguard mount i may make a vented one or I kind of like the look of none (M240) but we'll see this thing is taking on its own destiny, it tells you what direction to go you just follow its lead. I would have to say there is no one way this can done although there are some important things that have to be done.
KZ -
The shape of your AR hammer looks amazingly similar to mine, only I mounted my gripstick up higher - and that's where my 'tight fit problems' occurred (cocking). Congrats on your FP strikes - it is a BIG DEAL! The further you progress, the clearer it all snaps into focus. It's mostly logic.
Question - is the bottom of your TC/feed lever parallel (lengthwise) to your rails? It may be just the angle the pics were taken - be sure the feed STUD engages the feed LEVER (track) during it's entire stroke. You can tell by looking in the rear. I have to remove the stud to slip my BC out. I didn't understand what the square notch in SS's was for, until I was past that point. duh
Robert sells G3 stock sets for $8 HK G3 Surplus Green Stock Set you can epoxy to fit & their spring recess hole is perfectly located for this build
I just finished the BC extension and need to make some adj. to get the rear down about an 1/8" it still engages but i would like a little more.
How much of what is now the top of the BC did you remove seems like when I close the TC with links in it's pretty tight. Did you grind down so it is not up into the FT?
The 'top' face on the rear of my BC (the original section, where the bolt slips in) is almost even with the flat floor of the tray. No more than 1/32" below it. Did you take out the spring, behind/above the pressure plate? My FT slot is so wide that a single cartridge will amost fall through, but the belt suspends it in position.
My FT is about like yours a single cartridge will tip forward and fall. No spring in the top cover. But I had not removed any material from the "top" of BC so I will do that next like yours.
This pic shows how high the face of my BC sets up into the FT slot. Also shows the feed ramp and my attempt to patch it. All that was unnecessary. My problem was in the pressure plate. Shouldn't have screwed with the ramp at all.
[picture 404]
I'm talking about the the part of the BC that when in an AK would be right above the mag when the bolt is all locked up. Also I did make a slight extension on my feed ramp so the stub of the pressure plate is maybe 1/16 away to guide the round better. I was worried about welding there but on a test piece the high heat never migrated more than a 1/4" away from the weld and dropped dramatically from that point to well below 500 which I beleive is the point where the heat treat is affected and the lugs for the bolt are not close enough to get that hot, I also used a infared temp gauge to see right after and it was in the 300 range, I would think sustained full auto fire would get it hotter than that.
KZ
I didn't have to remove anything from the top of the BC either. You shouldn't have to as long as you haven't limited the upward travel of the pressure plate with the set screw too much. If you can pull an empty belt through the from left to right without to much force it should be OK.
Your welding tempurature should be no problem. The tempering tempurature should be around 700 to 800 degress for the hardness you see on a front trunion and as long as you stay below that, the temper (and strength) will not change.
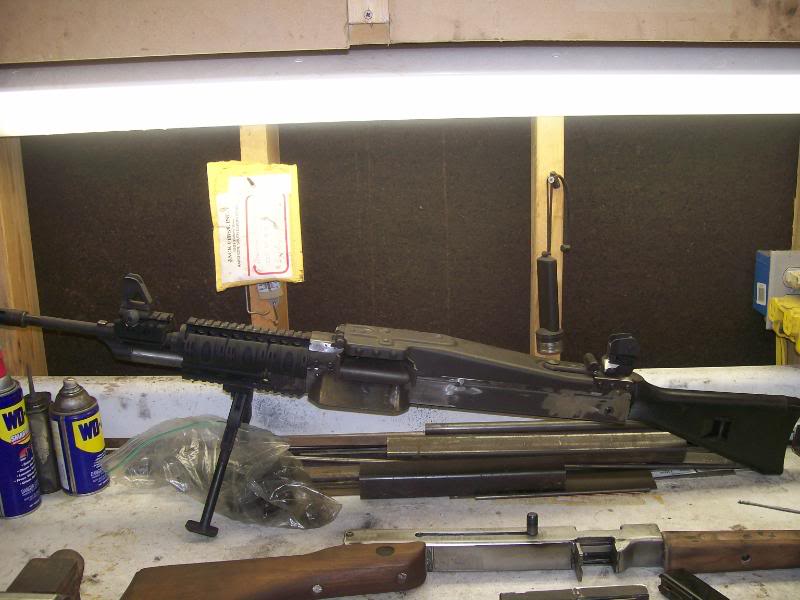
My original MG47 prototype has a gas tube made out of a 12ga. barrel section and it produces too much force. That is most of the apparent recoil of a 7.62x39 cartridge in a 13 lb gun as seen in the videos. Its mostly from the mass of the BC hitting the BC stop at the rear of the stroke. The MG47ES has a standard gas piston but a full length gas tube made from .565 diameter tubing. I gives plenty enough force to cycle the action. A full length gas tube is necessary to push the BC back through it's complete stroke in order the actuate the feed mechanism, with gas pressure relief holes drilled near the end of the piston stroke, but a larger diameter piston/tube is really not.
A gas regulator might be nice if you shoot heavier than the 122 gr standard load bullets though. My two builds and CTR's have the gas port drilled out to around .187, possiably too big, where a regulator might help tune the gas pressure down a bit and the apparent recoil. On the ES with a standard diameter gas piston/tube I bent the 1/4" dia. BC stop pin after a couple of dozen shots. This indicates it has plenty or even to much force with the standard diameter gas piston but too big of gas port hole.
Cntrailrider's MG47 & MG47JR have standard diameter gas pistons but full length gas tubes.
That's good to know that a standard gas piston will do the trick, sounds like you did drill out your gas hole a bit too big, I will start smaller on the gas hole (with the adjustable gas block opened all the way up) and work up on the barrel gas hole until it works, then I will close the adjustable gas regulator not quite half way and then work my barrel gas hole up until it works again, that way I will be in the middle of my gas setting with it functing and be able to go up or down with my gas pressure if needed, I still might make a bigger gas piston though, just to be doing it, that way the carrier will fit up inside the bigger gas tube.
So how long till you have your no weld plans up?
Is there some kind of TRICK you guys used to get disassemble the top cover's feed mechanism!?!?!?
I know the spring holds everything together on the top cover, but how do I get that damn pin out of my top cover? Mine seems to be 'peened' on both ends like some kind of rivet or something! Is there some kind of 'trick' to getting that pin punched out? Do I have to grind off one of the ends with a dremel tool or something?
Also, what size washer/screw did you guys use on your top-cover mods to hold the feed assembly in place (since you pretty much removed the spring that holds it together)?
If you push the pressure plate down slightly and then slide it rearward so the stop clears the top cover, you can pivot the pressure plate up so there is little spring force binding the pressure plate pin. If the rear end is riveted over, then yes you will have to grind the it off and then you should be able to pull the pin out in the forward direction.
On both my MG47 and MG47ES I replaced the hell for stout stock pressure plate spring with an AR15 trigger spring bent approximately the same shape and the stock spring and it still holds things together. I did not have to drill and tap the feed pawl guide stud for a retaining screw and washer. Cntrailrider did and perhaps his way is easier to tune and adjust but both mine work with the lighter AR15 spring. I will take a close up picture to night and send it to you.
SWEEEEEET! Thanks SharpsShooter!
I've decided on doing an ES-style build on mine. I was browsing my local hardware store, and found they've got nearly all the steel material I'll need for my build, but I'll still have to order the gas tube fit the piston. All my piston measurements seem to coincide with your advice perfectly thus far!
I've been drafting up hand sketches of my receiver but the overall width & height of the ES receiver (up to the new top rail) are something I've not yet decided upon... much of what you've described seems to fit perfectly thus far though! I've got it on its way now! This is a fun & exciting build so far! Though a little frustrating at times.
I realize I'm going to need to buy more C-clamps than what I've already got!
I finally had an afternoon to get back on the beltfed. I got the bolt extension pretty much completed and started on the dual spring system.
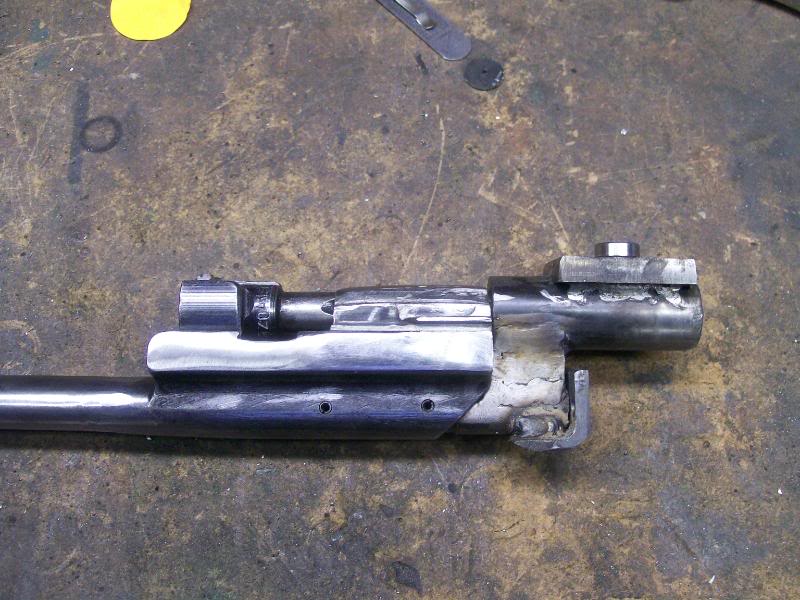
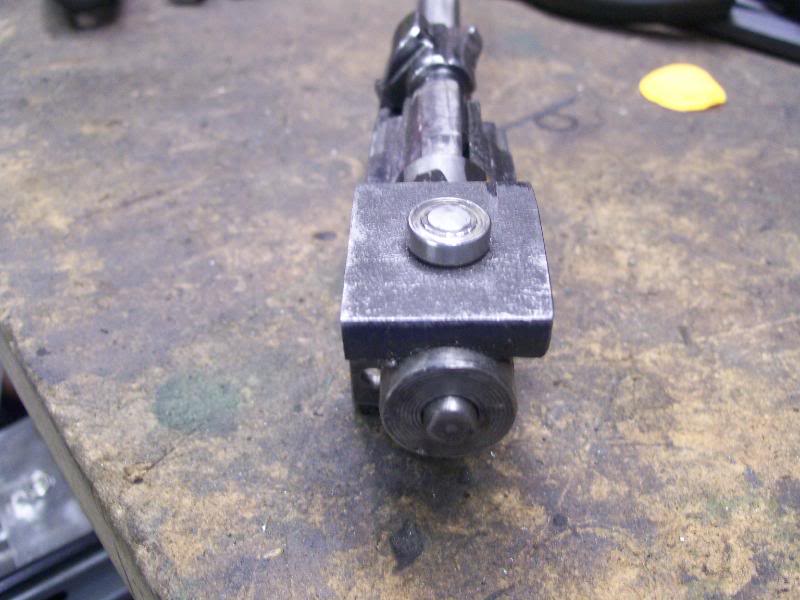
I used a roller bearing for the top cover actuator stud
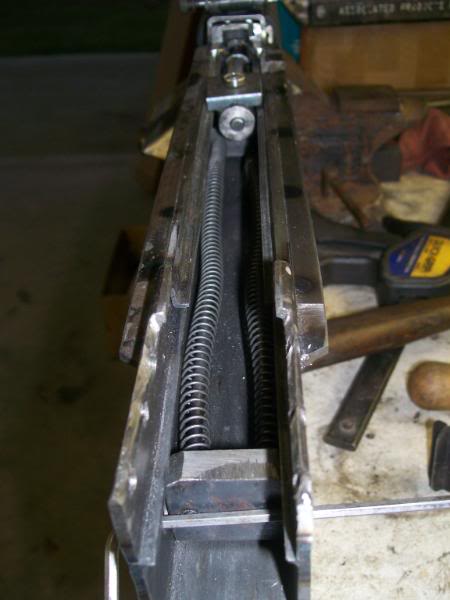
Dual spring setup. The springs are Fal gas piston return springs.The tension feels about right so we will see. I made the rear of the receiver removable to facilitate bolt removal.
Dvann -
Looks like you're coming along pretty good there. I like how your BC extension is roll-pinned to the BC, and also aligned between the rails on top. Is your firing pin all one piece, or is that a seperate extension on the rear? Do you have it feeding/chambering?
Curious what your entire BC weighs, because it looks pretty beefy with the ext. I will weigh mine and post it. Mine (first two) were too heavy to cycle
I saw where someone over @ subguns.com said he "was gonna knock one out since it looked like an easy build..." Never heard any more from him.
FWIW, I relocated my ejector tip closer to the breech (just far enough for unfired cartridge to clear) which remedied the ejection problems with "Jr". It would eject flawlessly when hand-cycling, but casings would not always exit, when shooting. Some got pinched between the front of the ejection port, and the FRONT of the left side of the BC ext. I tried different length recoil springs (shorter/slower) but relocating the tip was the cure. Weak extractor spring was also part of the problem. Remove the extractor & spring before building up the stripping lug with weld, to prevent the spring fom losing it's set, from the heat - or the extractor claw 'grip' weakens
The firing pin extension is a separate hardened striker that is spring loaded. The rod that goes into the bolt carrier is hollow to keep the weight down. The extension is also hollow. The tail of the bolt actually goes almost half way into the extension when the gun is in battery. I'm still working on some of the feeding issues but I want to finish the recoil system before I get any further. It will hand cycle now but I still have some feeding issues. I'm going to work on mounting the FCG next and then tackle the feeding issues. Also need to fabricate the non reciprocating charging handle. I don't have any skin left on my fingertips from cycling the bolt by hand.
I got the FCG mounted and popping primers tonight. I also worked on the feeding issues and got most of them corrected. I used the original pressure plate spring and just clipped 1 leg off of it and recontoured it somewhat to reduce the pressure. I actually had to add some pressure back so the bullet nose would not jump above the ramp. I can pull the belt thru the feedtray with very little effort. I am off Thursday and I will get the charging handle fabricated and installed then. GETTING CLOSE! I may have to play with spring weights as I'm not getting full lockup sometimes. Hell... if it was easy everybody would be building one.
Keep at it and I am sure you will get it running. Like you said, if these things where easy everybody would be making one. The drawings for the ES are almost done and maybe more people will be making one. Most all of you builders have had to wing a hell of alot of the build so with actual drawings it should be easier even though there will be alot of variations. Which is good, because there is no one correct way to build these. Keep at it and I am sure you will get it running. Like you said, if these things where easy everybody would be making one. The drawings for the ES are almost done and maybe more people will be making one. Most all of you builders have had to wing a hell of alot of the build so with actual drawings it should be easier even though there will be alot of variations. Which is good, because there is no one correct way to build these.
Subguns? Did you say subguns dot com? Perhaps I am the one you are referring to over at subguns...'been hangin' my hat there since '97... anyway, I haven't gone "poof" or anything! The reason I haven't posted any build pics is because well, I've got nothing to post yet! I'm working on utilizing a different feed system and although I have a TC for this system I am currenty having a biatch of a time aquiring a feed tray without having to part with one of my privates in trade! As soon as I do I will begin with the rock-n-roll and will post pics of the build as it progresses. Trust me, I can't wait to get started on it, it's no fun staring at a pile of parts.
I mentioned in one of these threads, purhaps even this one, that this build will be utilizing a dual captive spring recoil system 1.25" diameter round stock spring guides will be threaded into the rear of the BC and will recoil into the stock during recoil], a drop-in semi AK FCG [which will fit between the recoil spring guides without having to modify/extend the hammer] with the hammer being cocked by a shaved bottom BC, an adjustable mount for the bearing that will actuate the feed lever [to decrease friction and to aid in the initial feed timing setup [it will be "riding" on the two recoil spring guides just out of the path of the arc of the hammer during firing]], and the other components such as the handguard, trigger housing, and buttstock from the feed system I am utilizing.
I'll be TIG'n where I can and threading everywhere else, and may possibly go sheet metal entirely if I can get my hands on a decent brake.
I have an MG1 TC & FT from RTG in-house but will utilize those items in build number 2.
Thanks much to you and Sharpshooter5090 for your wonderful contributions here.
Finally ready to test fire. I have not drilled out the gas port yet. I'm going to test fire and enlarge the gasport 1 size at a time until she functions if necessary. I've got a good 45 hrs in this one with another 20-25 hrs of mental planning and sleepless nights. It was worth it as the cool factor on this one is off the charts...
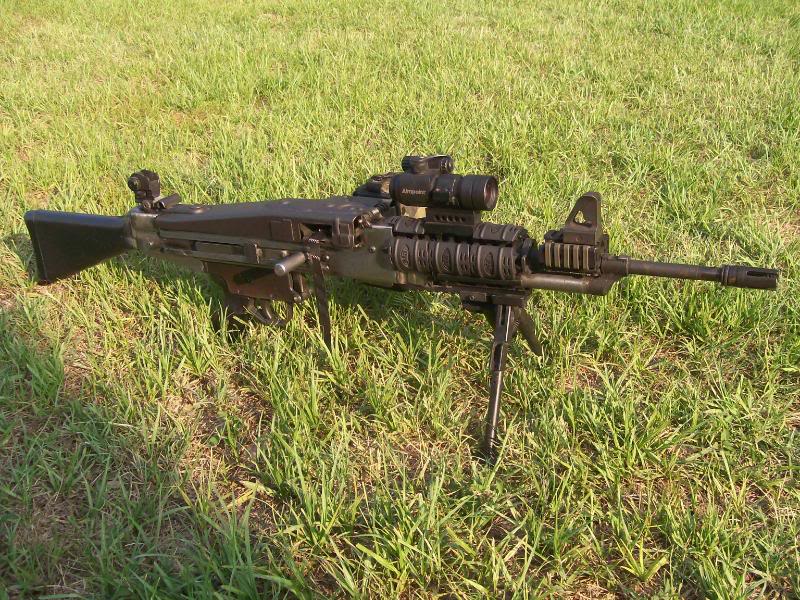
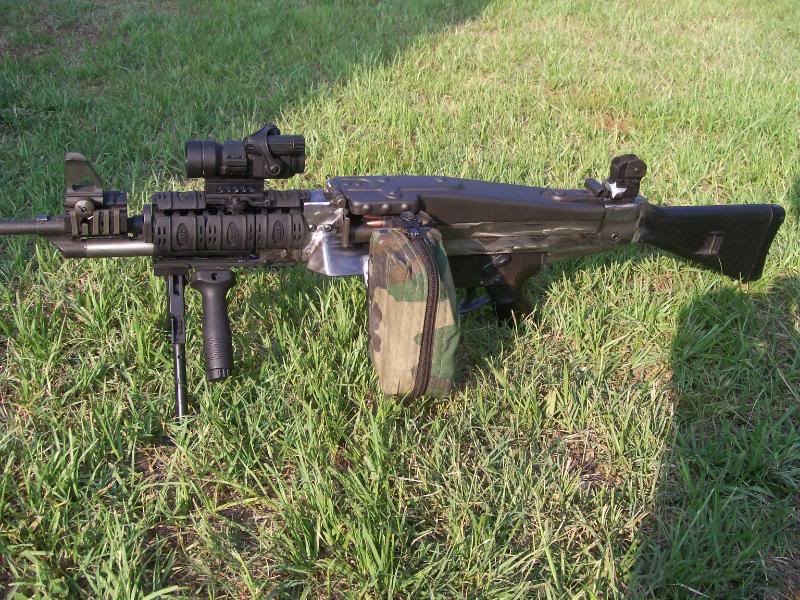
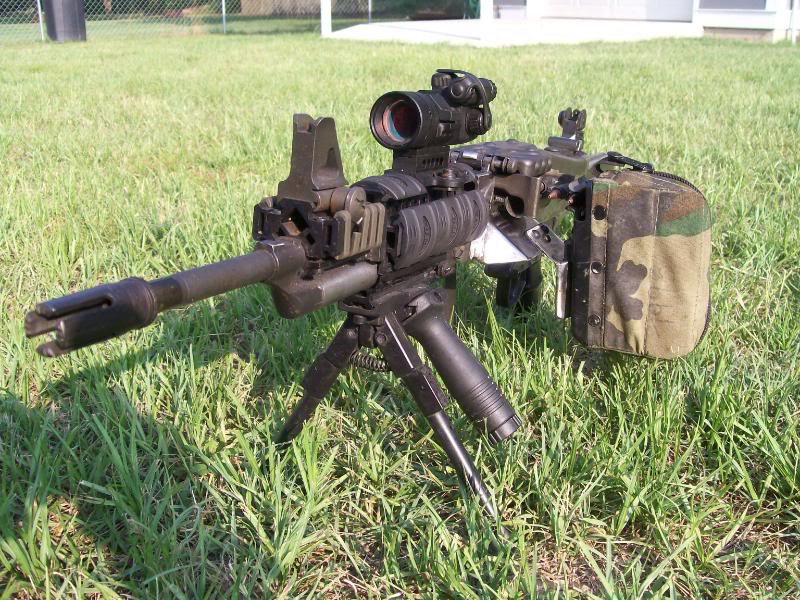
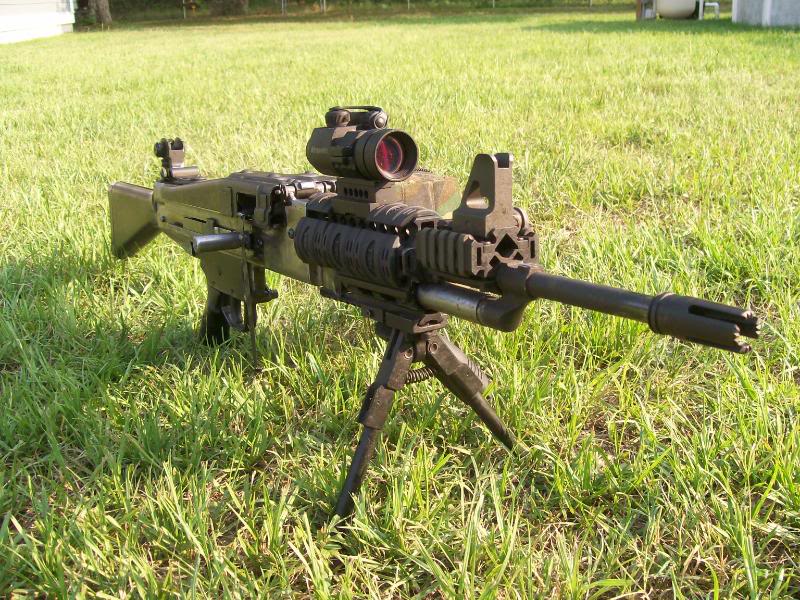
I used the original top cover spring. I just clipped 1 leg and reshaped it slightly.
I used a double spring setup. I had to slightly taper the sides of the hammer to clear the springs. It pops primers 100% of the time.
Looks real good. I am anxious to hear how it shoots. Does the left return
spring guide rod interfear with the ejection port? I see you have a downward
shell deflector attached. I did that on the ES. Drawings for it are 95%
complete now!
The left spring guide does not extend into the ejection port. Remember I built a bolt extension that moved everything back about 2".
Quick Question - What is that Ammo Pouch setup and who makes it? I'm just
wondering because when I saw that similar setup on the RPK-built version made
by a friend of CNTrailrider (Don't remember the builder), I think he had a
similar thing. I'm still unsure whether I should go the pouch route, or RPD
drums or what I'm going to use to attach my ammo belts...
Anybody have any info or other ideas?
The pouch is a 100 rd pouch for an m249 otherwise known as a "nutsack". You can find the at military surplus places. The mount was fabricated by me. Doubletapme is who was using this setup also. I also have a bigger one that is for 200 rds.
Here is a drum magazine I made out of a small backpacking cooking pot that came with a hinged lid. Holds 50 rounds and cartridges eject below it.
I fooled around in the shop some tonight testfiring in my snail drum one round at a time. Looks like somewhere around .190 is going to be the gas port size. I made another close tolerance gas tube and installed a regular gas piston. I'm going to take to the range tomorrow. I hope I have the correct combo dialed in. I'm scared to shoot it tonight in the snail drum cause if it dont work I'll be in the shop all night. I just can't seem to put a project that's giving me trouble down.
Dvann - You have that problem? My best progress is between 12PM & 6AM. Zero distractions, daybreak testfire then sleep like a rock rested for tracers at dusk. It's a rough life.
Weighed both BC's with the bolts
[picture 404]
#1 = 22.8 oz
#2= 21.4 oz (Jr, using RPD cover)
Standard BC + bolt weigh 17.3 oz
First two BC ext's (26 oz?) were too heavy to eject + push the belt feed mech. Wouldn't eject, even with NO recoil spring. So I went to thinner & lighter flat steel, then it worked. I feared the standard piston was too weak but it was the excess weight of the BC ext. Original intent was to cut enlongated slots for adjusting feed stud position on the BC, but eventually found it by trial and error.
Picked up 20' of tubing at the steel yard yesterday because Dvann's build was inspiring.
I took the MG47 to the range today. I got it to function several 5 or 6 shot strings. I think that since I used a 16" Romy barrel that Im going to install a Krink style booster to lengthen the gas pressure curve. BUT IT DOES WORK.
That's great that you got it functioning. I also tried a Krinkov booster but is was marginally effective. The thing that worked was to open up the gas port slightly. Keep at it and you will have it running perfectly.
range trip #2
The short stroke problem seems to be cured by the booster I fabricated. It has an inverted cone which slows down the gas exit. I can tell from the increased recoil that the springs are being fully compressed. The bolt speed has also increased which created an ejection problem. All malfunctions that I experienced today were from an empty not clearing the ejection port. I came home and moved the ejector forward about 3/8 inch and installed a new extractor and spring (thanks trailrider). This drastically changed the ejection angle. Next range trip will be 8 to 10 days out. Everything we do to these MGs affects something else. The trick in finding the right combination.
I am sorry, but I didn't see a link or info for it- is there a separate thread
for the MG47 ES build?
http://www.gunco.net/forums/f50/mg47es-belt-feed-37756/
That's great that you are getting it working. Maybe the difference in yours and my Romy base MG47 is that I have a 6" long barrel extension on the end of the standard Romy barrel. That seems to keep the barrel pressure up long enough to fully cycle the action. I lengthened the ejection port to solve my cases jamming on ejection problem but kept the ejector its self in the same position as in the standard AK. What ever works is great. Mine is a prototype and is far from being optimum so any improvements to the design is welcome.
Yup. With a gas system, boosters only give marginal increase in back-pressure.
Your best bet is to open up the gas port just a tiny bit more, and ensure the gas system isn't leaking pressure somewhere.
Another thing to consider is ammunition!
In the past 9 to 12 months, many ammunition manufacturers have actually DECREASED THEIR LOADS. Remington UMC, Wolf, and Winchester (yeah, that 'White box' crap) have all decreased their powder charge in much of their 'budget' ammunition line-up! I've got ammo from ~2 years ago, and ammo from 9 months ago, and the newer stuff is causing issues like crazy!
Several friends and myself have been experiencing short-stroking issues in all kinds of semi-automatic firearms! AK's, AR-15's, etc... Basically, many ammo makers are using LESS POWDER to save on manufacturing costs, and INCREASING PRICES to keep making a profit since the current Material Costs in the Commodities Markets hopefully return to a more stable or decent level. When Chrono testing ammunition, I've noticed loads from one lot in 2006 to a lot of the same ammo in 2007 - they're testing a pretty consistent 200 to 300 FPS SLOWER!
YIKES! That's bad! I've got to drill open my gas port on two of my guns because the ammo is no longer powerful enough to reliably cycle them. My buddy's rifle has an issue with new loads too.
The ammunition is still within SAAMI spec, but its loaded pretty close to the absolute minimum powder charge... It's some SLOOOOOOOW shooting ammo, and that lower pressure is causing a lot of people headaches lately.
It's sad to think that my old laquer coated steel BARNAUL RUSSIAN CRAP is a better performing load right now than Winchester White Box!!!
I'd suggest opening the gas port just a little bit, or roll your own ammo with slightly hotter powder charge (but keep it within SAAMI spec - don't load it over the maximum amounts) to see what that does with reliability. Either that, or buy some PREMIUM ammo and try shooting that for reliability testing.
Regardless of what you do to increase back pressure, ammo loads, et al, you're likely still going to need to open the gas port a tiny bit to make it more reliable across the wide range of ammunition available.
As for the ejection port, I'd just open it up a little wider/longer than it currently is...
The booster seems to work fine. I used technology the I have gleaned from building form 1 suppressors. The gas port is already at .191 which is HUGE in a .30 cal barrel.
Here she is all purdied up ready for a date. I got it functoning 99%. Just need to run some rounds thru it to smooth everything out.
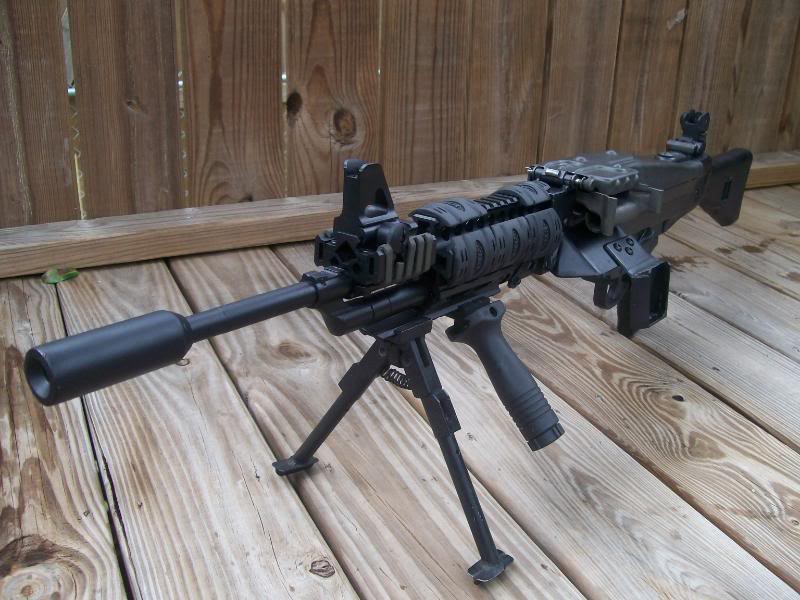
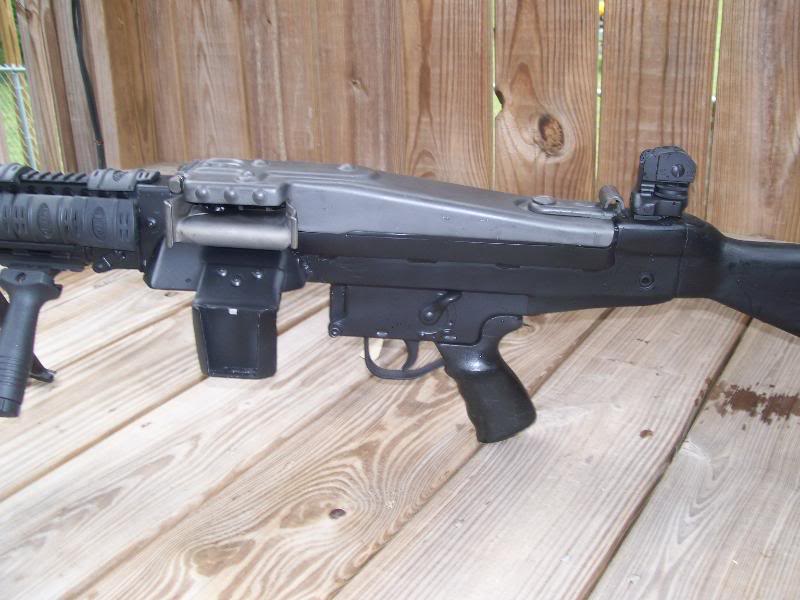
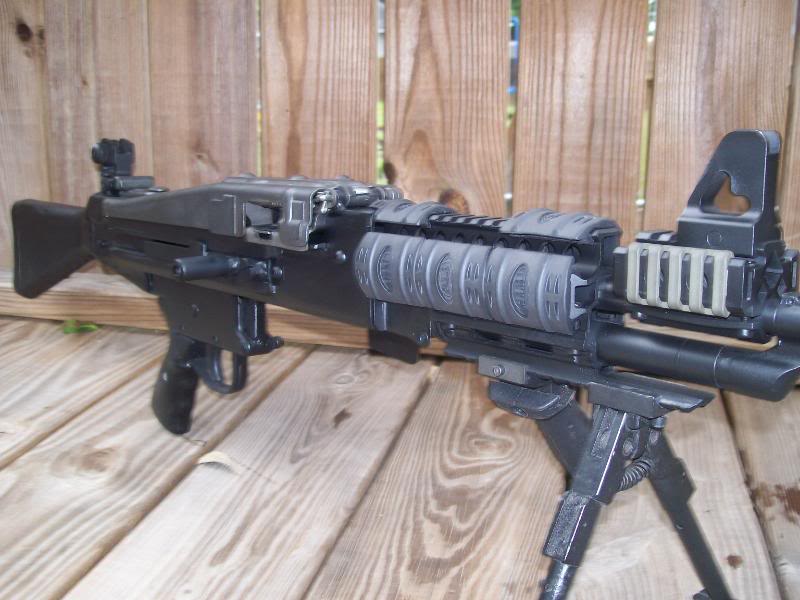
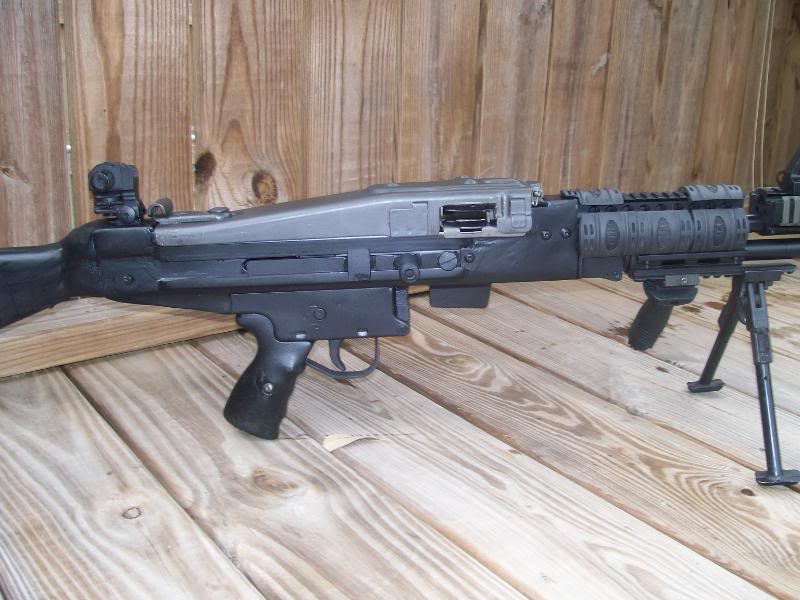
Thanks SS i,m sure i will have issues at the range to work out. i was looking
at the ejector and wondering if you guys install it the same distance back
from the trunion as on a std ak or if it a little further back.
I installed mine the same distance back as the stock AK ejector. I think that if you went back very far, the new cartridge being pushed in position might interfere with the ejected case since the new cartridge enters from the left and the ejected case exits to the left (and down).
RANGE REPORT!
Well went to the range today and here are the problems...
Gun is short stroking not quite enough to even eject round. I have a stock piston with close fitting gas tube and gas port at .183 and was using an amd style muzzle break, I'm thinking I need a booster style but need help designing one or would a Krink booster work?
Also light primer strikes, well not that light but fired on the second hit may be ammo related otherwise an easy fix.
All in all it cycles by hand flawlessly but I want a semi-auto not bolt action.
Check for gas leaks. That's the problem I had and after I got them sealed up it worked fine. Your gas port should be plenty big. Have you got an Jr/ES style gas tube to gas block type connection or do you still have the gas relief holes open at the gas block? The gas tube to gas block joint has to be almost a hammer fit with the relief holes completely sealed off. A seal sleeve like the one one the ES slid over the joint helps.
I just finished the tutorial tonight for the ES and will post that it is readly tomarrow.
The tutorial for the MG47ES is ready. A 87 page picture tutorial for building the MG47ES on CD. This is a companion to the drawings and describes how to build the MG47ES with out a mill, lathe or welder. PM or E-mail SHARPSSHOOTER5090 info.
I tried a Krinkov style booster on my MG47 prototype and it did help a little. How big in diameter is the I.D. of you gas tube? Are you using the stock AK gas tube or did you cut it off just where the piston head guides start and solder a new front section on? The piston needs to fit gas tight inside the gas tube all the way back to the end of the stroke.
I used a close tolerance gas tube as mentioned earlier in the thread I welded it on about 1inch from old tube so the piston is always in the new tube I can't remember the diameter but it was the closest I could get from Aircraft Spruce. I just ordered a 2inch barrel ext. and thread adapter and will try my Krink/M92 booster as well as use some sealer on the sleeve to gas block joint. I'm hoping this combo will keep the pressures up long enough to cycle it.
A second thought was to put O-rings in the piston grooves but I'm not sure they would hold up.
 Well went to the range today and here are the problems...
 Gun is short stroking not quite enough to even eject round
 All in all it cycles by hand flawlessly but I want a semi-auto not bolt
action
KZ -
I had exactly the same problem on my first MG47 - wouldn't even eject. I kept shortening the recoil spring, eventually to where it would just close the bolt. Each shortening it got better. Then went a bit too far, and had to stack springs until I got another one. Hope you have a few extra springs on hand, before shortening them.
Keep us posted - you are sooo close. I am curious to know what your BC weighs.
My MG47EC ('El Cheapo in 7.62x25) is 99% there. Shot it yesterday, got several strings then had a new problem with the TC popping up (first time; easy fix). It should have been rotating bolt instead of straight-blowback - didn't need a gas piston assist. Main problems have been the lightweight BC and M11 springs (too weak). I know this is OT but just thought I'd share. More posted on the "Jr" thread
My BC is modeled after yours almost exactly. I have my spring set up as adjustable the spring tube has a 3/8 nut welded on the back and I have a spacer in there as well as about 1 inch of adj. +/-. at the weakest setting it barely locks up but when locked up and fired it still wont cycle now I didnt remove all spacers etc. and try that. I will wait for the barrel extension and put the Krink booster on there and see what happens it looks like most of you had some type of ext. and or booster on and I only had an AMD style brake on a standard 16" AK barrel.
Also I'm using a 1919a4 spring maybe that's the problem and the spring rate is off. I may need to get an M60 spring and see what happens.
My gas port is at .191.
My port is also .191 which sounds huge, but it's extremely accurate - more accurate than any other AK I own. It's a Chinese chrome lined barrel (small dia breech).
KZ - I'd recommend your lowest spring-tension setting and see what happens. I don't know why a 1919 RS wouldn't work.
Keep us posted - this will get figured out - you didn't come this far for a bolt action beltfed.
KZ
I had a problem with my first MG47 short cycling when the feed cam roller was just a little off to the left side. It would cycle by hand great when you had a hold of the operating lever but would short cycle when firing. The bolt carrier had just enough side play in it to allow it to move sideways and the feed cam would hit the inside of the receiver and bind, causing short cycling. I moved the roller to the right about 1/16" and it cycled fine.
Check that the side of the feed cam is not contacting the receiver when the bolt carrier is pushed to the left.
Coils most of these guys are using M60 springs which operate a 308. I pretty much dismissed The o-rings as soon as i wrote it...
I wonder if metal piston rings would work. The funnel already present in the opening of the gas block would be perfect for progressively compressing piston rings as the piston enters the gas block bore. The chance of finding off the shelf piston rings for the odd ball ~0.550" diameter is slim, though. AR bolt rings are right around half an inch, so wont work.
For recoil springs, I just found that McMaster-Carr has a decent selection of coil springs in various diameters, spring rates, coils per inch, etc. Most are around $5 each, and so perhaps cheaper than adapting a spring from an existing gun pattern (M60, 1919, etc.).
My MG3 Rhinemetal just arrived, alongside a Romy parts kit ($200 for a parts kit?!? I didn't spend that much in the week I backpacked through Romania.) Anyway, I've been playing with the MG3 belt feeding "module" (top cover and tray), and it's an impressive example of Teutonic engineering. I'm ready to merge it with Kalashnikov's finest. Maybe I'll call my build the Eastern Front Fusion.
The MG3 parts look to be designed to feed into a chamber located perhaps two inches forward of the front of the tray. The round is fed forward, out the front of the feed tray, at only a slight downward angle. The factory feed tray slot width doesn't let a round pass through at any point; the round is controlled by the pressure plate and feed tray for the entire forward travel of the round. In contrast, all the builds here modify the feed slot width and pressure plate travel to feed at a steep downward angle.
I'm wondering about the tradeoffs of the two feed angles. The original German design seems to feed the round at a very robust, controlled position. The pressure plate and feed tray maintain control of the round, and precisely position it, for a great distance. The modified feeding angle shortens the distance to the chamber, but also seems to lessen how precisely the round is controlled during its travel.
Has anyone tried mounting the feed tray much further to the rear? Was it ever tried as an evolutionary step in the trial and error process of a build?
With the longer 7.62 x 51 (.308) round, the nose of the bullet just enters the chamber before the base of the cartridge leaves the link. With the shorter 7.63 x 39 round, if you don't move the feedtray and top cover ahead, then there is a point where the round is in mid air, not guided by the bullet nose in the chamber or the cartridge base in the links. The forword positon of the feed tray also puts the nose of the bullet at the same distance from the chamber as it would be if being feed from a stick magazine.
KZ
Check to see that the feed cam roller is exactly on center. On my original MG47 the roller was just slightly of to the left and it would feed fine when you had a hold of the cocking handle but there was just enough side play in the bolt carrrier to allow the feed cam to contact the side of the receiver when cycling during firing causing it to bind and short cycle. I moved the feed cam roller to center and it cycled fine during firing.
I'll check that. I'm also noticing a resistance when charging the gun when ammo is in the que to advance but if there is just one round no resistance so that needs some research as well. I'm going again this weekend so I hope to get it running. If not I won't let it get me down I'll figure it out sooner or later.
KZ
Are you using the stock cartridge depressor spring? It is way too strong. I replaced it with an AR 15 trigger spring. Dvann used the stock spring but clipped off one leg of the spring. Cntrailrider removed the spring completely and installed a set screw on the top cover that would bear against the depressor and limit its travel to just enough to allow the cartridge to pass underneath it. Try pulling an empty belt through the closed cover, it should pull through without much resistance. If it is hard to pull through then the cartridge depressor spring is most likely too strong.
I am using the spring but with one leg cut off. An empty belt will not easily pull through. I believe you may have fixed my problem. Can you get me a pic of how you have an AR spring in there. I tryed contrailrider's method but just couldn't get it to feed. I wonder if I can bend the leg on the spring to lighten it up some or I can just take apart one of my ARs and steal the spring.
Try it with NO spring at all. That's how mine accidently started feeding the first time - I was adjusting everything else and forgot the spring. You should be able to pull an empty belt through with almost no resistance.
Dvann bent the leg of the stock spring and also cut a groove in the cartridge depressor to lighten up the spring. Look at Dvann's post #560 image 4, it shows what he did to the stock spring.
I will send you a picture of the AR spring I used Sunday evening (remind me if I forget). I am leaving for a weekend camping trip right now. Good luck, between my method, Cntrailrider's or Dvann's we will get it working, just needs a little tweeking and advice.
I'm glad to see that this thread is staying active; I was afraid that I'd come too late to the party.
Today I started cutting some tubing into a rough receiver shape, thinking myself so great for harnessing the precision of a milling machine, and quickly realized my folly given the limitations of this standard grade tubing. The tubing dimensions varied by nearly 0.010" within a short piece. I can live with that degree of inaccuracy, but then as soon as my cut removed the integrity of the square cross section, the remaining steel started to spring and warp grossly. Other posts mentioned some distortion, but there must be significant milling stresses left in the tubing. I realize we aren't doing rocket surgery here, but the dimensional accuracy just went from Soviet armory to Afghany cave.
I'll plan to tweak the receiver back into square with some cross braces, but out of frustration I'm tempted to pop for the $10/ foot aircraft grade normalized 4140 stuff.
With the longer 7.62 x 51 (.308) round, the nose of the bullet just enters the
chamber before the base of the cartridge leaves the link. With the shorter
7.63 x 39 round, if you don't move the feedtray and top cover ahead, then
there is a point where the round is in mid air, not guided by the bullet nose
in the chamber or the cartridge base in the links. The forword positon of the
feed tray also puts the nose of the bullet at the same distance from the
chamber as it would be if being feed from a stick magazine.

 SS
No doubt, SS, you and the more veteran builders have far more thinking time into this belt fed design than I do.
As the belted round is being pushed forward, at what point do the TC / tray lose control of the round? Is it when the round clears the link, or when the round travels through/forward of the tray? As best as I can tell from holding the parts in my hand, with a .308 round there is control while it's in the link, then a very short "free" moment when the rim is just ~1/4" forward of the link, then as the round continues forward it is again controlled by a pinch between the pressure plate and tray. The stout pressure plate spring seems to maintain control of the round forward of the link, until the rim is forward (out) of the tray.
With a 7.62x39 round, there is more than an inch of feed tray in front of the link. I'm wondering if that space can be considered controlled travel. I imagine a strong pressure plate spring would be required to positively pinch the round against the tray for that distance.
Cntrailrider, it's amazing that your MG1/3 build functions without a pressure plate spring. Do you think that you had to build up the height of the bolt's feeding nub because the pressure plate, without spring pressure downward, allows the round to float upward slightly?
RANGE REPORT!
Good news, I was able to actually shoot this time, gun is cycling good now about 85%-90%. Had a couple empties jam up and am having some light primer strikes. If I add some weight to the hammer will this increase the impact power of the hammer? It's hitting the primer pretty good just not always firing it. Worse with Wolf ammo but better with some older Russian surplus i have. All in all I'm happy now. I need to clean everything up and get some Duracoat on it. One more note, I did need to make a booster out of an AMD muzzle brake that definitely increased the preasure and the noise. It is much louder than my AK.
Thanks to everyone that helped me just some minor tweaking and it will be 100%
I will post some pics soon
I've been thinking about ignition setups. All the builds so far seem to use a self contained grip / fire control group, be it from an MG42, Cetme, etc., except for SS's FCG tray module. Has anyone tried a standard AK pattern FCG, mounted on pivot pins within the receiver? It would require an extension on the hammer. A 1.5" square bottom receiver tube doesn't give much space under the bolt carrier, but a 1.5x2" or 1.5x2.5" rectangular tube would build in a bit more room.
Or, has anyone thought of a striker fired setup? It would allow the original recoil spring position, plus the additional striker spring could be tuned to give the necessary increased total spring force. I've read descriptions of PKM semi conversions done this way. An UZI grip frame and FCG has a correct orientation to hold and release a striker setup.
There are also issues with doing the build in the ES format. The 90 degree angle steel is rarely EVER perfectly 90 degrees... So, even with that build format, you've got width variations along the length of the receiver as well... Best bet is to try to use some form of brace to keep things as consistent as you possibly can. For mine, I've been using an 18" long piece of 2x4 that has been cut to the proper inside width dimension... Then I wedge it into the receiver to keep it at the proper width.
I think I might soon cut some steel and bolt it into place to help the receiver retain the width. One steel spacer at the rear of the receiver, and another just behind the feed tray location. That should help keep my receiver at the right width.
 That's looking real good. It's great you got it working. What was the final
thing you had to do to get it running?

 SS
It was a couple things, booster and pressure plate adjusted so empty belt would pull through easy. those two things made the diff. It seemed to get better the more rounds I put through it. I'm hoping to get at least 2 belts through this weekend.
I spent more time adjusting the pressure plate than I did on anything else.
Couple problems I had was cycling but once everything was smooth by hand cycling and I could put the BC in the receiver and tilt the recriver forward and the BC would by gravity close and the bolt lock up. I knew that was as smooth as I could get it. Also built a booster which I am going to test the gun without it to see if it will work. Had trouble breaking and bending hammer and trigger pins found that the BC was traveling 1" before hitting and resetting the hammer which i believe was what was doing the damage so I welded a piece on the BC that puts it 1/16" or so from the hammer so it won't slam into it when cycling.
I also used a 1919A4 recoil spring and welded a nut on the end of the spring tube. I have a small spacer in there and then thread a socket head bolt in the back. This gives me 1 1/2" of adjustment on the spring which can be adjusted through a hole in the butstock.
The one thing I noticed and I wonder if you guys have is the barrel gets much hotter than an AK and maybe brcause I have been shooting whole 50rd belts in a short period of time but it seems after 10rds it's hot as hell. Good thing its chrome lined I guess.
Anyways finally got a red dot mounted on it last night and will sight it in this weekend. I'll also post some finished pics and a video if I can figure that out.
That is very nice. Looks good and functions good. There will always be an occasional jam, less of them the more you shoot it. I had that type of jam happen until I lengthened the ejection port a small amount. The spent cartridges were hitting the back of the port and bouncing back in. Look at some of the ejected cartridges and see if there are dents on them. Again, great job on the build and great video.
Capt. V
The new "O" MG3 top cover feed pawl assy is designed to work with disintegrating links but you will have to cut off the drum magazine attachment on the feed tray. The attachment will interfere with the ejecting case if you don't cut it off. The other option is if you look on RTG Roberts, he has some disintegrating link designed to work with a MG1 TC and FT but with either I think you will have to squeeze the links down some in order to grip the 7.62x39 cartridge. I have a few disintegrating links and will try to squeeze them down to see it that can be made to work. CTR built his first one with a MG3 TC and FT I think. He also has access to links and may have already tried that.
1K+ in my first, 2K++ in the x25 EC. No noticable rail wear to date. Rails are 4140 from Aircraft Spruce, angle sections cut from square tubing. Am building my 4th right now, gas-op in x25, one-piece receiver (rect tubing, milled) to avoid weld warpage/bowing problems. If it weren't for rising ammo costs, they'd get shot a lot more. Most of my shooting nowadays is test-fire / working out bugs, down 80% from a couple years back. Somewhere along the way, building became more fun than shooting.
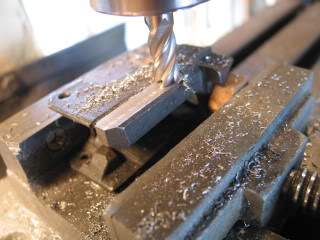
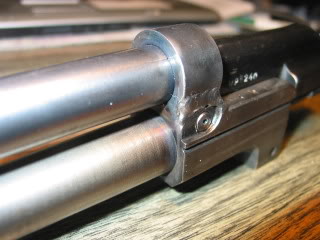
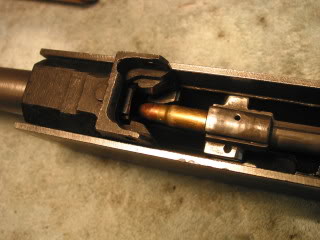
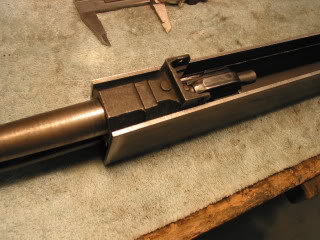
Originally Posted by shoot-n-scoot
Also - i think the receiver materials are ok to be A36, but the rails would be
better in 4130, correct?
I used .065 wall square tubing cut down for my rails, all my materials come from Dillsburg Aeroplane works in PA.
I used the shelf brackets only because the design rules for the MG47ES was to make a belt feed from readily available materials without a mill, lathe or welder. It was not made from the best materials or methods. It works but the rails are most likely just mild steel and soft. 4130/4140 tubing cut down would make much better rails. I believe I will keep the shelf bracket rails and see how long they actually last.
Originally Posted by camosoul77
Could it be case hardened? Not ideal, but at least an improvement.

Still coming up 0 for square tubing that is 4130/4140. Round all day long, but not square.
Try Wicks Aircraft supply, Aircraft spruce or Dillsburg Aero, all have 4130 square and rectangular tubing. Also online metals. Do a google search for 4130 DOM (drawn over mandrel) tubing.
Feeds and shoots great. The second generation one, MG47ES is much easier to build. Requires no milling machine, lathe, or welder. The butt stock and grip can be removed a spade grip can be installed in about 30 seconds. There is also a bullpup version that uses a RPD top cover and feed mechanism. Details of it are on a different thread here on Gunco.
Getting ready to get the metal for the gas tube and have that info. What about the gas holes in the block, just weld shut and smooth up? Also some pics show a sleeve at the front, what size tubing is that?
Cut the gas block off just in front of the gas relief holes. The sleeve that is silver soldered to the gas tube is sized to be a tight fit on the nose of the gas block. The actual size of the sleeve varies depending on what gas block you use, but you should have about 3/8" in length that tightly slides over the gas block. Also most gas blocks are not round on the nose so you will need to file it round as possible to get gas tight fit.
Hey all. I just began my build. The receiver is coming along and I'll have it tapped this evening. Am I going to be OK using Romy AK components and an MG3 top cover, MG3 feed tray? I ordered a linked 50 round belt which sounds like it won't work with MG3 parts? Did I order the wrong stuff? I thought it would look great with the drum attached, but it sounds like that may not work?
What you have should all work together fine. That combination has been used successfully before. The only problem you might have is you may have to make a shell deflector deflect the ejected cased from hitting the drum and bouncing back into the ejection port. I will post a picture of the shell deflector I made for the prototype MG47ES.
Spare Hungarian bolt and carrier, brand spanking new Bren barrel (I felt bad whacking the chamber back with the band saw)
Using only the finest Harbor Freight grinders, yard sale Sawzalls, and my lone precision tool: a 1951 vintage Logan lathe.
The pink gloves belong to the wife, honest.

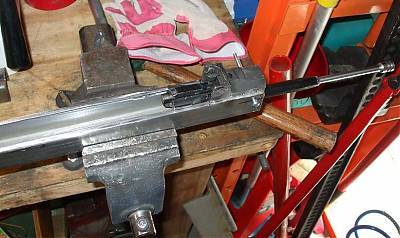
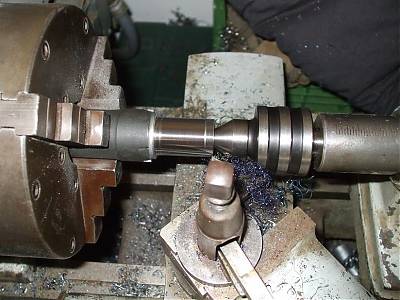
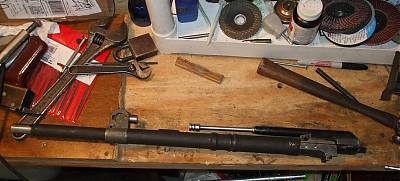
Here is a couple of images of a MG42/53 gripstick modified with a AR15 FCG that should work in a MG47.