Thread: Home Made Tooling for your Lee Enfield.
Retrieved: 06/07/2014
Following up on Bearclaw's request for barrel vise info, I thought I'd start a thread where contributors could put diagrams or pictures of the tools they have made or modified to do some of the work required for their rifles.
I'll kick off here with my barrel vise.
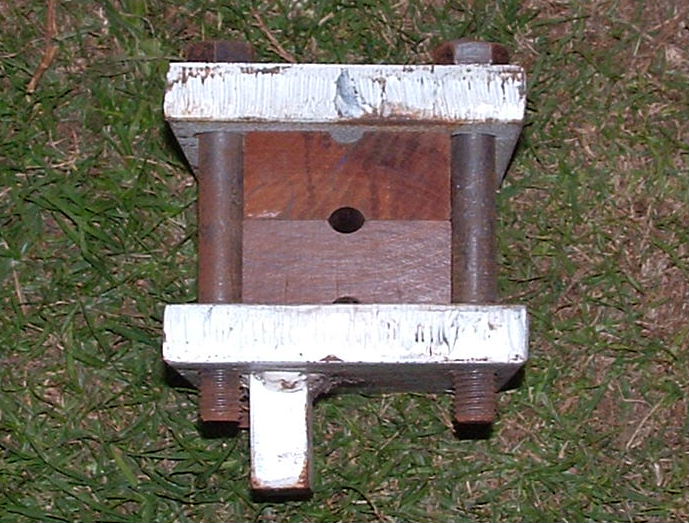
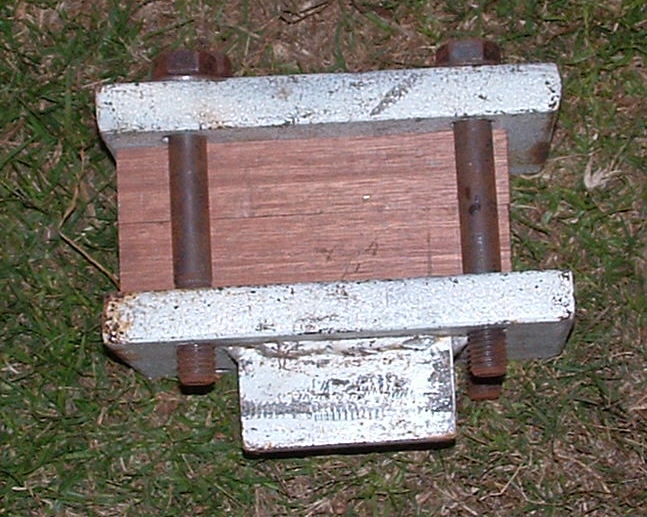
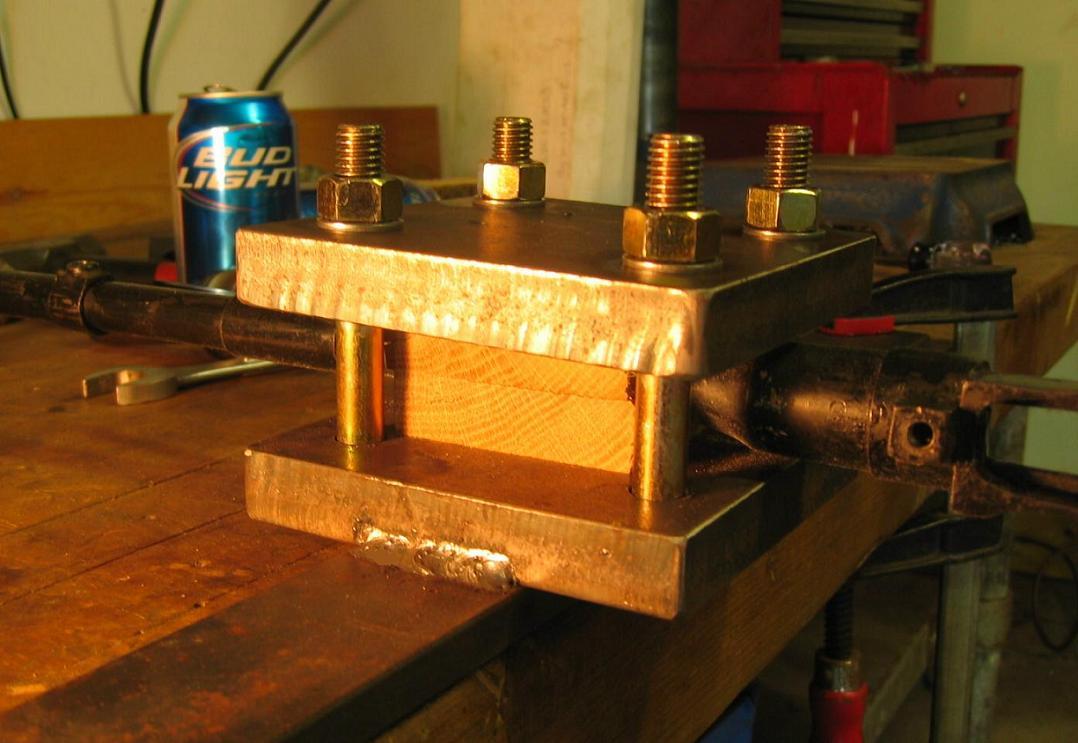
It's a very simple construction, involving 2 pieces of 1" flat bar, six inches wide and about nine inches long.
Together with four 1" grade eight bolts, they form the clamp to hold together two blocks of hardwood which have been routed to form around the diameter of the barrel. The hardwood is cut for both standard and heavy profile barrels.
There is a bit of 1" x 2" flat bar securely welded to the base so the whole thing can be gripped in a large bench vise.
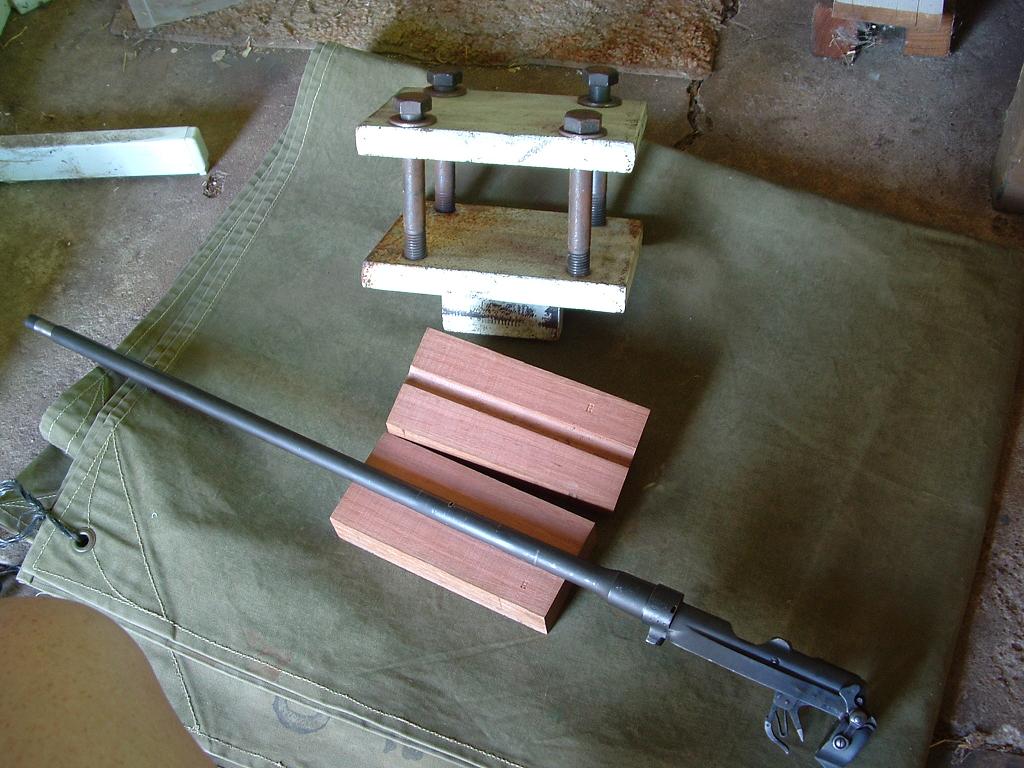
I would advise that the rear sight be removed from the barrel and the barrel pushed into the clamp to just short of the Knox if the action does not unscrew easily (which none do!)
For our US counterparts, your closest thing to Aussie hardwood (in this case seasoned spotted gum) would be high carbon steel... trust me, no tree on your part of the planet is as hard as this, and any may break before the clamp was tight enough.
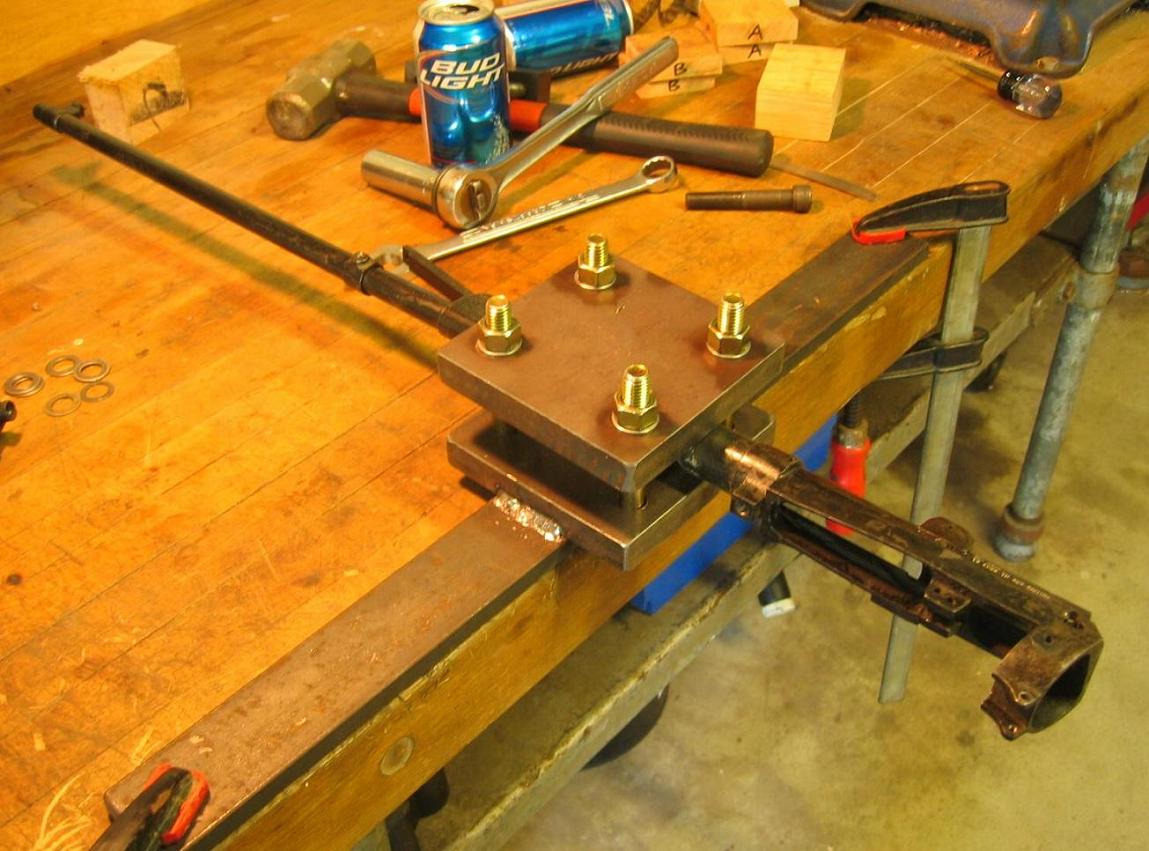
Note in the last pic, you can see my receiver wrench... I'll do another post on it later.

smellie
06-02-2011
What an incredible (and interesting) idea!
We have a timber yard only an hour from here which stocks some pretty hard woods, mostly for cabinet-makers and marquetry, but I don't think they have Australian Spotted Gum. They DO, however, stock GREENHEART (Lignum Vitae), which was used in the old days for ice-sheathing the Sealing schooners out in Newfoundland. I do know that you can take the whole edge off a Sandvik axe with one smack at a 50-year-old slab of half-inch Greenheart. You have to work the stuff like metal, pre-drill your nail holes and all that. Works fine for shaft bearings, too. Is this hard enough?
Son
06-03-2011
As far as the wood goes, try the hardest wood you can find, (something with tight, straight grain, and cut it so the grooves are on the outside and inside of the block if you can understand that - otherwise it will crack around the growth rings) if it breaks it's not difficult to cut two more bits out of something else. Myles - iron bark should be fine. Smellie - your timber sounds like spotted gum's cousin! Probably do a good job too!
Making the blocks...
I started with one piece, about 15 inches long and cut it down to the width between the bolts, and squared it off to uniform thickness. Then using a suitable "ball" router bit, cut a groove in the centre all the way along one face, then did the same to the other, plus opened that side up by widening it by half a mm each edge. By cutting less than half the barrel diameter deep and with a bit of trial and error, (on some scrap timber) this gave me roughly the sizes for No1 barrels one side and No.1 H and No.4 barrels the other. Cut the length in half and stamp the ends to match.
I have removed several very stubborn barrels without any signs of tool marks with this so far. By pulling the bolts down evenly a lot of grip can be got on the barrel. If it still slips, you can put a little rosin into to help grip.
When I go through the receiver wrench details you will see why it isn't a good idea to try to make this any lighter...
Son
06-04-2011
Now it's time to make a receiver wrench.
One thing to remember, the barrel was VFT to start with, and hasn't been disturbed for over sixty years. Anyone who has removed a couple will know what I am saying. The reason for stressing this point - if you don't use a well fitting wrench fitted to the receiver ring, odds are you will damage something. Worst cases - I have seen a receiver with a torque twist in it because someone stuck a pipe wrench (Stillson) on the butt socket. I have seen one with the side walls spread AND torque twisted because someone stuck a bar through the action at the mag well and tried unscrewing it. The most common one would be the metal vise marks on the receiver ring and the pipe wrench marks on the barrel Knox.
The idea of a form tool is so it does not put any crush across the receiver ring which can act to hold the barrel tighter.
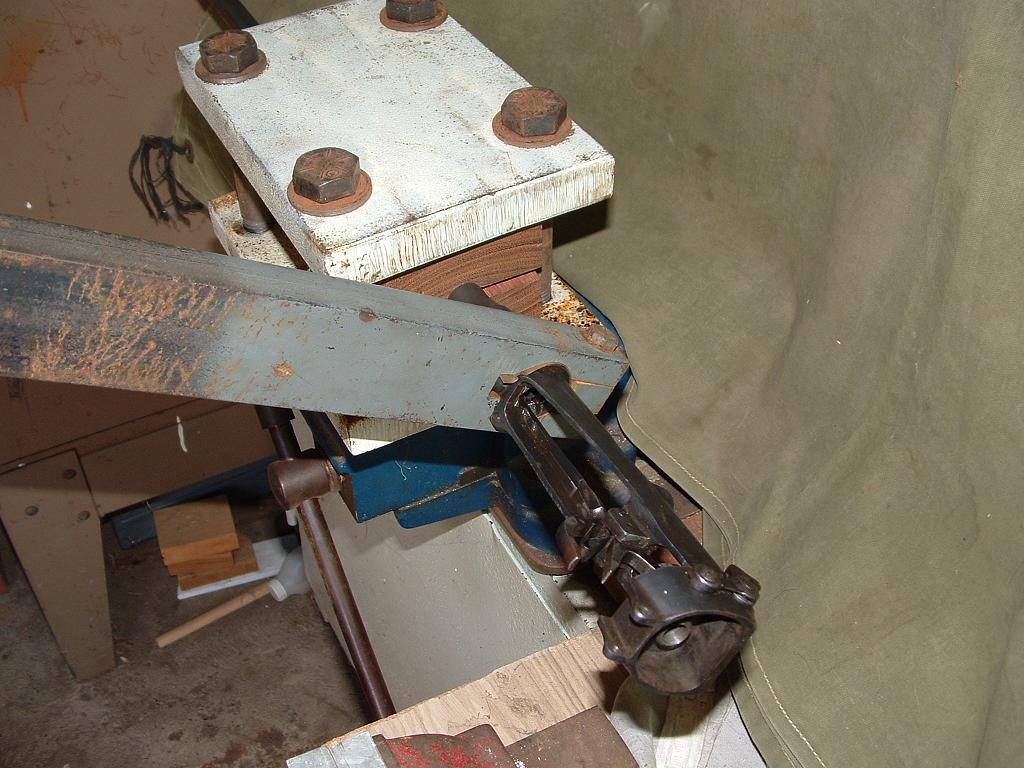
Here's a pic of what you will end up with.
Here's the instructions for making it.
Instructions For receiver wrench
Material - 2"x1" (or 3/4") flat bar. (mine is 14" long)
Paint surface and edges, (easier to see scribed lines)
Mark centre line down front face
Measure 1-3/4" down from top and centre punch.
Measure down 7/8" from above point and centre punch.
Mark centre line on edge, measure down 1/2" and centre punch.
On face, drill top hole 1-5/16" NOTE if not available, scribe a circle 1 5/16" and drill 1-1/4" (will have to be filed out to scribed circle later)
On face, drill lower hole 1/2" if possible: may run into big hole.
On edge, drill through 5/16". Re-drill 7/16" to depth of 1 7/16".
If large hole is 1 1/4" file or use metal burr to open to scribed line, taking care to keep edges square to face.
Hacksaw and file down from big hole to 1/2" hole, squaring bottom so the joined holes are 1-3/4" from top to bottom, 17/32" wide at the narrow end. Round out corners where holes join.
(NOTE; There is a slight difference in the No.1 and No.4 receivers where the front trigger guard screw lug joins the receiver ring. To fit both rifles, just test them both and remove the minimum amount of metal from the wrench to allow it to fit.)
Make 2 hacksaw cuts down into top of big hole, 9/16" in from each side of bar. Remove centre and file/grind 1/16" off each cut side
Tap the 5/16" end of the transverse hole to 3/8 UNC, tapping from other end, thru the clearance hole to help alignment.
A piece of brass shim should fit around the receiver ring, inside wrench, to prevent damage.
The cut out end allows fitting over barrel without removing sights, slide up onto muzzle ring, check position of brass shim, and re-fit cut out piece with a 2"x 3/8" UNC high tensile bolt and tighten.
If not locked up on receiver, add another brass shim or file/grind more off cut out piece to allow sides to close further.
Grip barrel in clamp/vise with wrench parallel ground, check you are going in the right direction and HIT THE BASTARD with something.
Here's a pic or two of it and the vise in action. I have had to use a three pound ball pein hammer and several full blooded swings on occasion to loosen a barrel. If the wrench isn't a good fit it can damage the receiver. If the barrel isn't into the vise to the knox, you can bend the barrel.
The brass shim may leave a smudge on the receiver which rubs off with some oil.
If the barrel turns in the vise, tighten it up some more.
jmoore
06-04-2011
Originally Posted by Son
If the barrel turns in the vise, tighten it up some more.
You CAN get it too tight, BTW, if your barrel vice jaws are metal. Squeezed an SMLE bore down enough to see the constriction on one occasion! It ended up becoming a 7.62x39 barrel that will strangely throw wild shots, but is otherwise "AK accurate".
tbonesmith
06-12-2011
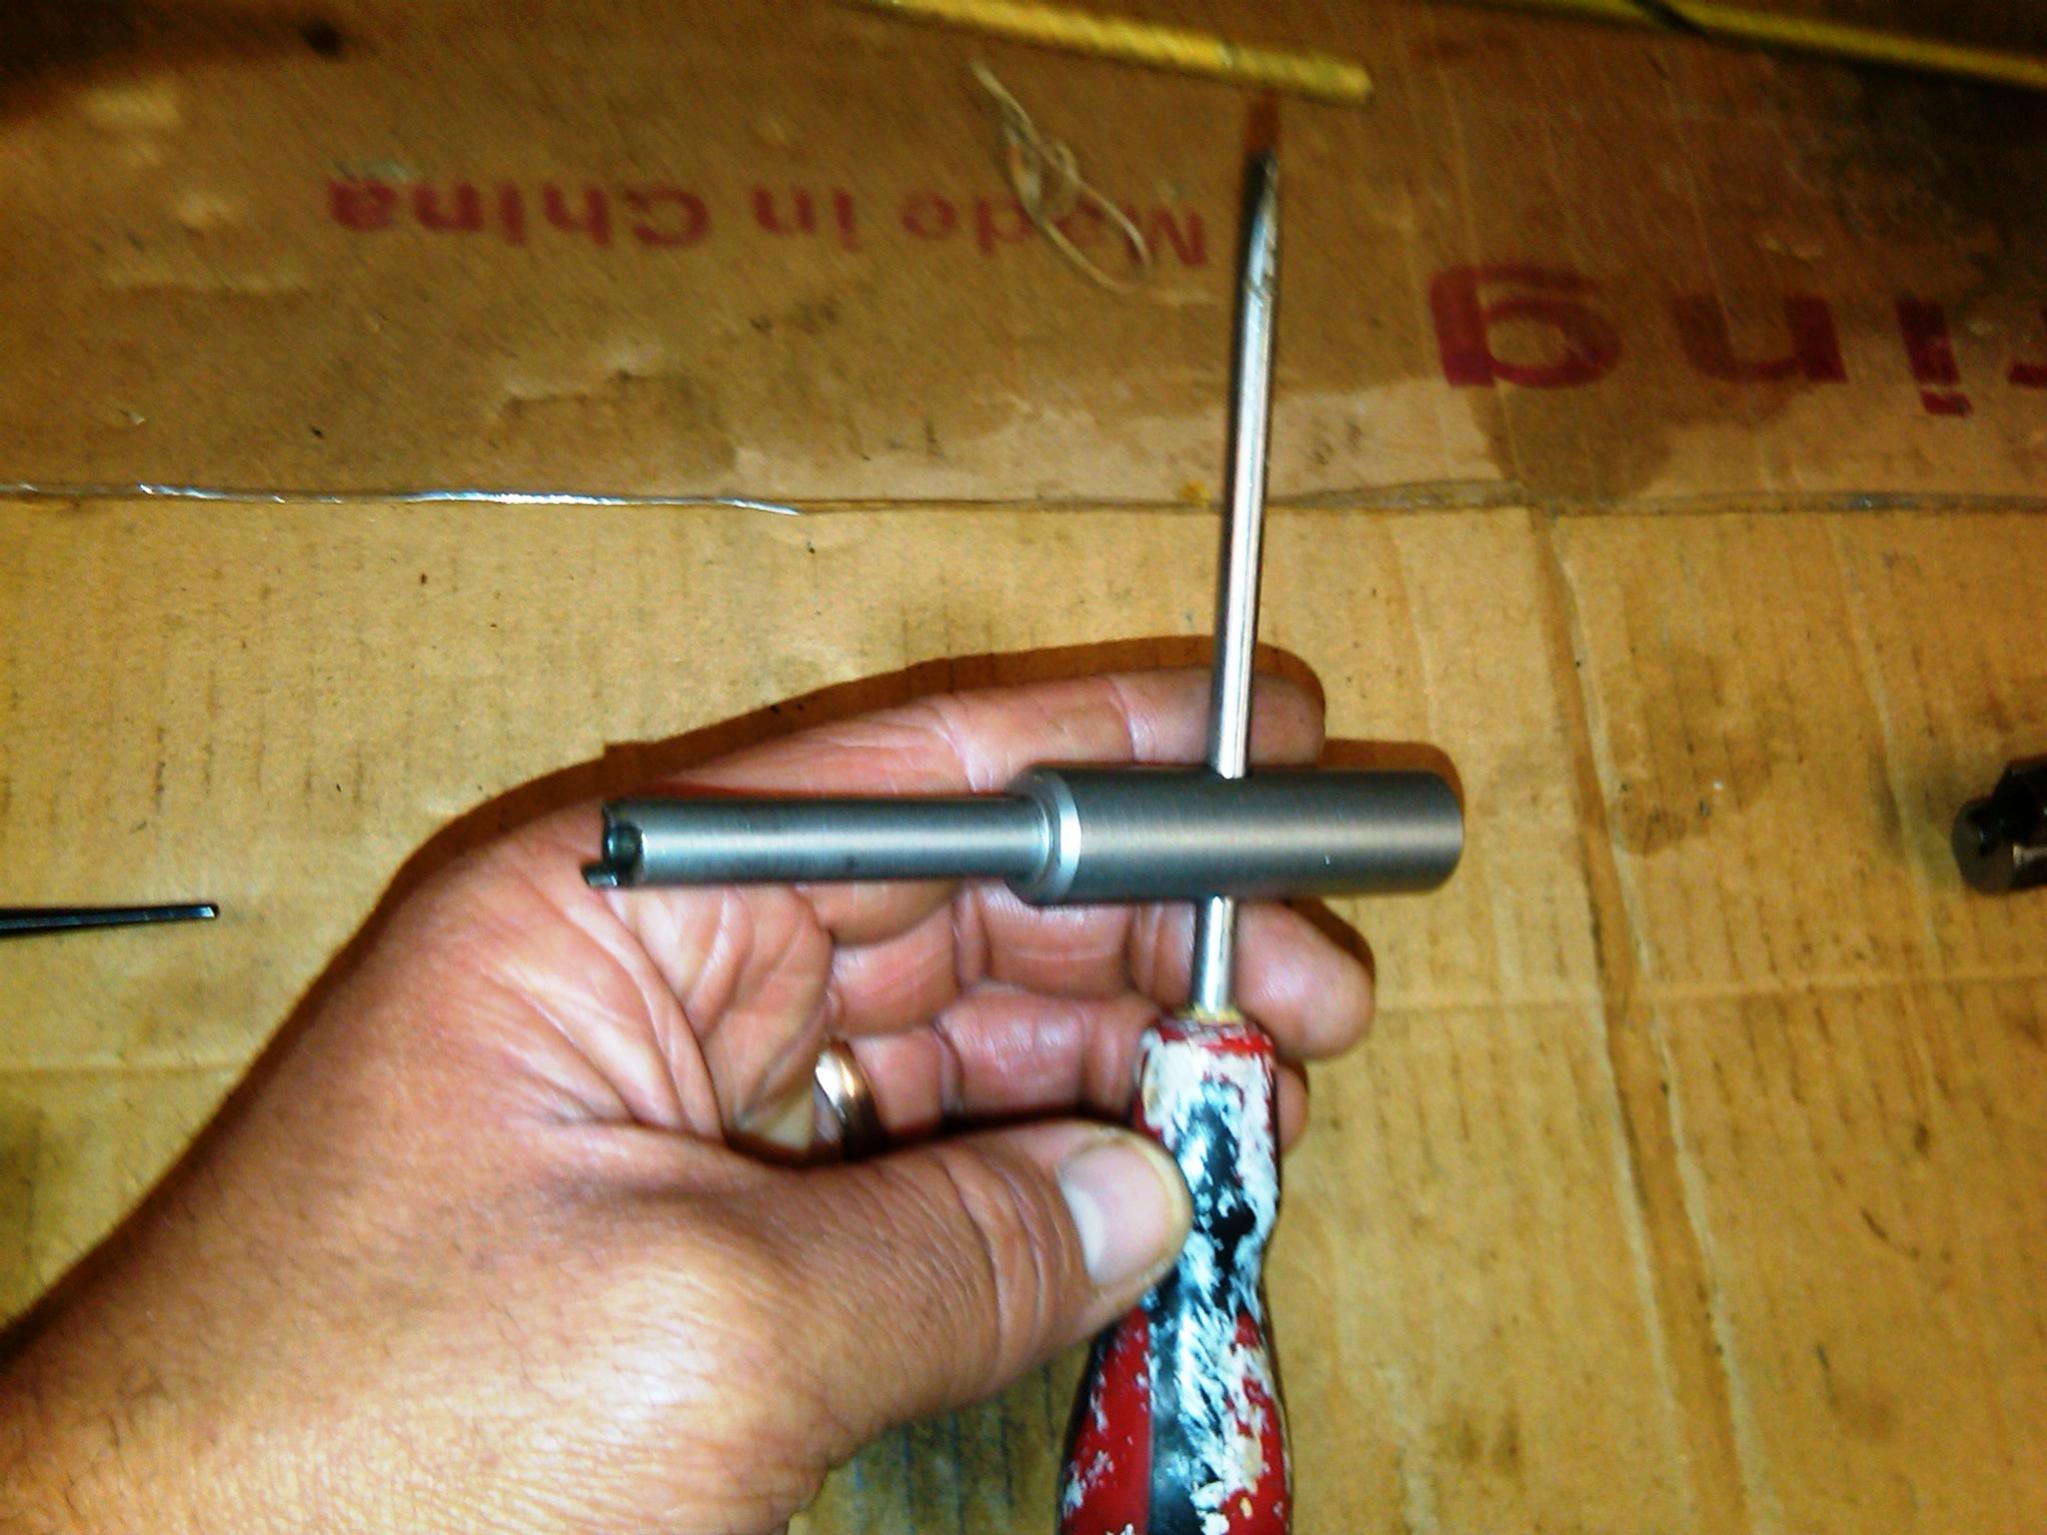
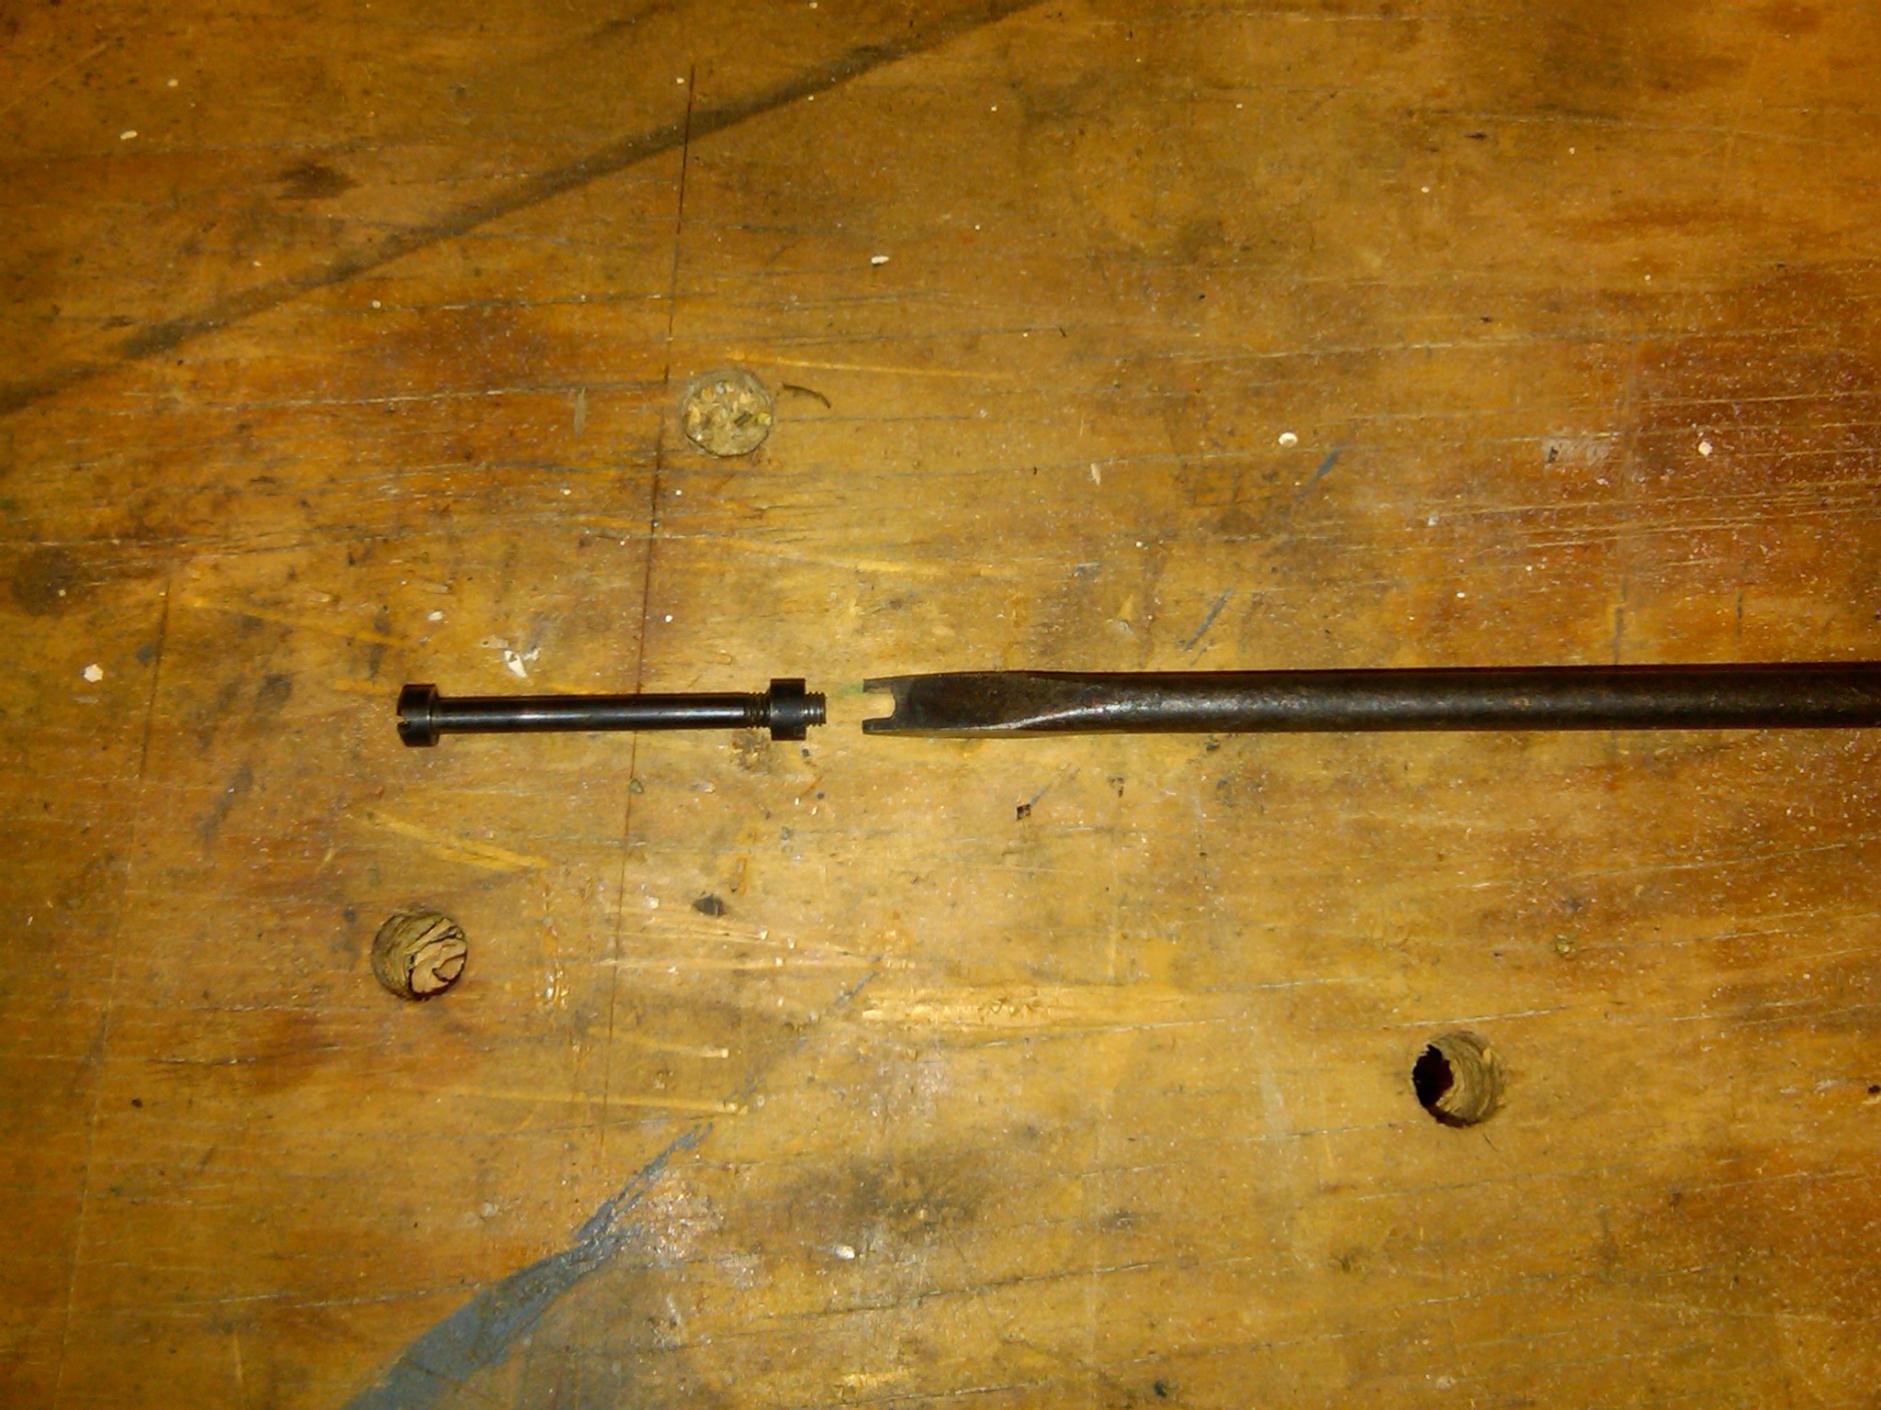
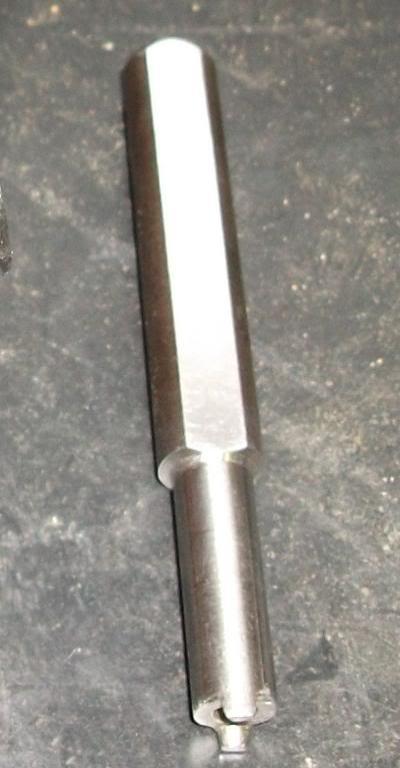
Striker removal/install tool
This was the first tool I made on my lathe when I got it a couple of years ago. It's made of 304 stainless steel (some threaded rod offcuts) and I've used it heaps, and on some really tight ones and it's stood up really well. It's a close fit, but I havn't come across a striker it won't go into yet.
I bead blasted it when I was done.
tbonesmith
06-24-2011
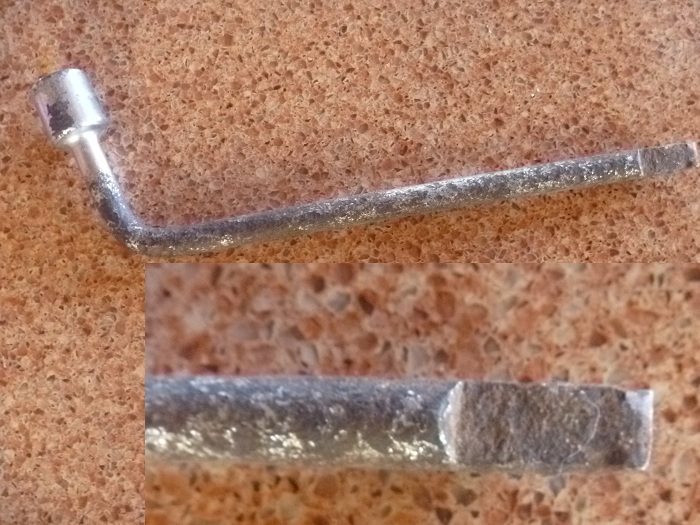
No.4 Mk2 forend crossbolt tool
Simple but essential.
Peter Laidler
06-25-2011
One day when I'm in the mood, I'll draw-up/sketch a breeching-up clamp and wrench that we used that would slide on and off the action and barrel very quickly, without having to unscrew anything. It also incorporated a 17 degree underurn mark that we could use to initially hand tighten. Being quick to remove, it was simple to slip it off or move it round a tad, go over to the breeching up sheet, do the rock test and back to do the final adjustments, back to the breeching up sheet... No rock on the sheet, inspectors check, tick the work sheet and that was it. Slide the barrel wrench off, body clamp and that was it. All done.
Peter Laidler
06-26-2011
Be warned anyone out there who is contemplating making their own breeching and unbreeching kit that you can sooooooooo easily crush the front trigger guard threaded spigot and thread unless you make sure that the body clamp if fully clear of it. Once you put the unbreeching load on it instead of the shoulders and it's crushed, that's it, body is finished.
I've even seen one with a scxrew inserted into the hole to protect the thread. It was so tight after the botched unbreeching that it was impossible to even remove the slave screw. So just be advised.
Can I also suggest that you make sure that the lever part, whether it's the barrel or body clamp, that you make sure it is TWO handled to spread the load and balance.
Every major Base workshop had a couple of breeching up kits, usually made on site (the official kits relegated to some dark and dusty store...) but they always followed a very similar pattern, based on years and years of experience.
Oh yes, just one other thing too... The body and barrel clamps must be 1" wide to spread the torque loading and prevent damage when you get a REALLY tight basxxxd.
Old Lancer
07-09-2011
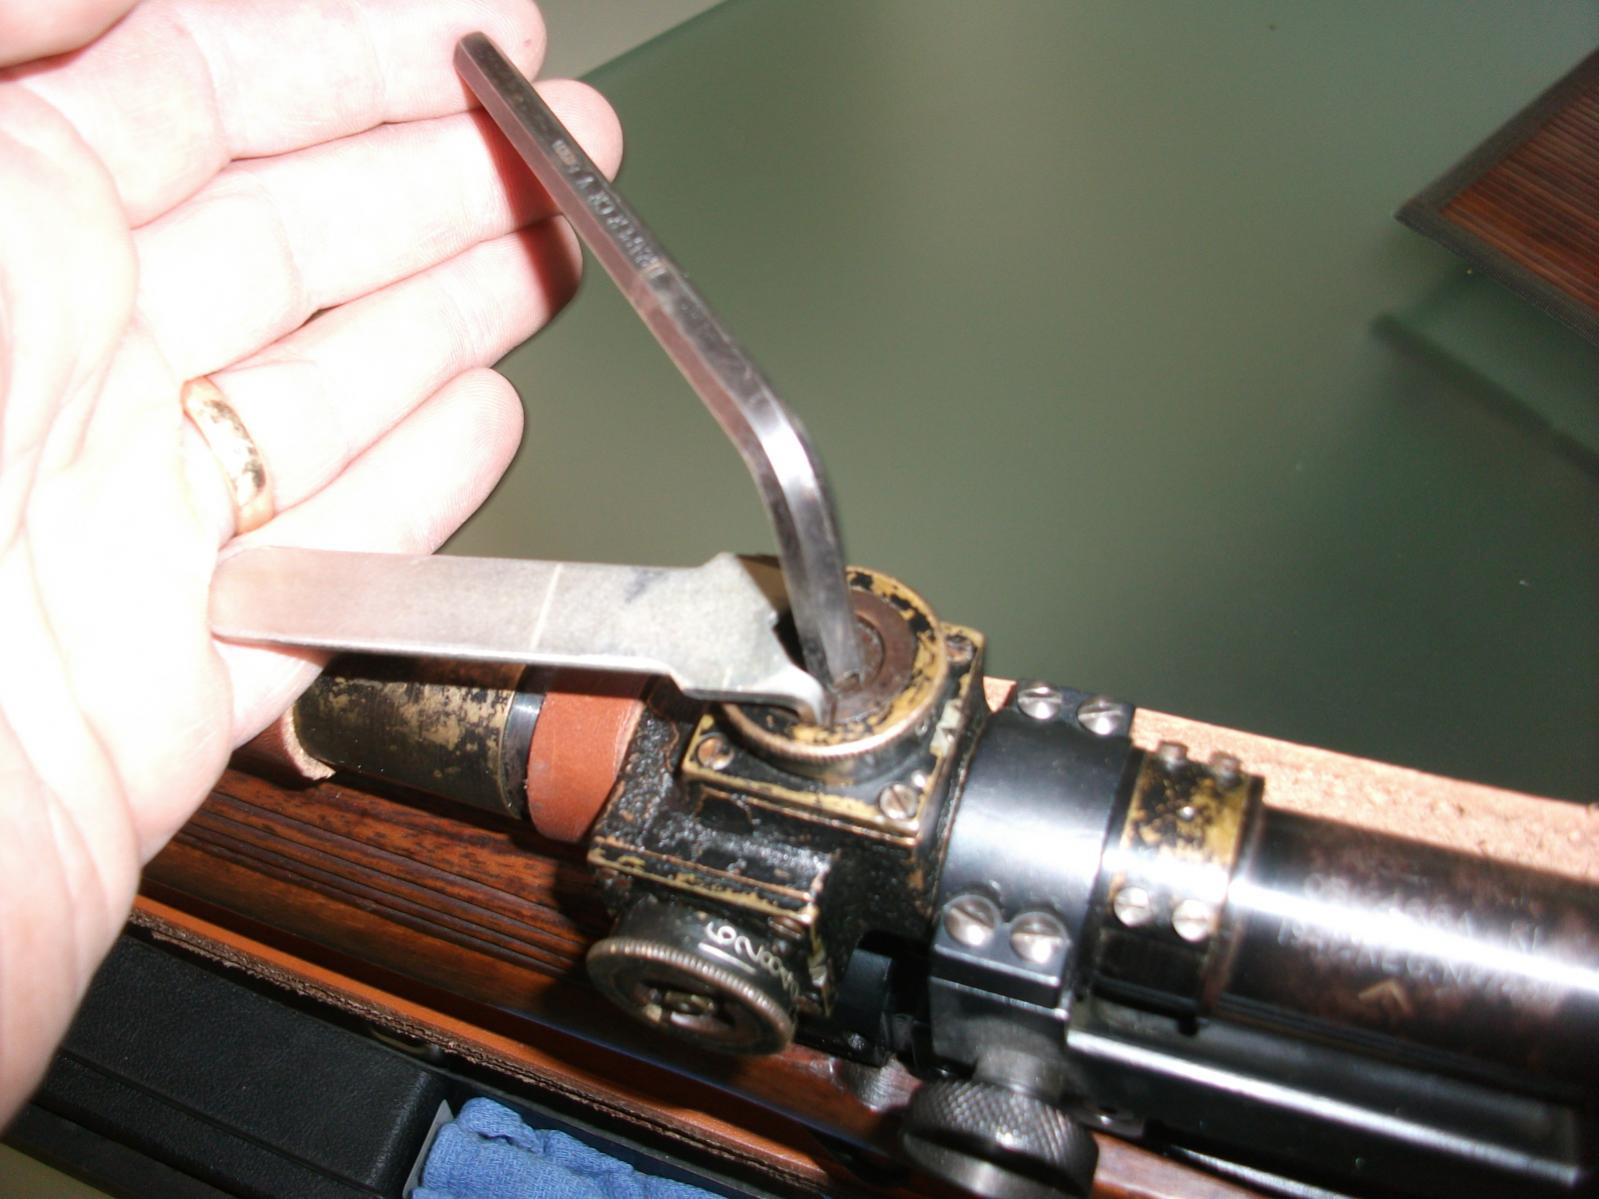
No 32 scope tools
Made the Allen key lead screw wrench as per Capt Laidler's instructions and made the lockring spanner from a pressed steel throwaway found in an IKEA flatpack, used a bench grinder to get it to the right dimentions then bent it to 90' in a vice. Works brilliantly.
See my range report in my thread "WOT I GOT FOR MY BIRTHDAY"
jmoore
07-09-2011
If you set the clamping pressure just right you won't need the spanner for range work, just the modded Allen wrench. You can hold the turret in place with your fingers. A little less fiddle-y. But to get to that point the spanner surely IS useful!
Peter Laidler
07-09-2011
In my limited experience with these things, JM is dead right... If you are a sniper advancing, carrying out a bit of sniping, harrying and covert intelligence gathering ahead of the main force advancing into Antwerp in 1944 then you'll need to clamp up the lead screw locking nuts like there's no tomorrow. But for us mere mortals on the ranges, so long as they are nipped up sufficient that when you turn the drum, the lead screw is locked to it and turns at the same time, then that is tight enough. Get that... JUST nipped up. Not Jumbo Jet wheel nut tight but just nipped up.
That way you can zero in at, say, 300 yards and when it's bang on, just hold the leadscrew with the modified allen key and swing the drum back to 3.
That's only my experience. Others might have other experiences.
muffett.2008
10-27-2011
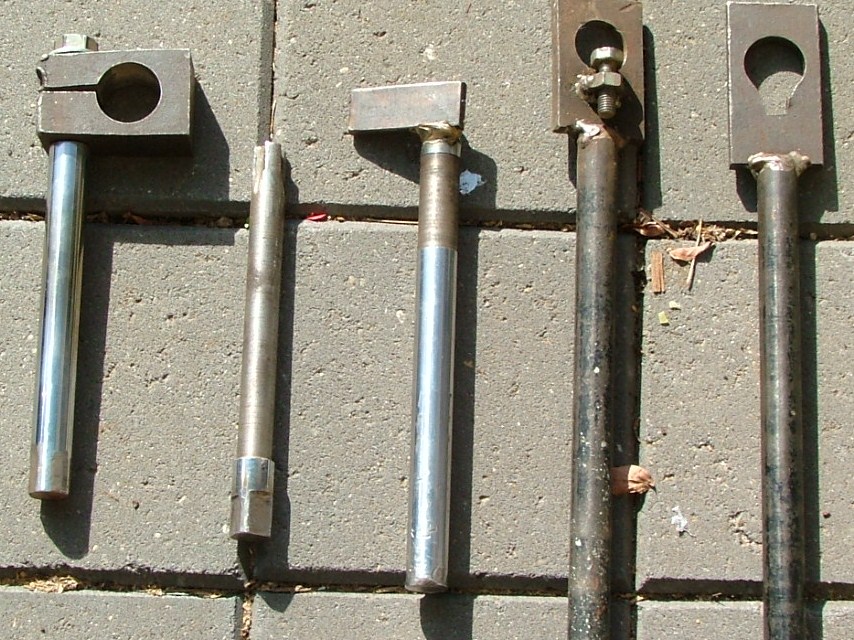
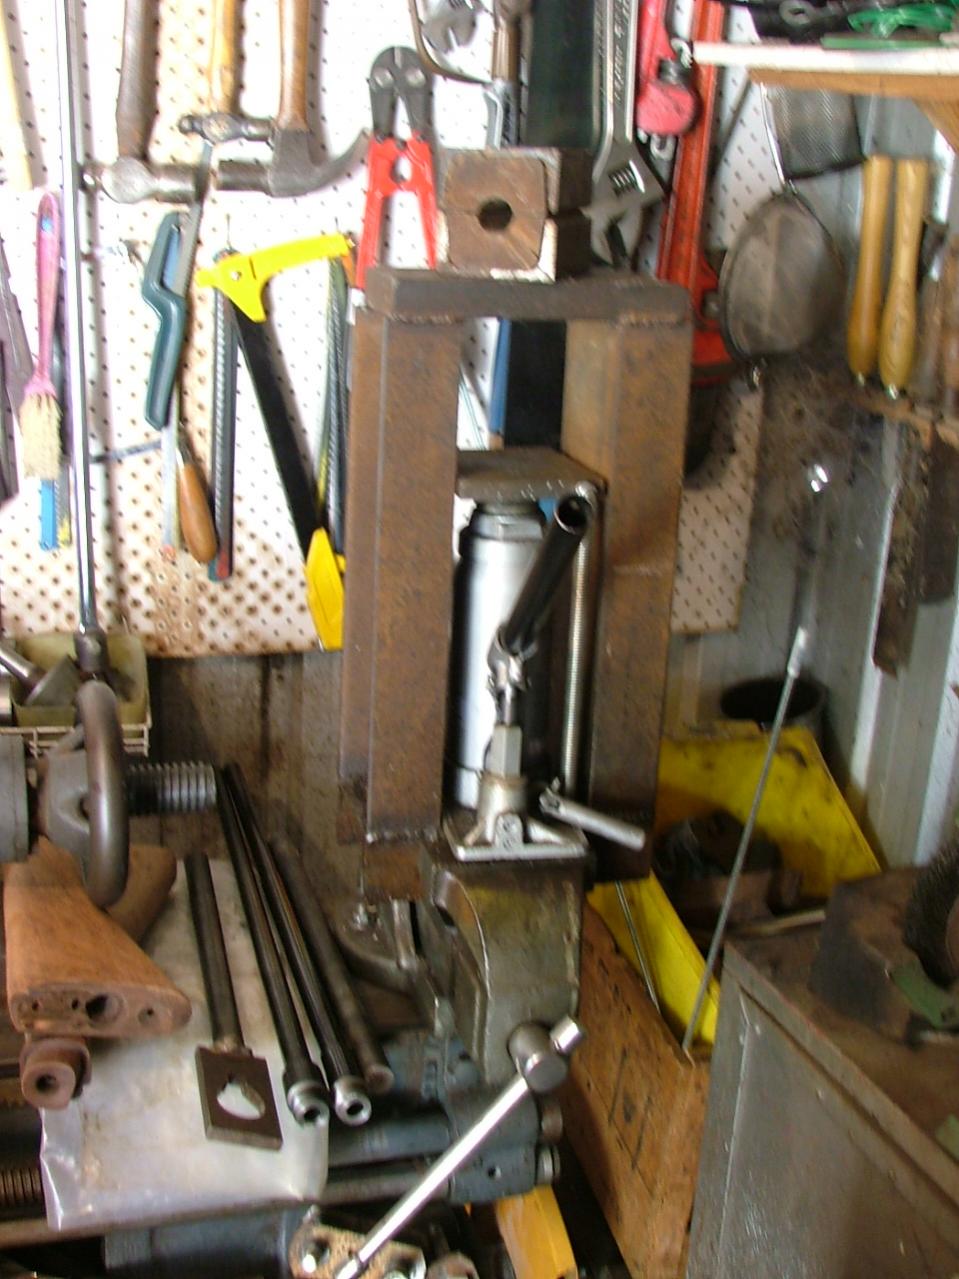
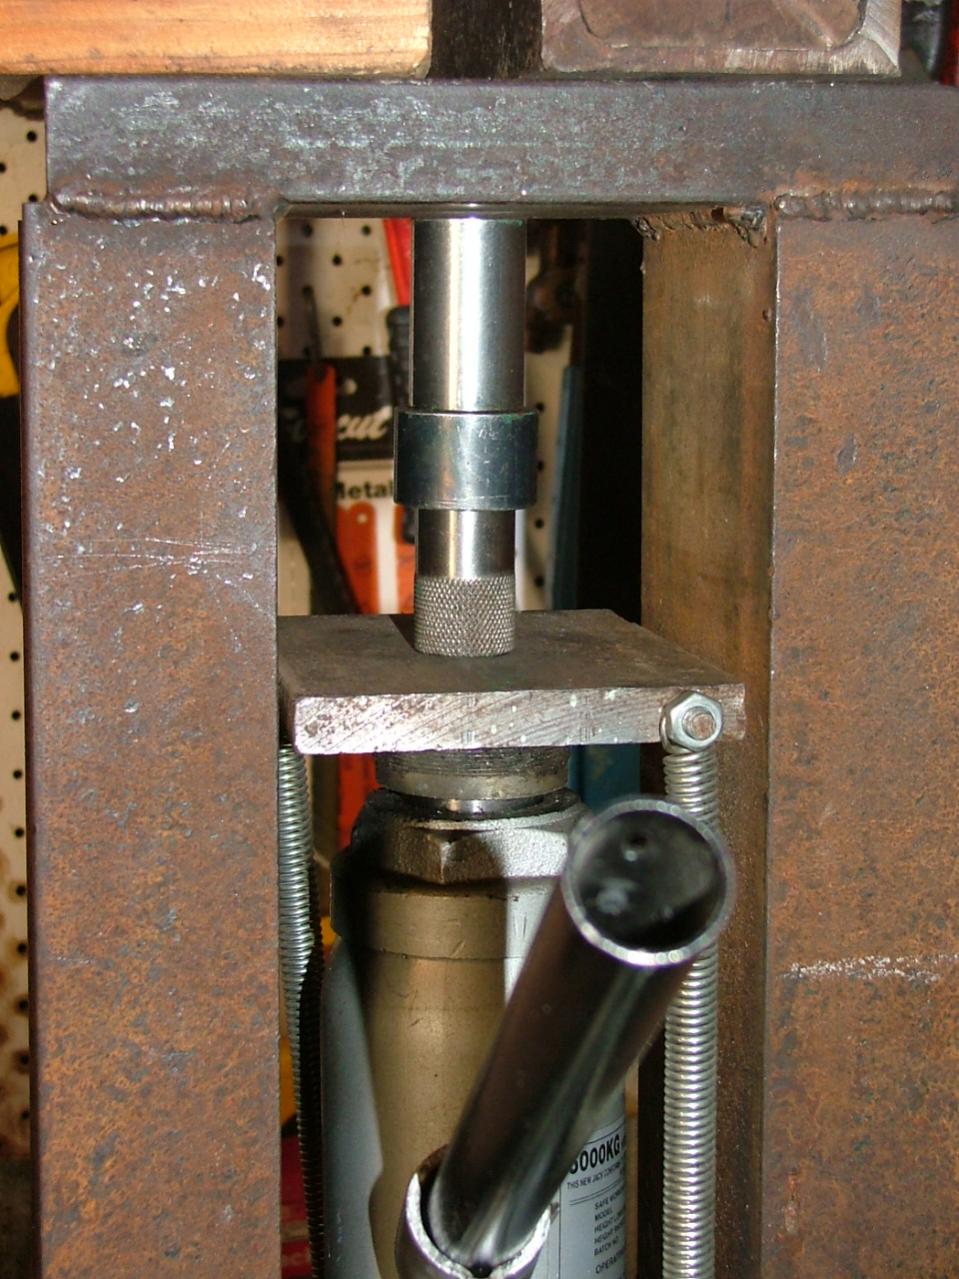
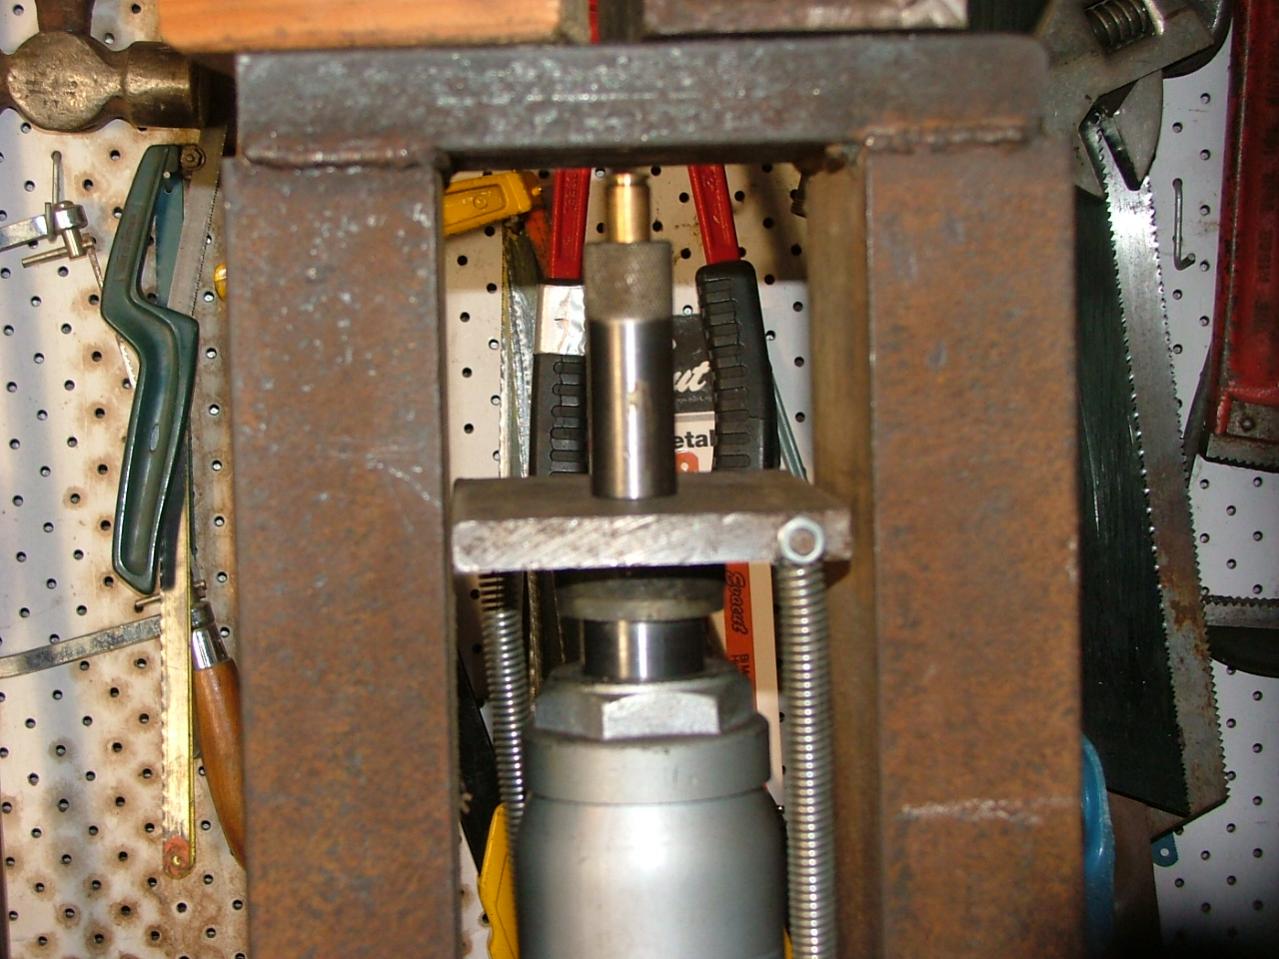
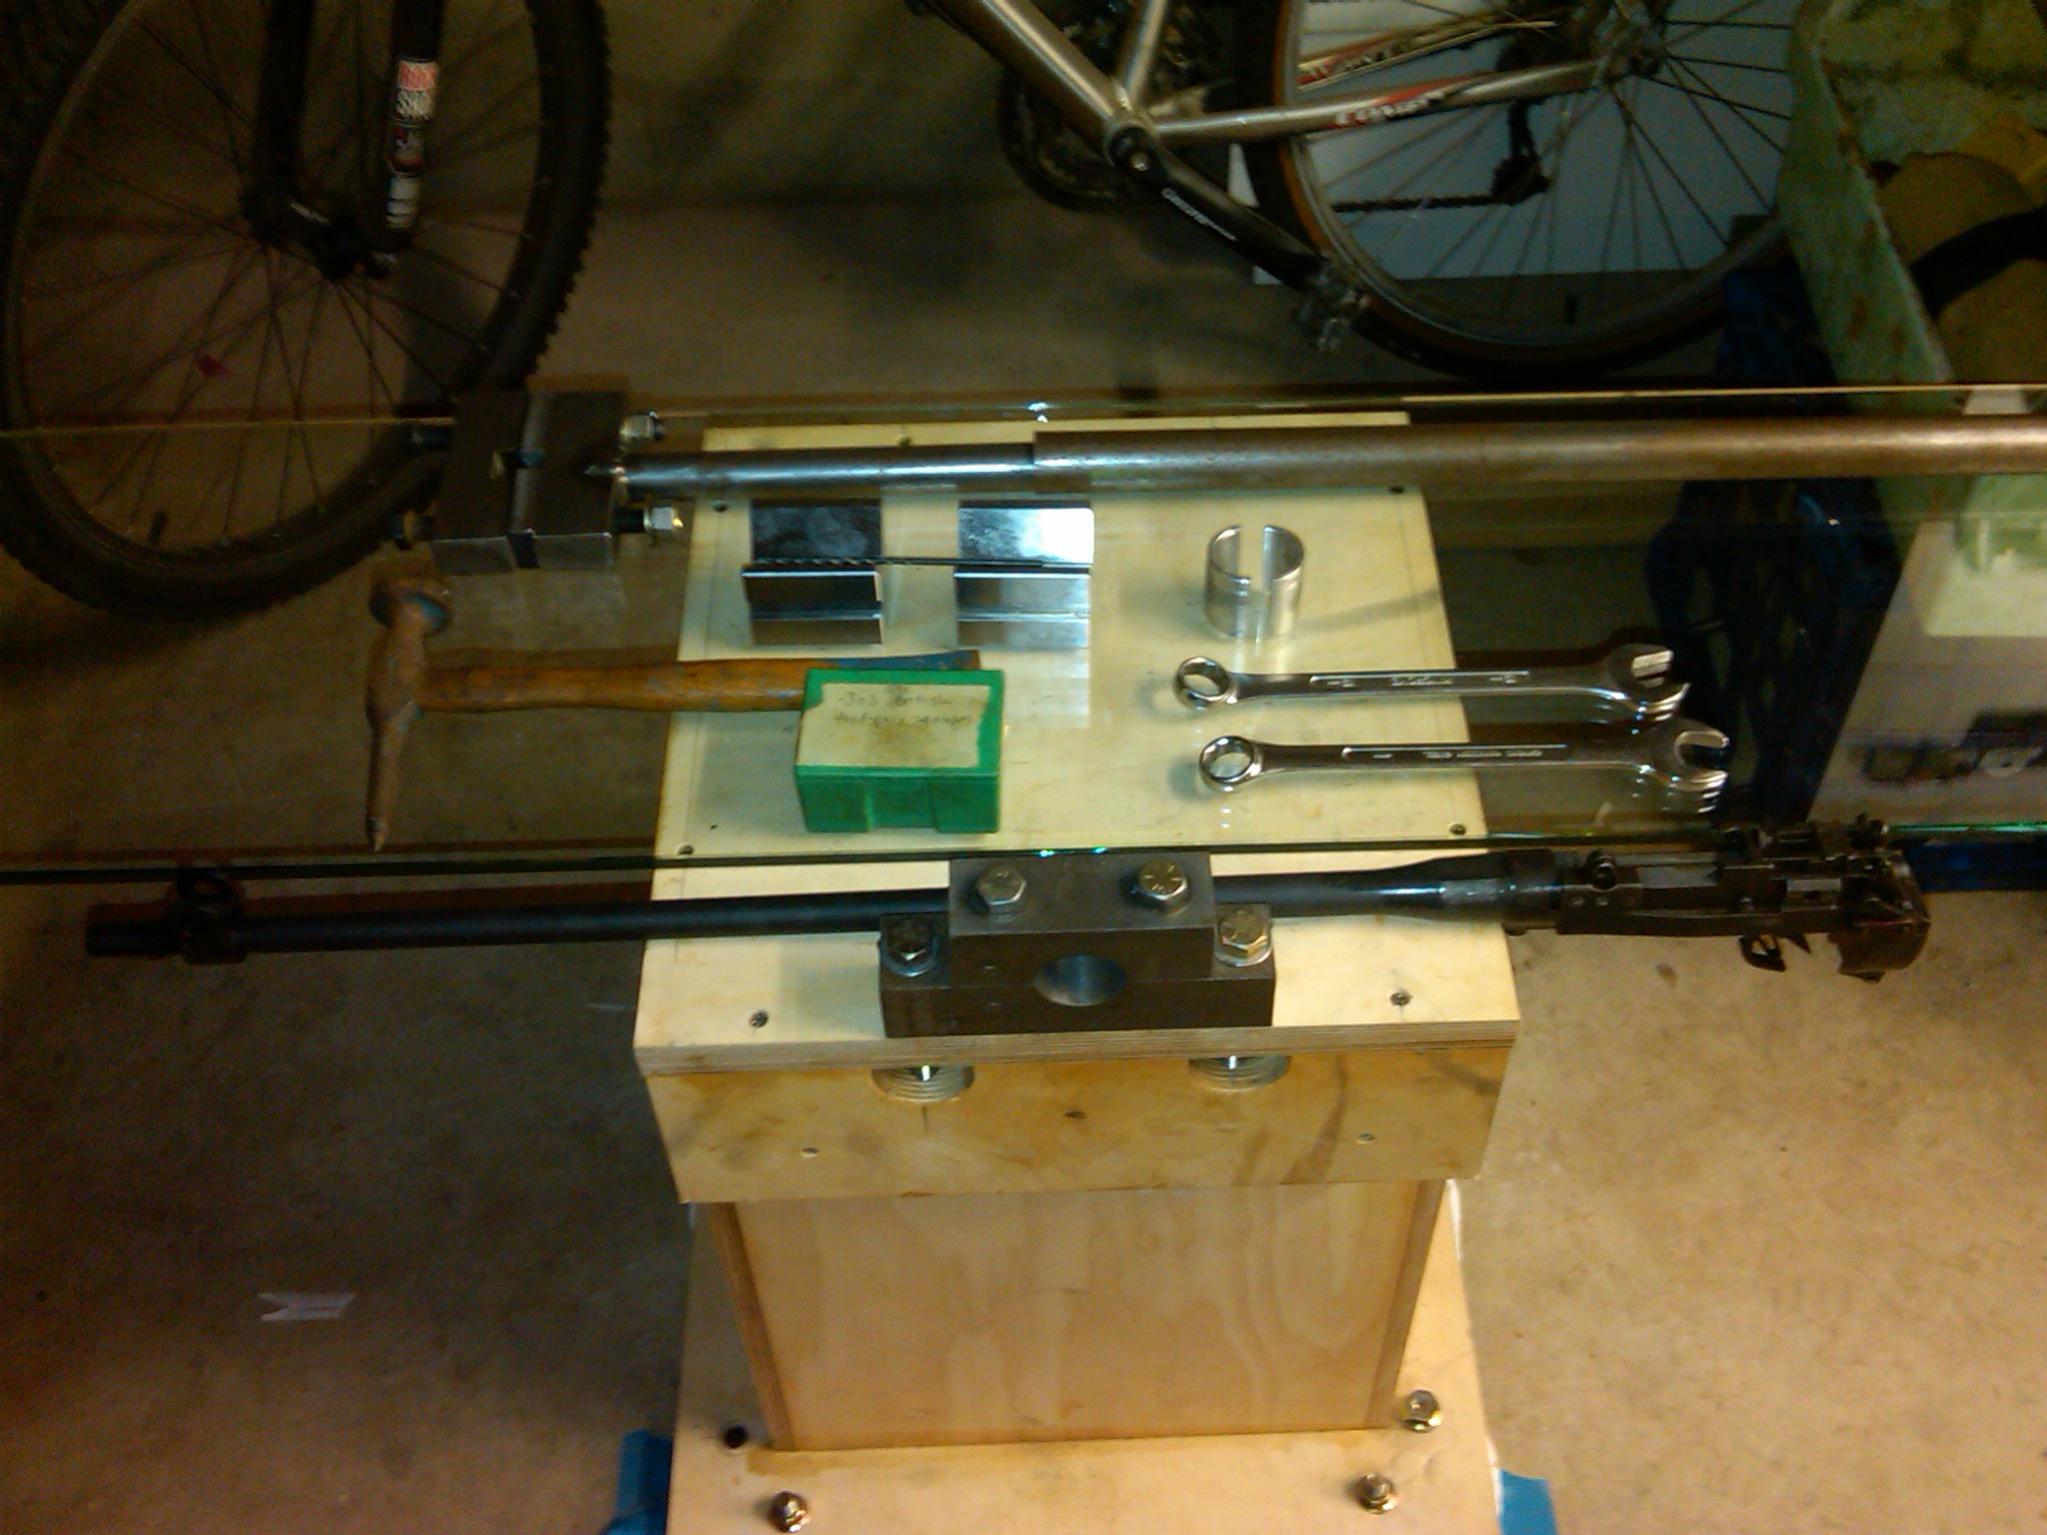
Just a few of the bits I use.
1st. receiver clamp, 2nd. Omark barrel tool, 3rd mauser receiver wrench 4th. smle barrel wrench, 5th. enfield receiver wrench. 2nd pic. barrel vise/case former/ full lenght resizer.
I use a 10 ton jack, saves dicking around tightening bolts and swearing if the barrel slips, a barrel block is sitting on top of the press.
I have finally got a computer set up to post photo's. This one will not be getting the same security program that the others have, so if you buggers virus it, I will be rather peeved.
Beezer
1-26-2012
Originally Posted by tbonesmith
This was the first tool I made on my lathe when I got it a couple of years
ago. It's made of 304 stainless steel (some threaded rod offcuts) and I've
used it heaps, and on some really tight ones and it's stood up really well.
It's a close fit, but I havn't come across a striker it won't go into
yet.
I bead blasted it when I was done.
I have been wanting to make one of those striker removal tools but haven't been able to find any dimensions for it. Do you happen to have any drawings for your's that you would be able to share?
I have searched around but haven't been able to find any drawings for them.
HOOKED ON HISTORY
01-27-2012
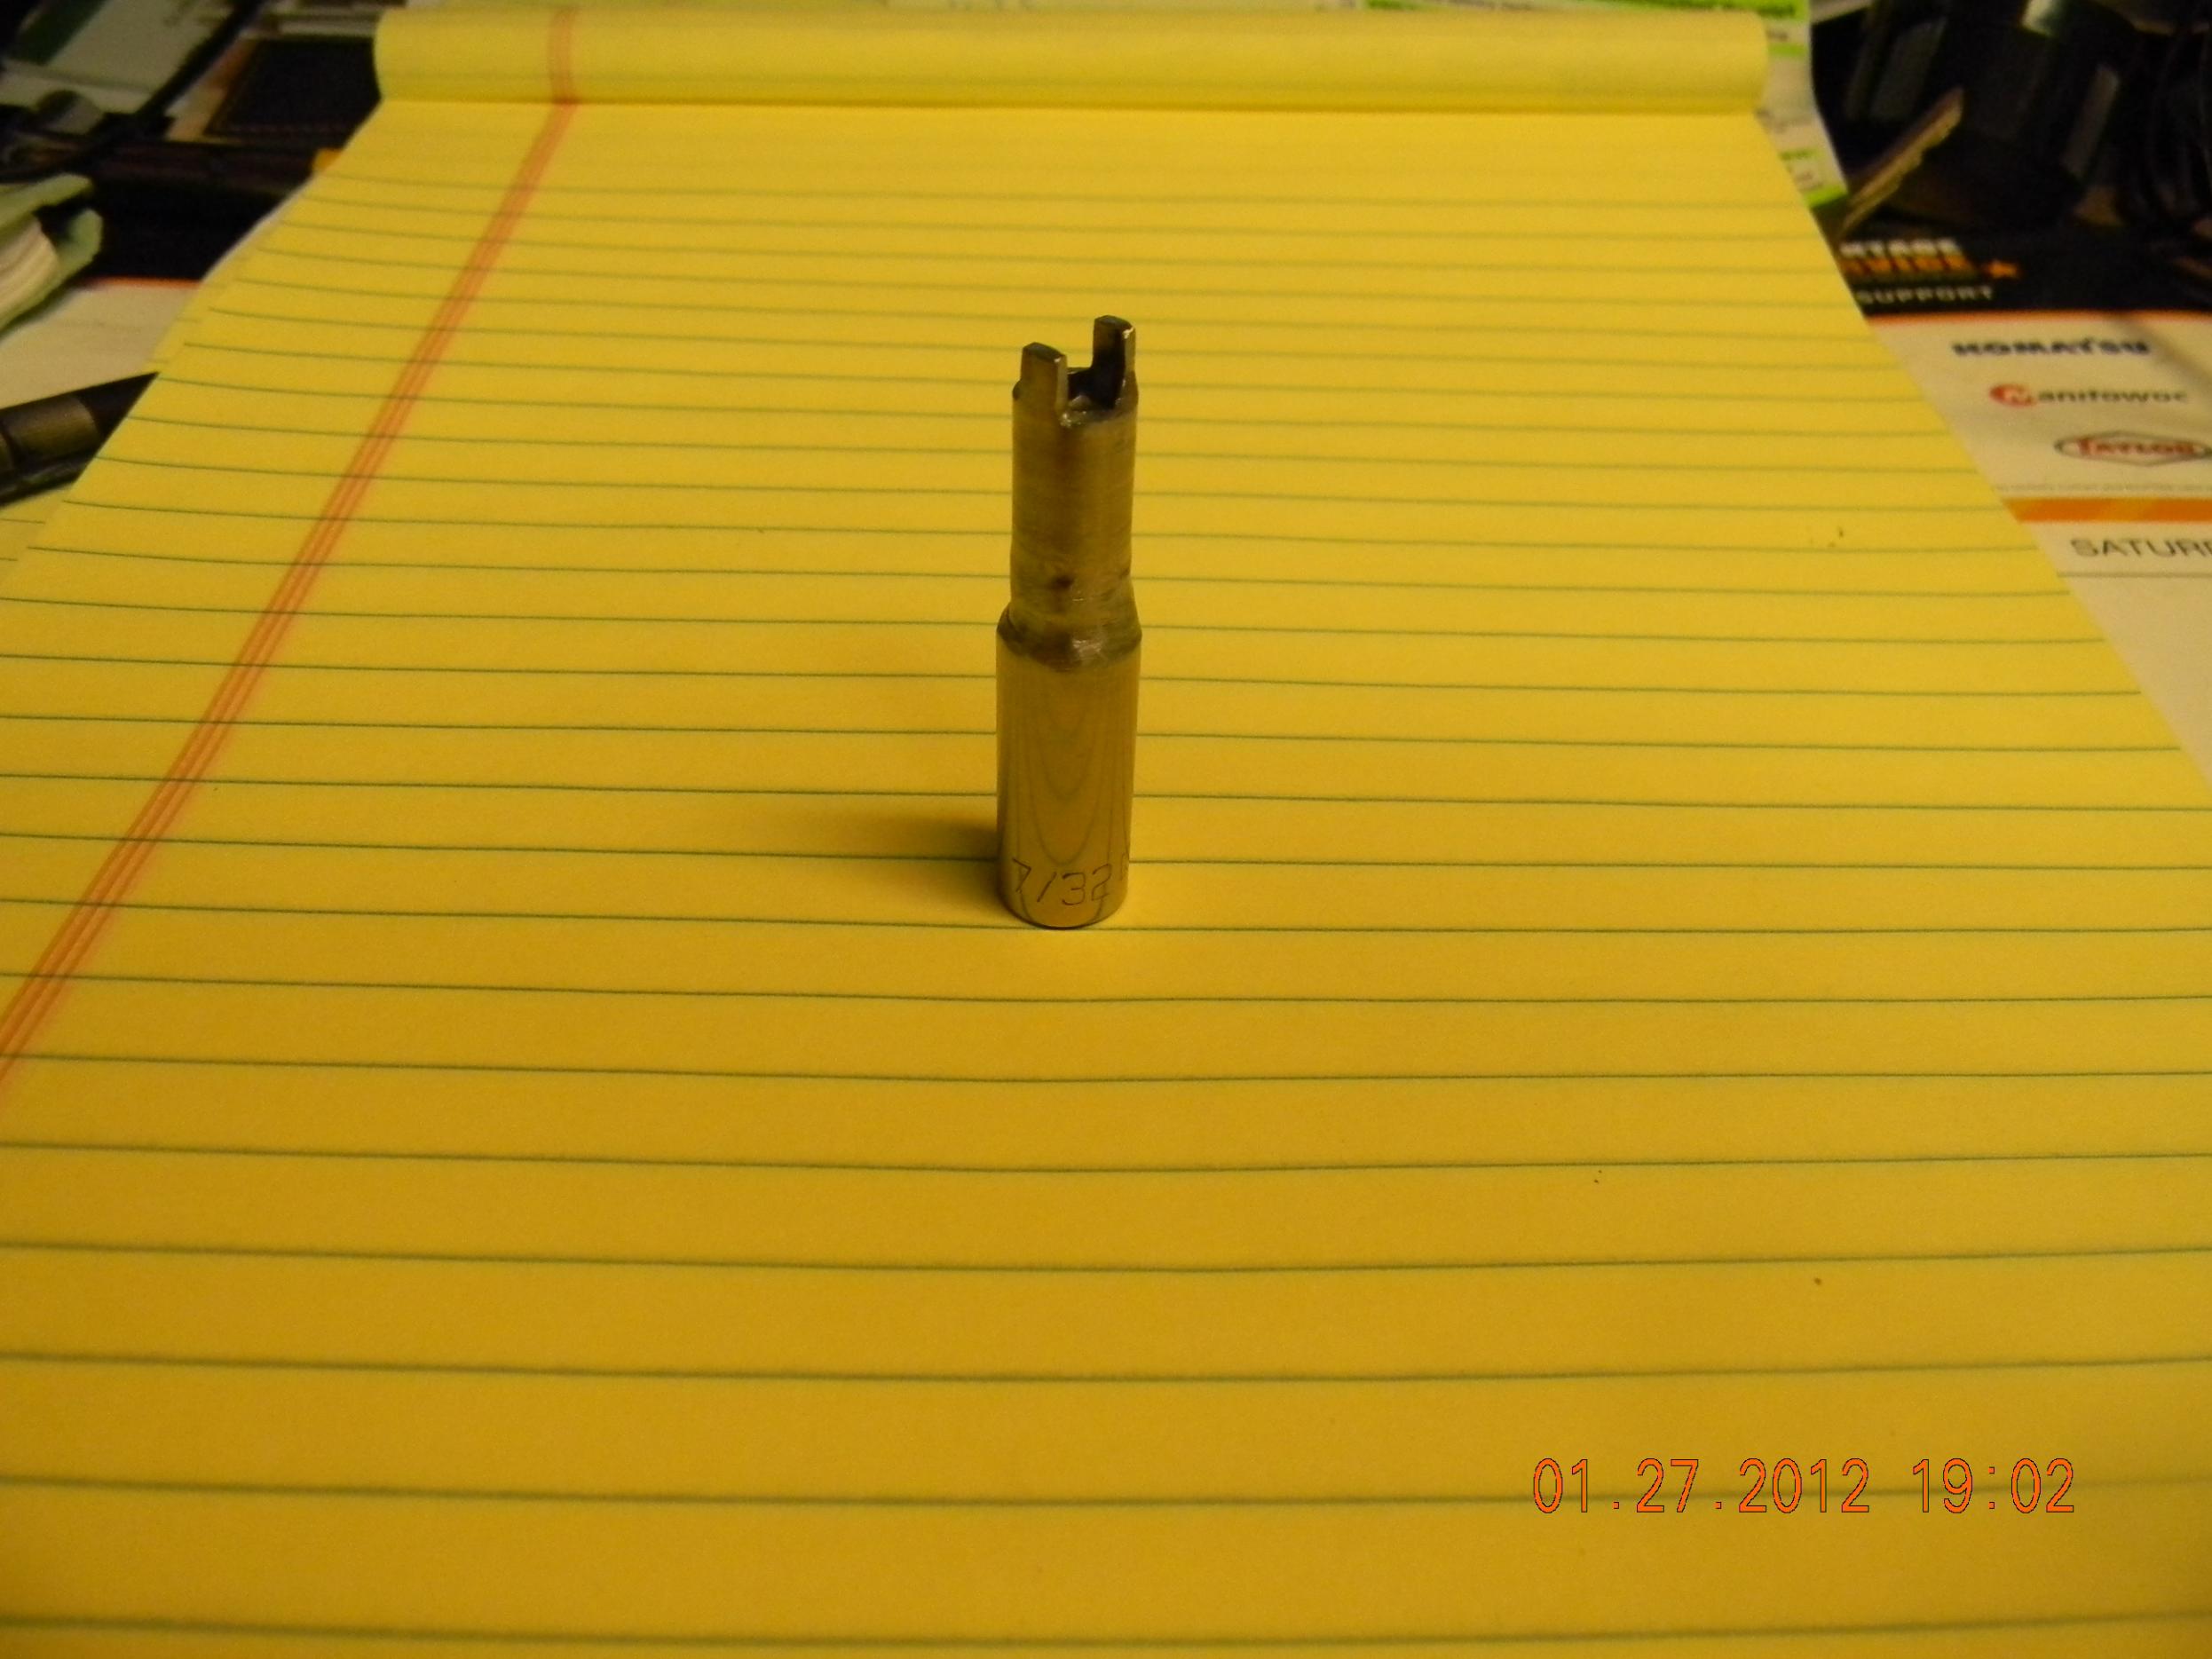
My first tool.
Pretty basic but it works well. Bolt disassembly tool SMLE made from a 7/32 1/4 inch drive socket.
sakorick
01-28-2012
I made a "special tool" for tightening or removing the butt stock retention screw... don't laugh, it works like a champ.
Surpmil
01-29-2012
No, I don't think you're wasting your time. If you can cut out the wrench and a stack of inserts on a wire EDM machine you'll be away to the races, as they say.
Of course if you have access to EDM, you could cut some proper jaws to grip the Nock's form. Made to true dimenions, they could then be slit into two lengthwise and the two halves fitted into a suitable "hollow square" vise block with a massive compression screw. It is the proper place to grip barrels and the greater diameter gives greater mechanical advantage and no chance of twisting barrels, which can happen with the SMLE barrels especially.
Some rosin on wood blocks would help them grip by the way.
tbonesmith
06-10-2012
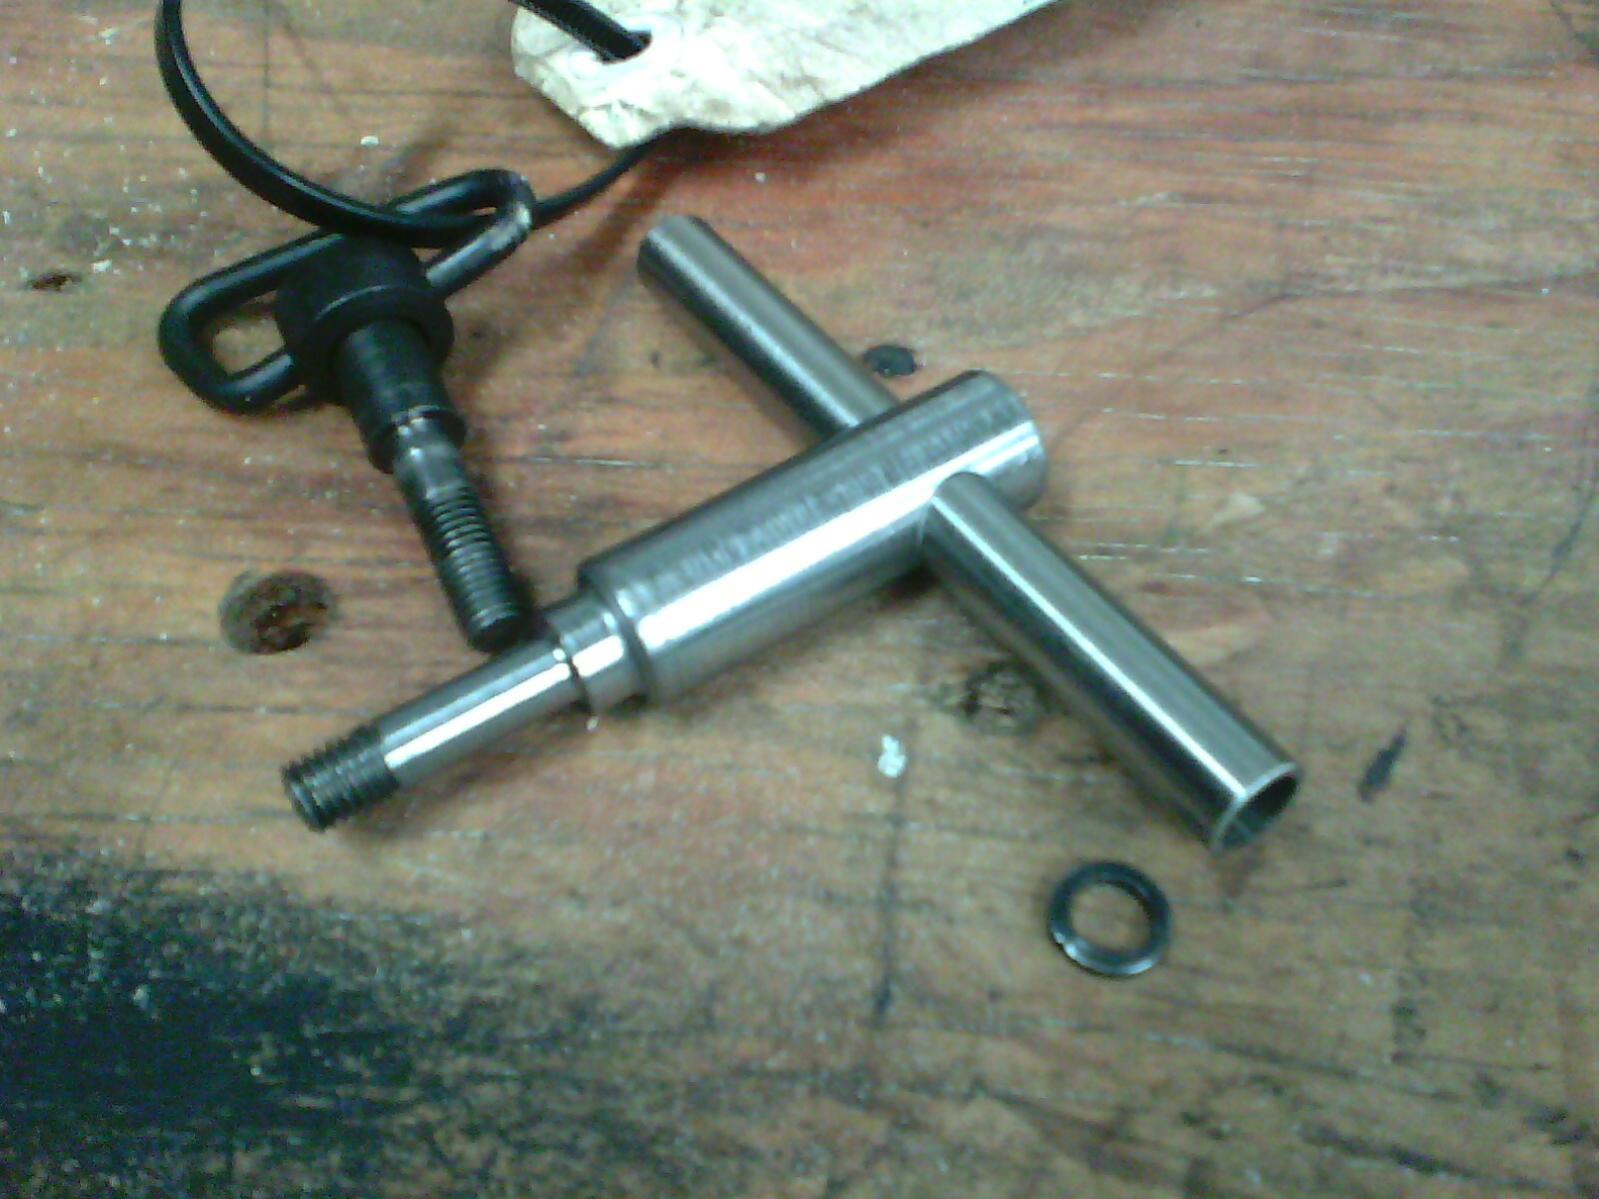
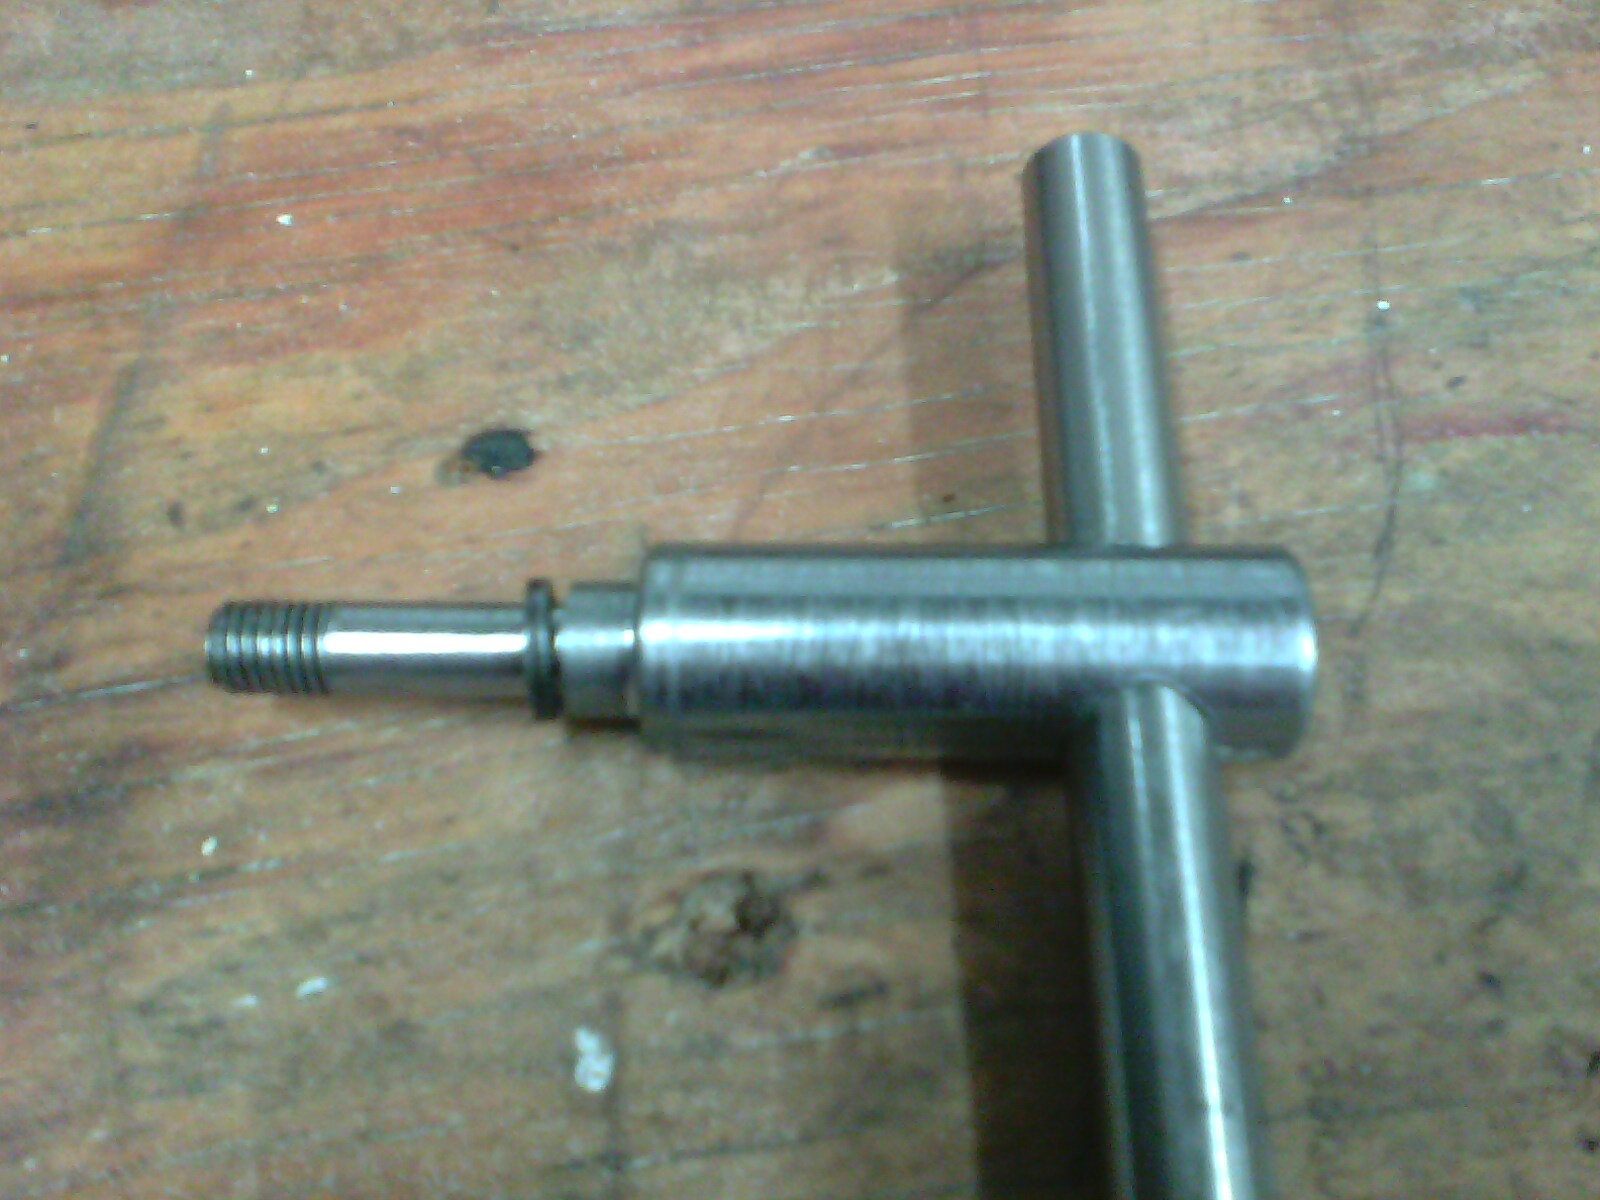
Front trigger guard screw wrench
Every time I stock up a No.4 I have to put the front trigger guard screw in and out about 100 times. And after that long I inevitably wish I had one of these (and often bruise the screw head!).
So tonight I turned one up, a 1/4 BSF on a shank with a handle. I tested it out and I might mothball this one and make another with a very slightly longer shank before the handle.
All good fun and should make work easier on these beasts.
I intend making one similar but on a knurled short shank for the rear trigger guard screw, but I'll have to cut that with a die as I can't single point cut BA threads.
ptf18
06-10-2012
TBone: Yes indeed a very good idea. Now if you could produce something simalar that could be used to install the actual screw that would encapuslate the head and thus prevent the screw head slot from getting damaged... you sir might make a pretty penny!
tbonesmith
06-10-2012
It's no problem with a properly fitting slot head screw driver, doing it up
very tight, many, many times just increases the odds of a slip or something.
tbonesmith
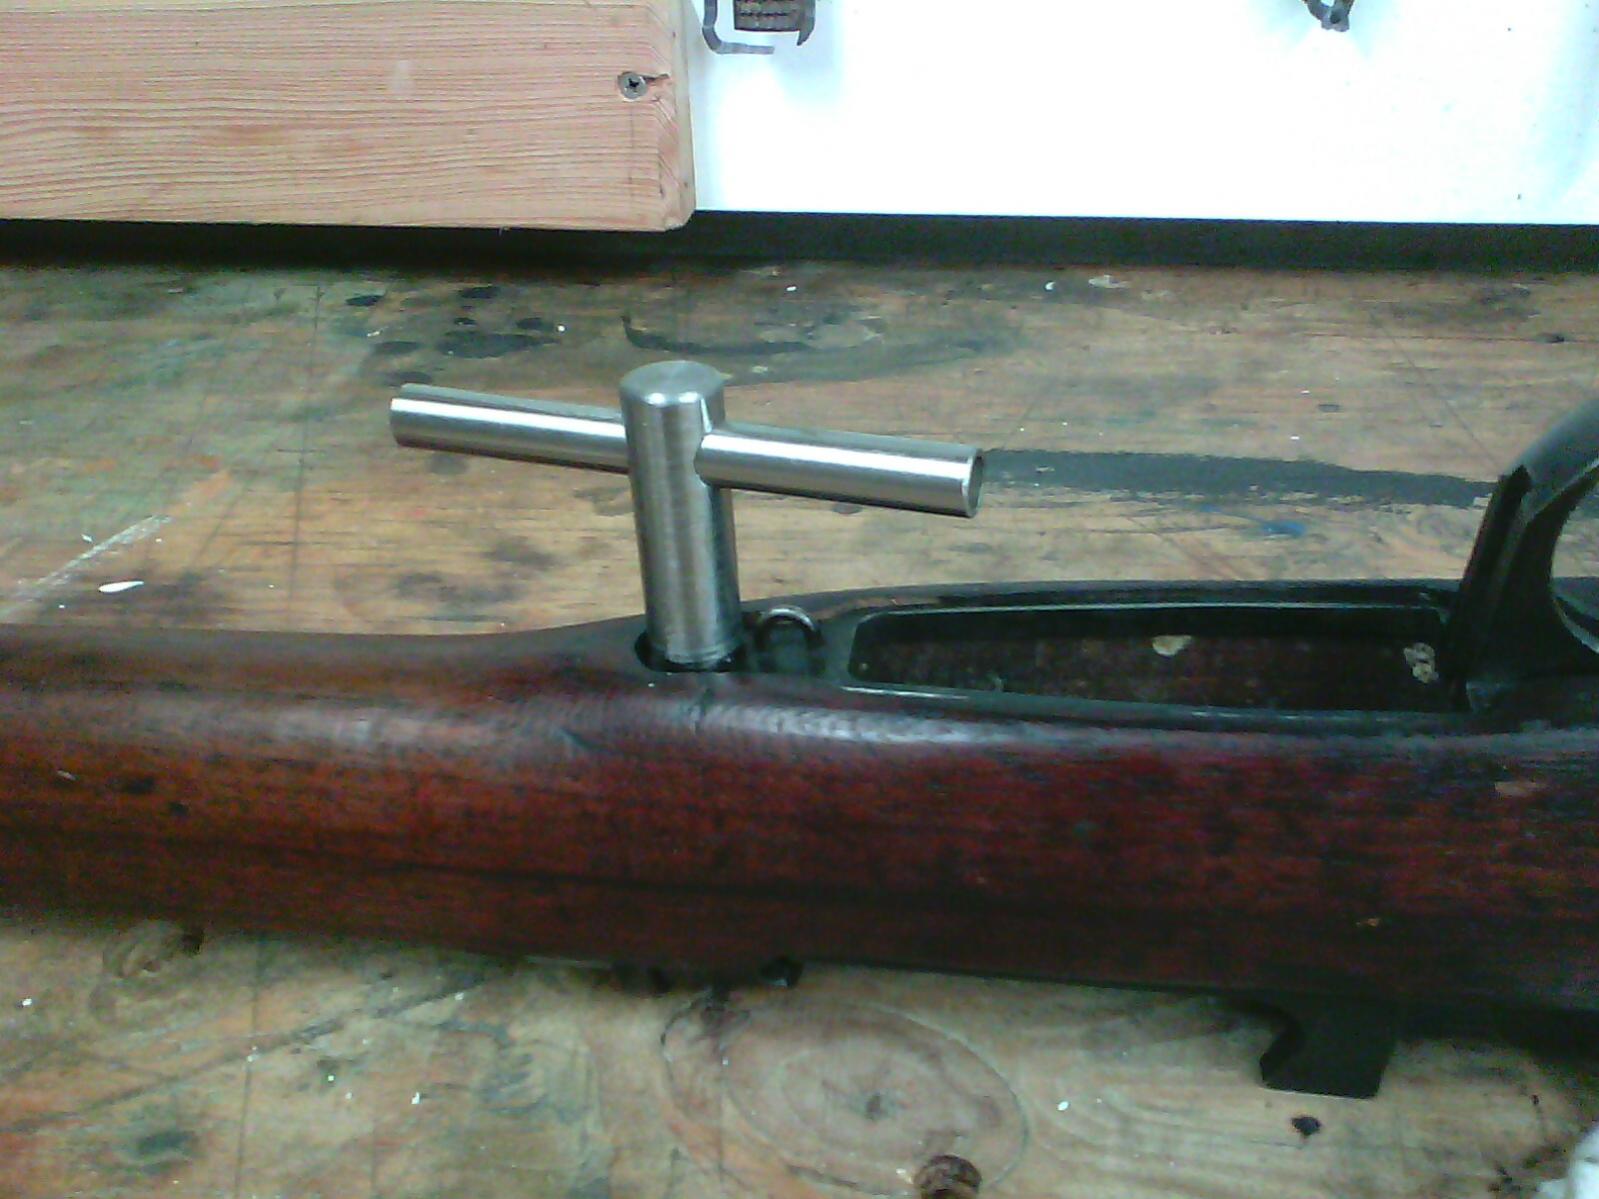
06-26-2012
Just stocking up the forend of a No.5, which I cut down from a stuffed No.4 forend, patched the draws, and the Knox, and that little tool works like an absolute ripper. No need to go longer, it's pretty well perfect!
Peter Laidler
06-26-2012
Talking of home made useful tools, at the massive 40 Base workshop we had hundreds of special home made tools and one I remember well was one specially designed to dolly bent and buckled RING, retaining, rear handguards into the correct shape. It fitted into the vice and the buckled ring was dollied around until it fitted and was then tapped lightly until it was perfect. Mind you, you'd need to be doing hundreds, day afrer day to warrant such a jig!
You'd occasionally find that on No.5 rifles, where the barrel and retaining ring were corroded, the unit Armourers had fitted a new ring but because they couldn't unbreech and breech up or remove flash eliminators, they'd make a split at the bottom in order to replace it. The jig was also used to position the ring so that the split could be brazed across the bottom.
tbonesmith
06-26-2012
Ha, this one is brazed on the bottom for just that reason!
Peter Laidler
06-26-2012
Did you do it TBone or was it already split and brazed? Could be one of ours if it is. If anyone else has one like it, that's the reason!
As you've probably guessed, we were all very ex apprentices and skilled so didn't waste much.
(unknown)
06-27-2012
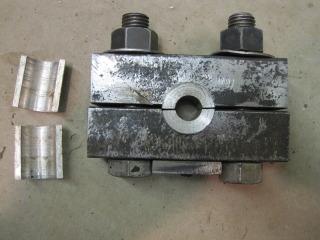
Here is a shot of the universal barrel vise that I use. It is made from 2 pieces of 1-1/2" square steel bar. Clamping bolts are 7/8" diameter. Split bushings are machined from 1-1/2" diameter aluminum stock. Bored to fit the barrel at hand, have made up a number over the years. Sprinkled with powdered rosin, kept in a salt shaker. I hold the thing in a monster 6" vise. Little bar on the bottom prevents the bolt from turning.
Bruce_in_Oz
06-29-2012
A while back I acquired MOST of what appears to be an "issue" barrel vise. It has a small plate dovetailed into one of the jaws to provide correct engagement with the driving flat on the Knox form. The two jaws appear to be part of a bigger kit; probably a bench-mounted specal vise. The blocks can be used by compressing them between hardwood blocks in a 6" vise, but a serious hydraulic rig may be more appropriate.
T-Bone: your "extended" triggerguard screw gizmo looks a lot like the stockmakers screws I have used for inletting stock blanks, bedding barreled actions in "Devcon" or various other fitting jobs. Folks who work with Mausers and commercial sporters use them a lot during set-ups; they certainly save the real screws (and the stock) from screwdriver damage.
One for No.4 users: Has anyone tried replacing the front TG screw of their "competition rifle" with a high-tensile cap screw, (hex or Torx drive)? 1/4" BSF versions don't exactly grow on trees here in Oz, but a long-shank 1/4 UNF could be trimmed and rethreaded (Carbide thread-cutting tip tool could be handy). Using a socket drive allows the operator to use an "inch-pound" torque wrench for consistent bearing after re-assembly.
Rastis
07-01-2012
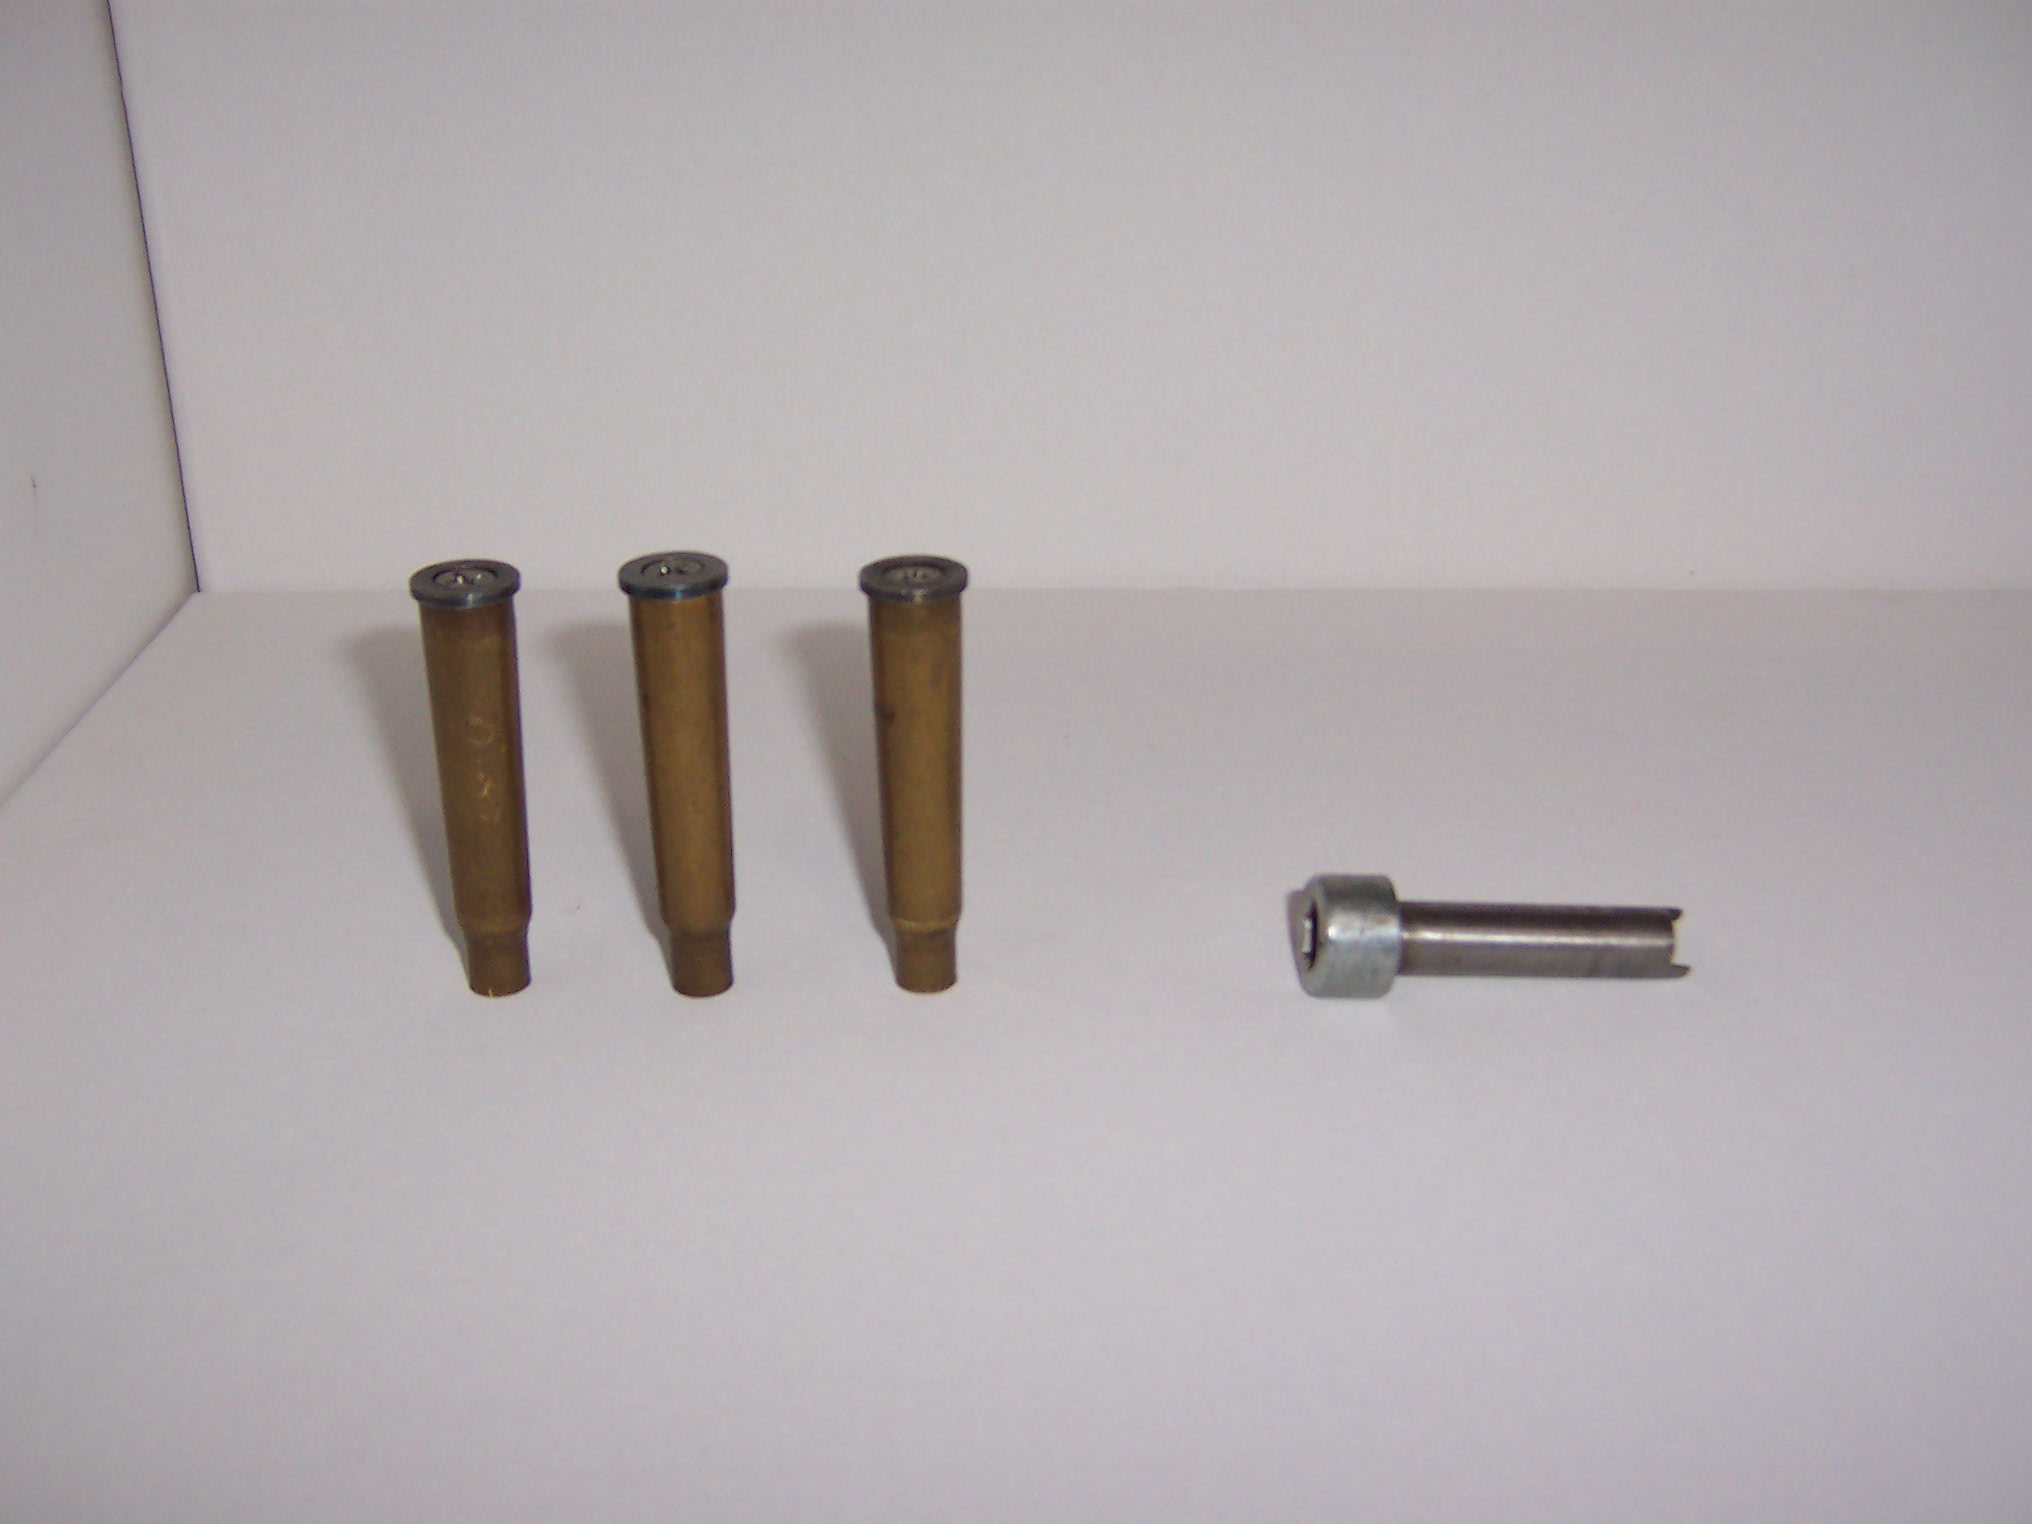
Here is my homemade Go and No Go Gauges, and firing pin removal tool. The gauges are unfired military 303 cases with steel discs ground to the correct thickness screwed to them, and the firing pin tool is just a socket headed bolt ground to the correct shape.
boltguns
05-29-2013
Pics of original armorer's tools
Pictures of original armorer's tools: Armourers Tools | All About Enfields
WarPig1976
05-29-2013
I used a round curtain rod and cut the nubs with the Dremel for firing pin removal tool. Bit flimsy but it worked still have it too...
tbonesmith
07-04-2013
Lately I have rebarrelled a few No.4 7.62 conversions with unused but old target rifle barrels. They were made for the O-marks and there are some floating around rifle clubs for cheap, so they make a good blank for a No.4. The threads are miles off and the chamber length doesn't work, so it's basically a full new chamber and thread proposition...
Anyway, I have not been hitting the correct CHS off measurements, and found the reason to be that where I was measuring off the receiver face to the bolt face was a bit burred or dinged once and another time the receiver face had a little recess from the old barrel crushing it a bit.
So in order to be able to in future accurately face the receivers before measuring for the tenon length and headspace/chamber length I made this little fella. It is one of the fixtures outlined in John Hinnant's great book: The Complete Illustrated Guide to Precision Rifle Barrel Fitting. For what it's worth, the mandrel through the body is a very close fit, it runs true and locks up nicely with the threads, I think it will do the trick nicely.
I will use it pretty soon and let you know how it goes.
tbonesmith
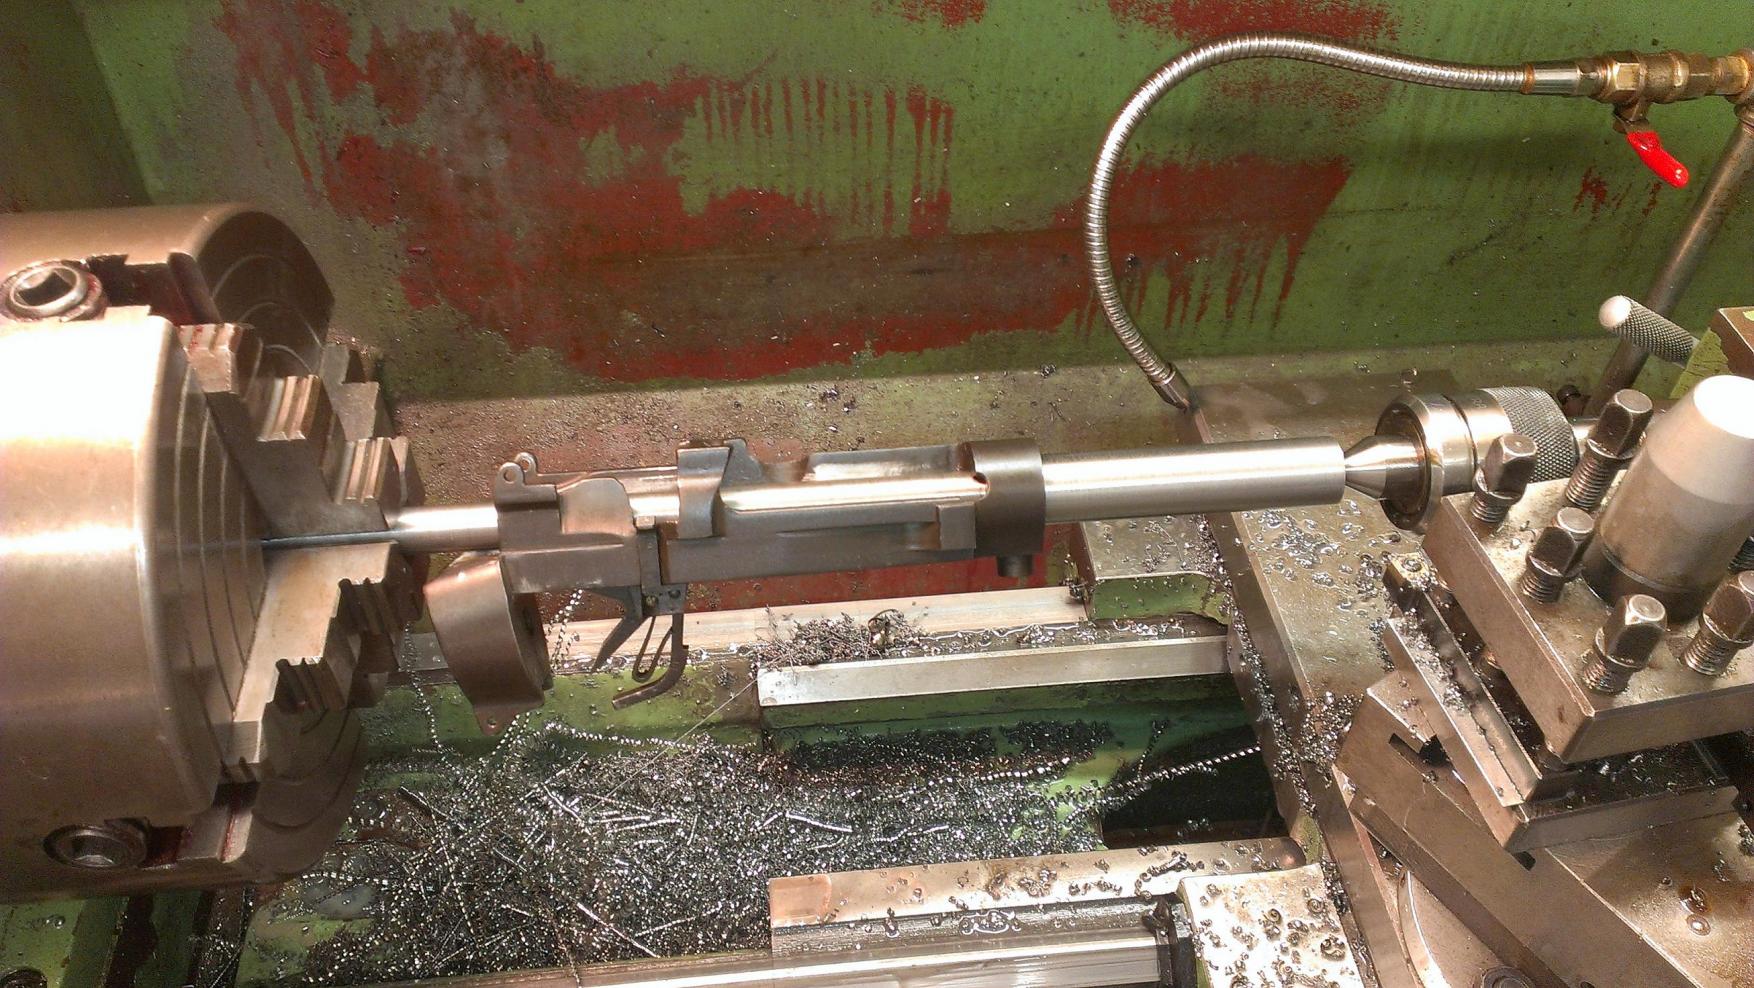
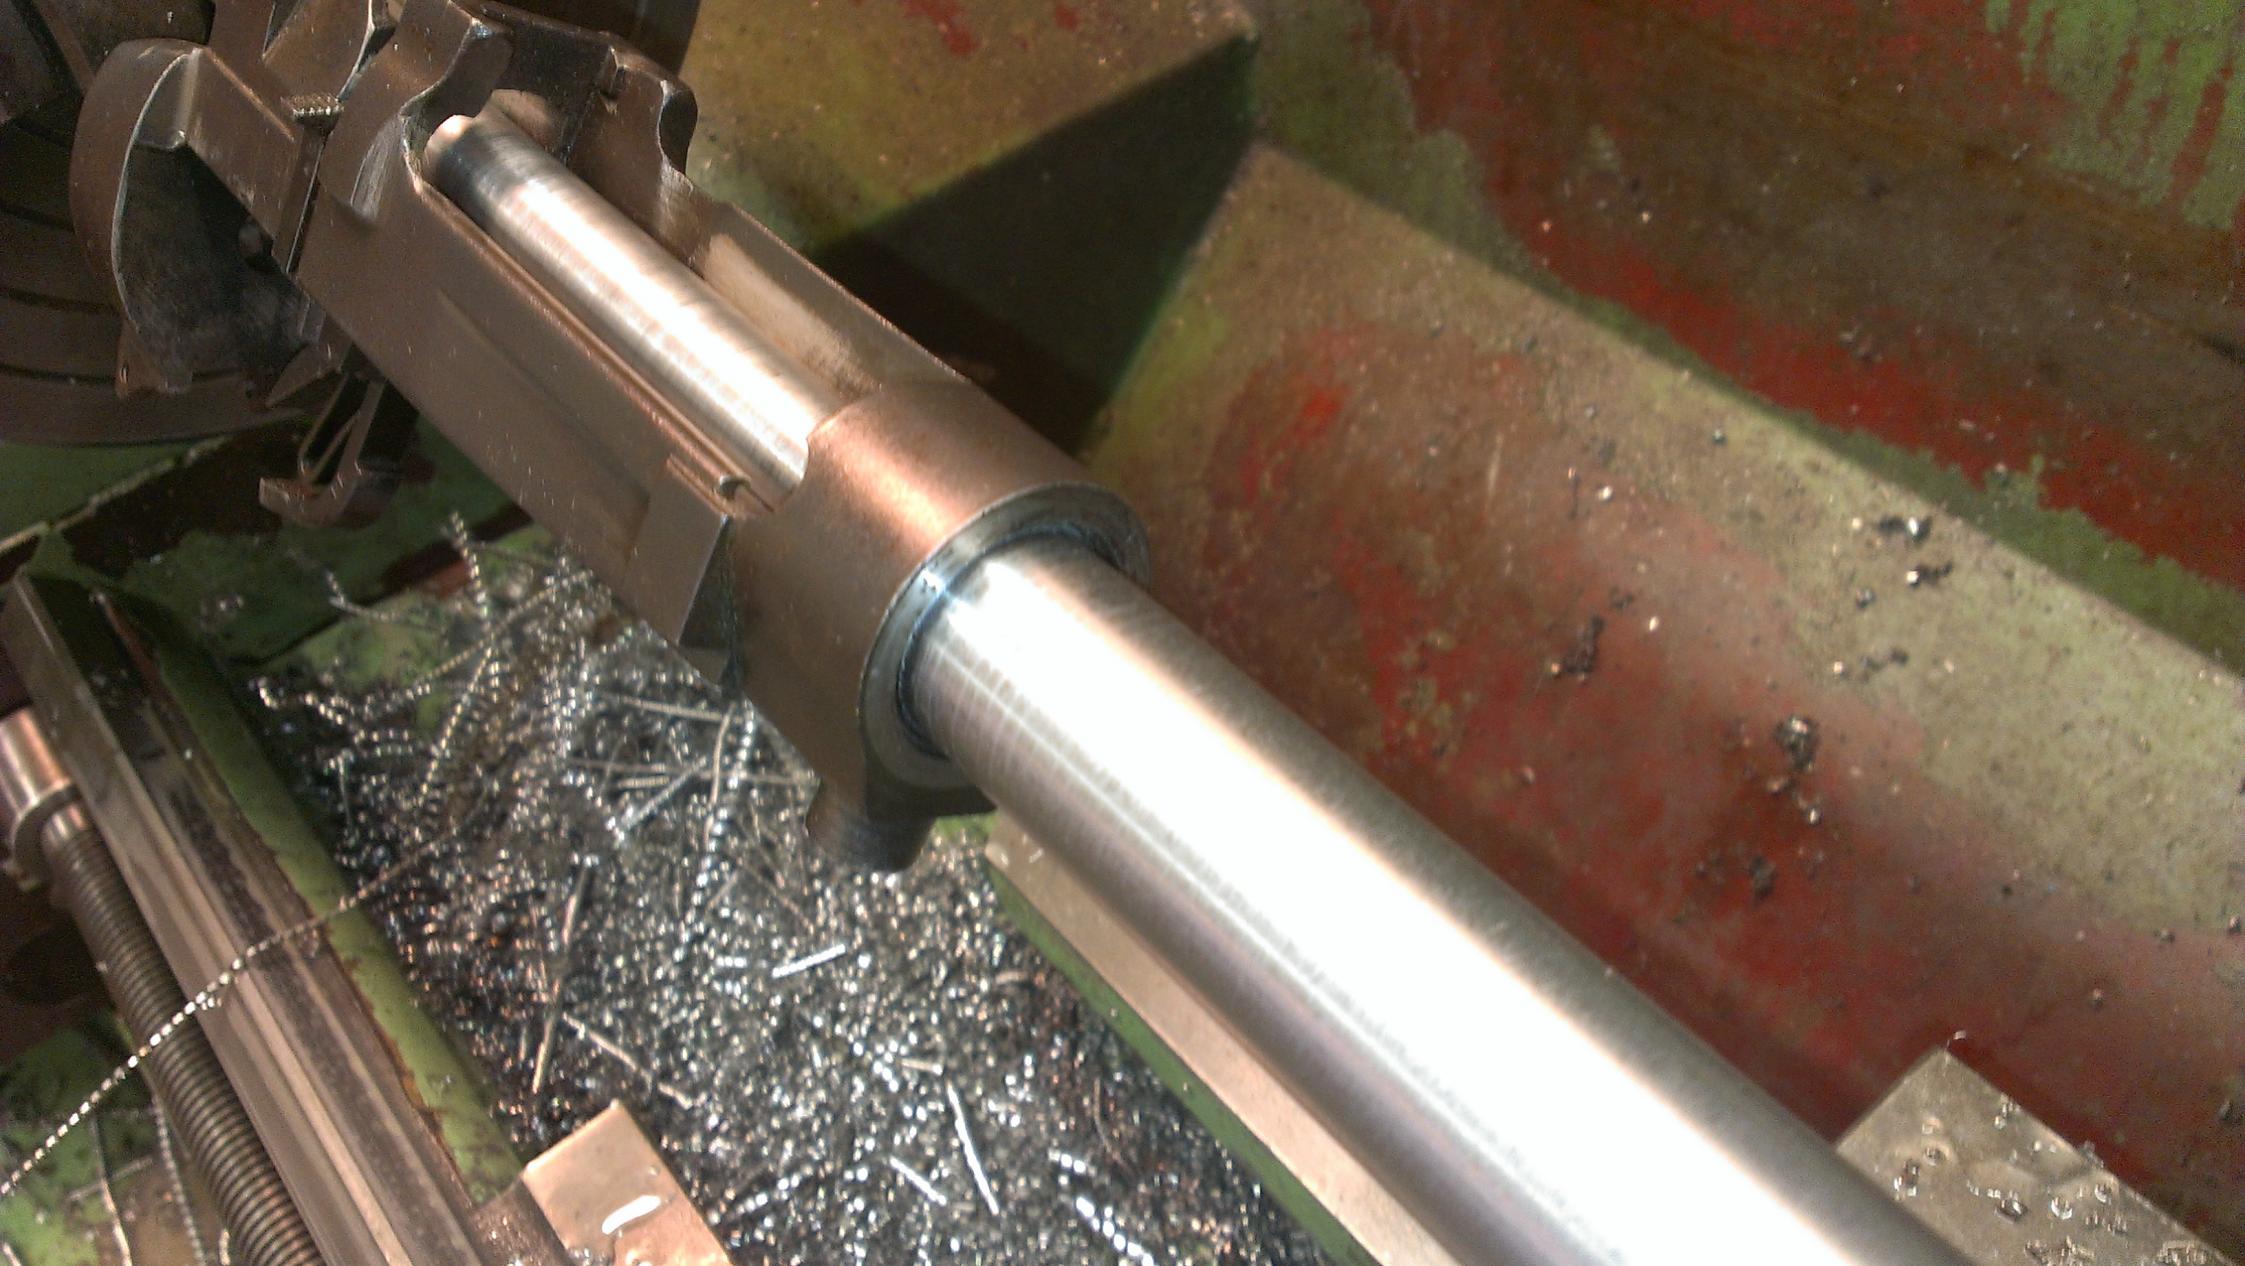
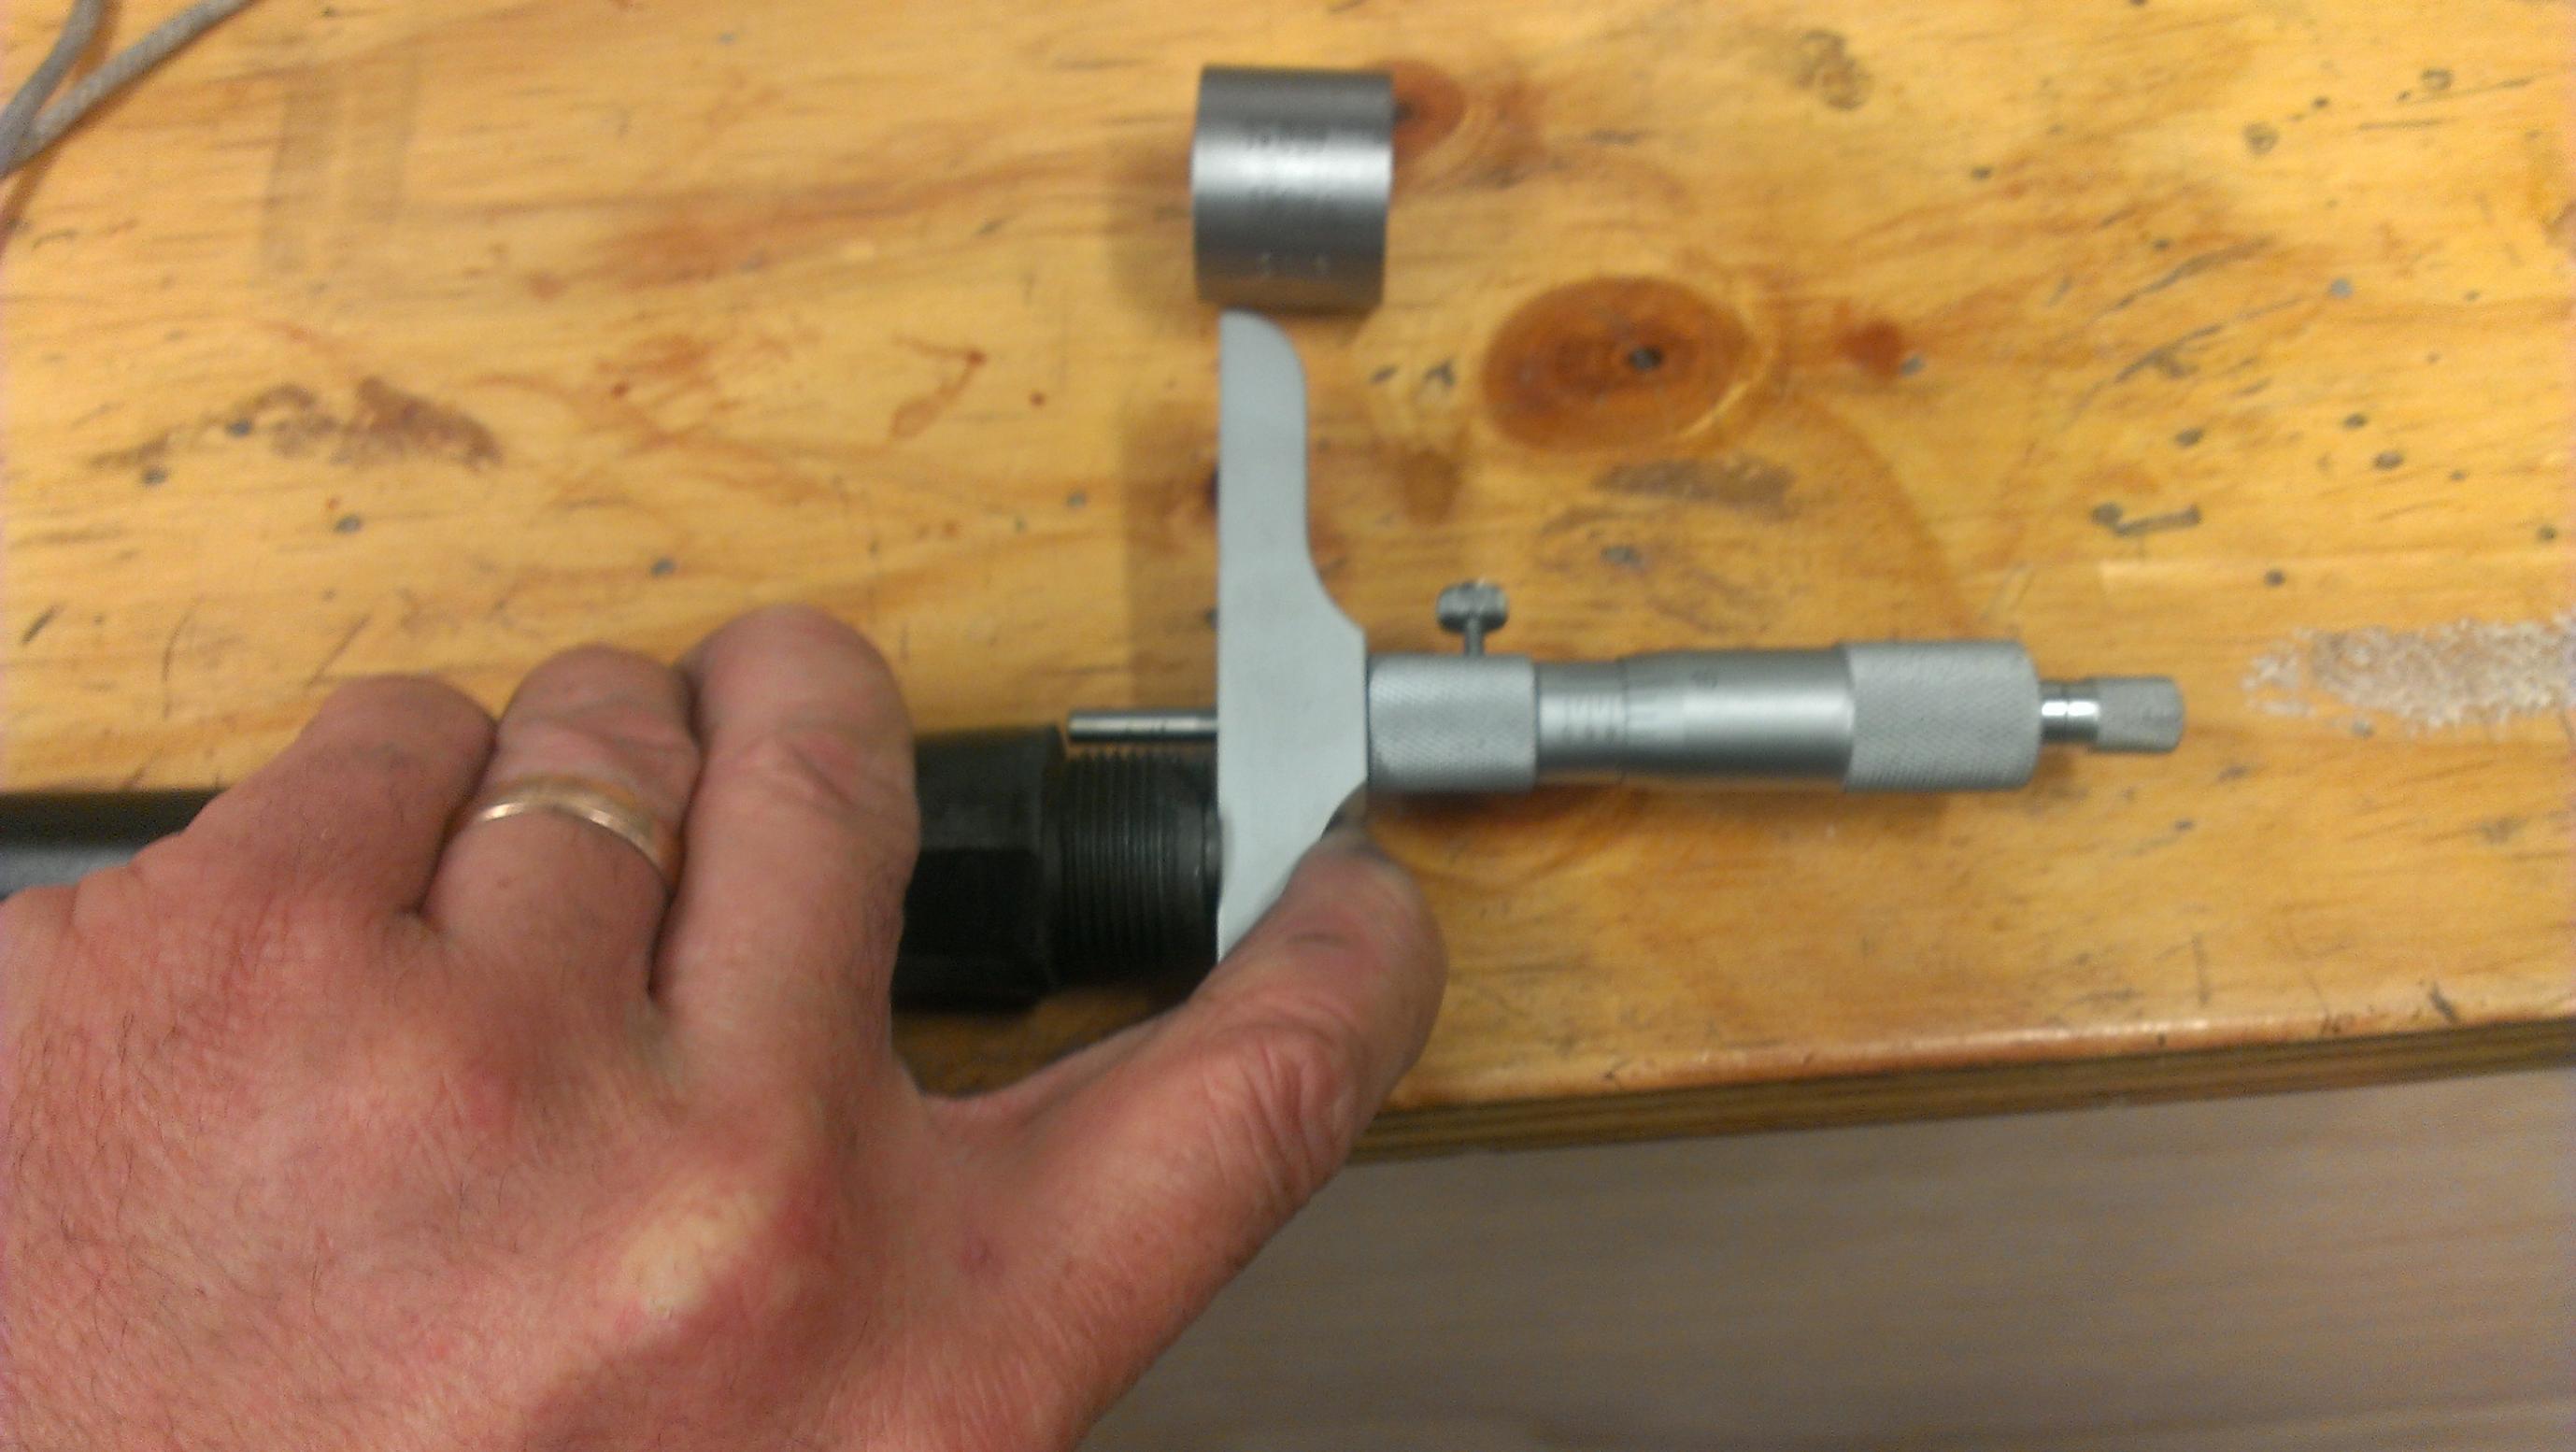
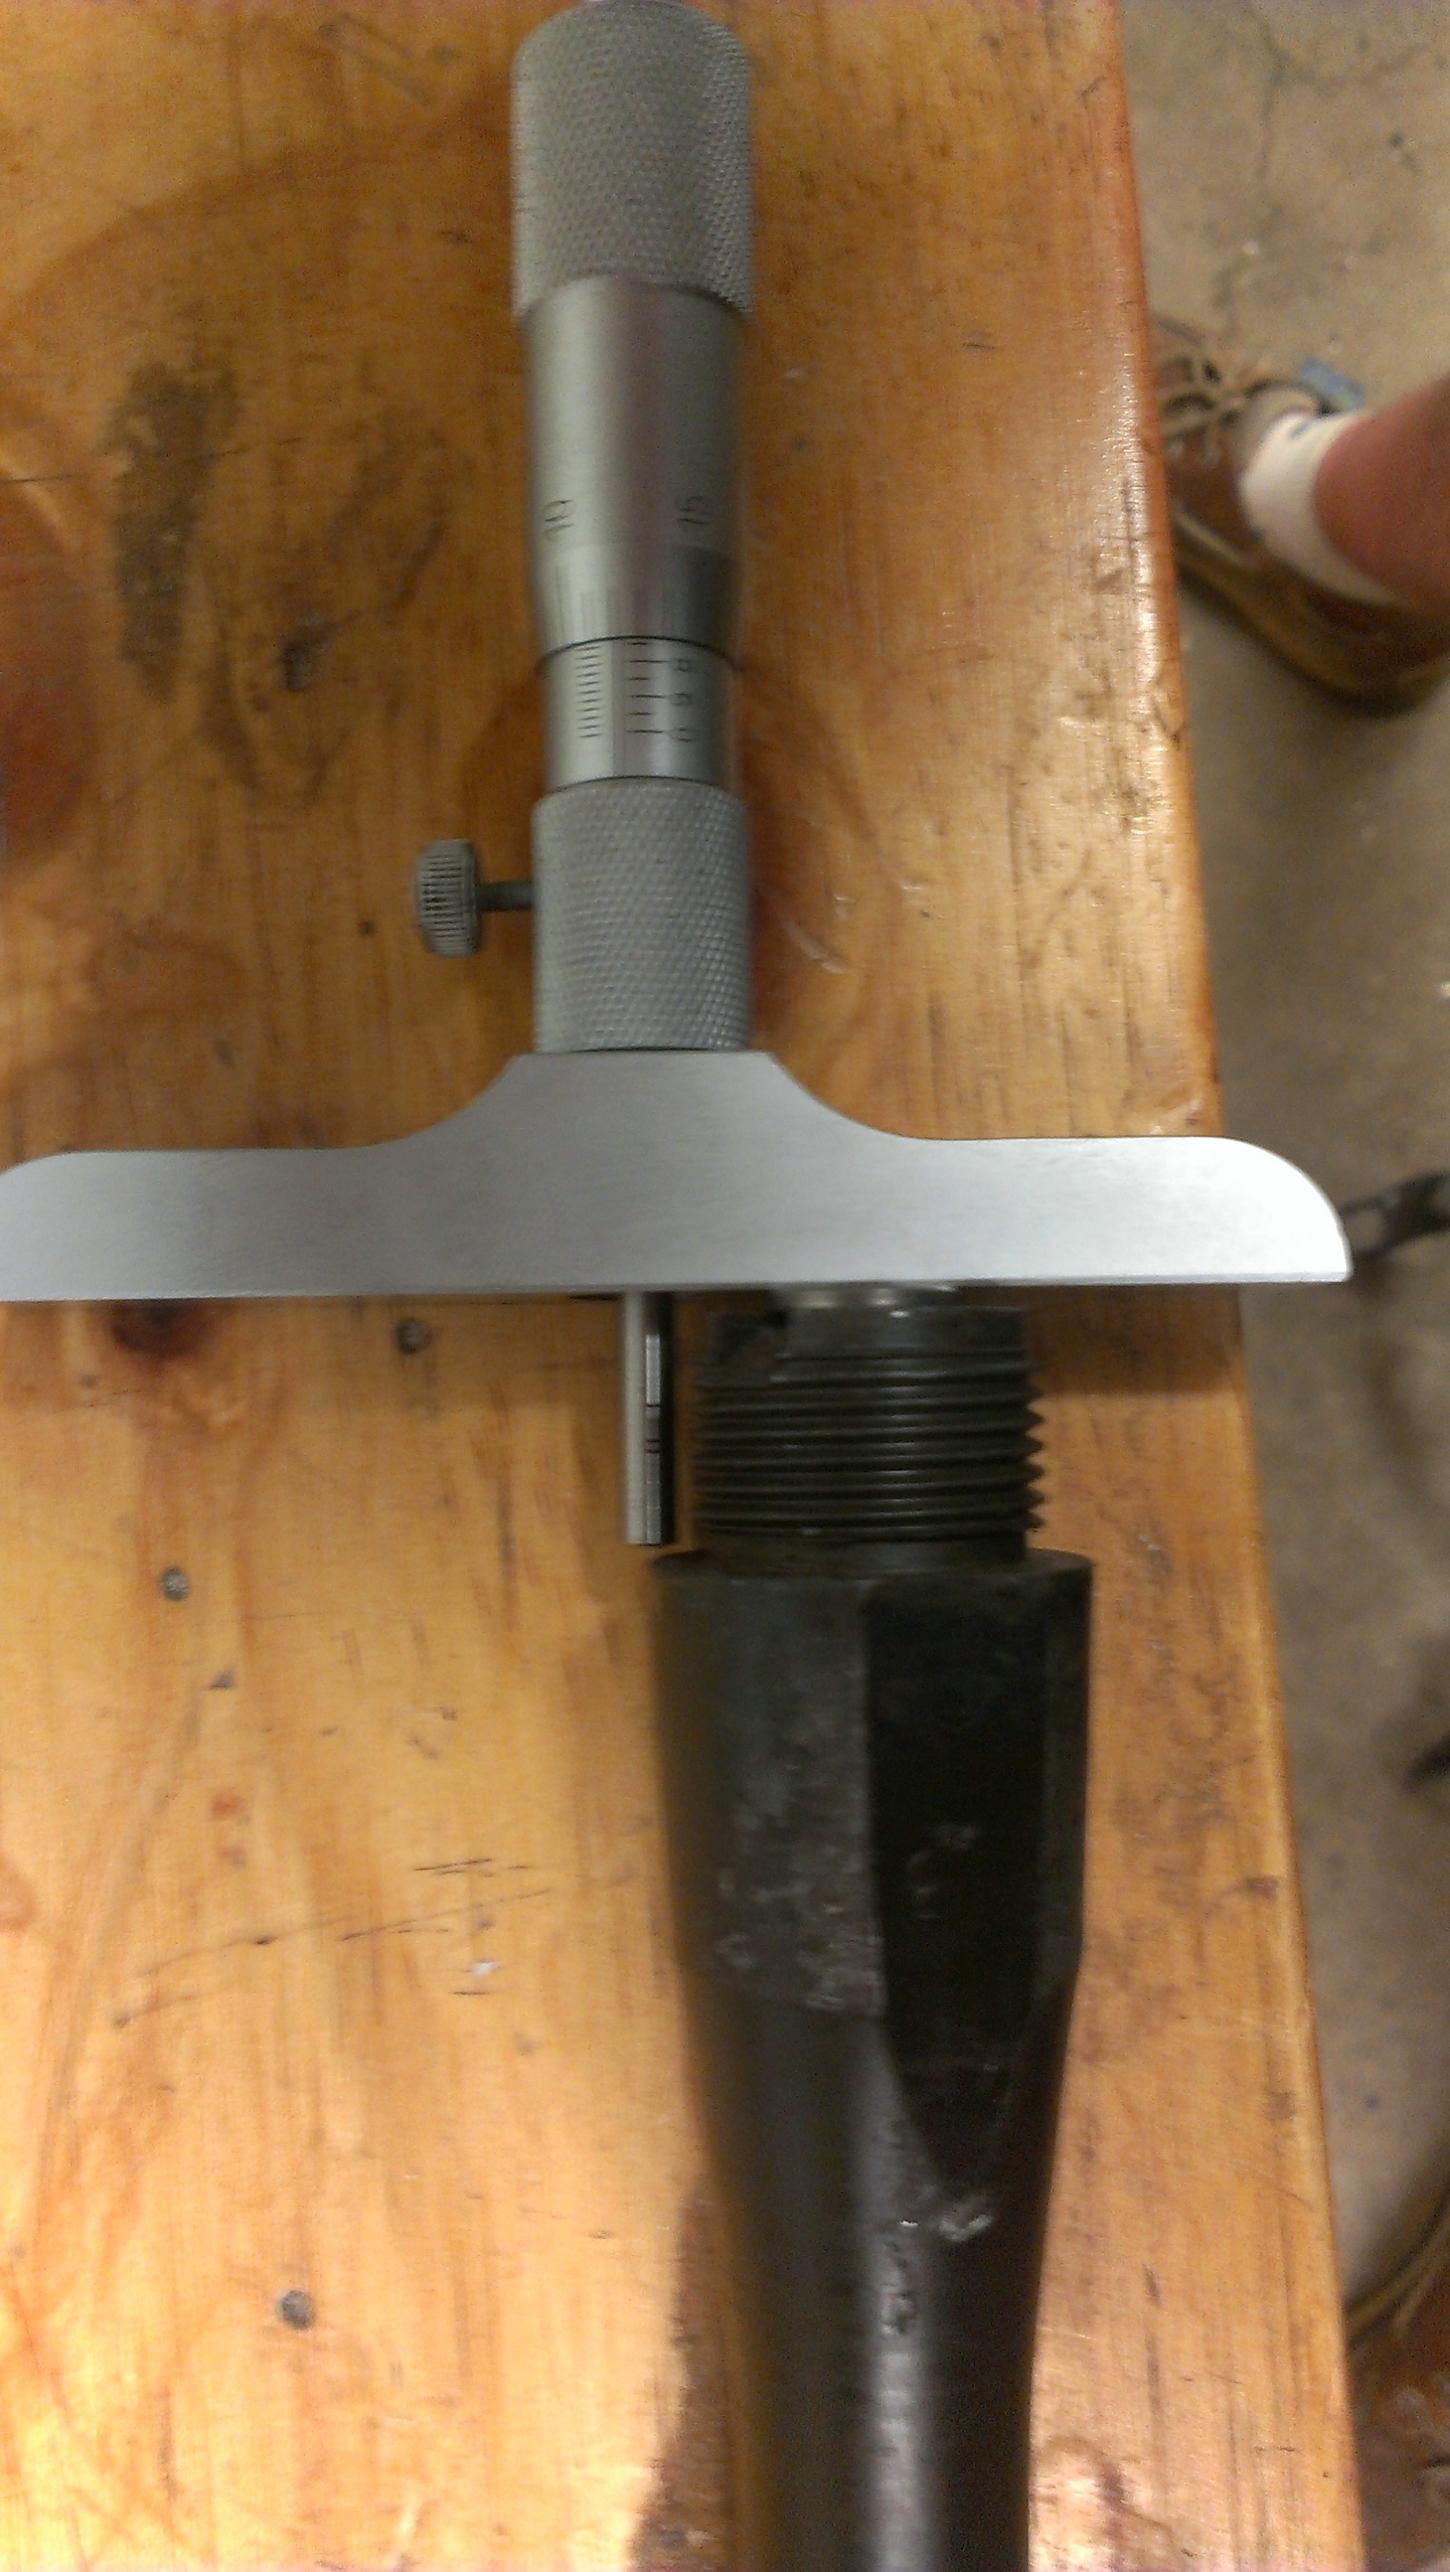
12-21-2013
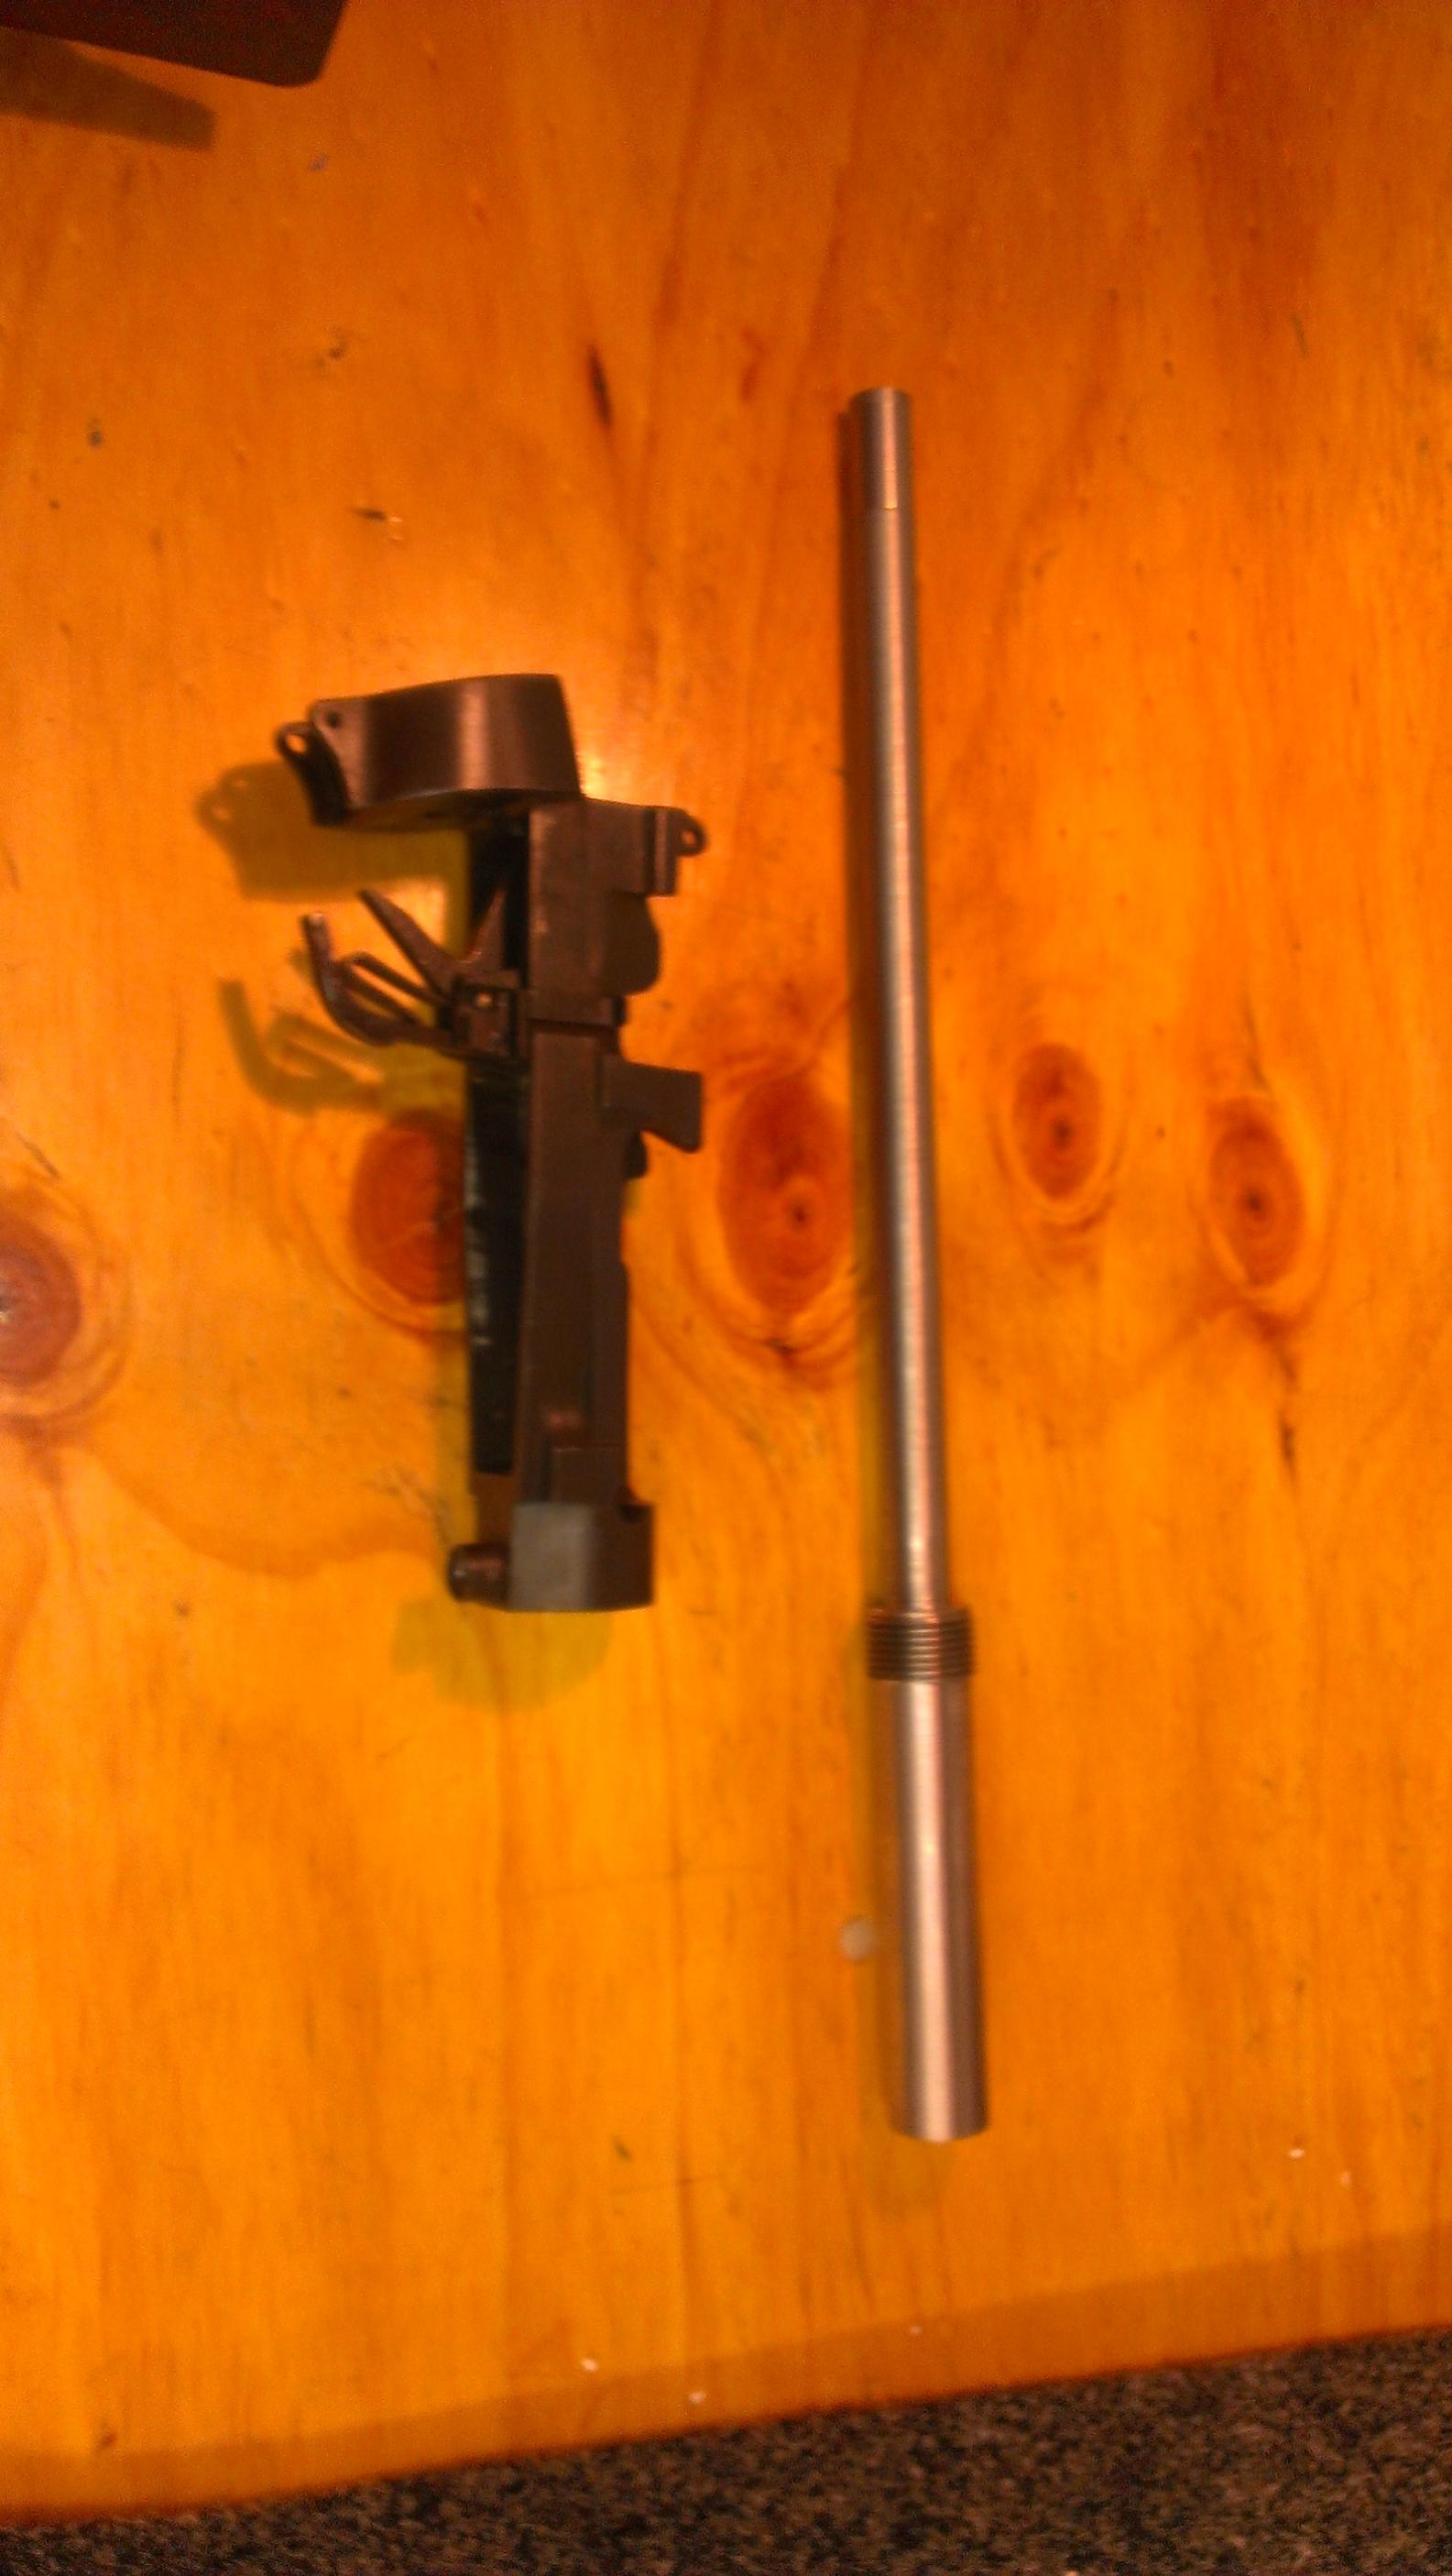
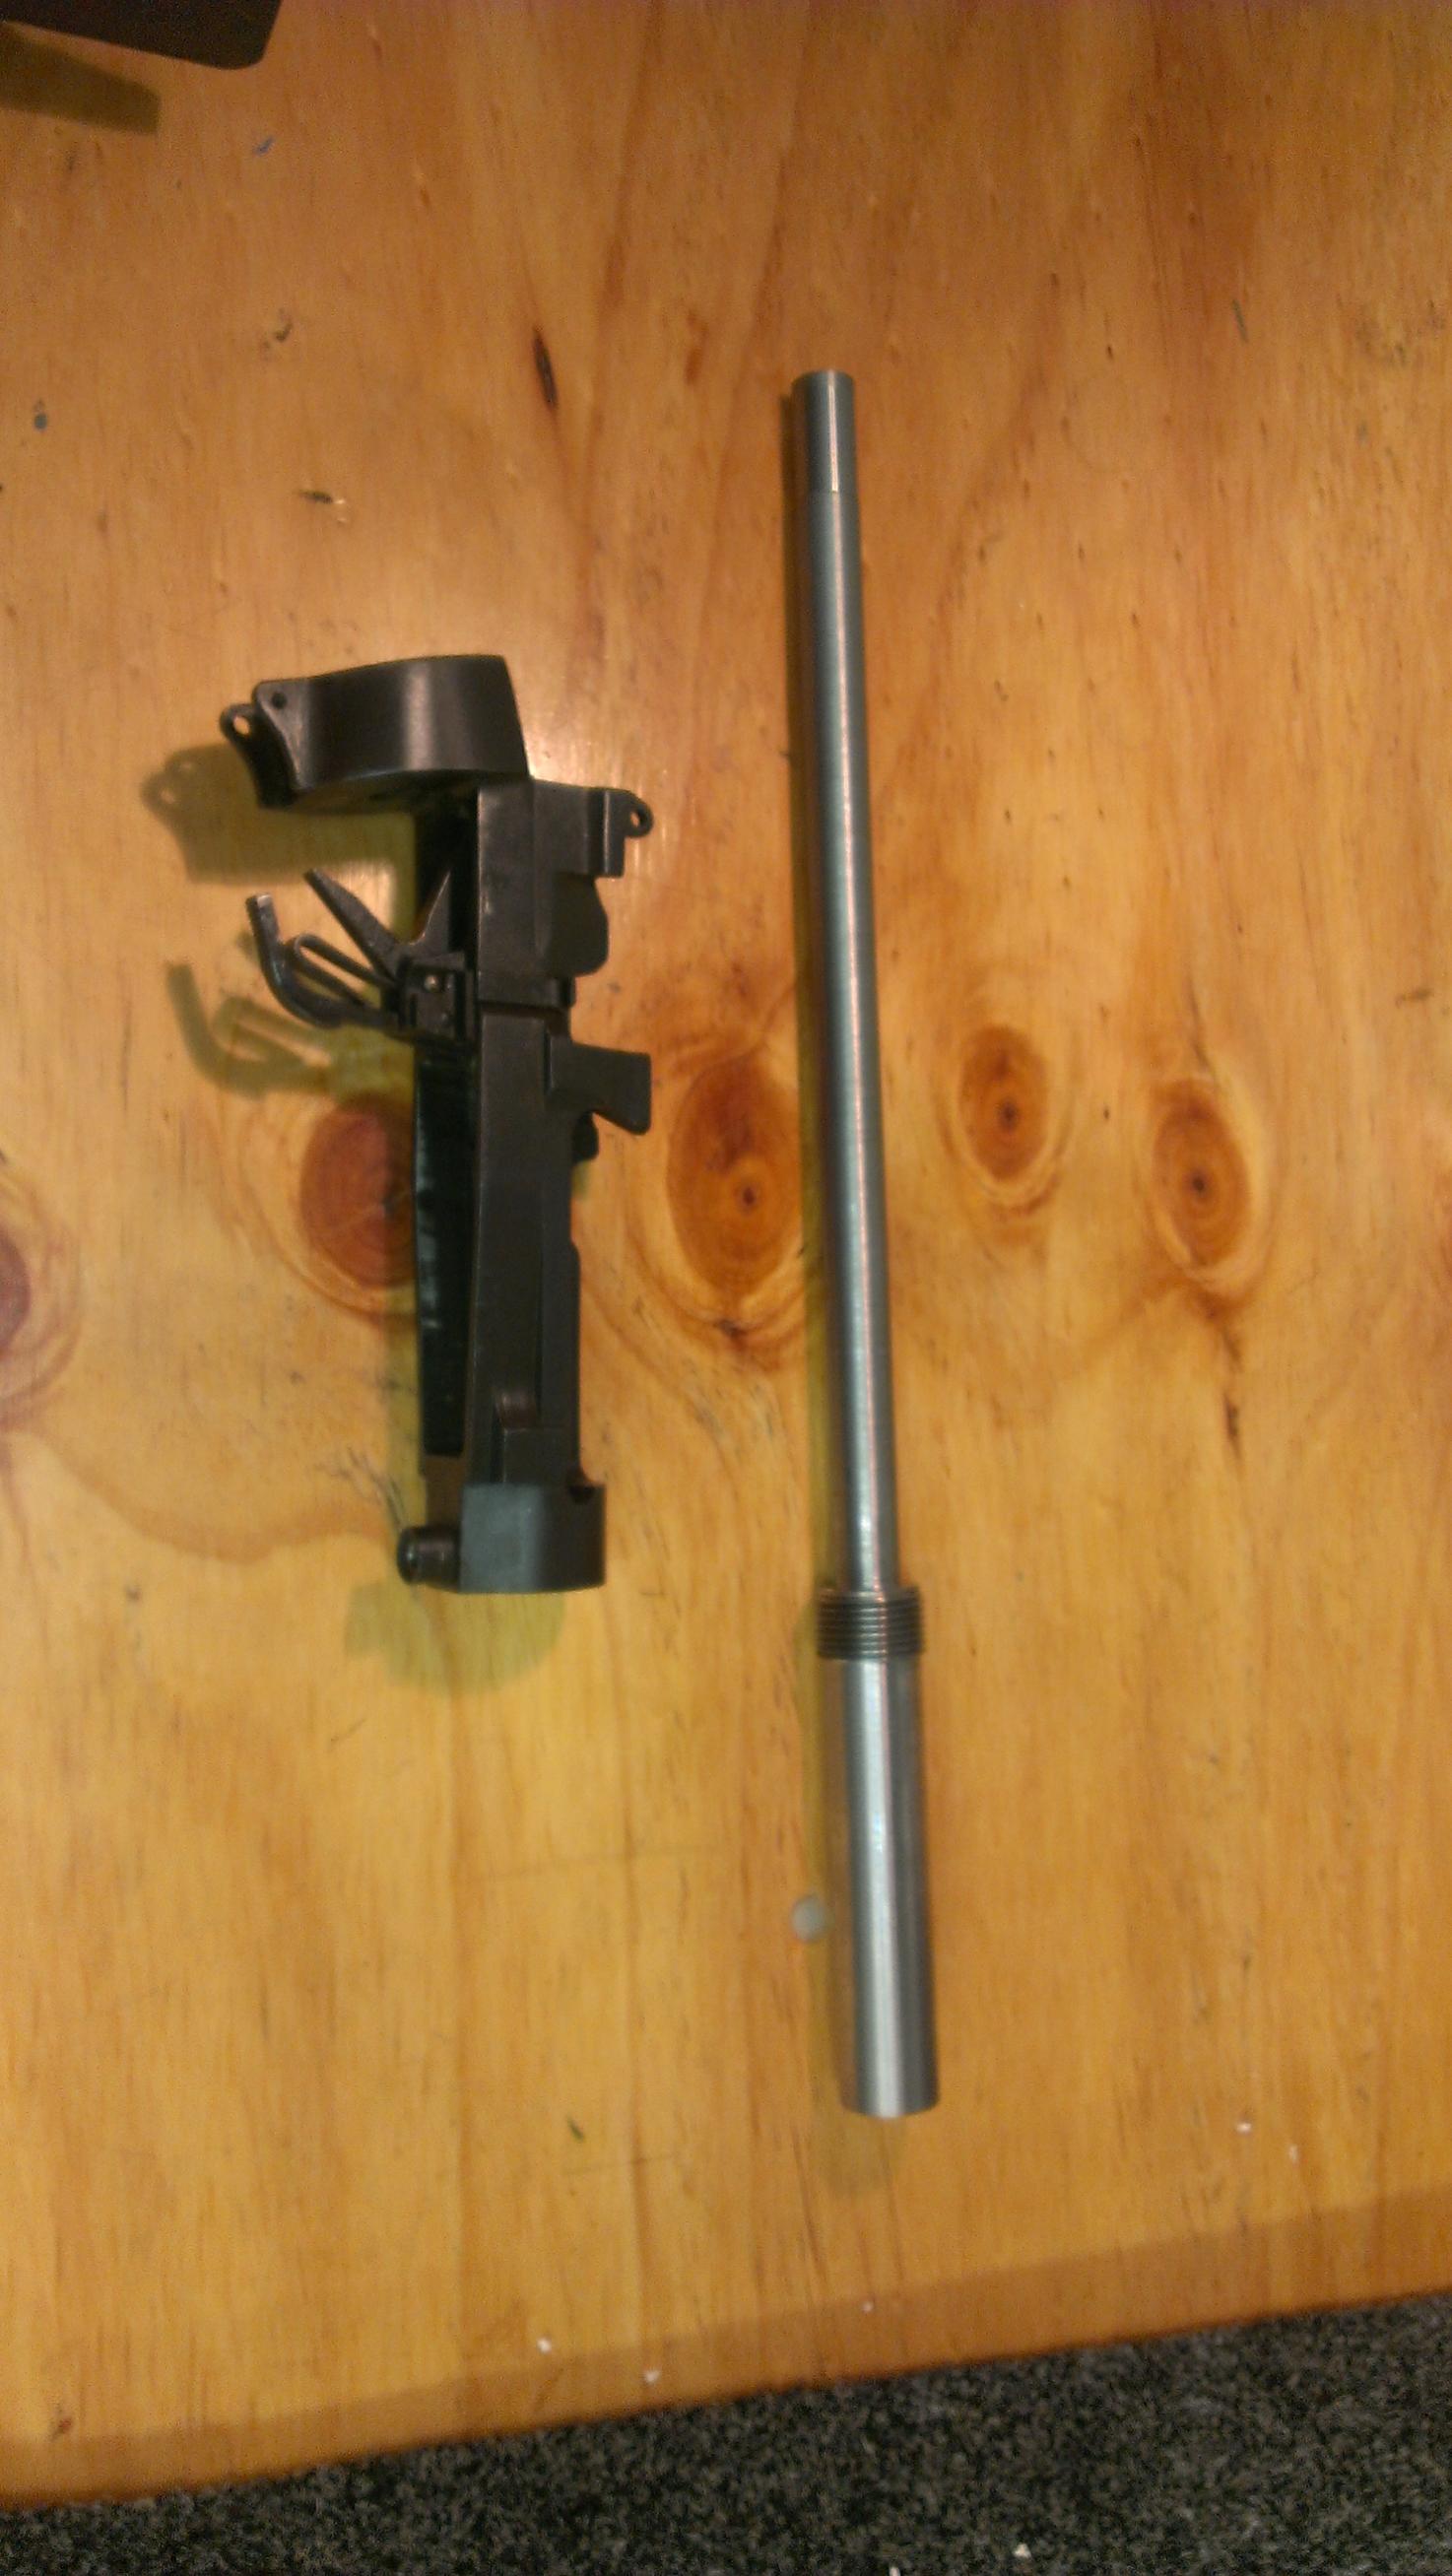
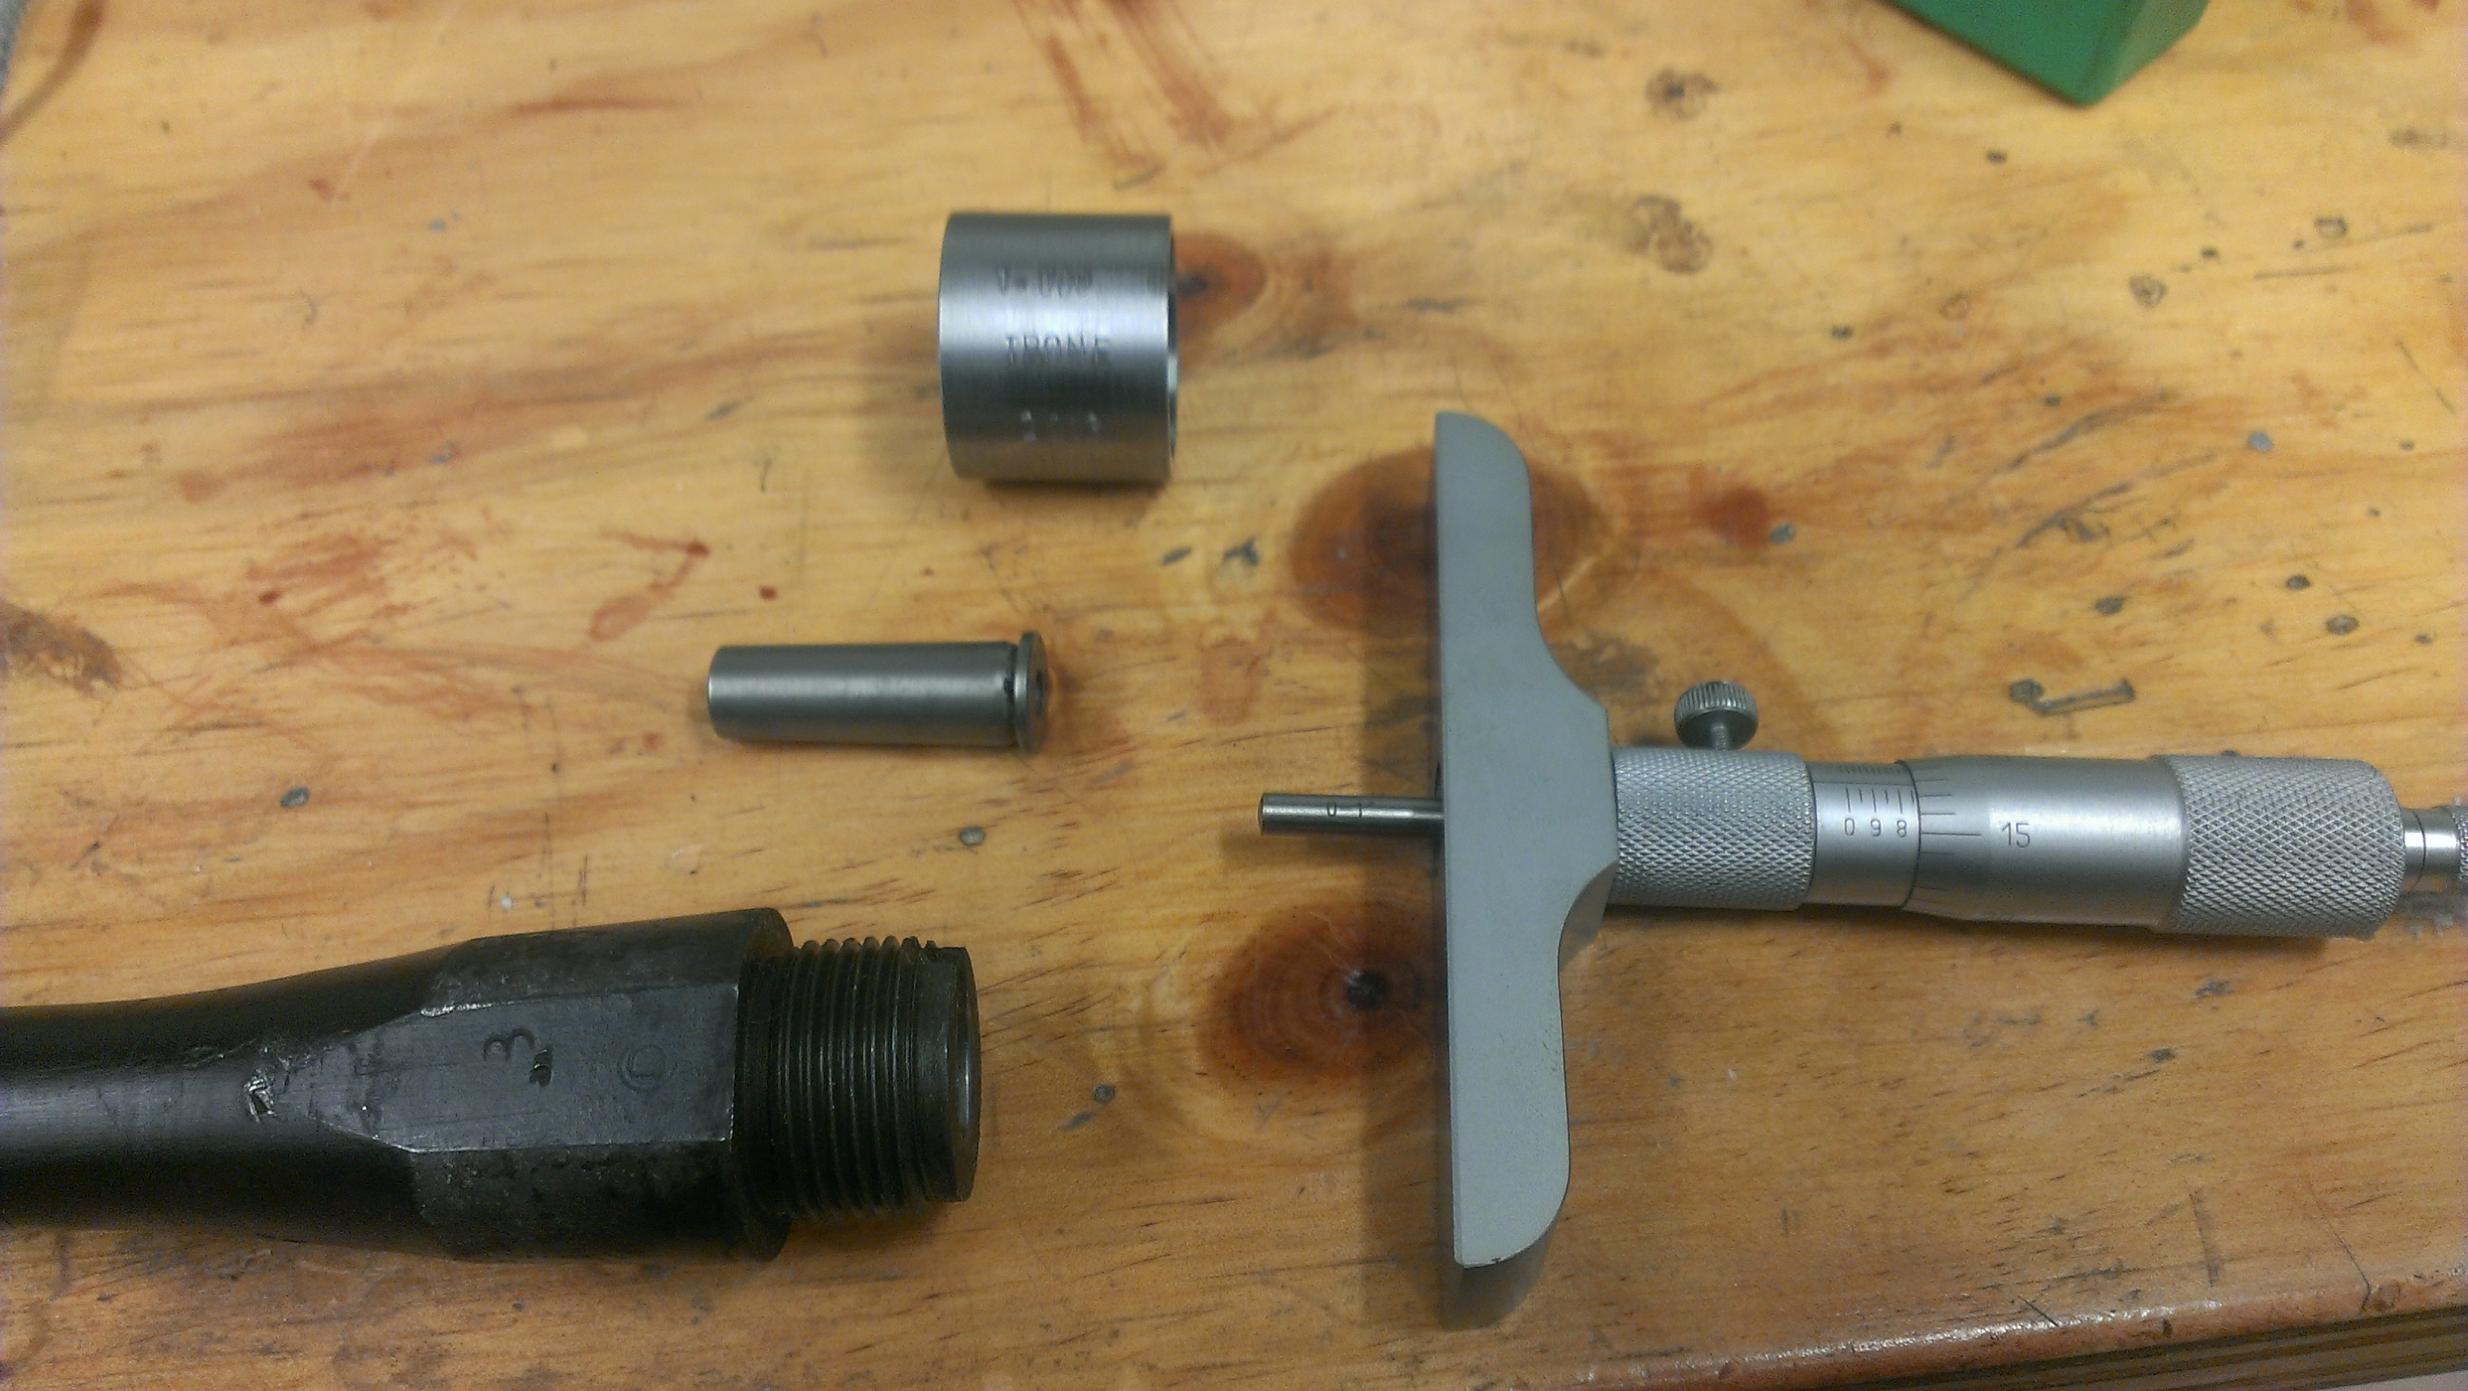
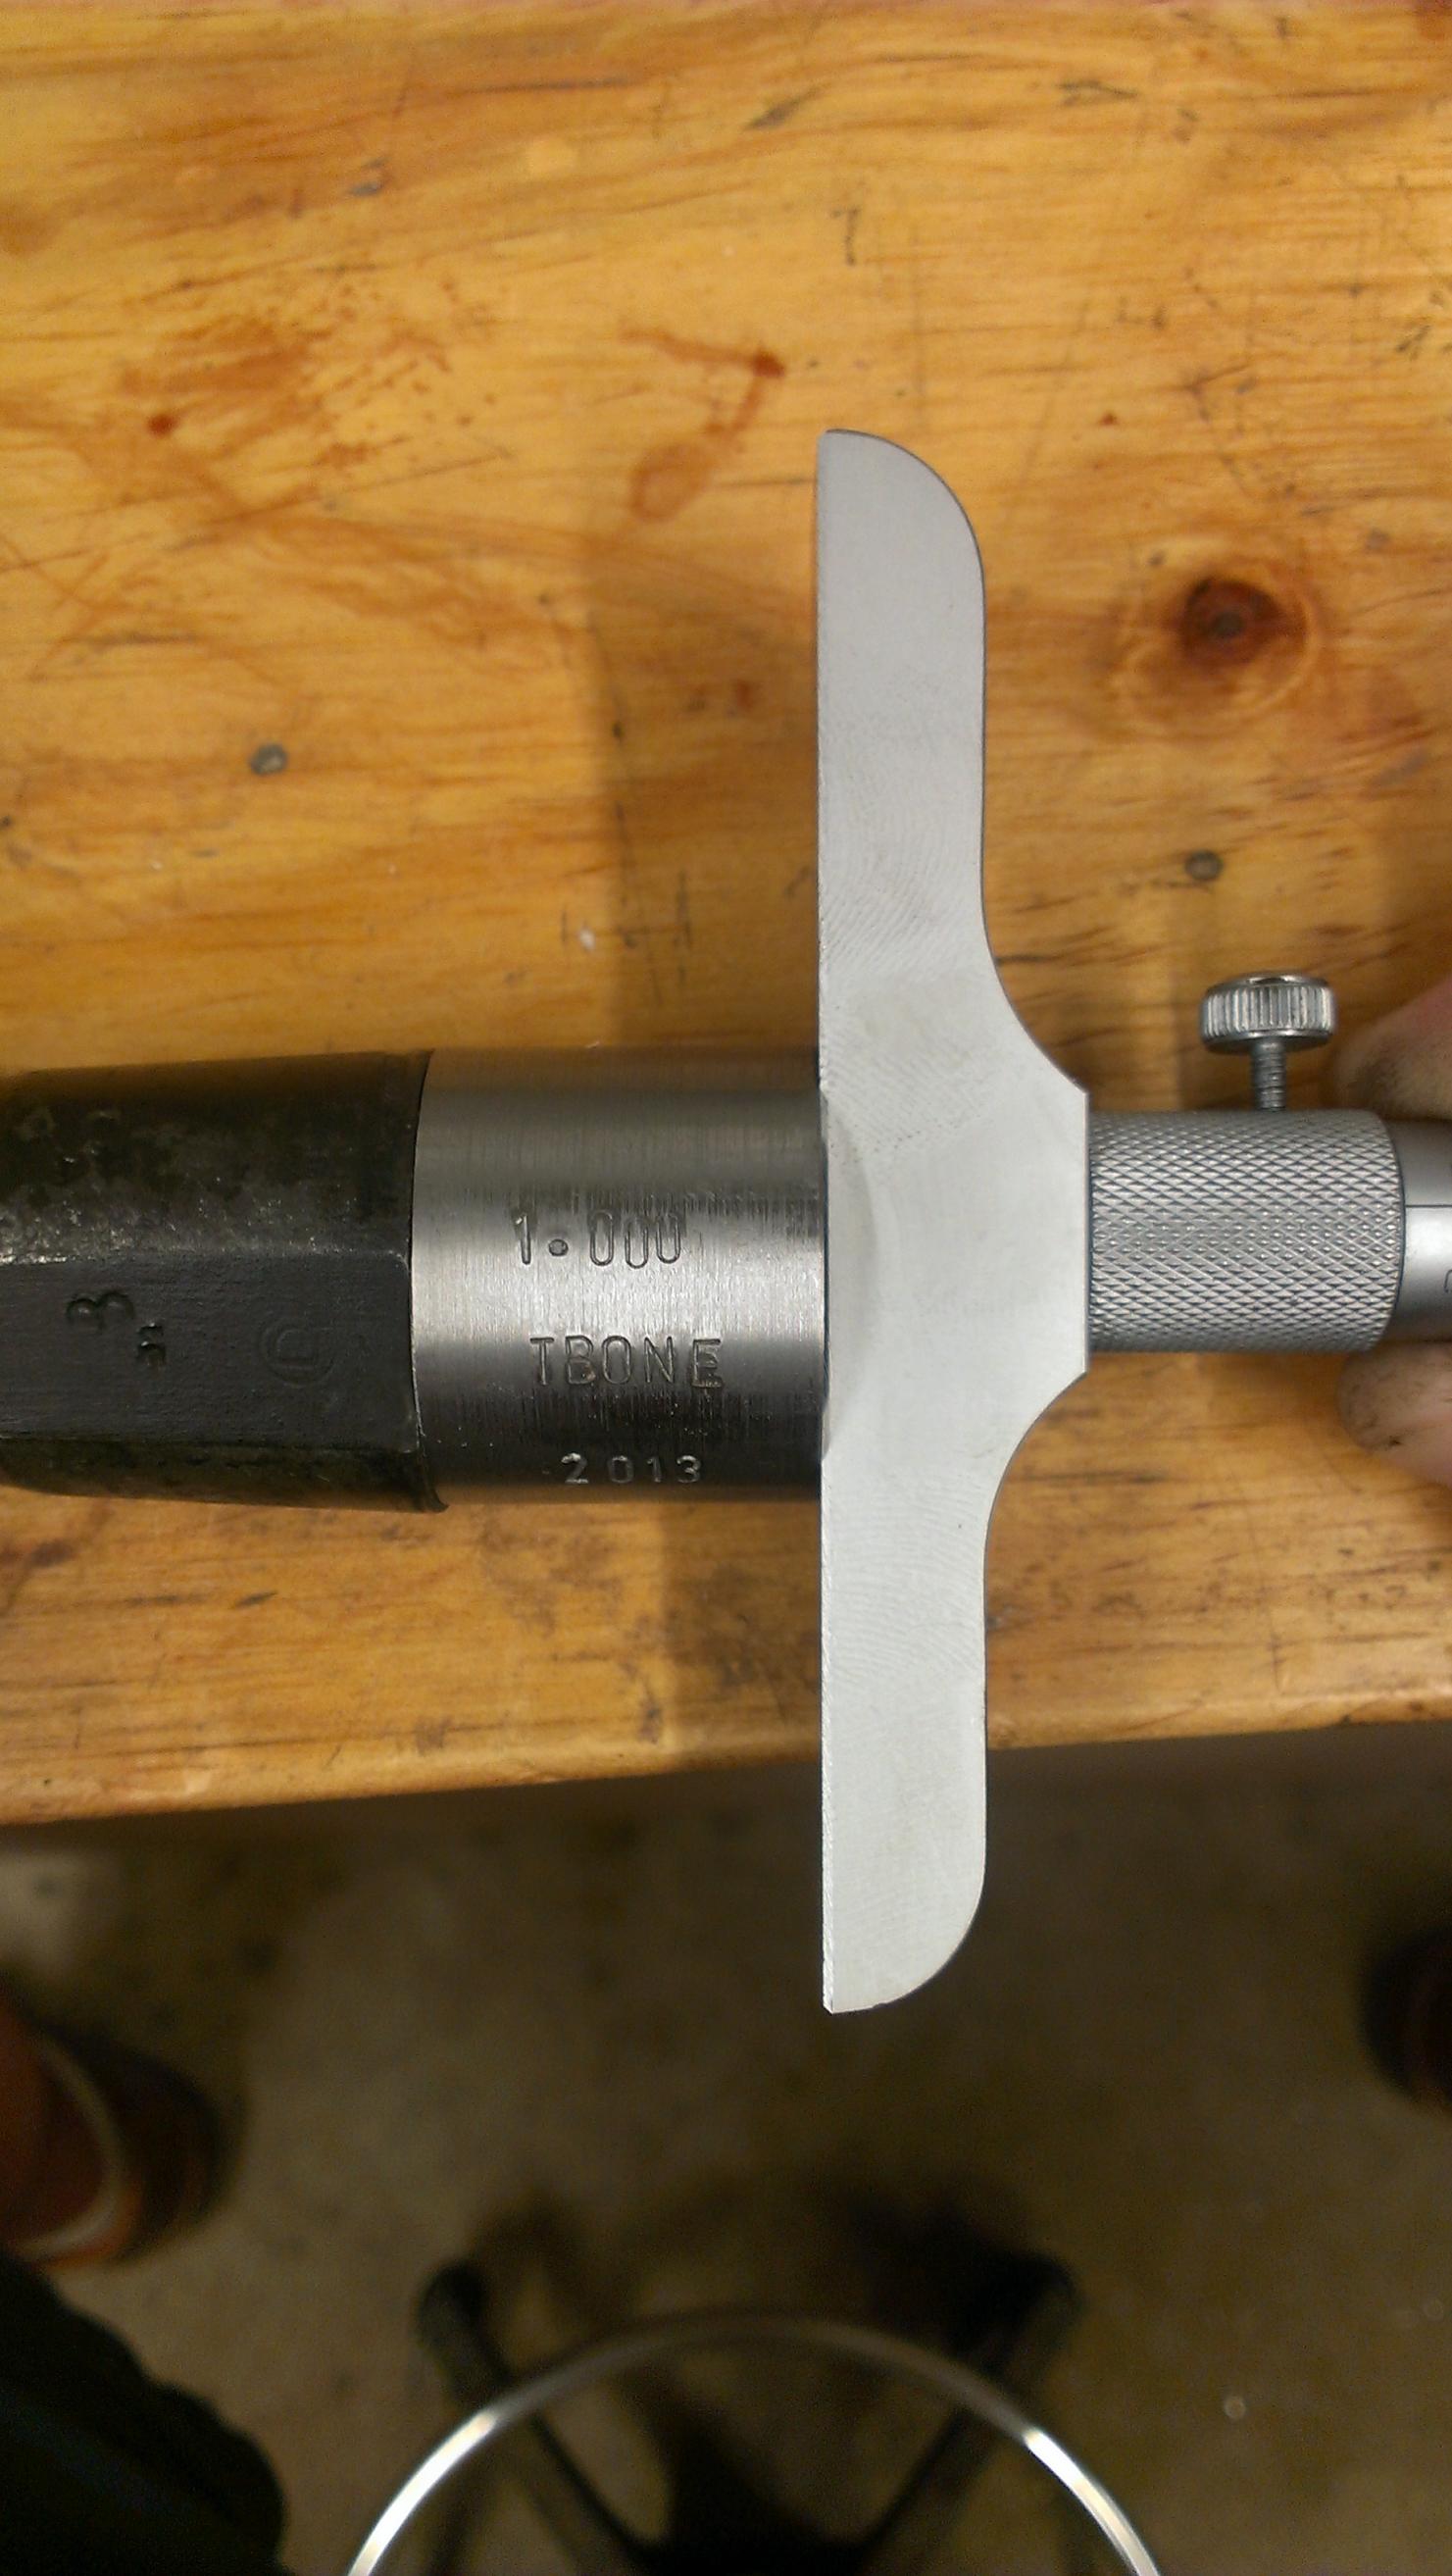
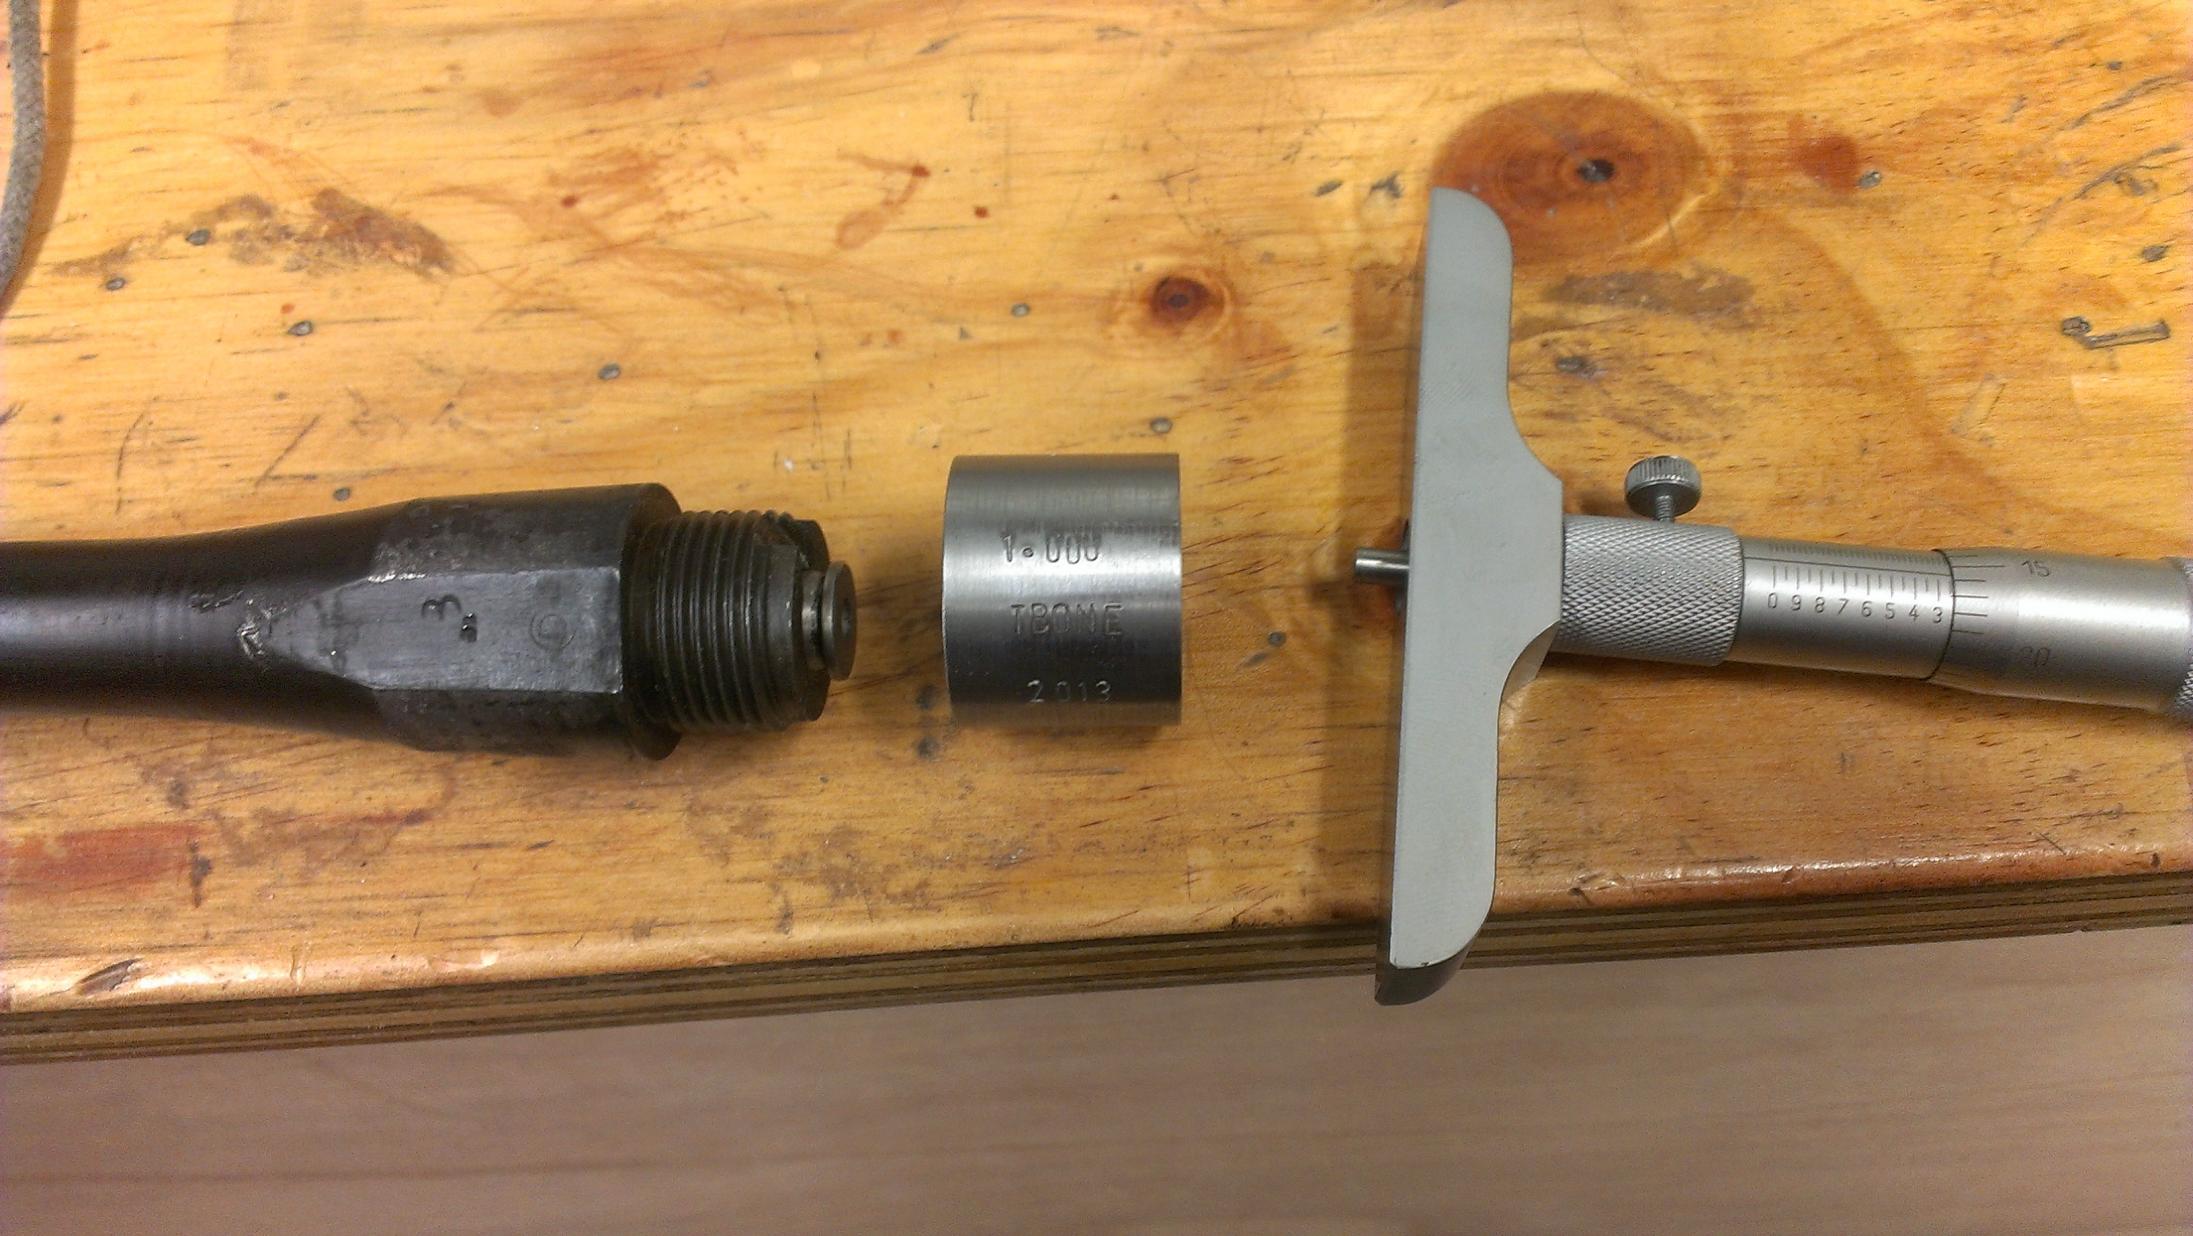
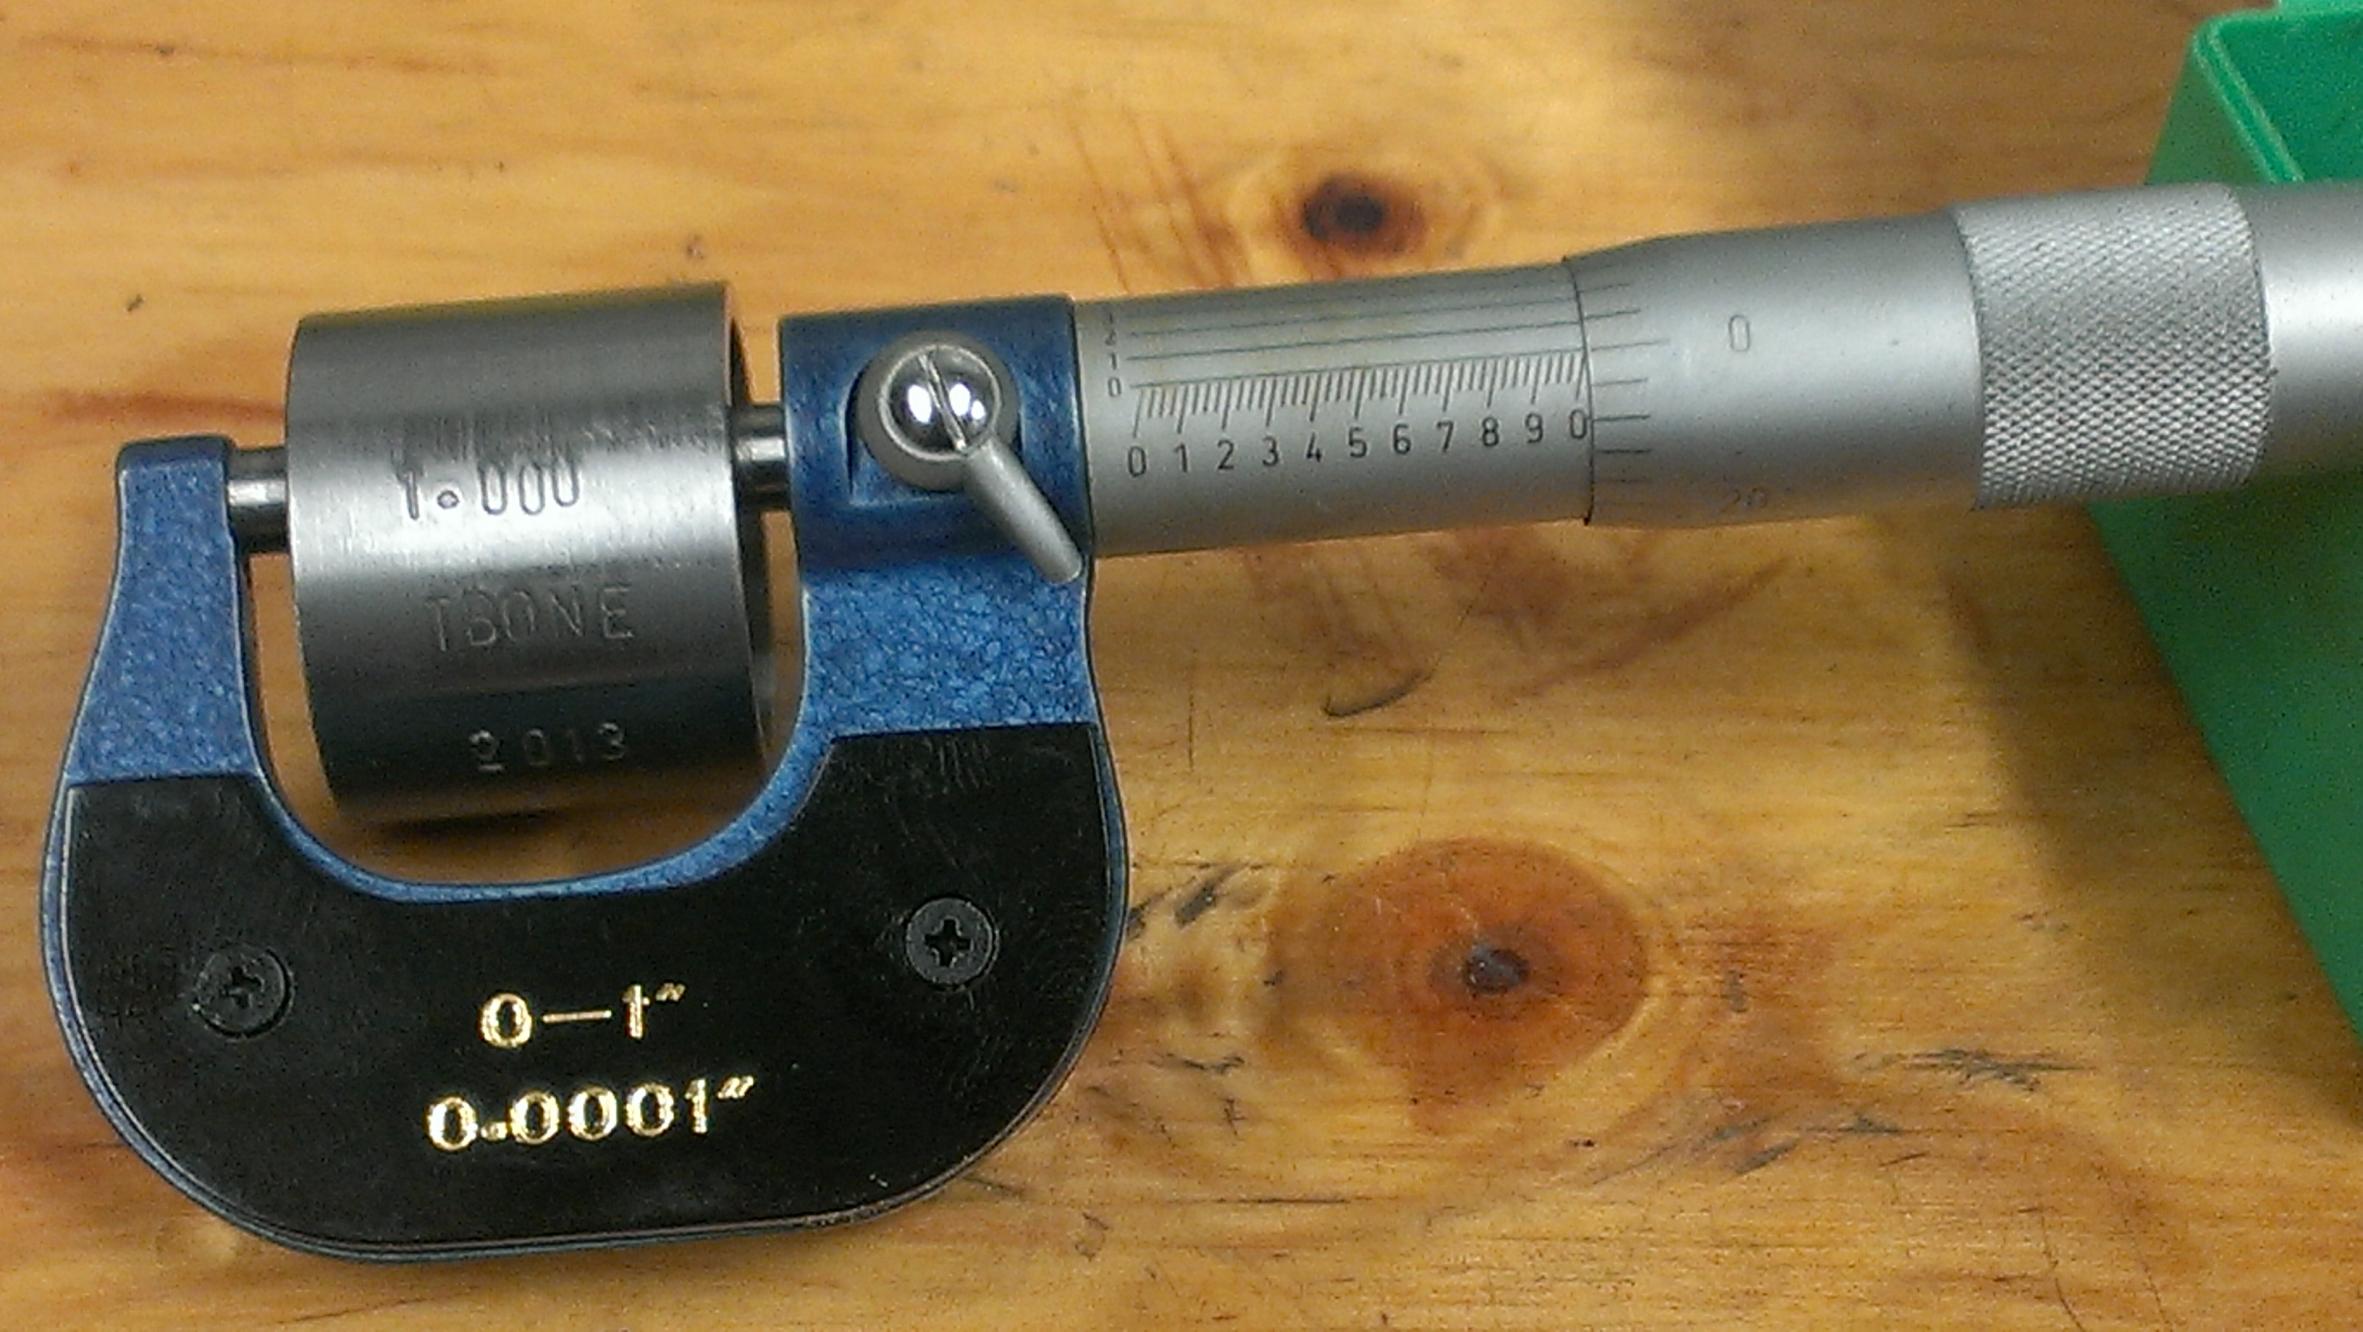
Here is a tool I have been meaning to build for ages.
When you are chambering a barrel, one very critical measurement is that from the shoulder to the base of the GO Gauge. This distance is calculated by measuring the breech face of the receiver to the boltface.
At the best of times it is difficult to measure because the shoulder is small, when the barrel is in the lathe it is even more awkward. I have recently been clamping a V block and using a depth mic. off that, but the length of the v block is something stupid like 2.372" which is just too hard, and it's big and heavy and plain painful.
So this little number I have turned and stoned to a length of 1.0000" with an internal diameter of 1.1". It's not hardened, but I won't abuse it and I think it will last fine. I have some blanks waiting to be fitted to this can earn its keep right away!
Bruce_in_Oz
12-21-2013
Remember that SMLEs (No.1 MkIII etc) breech up on the INNER breech ring, as do the opposition (Mauser 98s). There is SUPPOSED to be a minute gap between the front of the receiver and the back of the Knox Form.
No.4 and 5 rifles breech up on the FRONT of the receiver.
"Truing" the front of a SMLE receiver before fitting a "new" ORIGINAL barrel will not do much for improving alignment. HOWEVER, on a No.4 you will probably blow out the alignment / "crush" allowance if you take more than a few microns off the front face.
If you are starting with a new, blank barrel, do whatever works for you.
I suspect that the use if the inner ring as "datum" allowed the entire receiver to be mounted on a precision mandrel whilst many other external operations were carried out. It would also allow the "fine tuning" of the indexing of the threads BEFORE too much metal was removed from the rest of the forging.
A lot of dimensions on a SMLE receiver use the bolt centre-line and the inner breech ring as primary datum references.
And don't forget: the thread on a SMLE barrel is an "Enfield Special". The pitch is the same as a No.4, (14 TPI) but the included flank angle is 49deg 40min, with radiused roots and crests like BA threads: definitely NOT Whitworth.
The breech thread in No.4 and 5 rifles is 55deg and pretty much Whitworth form.
Bluenoser
02-05-2014
I am new to the group, but have been playing around with Lee Enfields for about 40 years. This thread couldn't be more timely for me since I am currently setting up to do barrel swaps on a couple of LEC1s. This will be my first bbl removal and I am doing a practice run on an SMLE barreled action. I am having difficulty with bbl slippage. My vise consists of two pieces of 2” x 3” solid steel held together by four 1/2" NF bolts. Alternatively, it will accept two 7/8" NF bolts but I think the 1/2" bolts should provide the required pressure.
My current blocks are just long enough to cover the Knox form. They consist of hard maple set in sections of 3" channel iron. They are an exact match to the bbl profile and-even with powdered rosin - it's a no go.
I have an idea for new blocks and would appreciate feedback. I am thinking of using 3" long sections of 3" channel iron with sheet steel end caps brazed on. Alternatively, the end caps could be sheet brass soldered on. The 3" length matches the width or depth of my vise. Each end cap would be cut out to match slightly less than half the bbl profile. What I would end up with would be molds that would conform to the first 3" of the barrel and Knox form. I would then fill each mold with a chopped fiberglass slurry and make casts of the barrel. If the end caps are steel, I would slightly relieve the openings once the glass has set up so as not to score the barrel if it slips. In use, I think I would still use rosin.
Once I know I have workable blocks I would make blocks to fit the LEC1s, which have a different Knox form profile.
And now the question: Should it work or am I drinking my bath water? Has anyone tried it?
Steve H. in N.Y.
2-05-2014
Welcome to the forum Bluenoser. It sounds like your setup should work. How thick are the clamping plates-could they be bending? Is maple too soft? I’ve had some success with oak blocks that grip only the straight section of the barrel, not the Knox form and I tighten the bolts enough that a fresh set of blocks actually compress almost 1/4". For barrel removal I usually find it necessary to give the receiver wrench handle a whack with a hammer to break it loose. I've only done this a few times, hopefully some of the more experienced folks will chime in.
Bluenoser
02-05-2014
Originally Posted by Steve H. in N.Y.
It sounds like your setup should work. How thick are the clamping plates-
could they be bending? Is maple too soft? I've had some success with oak
blocks that grip only the straight section of the barrel, not the Knox form
and I tighten the bolts enough that a fresh set of blocks actually compress
almost 1/4". For barrel removal I usually find it necessary to give the
receiver wrench handle a whack with a hammer to break it loose.
Thanks for the reply. I like your setup. My clamping plates are 2" thick solid steel. They won't be bending. The blocks are a fairly hard maple - but not as hard as rock or sugar maple. I chose maple over oak because it is less porous and I thought there would be less chance of splitting. That might not have been the best choice. I was under the impression the best place to grip the bbl was at the Knox form, but I could stand to be corrected. I suspect my main problem might be inadequate contact area. With the blocks bearing only on the knoxform, I probably had only about 4 square inches of bearing surface. I did give the handle a whack with my 4 lb maul but, with the bbl slipping, that didn't help.
Son
02-06-2014
Bluenoser, the lack of surface contact is the big issue. I posted all the details on my barrel vise at the head of this thread, and a couple of posts down the first page, details of the receiver wrench I made.
Have a look at it, the clamp set up is 9 inches long, with Aussie hardwood blocks routed to the correct form to clamp on the barrel. Spread over a big area gives big friction with the big bolts locked up with a big ratchet!
I sometimes have trouble holding a barrel with this set up locked down with a 24" 3/4 drive ratchet, so I would give your set up little hope I'm afraid. On that surface area it would squeeze the blocks out like butter before you would get it tight enough.
Brian Dick
02-06-2014
It's amazing when you take one out. It's almost a hundred years old and the grease/oil in the threads is still wet!
Rastis
02-07-2014
With jigs comprising of 1" steel plate and 3/4" bolts done up with 2 foot spanners, is there any chance of squashing the barrel, especially if you are clamping at the chamber?
Peter Laidler
02-07-2014
The question is too vague Rasta! Are the plates shaped to the chamber portion? Is the Knox form area locked down with a locking segment?
I have severe doubts about unbreeching a barrel further forward of the nocks form - as shown in Steve's pic 1 above. I am confident that a tight barrel, with a gorilla hanging onto the body wrench could twist the barrel. It is after all, only a low to medium carbon steel tube!
JM/Bruce in Oz... Comments on No.1 rifle barrel steel and torque ability/resistance
Peter Laidler
02-06-2014
After having breech and unbreeched hundreds of barrels, take it from me, some are just hard work. They just won't budge and when they do, it's with a loud crack and just unscrew so easily and freely that you ask yourself just what was holding them. But the only way is a tight fit at/on the Knox form I say.
Bruce_in_Oz
02-07-2014
Tbone's "stockmaker's" screws are wonderfully versatile things.
I have a couple of sets in the toybox.
VERY useful when setting up bedding, (or making a stock, if you are really keen), be it on a Lee Enfield or anything else. They keep sharp screwdrivers away from expensive woodwork until final assembly is done in a decent "gun- plumber's" padded cradle.
For Lee Enfields, a couple of rear triggerguard screws with extended, knurled "handles" are the way to go.
Another handy hint for people building "racing" No.4s; borrowed from the bench-rest and F-class folks:
If you swap out the 1/4" BSF front triggerguard screw for one with a hex drive, you can use an "inch-pound" torque wrench to set that important screw to the same, "match-winning" torque after a strip-down. If your local supplier doesn't stock 1/4" BSF, then get long 1/4" UNF cap screws, trim to length and thread appropriately. (This is probably best done in a lathe with a 55degree carbide screw-cutting insert. The toughened steel in these high-tensile bolts can be a bit hard on hand-driven HSS dies! Use lots of good tap-lube)
Bruce_in_Oz
02-07-2014
Well, according to Specification S.A./462 P, (1938), the barrel is to be made from D.D. 8 (heat treated).
The earlier (1903) S.A. 242 for the Mk.1 SMLE lists 110A Crucible or Siemens- Martin steel.
I suspect that I am missing the last couple of pages for the 1903 Spec; right about where the detailed specifications for the materials are. My copy stops at a hand-written spec. O.F No 56 B90.
Still trying to ferret out the specified analysis and mechanical properties of either.
Maybe someone with a suitable background and or "vintage" library can chime in.
The 1903 Spec (110A crucible steel) for the barrel states:
"The barrel is to be made of special mild steel, free from greys. In the forged state, each barrel is to receive a mark by which the particular batch of steel from which it has been made can be identified. The barrel must be re- marked as the metal is removed."
tbonesmith
02-08-2014
Back to Bluenoser -
here's what I use. The barrel vice uses aluminium tapered bushings machined to the same taper as the knox form, no driving flat. This arrangement has allowed me to undo the most frightfully tight No4 barrels without slipping.
I believe that the timber blocks would be suitable for most sporting rifles and many people use just that setup, but for No.4's and M17's and P14's and the like I think you will be unable to win with that setup. I think you would be well served to adapt some form of tapered bushing in aluminium or steel.
This is just my 2cents for what it's worth.
Bluenoser
02-10-2014
I think you are right on the money. At this point, modifying my vise and making the bushings would necessitate engaging the services of a machinist - which I would like to avoid. I was reading Bob Brownell's book "Gunsmith Kinks" a couple days ago and found several recommendations to make barrel blocks using acraglas. I think fiberglass should be just as good, and it doesn't involve significant effort or cash outlay to make a set of blocks. It's off to the machine shop if it doesn't work.
I picked up another good tip in the book regarding rosin. Dissolve it in a little turpentine and paint it on. No more chunks to score the finish.
I took particular note of your action wrench, which is similar to mine. Do you use the same insert plate for No.1s and No.4s? If not, could you post a photo of your No.1 plate, if you have one?
tbonesmith
02-10-2014
I'll take some pics when I get home, but instead of a plate I have small tapered steel blocks for No.1s , they lock the action up really securely.
jmoore
02-17-2014
Originally Posted by Peter Laidler
have severe doubts about unbreeching a barrel further forward of the nocks
form - as shown in Steve's pic 1 above. I am confident that a tight barrel,
with a gorilla hanging onto the body wrench could twist the barrel. It is
after all, only a low to medium carbon steel tube!
JM/Bruce in Oz... Comments on No.1 rifle barrel steel and torque ability/resistance -
Having ruined more than one by clamping in that area just behind the rear sight (described in more detail earlier on in this thread I think), it's best to stay as close to the chamber area as possible. (In most cases I was pulling rooted barrels from good action bodies, but one barrel constricted by the clamping blocks gained something of a second life as a 7,62x39 thing.)