Thread: No.1 MkIII Bolt Tab near cocking piece broke
Retrieved: 06/01/2014
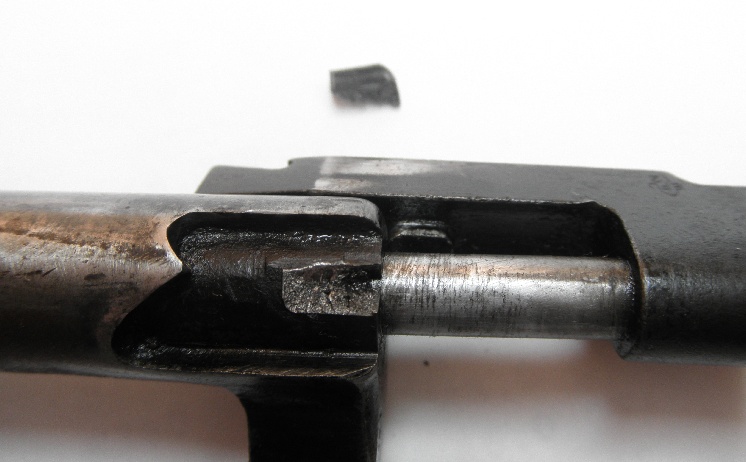
While cleaning a No.1 MkIII, a tiny piece of cast metal fell into my hand. It came from the bolt, in the area between the two cocking position grooves. This does not seem to affect anything, and all seems to move properly.
Is this something I can live without, and still properly use the Enfield, or does this mean I need to replace the bolt? How does the broken tab work, or what does it do?
Peter Laidler
06-17-2012
It is most probably the cam stud on the top unseen area of the cocking piece. It's part of the mechanical safety and while the rifle might work, it ain't safe. I won't go into the whys and wherefores but you need a new cocking piece not just PDQ but PDFQ!
I could be wrong of course
RobsTV
06-17-2012
It appears that the portion is part of the bolt, not the cocking piece.
Photo showing cast part of bolt, with piece above.
Peter Laidler
06-17-2012
Same meat, different gravy but not a bad diagnosis from the description was it? But the bad news is that it means a new bolt because you haven't got a half-cock mechanical safety.
Quite what this means in PRACTICE has got me thinking without the benefit of a rifle on my lap.
One thing it will allow is the striker to go fully forwards with bolt not fully closed - in that it will not allow the bolt to go into the half cock position - but while the cocking piece and striker is going forwards, the cam stud on the cocking piece will go left into the bolt raised position and fail to fire or it'll go right into the bolt lowered 'fire' position and won't fire because of the diminished force of blow onto the primer.
In any case, you need a new bolt! You need to read up about fitting new bolts then when you've fitted the new bolt body to match your rifle... I'd just sens it so someone who can do all of the interrelated things that are necessary when fitting a new bolt, CHS, overturn, life etc etc etc.
But now, things are not in the PDFQ theatre or operations but more the PDQ area of time scale!
Simon P
06-17-2012
I've seen this same problem on a few Long Lees over the years, I've learned the hard way, and this is one of the things I check before buying rifles in.
On a recent Lee Speed we had in the stud on the cocking piece was failing on the stud of the bolt making the bolt hard to close, the problem was resolved with a replacement cocking piece.
muffett.2008
06-17-2012
It's time to call in the Contagious Infection crowd, this makes three in two months, I just knew it was catching.
RobsTV
06-17-2012
Prior to original posting I did a search and did not find anything.
Could you point me to other threads where this also occurred?
I like to do everything myself, and as it is, will go into this with the plan of doing it myself.
There are no gunsmiths anywhere in my area.
If I travel outside my area, finding one familiar with Enfield will be a crapshoot.
Already went through this with an original Pattern 1853 3-band and never could find anyone competent.
Plus, after 51 years, I find I can screw things up as good as any professional.
The 3-band came back from far away highly rated gunsmith with a newly bent barrel. And he never could remove breech plug.
Have a lot of very high end machine shop help and tools available and will purchase some things if needed, like special tools and gages, within reason.
But reading, then reading some more, is where I am starting.
This No.1 MkIII made in 1917 is not a collectible, (although it could be for many), but instead an accurate shooter in fairly original fair condition with a great tight bore, that I enjoy shooting very much. I keep a No.4 Mk1 Sniper mostly in the safe as the collectible of the house.
Other fine examples of professionals in my area are, 3 local gun shops had no clue what I was talking about when I asked if they had any 38-40 black powder revolvers to go along with my 1873 Winchester. They all looked like deer in headlights with a blank look on their faces.
paulseamus
06-17-2012
This link should help you.
Fitting rifle bolts - CHS and boltheads.pdf
The article is listed under Peter Laidler's online series of articles, listed in the Lee Enfield stickies at the top of the Lee Enfield Forum.
Here is a link to all of the valuable articles.
Index of Peter Laidler's on-line series of articles
RobsTV
06-17-2012
Thanks, and yep, that link to Peter Laidler's guide is where I am starting (thanks Peter)
A quick question that on the surface sounds like a simple solution.
Can I not simply measure my current bolt and match that up with another the same size, or within a range?
Or will all that be answered with my readings, which I am continuing.
Steve H. in N.Y.
06-17-2012
Had the same thing happen on a nice SMLE with a matching # bolt. A friend who was a good man with a TIG welder built up the spot and I finished it off with a Dremel grinder. It worked out very well.
RobsTV
06-17-2012
Thought about welding and grinding as well, and might go that route.
The bolt number does not match, so that is nothing I am concerned about if replacing.
As to adding metal and forming current bolt broken tab:
How much stress or load is placed on this tab?
I would guess very little under normal use.
Anything made to "liquid" weld the broken tab back on? (JB Weld or?)
I think I know how tab broke off, and I did it.
Last range trip and gun would not fire after 30+ rounds. Trigger was hard and would not pull. Range was Hot and they need you to remove a round and make weapon safe before they can allow range to go safe. So the range was waiting on me. Took a hard rubber mallet range officer gave me and wacked on the bolt handle to try to open so I could remove round. I know, bad move. Didn't work. Then I realized cocking piece was not fully out like it should be when ready to fire. I gently pulled cocking piece fully out, then was able to fire the gun. Noticed excess dirt in cocking piece area. All seemed to work fine after that though at the range. Found broken tab during subsequent cleaning..
jmoore
06-18-2012
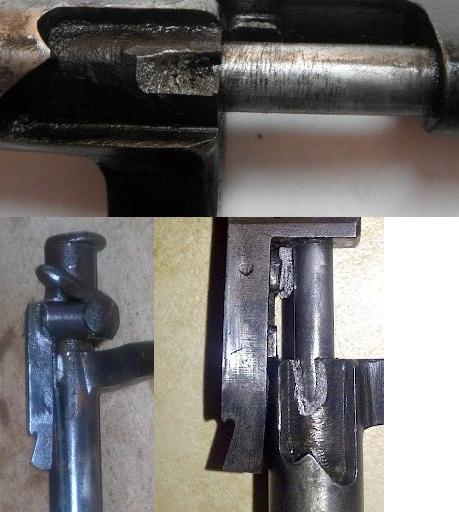
A file photo of the damaged area under discussion:

Also added a link to this thread in the "Gallery of Dramas" for future easy reference:
http://www.milsurps.com/showthread.php?t=27425&page=11&highlight=gallery+dramas
Peter Laidler
06-18-2012
If I was you, I wouldn't go down the welding route Rob because while your welder mate might be good or indeed VERY good, but he doesn't know how the heat from his torch had affected the integrity of the case hardening and toughness of the hardened locking shoulders or toughness of the bolt. Don't forget, in simple terms, to stick a new blob of steel back onto your bolt, he's brought that part of the bolt up to the melting point of steel. That's only my opinion as a bit-part amateur
Look... bolts are cheap, fitting a new one is relatively easy if you follow the lessons. Even if you have to take it to your local reputable gunshop to fix - or even send it to someone who knows what he's doing, it's better than not knowing what you've ended up with. Just get a new bolt.
RobsTV
06-18-2012
Bolt replacement is what I would prefer to do.
There are no local gunsmiths, and gunsmiths an hour or more away have not been very reputable. They also pretty much charge $80 to $100 (US) just to look at something.
I think I just saved some money in equipment, and looks like I can "roughly" measure headspace without headspace gauge.
Using the spent primer method, and test was repeatable 5 times. Results show current headspace at exactly 0.070.
(chambered case length with spent primer inserted using closed bolt = 2.253", minus original sized case 2.241" = 0.012 + case rim thickness of 0.058 = 0.070)
Peter Laidler
06-18-2012
Florida - South Carolina... looks pretty close on my map. Just send the stripped barreled action and old bolt to Brian at BDL in SC and he'll fit a new or good used and re-numbered bolt for you in an hour or so. And you know that it's done properly, the bolt will be set-up internally and CHS'd perfectly.
Bruce_in_Oz
06-18-2012
I would recommend a new bolt body as well.
The bolts are specified as being made from a material called D.D.8. This appears to be a malleable iron, rather than "steel" as we know it. The "grainy" nature of the surface at the fracture is a clue to a problem that will face ALL users of ALL fine toys made from this type of material. The issue is that of age embrittlement. This is an even bigger problem in components that have been hardened by heat-treatment. With only carbon as a hardening component, it is VERY easy to get it wrong, especially before the days of accurate pyrometers.
Assessing "cherry red" is a bit subjective for a start. Work in the various plants went on whether the sky was cloudy or sunny, day shift or night. It would be something of a challenge to maintain precise temperature assessment visually, in a factory illuminated by skylights and vintage lamps, either gas or electric.
Brittle cocking pieces appear with monotonous regularity these days. WW2 British No.4s seem to be particularly prone to this. "Over-cooking" seems to be the cause.