A Simple Hydraulic Press
Retrieved: 12/28/2014
This was one of my most enjoyable projects! It was done without great expense or special tooling. There are many ways to build a press with this approach. Maybe this particular plan will give you some ideas for building your own.
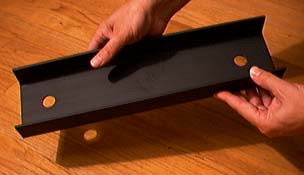
These first pictures show some of the major component parts of the press. This is one of two pieces of 4 inch wide channel. They are 16 inches long and are used at the top and bottom of the press. They are useful for mounting eye bolts and the blast shield as well as providing a space in the base for the large pressure bearing nuts. I chose to drill the two holes where the 3/4 inch threaded rod goes through. The task of drilling holes in a piece of channel is not nearly as daunting as drilling through 3/4 inch flat bar as shown below.
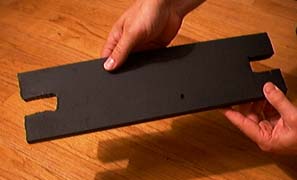
This picture shows one of three pieces of 4 inch wide flat bar. They are 3/4 inches thick and 14.5 inches long. A notch has been cut in each end to accommodate a 3/4 inch threaded rod. As you can see, the cutting is very rough because it was done with a simple cutting torch by the metal dealer. These three pieces cost me $15 and the torch cutting cost another $5. You very well might do better if you try to find this material from a scrap dealer.
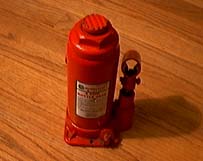
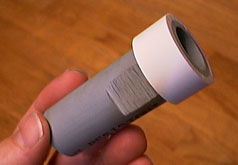
This is the six ton hydraulic piston jack. I purchased it from an auto parts store for about $20. The force of this jack is sufficient to bend the pieces of channel. This is why I needed to use the pieces of flat bar to reinforce the channel pieces at the top and bottom.
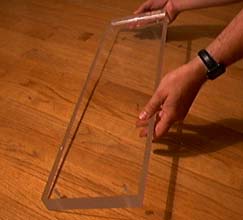
This is a piece of 1.25 inch thick plexiglass that I used for the blast shield. I was very fortunate to receive this free from Donald Haarman who apparently salvaged it from a dumpster. Thanks again, Donald!! Part of the fun of these projects is the "scrounge" phase. Whatever is used for the blast shield, it's very important to include it. I certainly feel a whole lot safer with 1.25 inches of plexiglass between the press and my face.
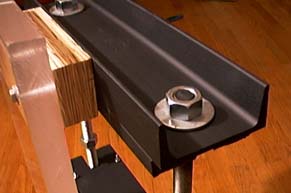
This close-up view of the top shows the channel placed on top of the flat bar. The threaded rods hold them both in place with a nut and washer on each side. The blast shield is bolted to the channel through a wood offset block. This gives me a little more working room around the middle pressing deck.
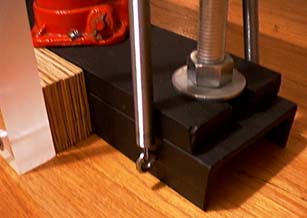
The base of the press is assembled identically to the top. The retraction springs are attached to eye bolts which are mounted through the base channel.
This picture shows the attachment of the blast shield to the base channel. You can also see the bolt which secures the base of the hydraulic jack to the base of the press frame.
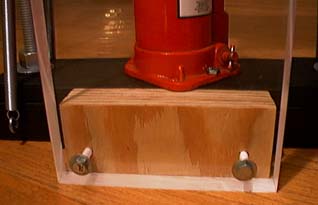
This view from the opposite side of the blast shield illustrates the attachment and placement of the retraction springs. The springs add stability to the middle pressing deck and conveniently retract it when the release valve of the jack is opened. These springs are fairly expensive at $2.85 apiece, but are well worth the contributions they make to the design.
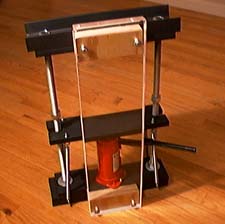
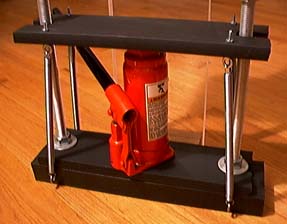
Finally, the finished product is shown. This press design was partially inspired by a similar plan sold by Firefox Enterprises. The major difference is that the Firefox design places the hydraulic jack on top of the pressing deck and the object to be pressed is placed on the base of the pressing frame. This way, the pressing surface comes down from above, whereas the design shown here causes the pressing surface to push up. If you are interested in the Firefox design, it only costs $4.00.
This idea comes to you from Rich Weaver. I liked it so well, I made the modifications to my own press. The concept is to add protective sleeves around the threaded rods to prevent the press deck from scraping against them as the deck is raised and lowered. I made the sleeves from 3 inch lengths of 3/4 inch PVC conduit pipe. I glued a coupler on one end and then cut the coupler right down the middle. The PVC tubes had to be notched a little to allow them to fit into the slots of the press deck.
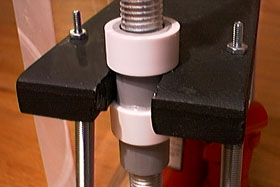
The sleeves are installed by using the coupler rings that were cut off in the step above. The rings are glued and slid over tubes to lock them into place in the slots of the press deck as shown. The tubes now act as guides that give the deck a little more stability and keep it from binding or scraping against the threaded rods. Rich Weaver has some other ideas about pressure regulation using a torque wrench. If interested, you can contact him by e-mail.
weaver_r@mediasoft.net
Date: Wed, 25 Nov 1998
From: " Mike N." (705728@ican.net)
I think arc welding the head of the jack right to the metal plate would help to keep the item(s) being pressed perpendicular to the plates. -Mike N.
Date: Sat, 5 Dec 1998
From: Robb W. (Rwhite9000@aol.com)
Mike N. suggested arc welding the jack piston directly to the pressing deck. I suggest arc welding a 4"X4"X1/4" thick plate to the jack piston in case you ever need to take the press apart. -Robb W
Date: Tue, 8 Dec 98
From: skessler@LCSI.COM
Robb W. suggested arc welding a 4"X4"X1/4" thick plate to the jack piston in case you ever need to take the press apart. I suggest arc welding a large socket to the 4x4x1/4 plate (large enough to accommodate the jack piston) in case you ever need to replace the jack :) -Steve Kessler