A Charcoal Cooker
Retrieved: 12/28/2014
A Charcoal Cooker
There are as many ways to produce charcoal as there are pyro enthusiasts. There are certainly many approaches that are simpler than my method. I will try to point out the advantages of this particular charcoal cooker and leave it to your judgement to determine whether it has merit. As always, I invite critical commentary, but praise and homage is preferred.
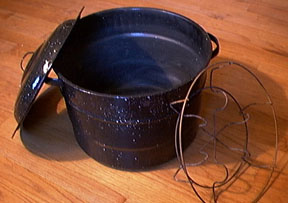
This is a typical 22.5 quart or 6 jar canner pot. It is used to can fruits and various garden grown produce. The pot is constructed of fairly light weight sheet metal which has a tough porcelain finish. It comes with a wire basket which holds the canning jars securely inside during the canning process. You can purchase one of these at Wal-mart type stores for about $14.00. This is used as the "oven" part of the charcoal maker. There are many alternatives to using this particular kind of pot. Various metal drums or metal buckets will work just as well.
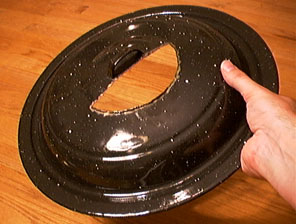
A lid for your "oven" must be fashioned with a hole in it where the hot gases can exit. The idea is to create a draft of hot gases from the bottom of the oven to the top. If you use this kind of pot, it's a good idea to cut the hole with minimal damage to the surrounding porcelain.
Next, the holes in the bottom of the pot are made. I placed a length of 3 inch paper mortar tube with its face against the inside bottom of the pot, beneath the site of each hole. This gives firm support to the bottom surface which avoids cracking the porcelain while the holes are formed. A sharp blow with a hammer on a center punch creates a hole about 5/16 inch in diameter. I created 30 holes in an evenly distributed pattern on the entire bottom of the pot.
Now, the theory is that the oven temperature could be regulated by the number of holes in the bottom. More holes allow more draft and consequently a hotter fire. I tried to create the holes in groups that would accommodate the addition of rotating hole covers. This should achieve the desired temperature regulation, but I have yet to experiment with this concept. Currently, the 30 holes result in an oven temperature of about 575 degrees F. Another enhancement would be the addition of standoff feet on the bottom of the cooker. I just set the pot on 3 rocks during operation.
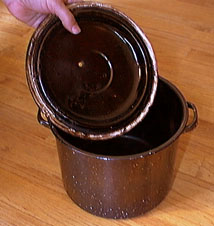
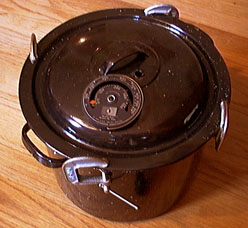
Now we turn our attention to the retort container. This pot is a miniature version of the oven pot. I bought it at a garage sale for $1.00. Wood stove cement and fiberglass gasket material were used to seal the lid which is held in place by 4 mini C-clamps. A single 5/16 inch hole was punched in the lid to vent the smoke from the retort. I like this retort can because it will last for dozens of uses before it will need to be replaced. The handle is handy for lifting it in an out of the oven with a wire hook.
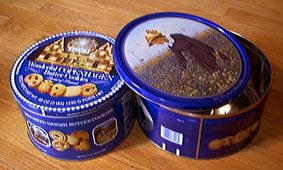
Many simpler alternatives can be considered for the retort container. These Christmas cookie cans work great. Add a couple of screws to hold on the lid, put a hole in the top or bottom and you're all set. (Editorial comment: You know you're a pyro when you buy stuff you don't need just to get the container. I don't care for these cookies, but I will gag them down just to justify buying the can.) My objection with this approach is that this kind of container will only last for about 5 or 6 roastings before the thin metal walls loose their integrity. Then I have to eat more cookies.
If you really want to become a gourmet charcoal cooker, you might want to consider buying one of these flu thermometers. This one cost $11.00 and was purchased at a hardware store that carries wood stove products. It is magnetic and will stay anywhere you put it on the retort if the retort is made of iron. Perhaps you are asking....Why do I care what the temperature is in my oven?
Let's slip into the theoretical domain again for a moment. Charcoal made at lower temperatures contains a higher percentage of volatiles in it. This leads to black powder that ignites easier, which would be desirable for black powder based primes. Charcoal made at higher temperatures contains less volatiles, ignites at higher temperatures and may be more desirable for creating lift and break powders. I don't know if there is a strong consensus among the pyro community for these theories. At any rate, the addition of the above temperature gage to your retort gives the appearance to the uninitiated that charcoal making is nearly as complicated as rocket science.
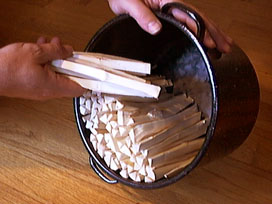
OK, we've finished making our primo charcoal cooker. Let's talk about how to use this hi tech apparatus. Perhaps the most labor intensive part of making charcoal is the preparation of the wood. When using willow, you must remove the bark and split the sticks into smaller sticks no thicker than 1/2 inch. I load the retort as full as possible with the sticks oriented vertically.
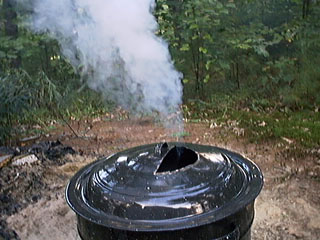
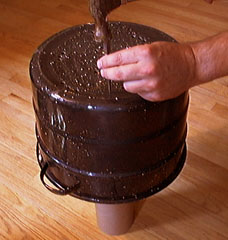
Now we need a fire in the oven. I use two layers of regular barbecue briquettes to fuel the fire. I place the briquettes in the bottom of the pot with the wire basket in place. The handles of the wire basket are removed so they don't interfere with the placement of the retort. This keeps the retort from settling and choking off the intake holes at the bottom of the pot. My kids think it's pretty funny that I use charcoal to make more charcoal. I'm afraid they tell their friends, "He's a nice guy, but sometimes he ain't too bright!" This picture shows the cooker in operation. The flu temperature gauge is placed so it is visible from the hole in the lid. A nice column of smoke is rising from the retort vent and the smell of smoky campfire fills the air (and sometimes my house when the wind is right.)
A close examination of the smoke column reveals an interesting fact about the operation of this cooker. The smoke is not visible until the gas jet rises several inches above the retort vent. This implies that the escaping volatiles don't condense into visible smoke until they cool in the rising column. This is the main advantage of this kind of charcoal cooker. Allow me to explain...
In my days as an apprentice charcoal maker, I would simply place the retort can over an open fire. I found that it was difficult to achieve a steady, well controlled heat source. I had to constantly add fuel to the fire and check it often. Even with great attention, the heat was not distributed evenly. The result was that there were often cool spots in the retort where the charcoal was brown instead of black, indicating that the wood conversion to charcoal was not complete. Even worse, cooler areas of the retort lid would allow condensation of the reaction gases on the inside of the lid. The accumulation of these tars left a mess that was impossible to remove. All of these problems are eliminated by the new cooker. Now, the retort stays fairly clean, I don't have to constantly tend the fire and the temperature is even and controllable.
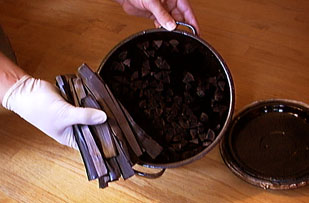
Finally, the result of all this effort is beautiful, almost shiny black charcoal. Getting it into usable form is another story. I use a meat grinder for the first stage of reducing it to useful grain sizes. Tom Perigrin suggested in the April 98 AFN that you use gallon size zip lock bags, remove excess air and whack and roll it with a PVC pipe. The resulting charcoal powder is then graded with various screens. For airfloat, of course, you will need a ball mill. Whatever your method, you will get pretty grubby and will probably blow black stuff in your kleenex for a week.
Date: Wed, 16 Sep 1998
From: Robb White (Rwhite9000@aol.com)
Great site. I use large coffee cans. I cover the top with foil, punch holes in the foil and put it on a Coleman single burner propane stove. Nice hot and even heat.
Date: Thu, 05 Aug 1999
From: Mike Johnson
Just wanted to mention that I took the contents of the retort and placed it in a double zip-loc freezer bag (the heavy duty kind) and layed it on my concrete patio, I then smashed it down to about dice size and smaller with the end of a 2x4 by 3ft. This took about 2 minutes. I then thought about an electric mincer chopper my wife bought some time ago and never used. She gladly donated it to me without much convincing. Man, this thing really works great and almost makes an air float in about 20 seconds. It's made by Black and Decker. Anyway, I did the whole batch in about 5 minutes.