
Home Manufacture of Black Powder
Retrieved: 12/28/2014
Without black powder in all its varieties, it would be tough to make much more than sparklers for pyrotechnical displays. Making high performing black powder is one of the fundamental skills that the aspiring pyrotechnician will probably want to master early in his quest for knowledge in the field. The goal of this meager treatise is to illustrate the most popular method of amateur production which is called the "ball milling method." This implies that anyone who wants to use this approach will need to first build or have access to an efficient ball mill . Without a mill, one is left with the inferior alternatives of using the CIA (precipitation) method or the incredibly laborious mortar and pestle method.
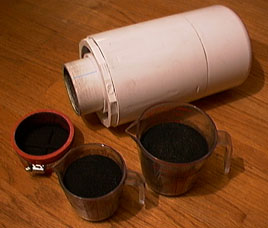
The first step in the process is to assemble the raw materials. In this case, there are only three, as pictured: potassium nitrate, charcoal and sulfur. Of these three, potassium nitrate and sulfur can readily be purchased from pyro supply companies such as Skylighter or Iowa Pyro Supply ,but charcoal is a different story. The subject of charcoal could require a whole book to adequately cover. For the purpose of brevity, this text will assume that willow charcoal is one of the most popular choices for making high performance black powder. Unfortunately, commercial sources (at least in the US) for this particular kind of charcoal are very rare. The best approach is to make it yourself with a home-made charcoal cooker. Then you can control some of the characteristics of your charcoal by custom cooking it to your liking. .
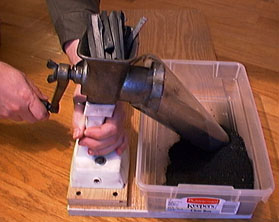
If you make your own charcoal, you need to reduce it from the original sticks to a more usable powder form. I use the meat grinder method shown here. A guide chute has been fashioned from a sheet of transparency film to help keep the dust down. This is definitely not a job to do in your kitchen unless you want to risk sleeping in the garage for a month. A good respirator is also recommended. The result is a charcoal powder which ranges from air float to about -8 mesh. This may or may not be useful "as is" for making black powder, depending upon the approach used to make the green meal. Hopefully, this will become clear in a moment.
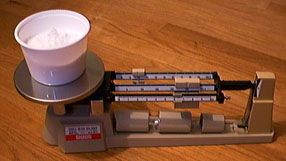
Regardless of the method used to make the green meal, the proper proportions can only be achieved by weighing them on a scale. I generally use the traditional ratio of 75 parts potassium nitrate, 15 parts charcoal and 10 parts sulfur. If your black powder is intended primarily for use as lift powder, you might want to use the ratio which is purported to be optimized for this purpose. It is 74 parts potassium nitrate, 14 parts charcoal and 12 parts sulfur. Just remember that these are parts by weight. It seems that every "newbie" to pyrotechnics will reveal his ignorance by asking the question concerning whether parts in a formula refers to weight or volume. Save yourself the embarrassment and etch upon your mind that pyro formulas are always in parts by weight unless specifically stated otherwise. The triple-beam balance scale shown does the trick quite nicely for weighing out parts of a formulation, but you can accomplish the same purpose with a much less expensive home-made scale .
Let's diverge to a little background discussion for a minute. The green meal referenced above is the raw, unprocessed mixture of the constituent ingredients. There are two basic approaches to creating this initial mixture. One method is to create a bulk mixture from which a "volume measured" portion is taken and placed in the milling jar. The other approach is to create a batch of green mix which is exactly the amount needed for the intended milling jar charge. In the first case, the particle size of the individual components of the mix must be small enough to assure homogeneity. In the second case, there is no concern about the green meal being homogeneous. The potassium nitrate and sulfur can be full of lumps and the charcoal can be very coarse. The proper weight portions are just loaded into the mill jar and the milling accomplishes the homogeneity. The second approach has many advantages, but it can only be done if the user knows the exact weight of the optimum charge for his milling jar. For the purposes of this discussion, the definition of an optimum charge is the following: the amount of fully milled black powder meal which occupies 25% of the mill jar volume. The determination of this optimum charge is challenging because milling will often alter the volume of that which is milled. The best way to determine the weight of the optimum charge is to actually weigh the desired volume of finished meal. This implies that the user of a new milling jar must use the first approach to making green meal for his first batch. The optimum charge is then determined and can be used for all succeeding batches.
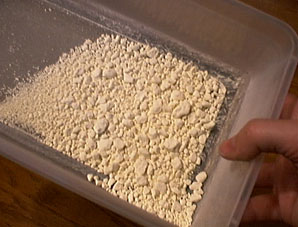
The first approach to making green meal will be demonstrated because it also includes many principles of properly mixing pyrotechnic chemicals. In general, successful pyrotechnic compositions work well because their proportions of ingredients have been very carefully determined. If the pyrotechnician allows the proportions of his mixture to vary from the ideal, the performance of the composition will usually suffer. Therefore, except in a few unusual cases, a high degree of homogeneity is desired in pyrotechnic mixes. One of the best ways to accomplish this is by using screening (which requires a good set of mixing screens ) as a means of mixing pyro chemicals together. In the picture at the left, is shown the results of screening a mixture of the potassium nitrate and sulfur which were weighed out for the bulk black powder green mix. The two chemicals were stirred together and appeared well mixed. However, upon passing the mixture through a 40 mesh screen, many large lumps of sulfur are revealed. These lumps obviously destroy the homogeneity of the mix in their near vicinity.
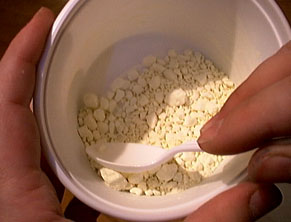
In order to eliminate these lumps, I perform a rough approximation to a mortar and pestle operation by placing the lumps in a container. The lumps are crushed by the back of a spoon against the sides of the container. The contents of the container are then returned to the mixing screen box and the cycle is repeated until all of the material passes through the screen. The entire quantity of mix is then passed through the screen several more times to ensure a thorough mixture. This method works well if the lumps aren't hard and dense. If they are too hard to crush easily, the best way to eliminate them is by milling each chemical separately prior to mixing with others. Now, to complete the black powder green mix, the charcoal must be added. The screening method could have been used to mix all three chemicals together in one step, but I prefer to add the charcoal as an "airfloat" which will be free of coarse particles. The charcoal is added to a container with the screened potassium nitrate and sulfur, a tight lid is used to close the container and the container is shaken vigorously. I do this because screening any mix which contains fine charcoal will usually result in a lot of airborne dust which enters the lungs and coats the pyro lab with a nasty black film. At this point, a black powder green meal with a reasonable degree of homogeneity has been achieved.
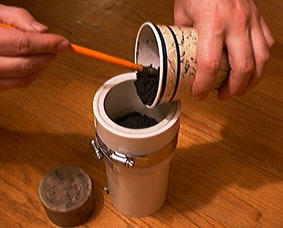
Now a volume of green meal equal to 25% of the mill jar volume is measured. For this jar, that volume is 3 and 1/4 cups of our bulk green meal. This is the first approximation to the theoretically ideal mill jar charge. It is added to the jar along with hardened lead milling media equal to 1/2 of the mill jar volume. In my experience, the volume of the black powder meal will increase during the milling. If you have a high efficiency mill, the milling process will be complete in about 3 hours of milling time. I would be remiss if I didn't mention that the milling should be done with all the due precautions taken. This means locating the mill remotely and perhaps using protective barriers around it.
The powder which results from the milling process is still referred to as "meal" because it is not yet very useful for pyrotechnic applications. However, it is no longer called green meal. The meal is processed into grains of black powder by a method known as corning. The size and characteristics of these grains will determine some of the aspects of the performance of the finished black powder. The first step in the corning procedure is accomplished by using a powder die to compress the milled powder into "press cake". One of the secrets of making durable black powder grains is to add sufficient moisture to the meal prior to pressing it into the cake. I add 4 grams of 50% water/50% alcohol to 119 grams of milled meal to make an individual die batch. This is done by placing the meal and water/alcohol in a mixing cup and stirring vigorously with a stirring rod. The milled powder will undergo a fairly rapid transition from fluffy, loose powder to a stiff, but still crumbly powder when the moisture becomes well distributed. Some will advocate adding moisture by misting it lightly onto a pile of milled powder while mixing with the diapering method. Theoretically, this avoids degrading the performance of the powder by not giving the potassium nitrate a chance to dissolve and recrystallize. However, I have found this trouble to be unnecessary. The picture shows the dampened, milled powder being added to the powder die, after which the compression piston is placed on top.
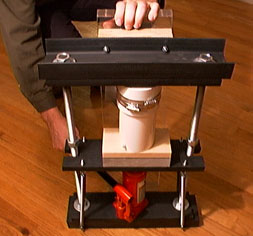
Next, the die is placed in a home-made hydraulic press and the press is operated from behind the blast shield. This picture is illustrative of the pressing step, but in actual operation I recommend the use of a heavy glove on the hand which is used to pump the hydraulic jack. This and a heavy sleeved shirt or coat are a good idea. The die has been designed so that the finished press cake has the desired density of 1.7 grams/cc.
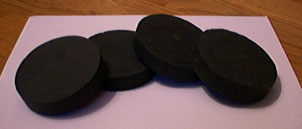
These are the puck shaped pieces of press cake which are extracted from the powder die after pressing has been completed. They are rock hard and should hold together well without crumbling. If the press cake crumbles easily, this is one indication that insufficient moisture was added to the milled powder. The press cake pucks are allowed to air dry for at least 24 hours before they are crushed into powder grains. Tapping on the pucks with a wooden dowel makes a china-like clinking noise even right from the powder die. After drying for a day or so, the pucks will ring even a little more, indicating that the moisture level is about right for the final step of the corning procedure.
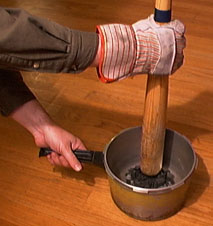
Crushing the press cake into useful grains is somewhat nerve-wracking for me, but I like this step because it is the last in a long series required to finally obtain high performance black powder. I use a small baseball bat to crush about 1/2 of a press cake puck at a time. The chunk of press cake is placed in an old aluminum pressure cooker pan and the bat is used in short, downward strokes to break up the cake. This works best if the pan is placed on a very hard surface, such as concrete or stone. The idea is to fracture the cake into grains without crushing it back into useless powder. Again, for safety's sake, this should be done outdoors with protective clothing and always avoid placing your face directly over the pan. If 60 grams of black powder were to ignite in the pan, it would create a hot flame as much as 4 feet high before your reaction time would allow you to get out of the way. As I said, this step is a little nerve-wracking, but I have never had an accident during this step yet. There may be some arguments for using a plastic bucket instead of an aluminum pan, but I'll leave this choice open to discussion.
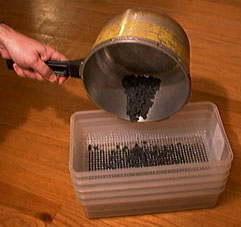
The contents of the crushing pan are emptied into a stack of screens to separate the various desired grain sizes. Whatever will not pass through the top screen is returned to the pan for more crushing with the "bat pestle" and this cycle is repeated until all the black powder cake passes through the first screen. A little side to side shaking of the screen stack during each cycle helps the grains settle to their proper location in the stack. This particular stack of screen boxes consists of the catch box, a 40 mesh, a 20 mesh, a 10 mesh and a 4 mesh screen on top. The powder which falls clear to the catch pan is a -40 mesh powder which is retained for use whenever meal D is called for in my pyro formulas. The powder in the 40 mesh box is a 20 to 40 mesh powder which is used as 4FA equivalent. The powder in the 20 mesh box is a 10 to 20 mesh powder which is used as 3FA equivalent. Finally, the powder in the 10 mesh box is a 4 to 10 mesh powder which is used as 2FA equivalent.
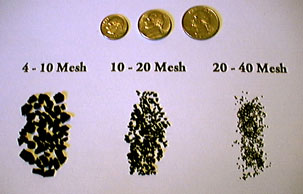
This picture is shown to give an idea of the various grain sizes relative to common US coins. Now I'd like to explain a little about my philosophy regarding my choice of screens for separating the grains into these ranges. The ranges don't conform exactly to those given for the common commercially produced powders and this is intentional. The only motivation I can think of to conform more closely with the commercial definitions for black powders is to enable a completely transparent exchange of commercial and home-made powders in pyrotechnic projects. In these cases, the pyro craftsman wants his home-manufactured powders to perform identically to commercial powders so that he can always expect consistent end results. In my case, I don't use commercial powders. Therefore, I can afford the luxury of adjusting the amounts of powders used in my projects according to the desired results. This way, my only concern is to make my own manufacturing process very consistent so that my home-made powders always give me the same results. The advantage of this approach is that the ranges of grain sizes for my equivalent powders don't overlap as they do in the commercial ranges. This means that I can use commonly available screens and do multiple separations in one step as illustrated above.
Finally, I am compelled to add a few words of caution and disclaimer to this brief explanation. Remember that the manufacture of black powders is a regulated activity in many areas. One should do some research into the legal requirements before attempting to do any of these steps. The procedures described represent my own experience and are not necessarily recommended as the final word in how to do it properly and safely. These explanations are made available to others in order to stimulate constructive dialog for enhancement or improvement.