
I have 2 custom colt series 70 1911's built by the same smith. One is complete and the other is in a shake out stage.
Things that matter:
Ed Brown triggers
Ed Brown hammers (in one unsure of other)
Ed Brown perfection sears/disconnects
Ed Brown hardcore sear springs
3 months ago I got my 45 back to shake it out before bluing to see if there were any changes I would like made. After about 500 rounds it started double firing and tripling. I stopped shooting and put it away and trucked on with my other 1911's. When I got home I noticed the screw in the trigger was backed all the way out against the front of the shoe. Anyway told the smith when I dropped it off to be finished. Well I got it back along with the 9mm/38S series 70 to match it in shake out stage. Today I went to a close indoor range with a few of my 1911's to shoot. I put around 100 rounds in the 9mm without any fail of any sort and then switched over to the 38 super barrel. After the second mag of 38 super it started doubling. I stopped shooting it then and put it up. Switched onto my 45 that was trouble before. After about 100 rounds it started doubling which really Tee'ed me off. Well got home and started looking them over and noticed the screws in both pistols triggers were backed all the way out. I then took the grip safeties off both pistols and noticed this let the trigger push the sear into a weird spot that barely caught the hammer. Then I started playing with the screws and turning them in till the hammer would not fall and backed out 2 full turns. I did some function checking and no hammer fall so I put on some low strength loctite and headed over to the range. I was able to put 200 rounds through each pistol with no trouble.
I know that's a long post to get to the point but I am suspecting that this cannot be the only issue but not 100% on that. Could this silly screw let the trigger mess with the gun that much? Pretty sure I am going to send them both to Vandenberg to have the triggers looked at as the springfield he built me is solid with no trouble at all.
I have a 3rd Springfield Armory 1911 45 that is built with the same parts except for the trigger which is a solid style with adjustment screw. Vandenburg did the work on it and its solid and I don't wanna mess with the screw to see if it would do the same thing.
Pics as always...
Yes, absolutely, the overtravel screw is an important adjustment. As you graphically experienced. The bow should be stopped before it pushes the disconnector too far and lifts the sear spring by the step in the grip safety arm, but that doesn't always work due to parts, dimensions, etc.
I thought that the original 1911 design used the grip safety arm to stop the trigger's reward motion and the modern over-travel screw was intened only to reduce trigger reset travel for competition... the original pistol didn't have this adjustment screw nor do many modern 1911 variants including Colts.
I have removed the over travel screw on builds without consequence... except longer trigger resets.
If the screw is adjusted too far in then the hammer hooks may get rounded off becuase the sear can't completely separate from the hooks. Adjusting the set screw too far out should do nothing but increase the trigger reset.
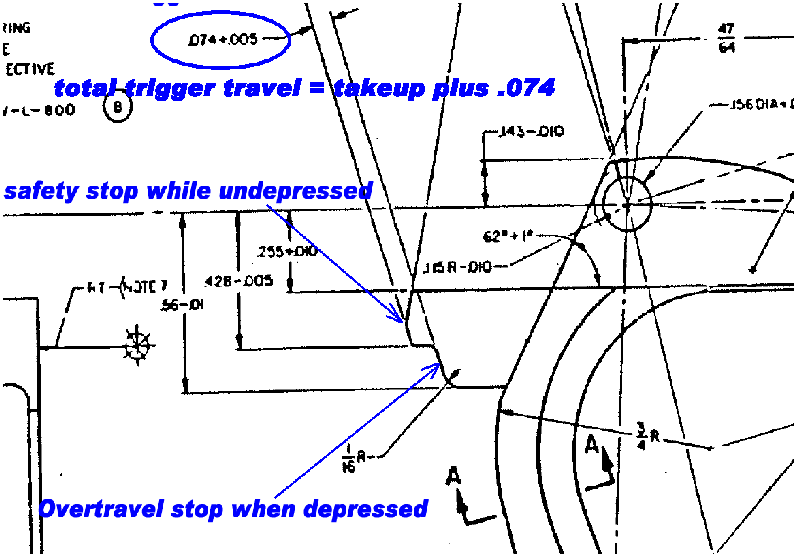
It would be nice if the step in the arm always worked, but with the mix of sear, hammer and disconnectors the number don't always add up to stopping before lifting the sear spring just a tad. A good way to check is the get acquainted with the parts by looking in through the mag well relief cut. With the slide held back, with a block in the ejection port to hold the disconnector down, and remove the mag catch. Now with the gun upside down, grip safety depressed, and pull the trigger back and forth, with a bright flashlight you can see if indeed the arm is stopping the bow, or was the mag catch. Some do, some don't.
Did the above and there is a good distance before the trigger bow hits the grip safety arm. It doesnt look like any of the material has been removed off the area that this would hit on the grip safety so I dont think fitting a new grip safety would help that anyway. I am pretty sure there is something in my kounhousen (spelling) books about peening the arms of the GS so will look it up.
One thing I am pretty sure of it is I need to get it to a 1911 smith and get it sorted out.
Quote:
Did the above and there is a good distance before the trigger bow hits the
grip safety arm. It doesnt look like any of the material has been removed off
the area that this would hit on the grip safety so I dont think fitting a new
grip safety would help that anyway. I am pretty sure there is something in my
kounhousen (spelling) books about peening the arms of the GS so will look it
up.
But did the bow lift the sear spring? The purpose of doing it.
Peening is an expedient fix for the arm being just a bit too short to block the bow from firing to begin with, not too elongate the step.
Mr Walter is right in terms of the bow lifting the sear spring and getting doubling. Readjusting the over-travel screw and using Loctite and/or staking the trigger screw would be in order. The other problem with the screw being loose is it working its way too deep and preventing hammer drop, therefore the adjusting and staking.
If you have a hard use 1911 philosophy and want to eliminate the potential problem with the over-travel screw, you can adjust the grip safety nose to create a stop as Egumpher suggested. If there isn't enough metal as was described on this grip safety it can be tig welded up and carefully filed to provide the same over-travel stop but without a screw. The lifting of the sear spring can still occur if the welded stop is adjusted for too much over- travel. There is a lot more handwork with the weld up method.
Quote:
Yes, absolutely, the overtravel screw is an important adjustment. As you
graphically experienced. The bow should be stopped before it pushes the
disconnector too far and lifts the sear spring by the step in the grip safety
arm, but that doesn't always work due to parts, dimensions, etc.
Sorry guys, but it's not the over-travel screw that should stop the rearward movement of the trigger. It's the grip safety. And that's what you should adjust, to make sure your trigger does not over-travel. The over-travel screw fix, is a patch, not the definite fix. Your pistol appears to be working all right, but that's not the way it should be working.
The over-travel screw should not be a patch, and wasn't the intent of it's use. The grip safety arm notch is located as far back as the trigger should be allowed to go and not any further. The over-travel screw is a tuning aid to stop the trigger at the release point. For many this is point for accuracy. The grip safety arm step should stop the trigger if the screw is taken out. But unless you know how to check this over-looked area, you may find out at the least opportune time. So, do not throw out the screw unless you fully understand the possible result. Tuning the grip safety arm requires welding, to stop the bow sooner.
Some directional blows with a ball-point hammer can work equally well, some times.
I'm not an expert but I have to agree, the grip safety is not doing its job and stopping the bow. I've also experienced issues with the overtravel screw triggers and won't use them anymore because of it.
I know there are others, but Harrison's Extreme Service Triggers work very well as the overtravel adjustment is fixed and fit to the gun once.
Fix or replace the grip safety and consider a different trigger. Good luck.
I ran accross a thread this morning on my iphone about this problem. Seems that an overlength trigger can cause this problem. I have spoken with the smith that did the work and have a new hammer, sear, disco for both guns worked out. The current sear/hammer appear to have rounded contact corners. I think the thread was on the 1911forum though and done by chuck rogers outlining the problems with replacement triggers.
Quote:
Some directional blows with a ball-point hammer can work equally well, some
times.
John, I got lost at this point... could you clarify?
Easier done than described.
Use a small ball hammer to "push" the metal in the area which stops the trigger, to the front. Hammer that area on a vise, with a slight sweep towards the front. All you need to do, is to make it slightly longer, so that it stops the trigger.
Ahhhh..I see. Thank you for the clarification