I've been tuning up my Charles Daly 1911, making ok progress given that it's the first time I've ever worked on one, and I'd like to tap the group mind for a little help. I'd like to modify the trigger to include an overtravel screw, but the only thing to have it bump against is the magazine catch. I don't have a problem with that, except that the slot for the mag catch lock faces forward and the overtravel screw would have to bottom out on the edge of that slot. Is this the way a custom trigger that incorporates a travel screw is setup or am I missing something?
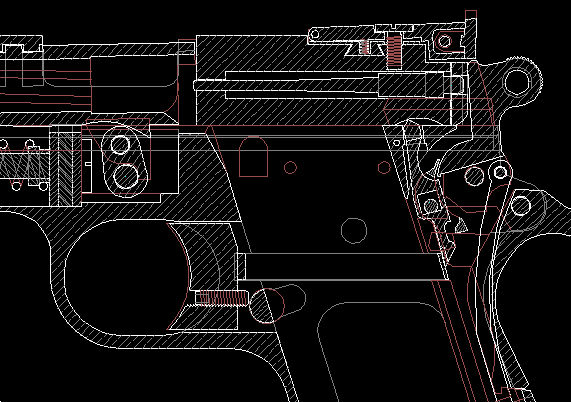
You're not missing anything Marv. That's pretty much the way it works. The stop, on most triggers, actually hits just above the slot you're talking about, really on the rounded top portion of the mag catch body (see sectional drawing below).
Most of the aftermarket triggers I've seen that have screws use a pretty small screw for this, like a 4-40 or 6-32. You can improve the effectiveness of the stop by using a larger screw with a flat face on the rear instead of the more common pointed "grub" screw type. The Gold Cup, which has a much wider trigger body, uses a 12-24 screw which has a flat rear face that's almost 1/8" in diameter.
Thanks for the quick explanation, Doug. My trigger mics out at .236 thick... while I would prefer a larger contact surface for more positive operation and less possibility of buggering up the mag catch slot, I'm afraid that if I were to use a 10-32 screw I'd only be left with about .025 of meat from the major diameter to the walls of the trigger. In one respect this might be considered a benefit, as I could upset one of those thinner walls with a center punch to tighten the grip of the screw to keep it from moving. OTOH, given the amount of abuse encountered during firing, I'm worried that those thin walls would fatigue and ultimately cause the trigger to fracture. There's a picture in Kuhnhausen V1, p108, fig 147 that shows an overtravel screw with a flat contact surface that looks like a screw head at the rear that would provide a larger contact area, and I could probably TIG weld something like that on a SS 4-40 set screw, just parent metal welding at very low power.... but probably more work than is required. I'd prefer the 10-32 solution, as the back area of the trigger is the only part that would need to be threaded... (this trigger has a crescent shaped .115 wide lightening slot that parallels the face of the trigger,) and I would only need to drill a clearance hole for the allen wrench in that front trigger section... more meat to keep the strength up. Given these points, what approach would you take? Go for the 10-32 and its inherent nice large contact area, or futz around trying to weld a contact platform on a tinier screw?
Have you considered getting a new trigger altogether?
There's alot of after market triggers out there that are of superb quality & you can fit that puppy to the gun so there is zero play (wiggle) and the overtravel screw problem is already solved.
Of course I understand wanting to do it yourself, but fitting a trigger is going to be about the same amount of work (imho) + you have the stock part waiting if you screw the new one up.
Yeah Marv, .025" wall thickness around that 10-32 setscrew sure doesn't sound like enough "meat" to me. Even an 8-32 would only leave you about .036" of sidewall. For the sake of comparison, the thickness of the sidewall at the 12-24 screw hole through the much wider Gold Cup trigger is about .065".
I'm not familiar with the pic you referenced from the Kunhausen book, but I can understand what you're talking about. Some sort of enlarged "button" on the tail end of a 4-40 or a 6-32 set screw sure sounds like a do-able thing to me. Not being much of a welder, I'd probably just silver solder a nut onto the end of the set screw, chuck it up in the lathe, and profile turn the outside edge and face of the nut to provide as much bearing surface as possible.
Thanks for all the input, guys... I was thinking about this thing today and decided to try the 10-32 setscrew solution and live with the consequences. If I screw it up I'll buy that new trigger with the travel screw and still be ok. I just thought it would be more fun to do it this way.
Now to get a hammer/sear jig so I can do a real trigger job. I polished up the trigger, disconnector, and gave a couple licks to the hammer and sear, but didn't want to get real serious about it until I had a fixture and some good stones. I like the Marvel jig that Brownells sells, but thought I'd be better off with the Power Custom unit that can accommodate an assortment of adaptors to work on other guns. Multi-function stuff always made more sense to me.
I snugged the slide up last night, polished the feed ramp and am happy with the way things are turning out. I'll take a picture or two to show off what I've accomplished thus far.
I've used 6x32 several times, and if you are drilling the trigger yourself, you can position the rear of the setscrew wherever you wish. There's millions of guys, firing many thousands of rds each, every year,using such a contact with the mag release. No real problems. Just be sure to loctite that screw, after it's properly adjusted. remember to modify the half cock notch and the sear, and to test for "rub" of half cock and sear. This occurs when you try to screw in the overtravel too far. Also check for contact of sides of hammer on slide, frame, and for contact of hammer strut and grip safety. Both mean trouble at high speed hitting.
Gotcha on the 6-32. I spotted that spec in Kuhnhausen v2 last night, so will put the 10-32s that I bought in my spare parts bin and use them for another project. Thanks for the reminder on the sear engagement as well... I noticed on one of the AGI 1911 tapes re: trigger jobs where that point was included as a part of the testing when setting up an adjustable trigger.
So far, everything is coming along nicely on my Daly, it's going to be a dandy shooter when I'm done with it. Can't wait to do the actual trigger job, should be fun.
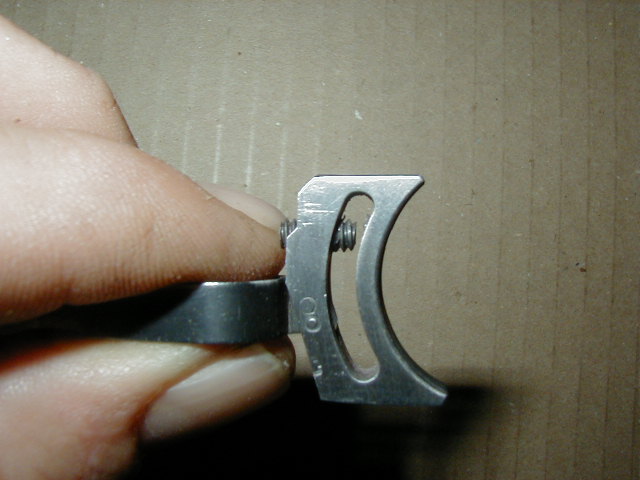
Well, I did it. Started with a #50 drill from the front to allow the allen wrench to get at the socket, then came in from the back and drilled and tapped to 6-32, cleaned up the burrs and installed the set screw. It turned out nicely, picture attached. Thanks for the tips. My Power Custom trigger/sear fixture should be here Thursday, so I can finish up the trigger job and get this pistol put back together. Can't wait to take it back to the range and try out my handiwork. What fun!
PS... I put the fire control back together to see what it felt like with the shorter pull and I'm amazed at the difference in trigger feel. I took out just a little more than .060 of overtravel but it feels like a lot more.
On another note, I ran across some 30 power self-illuminated pocket microscopes for about $12 apiece, bought one to see how it would work for looking at the hammer/sear connection and am really pleased with it. I discovered that the grind on the hooks is slightly negative and that the sear face really doesn't seat well against them, so the trigger fixture is really going to come in handy. Brownells sells a Yavapai fixture that includes a 25x microscope for about $70, so this is a great alternative at a fraction of the price to accompany the all-purpose PC fixture. I saw one on Ebay with a buy- it-now of $19 (look here), so this is a pretty good deal. Drop me an email if you'd like one, I'll send them at my cost plus shipping. FWIW.
Thanks for the kind words... my education continues.
I picked up a nice fish scale at WalMart today, made by Rapala... it was the only one that had a sliding stop and was calibrated to only 28#... all the rest went to 50 and I was concerned about their inaccuracy in the lower weight ranges. I used it to perform about a dozen trigger pull tests on this pistol and every time it came in at 5-1/2#, so at least it's repeatable. After checking it with graduated quantities of 240 grain bullets (29 to the pound) it was off about 2 ounces at 1 pound, but read right on once the load made it to 2 pounds... it was dead nuts on all the way through 8 pounds, so I guess it was a pretty good $10 investment. No freight to pay either
Well, it's pretty much done and I'm pleased as punch with how it turned out. I know this goes way beyond the thrread title, but it is about my Daly .45, so I'll just include everything here.
First off, tools... I decided to spring for some 1911 specific stuff as well as the Power Custom series 1 hammer/sear fixture. The nice thing about the PC fixture is that with different adapters you can do precise trigger work on about 15 different guns... very slick. I also picked up a couple different sizes and grades of stones, as well as some 1911 specific ones... one for the trigger track and one for the hammer slot. I also got a hammer hook squaring file and am really pleased with its quality... that and most of the stones were from Brownells. Included in the tools was a single rail frame swaging punch, and one day soon I'm going to use it to completely refit the slide to frame... I did a fair job without it, but would like to do it right and this should make it possible.
As for the gun itself, I replaced the 23# stock mainspring with a competition 19 pounder. Cut the hammer hooks back to the .020 spec, polished their engagement faces and the sear according to the specs in Kuhnhausen. Polished the disconnector top and bottom, the trigger bow and track, the hammer sides and its slot, and took about 1/16" of the bow out of the sear spring. As mentioned earlier, I'd already modified the trigger to include the overtravel screw and did all the tests required to insure that it wasn't adjusted so deeply that it would cause the sear engagement to be battered by the half cock notch. The trigger now measures about 3-1/2 pounds and is smooth as silk. In addition to the trigger work I also polished the feed ramps and radiused the barrel ramp into the chamber, re-tensioned the extractor and tuned the ejector. I hope to take it to the range on Saturday for a workout and will report the results after I shoot it.
As you can probably surmise, I'm pretty pumped about how this turned out. This was my first effort along these lines and I give a lot of credit to the AGI M1911 video series and the fine shop manuals by Kuhnhausen. (Oh yeah... and you guys here passing along the jewels of your experience... thanks!;) I'm now convinced that with the proper preparation, some targeted study, the right tools, some patience and a little perseverance, even a neophyte like myself can turn an inexpensive pistol like my Daly into a finely tuned machine. Yeee-haaahhh!!!