
I recently acquired a set of Chuck Warner's TR sear jig. TR being true radius. This is a concept for stoning the sear to the radius it pivots on and produces the only true neutral sear. When the sear is prepped as per the original specs it is actually slightly negative, and can also be angled to be positive. Much discussion has been done over this, and the radius idea has been discussed. Chuck Warner did something about it, and is producing center- less ground O-1 discs of the exact size, and hole needed to sandwich a sear, and stone it to match the radius.
The hammer prep is important as well and a huge variety of trigger pull feels and weights can be had. I started with a Nowlin hammer with .020" hooks, leveled in the manual way of stoning with a feeler gauge on the flat. The face of the hooks was also stoned and the tips given a slight radius. You can think of it as dulling the tips slightly.
The first thing I do with a new sear is lay it on its sides on 1000 grit paper on a flat surface and do a figure 8, 4 or 5 times to remove any burrs and smooth the surface.
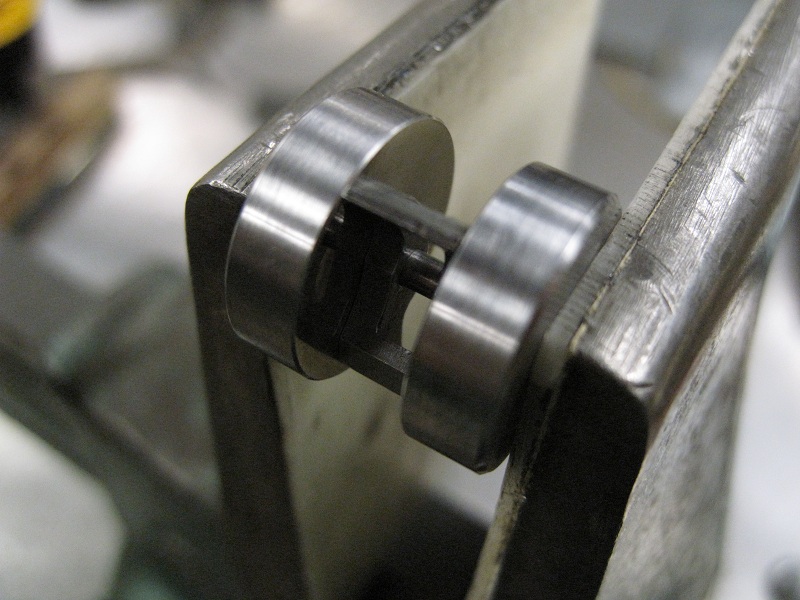
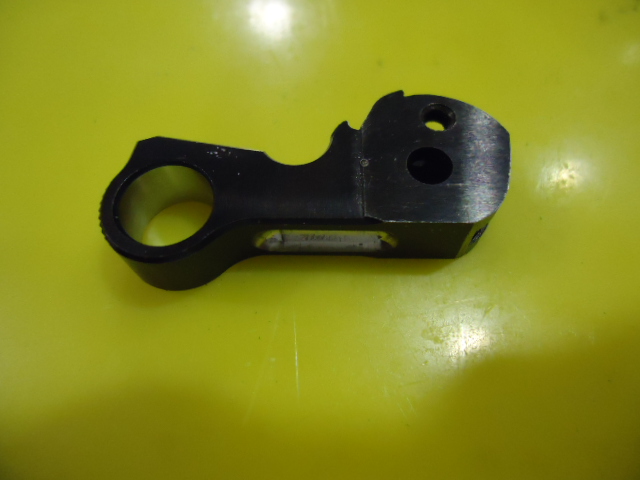
Here's the fixture discs and sear and sear pin.

I assembled them as per the directions that come with them. You use the sear pin to hold the sear between the discs and clamp in a smooth faced vise. The sear pin head isn't quite flush with the discs so when clamped it is held securely and can't turn when stoning.
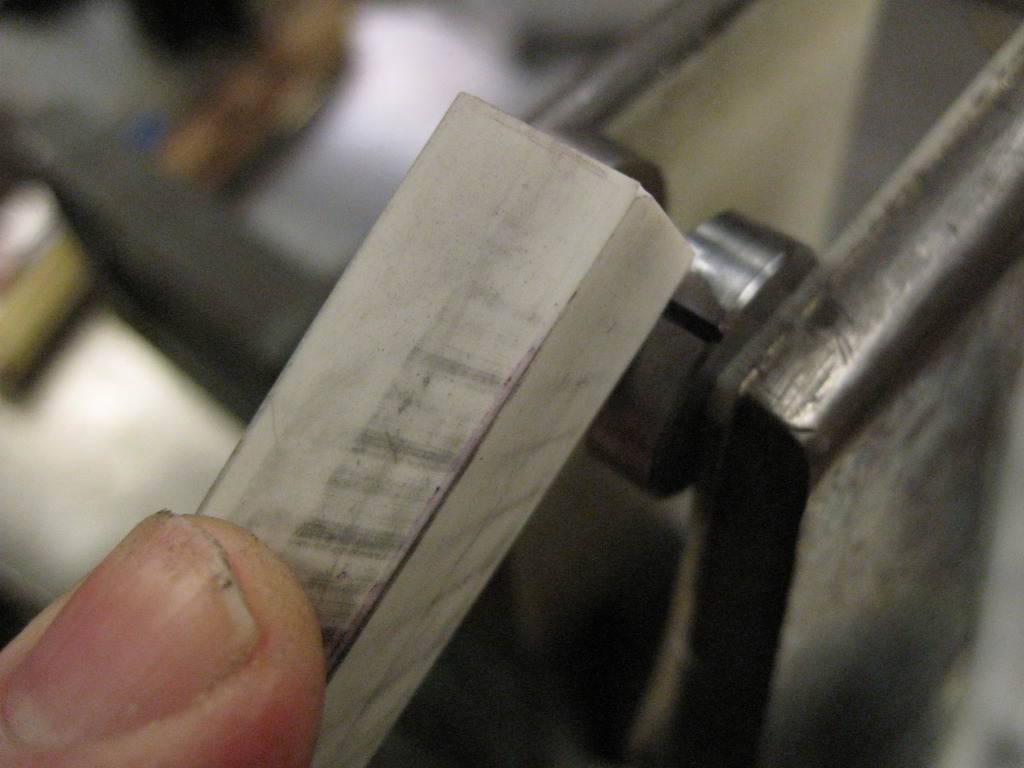
A great hint in the directions is to draw a line with a felt tip pen across the discs and sear nose. This will give an indication of your progress when stoning down to the discs.

I had about a .001" or so of sear to profile so started with a fine India stone, and went just till I could see by the ink I was close.

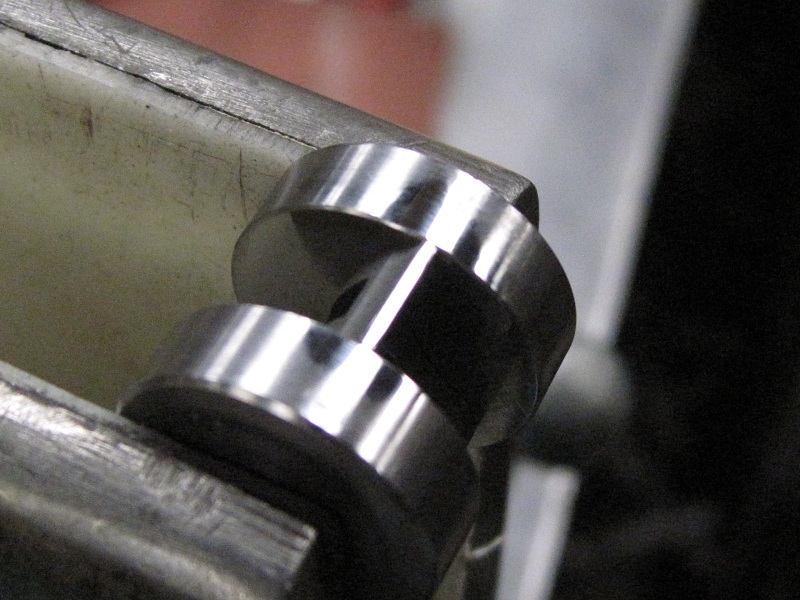
A few strokes later and you can see the progress.

At this point I switched to the white ceramic stone to polish.
You will also stone/polish the discs, but is of very little consequence for future use. I think you could probably do 100 sears without appreciable wear.
You will notice a slight irregular escape edge until you stone a relief angle. This can be just a few strokes to straighten the edge, or 30% or more to shorten the pull.

At this point I assembled the sear with the nose inked, the hammer, and dry fired a few times to check contact.

Further stoning of the hooks can increase equal contact, but this only took about 10-15 minutes, and the pull is very nice and clean. More in depth tuning can be done, but this is a very impressive pull for the first time through. Smooth, and clean!
A couple weeks ago I used my newly acquired TR-Jig on the original sear of my DW C-Bob, the trigger measured a decent 3.5 # before. Fairly good trigger for a factory job. After radiusing the sear, cutting the secondary and polishing the hammer hooks. Reassembled the gun and the pull went to 2.25#! I can't say it is a smooth trigger it just gets to 2.25 lb and breaks. I re- tensioned the sear spring to bump it closer to 3#. This is the best trigger I've done and it was so simple. Glass rod good!
Note: the sear in my C-Bob was marginal in length as it just barely took the radius across the face. Some other or new sears will most likely be longer like the one Log did above. I was lucky being that the sear didn't require hardly any metal to be removed and the TS fit was not affected.
Chuck has stated somewhere that he has found a few sear manufacturers that have a more suitable length for this mod than others.
I started to use the jig just like you did Log. Then I considered the benefit of using the jig to support the stone and allow it to roll with the stone. Initially I selected a aircraft drill bit (long shaft) to substitute for the sear pin and anchored the bit and the sear with enough slack on the jig itself to allow the jig to roll as I stoned the sear.
This worked well in my opinion. I then went further and took a section of square aluminum tube from the borg and found the sear and jig rounds fit into the tube with the proper slack to allow the rounds to roll. I drilled an axle hole (sear pin) and reduced the end to allow the stone to arc around the end and follow the jig diameter. I drilled and tapped two holes to insert bolts and jam nuts to position the sear at 90 degrees to the sear pin axis. This allows me to hand hold or vise mount the jig. The upshot of this is the near elimination of wear or the chance of wear on the jig rollers. The wear factor just kinda griped me as the fine engineering that went into producing this jig shouldn't have an expiration date on it!
I set up my Powers jig to as close to 45 degrees as I could determine with trig and the release angle and radiused sear face are sure pretty.
I have the prepped sear ready to install into my new Colt Commander that I treated myself for my birthday (drive by gloat notice...)
A question about suitable sear lengths came up on another board.
I was thinking that if the fixture hole was cut slightly eccentric, the fixture would be able to accomodate sears that were a bit shorter or a bit longer.
And by aligning the plates to differering points, one could stone on a slight bias to achieve contact on both hammer hooks if the frame holes or hammer hooks were a bit askew.
No real effect on the radius.
I had thought about the possibilities of the center hole being placed somewhat off center too. Indexing marks could be machined on the disks at the time the holes were drilled to help in setting the job up.
The only problem with an eccentric set up is the general public. There would be a lot of beautiful radiused AND angled sears. Bullhunter, Log and I have tossed around quite a few ideas as to optimal jigs for pros. I suspect something more will be down the road. It is quite interesting just getting equal, square, proper discs.
Chuck, The way the Jig is set up, you can't get a sear length any less than about 402 - 403. My own experience has been problematic below that length, even with proper angles. I can't explain it fully yet, I just never went below that because it was always problematic. I am working on the answer since it came up with the TR.
The eccentric idea is awesome as both you and Bullhunter mention.
This may be ludicrous, but could you not have a series of numbered holes on both sides of the jig? Then use a pin to hold them in alignment. If you need it a little offset then put the pin in hole number one on one side and hole two on the other side. Obviously the holes would have to be relatively small and close together to have an adjustment that is small enough.
Another side affect of the holes is that they could be placed so that the legs of the sears stop against the pin. With an eccentric center hole, you could then have each numbered hole a given length so people could cut their sear to any specific length with the range of the jig.
Again, I may be missing something here and that could be completely useless.
Or - you could just stick to one brand of sear that you know is consistent. Course that would be problematic if you're trying to use the customer's parts...
If you are careful about keeping disks positioned evenly you can use a smaller pin. Span the vise jaws with the pin, hold the disks down between the jaws and pull up on the sear as the vise is snugged down.
Used it once to redo a sear, worked like a charm.
Very good idea Jeremy. Complicated to a degree to execute consistantly if you were gonna make them in batches.
Strikerdown, That minor adjustability was thought of when these were made. The pin hole/disc diameter was sized accordingly and per Logs suggestion, within a window of about .003.
Current instructions include just such a tip. I am including as much feedback as possible, while trying to keep it as simple and foolproof as possible.
Or, to make it even more complicated to produce, the circle could have lobes cut into it. Each lobe could be .001 or .002 longer or shorter than the adjacent lobe. 3 or 4 lobes could cover a range of sear lengths.
(You could call it the Series II TR jig.)
Kruzr, that would be a different way of doing the offset pin idea, and much harder to do. Kinda like asking my Guy to make cam lobes instead of discs...
Until I used it, as it is today, I also went to the adjustable mode thinking, and while that is great, the simplicity of the discs is the best marketing feature. No adjustment to agonize over in a learning curve to do your first sear. Just load it up and do it. Go shoot.
Simple definitely has advantages. If a smaller diameter pin is used, I believe the disks could be biased with a resulting bias on the finished sear. The more clearance between the pin and holes, the more bias would be possible, and vice versa.
I have a CNC lathe with live tooling, which can cut cams (or most any shape for that matter) with end mills (or other cutters) and drill holes off center. So technically it would not be difficult to make the disks eccentric, and/or with indexing pin holes, indexing marks, and etc. That of course would add cost to the product, and raise the difficulty of use somewhat.
Joe had an issue posting his pics for the above so here they are:


Jolly. Thats a pretty cool adaptation. My only concern is removing the wear from the outer disc edges to the much smaller pin surfaces. If you wear a spot on the outer edges of the discs, move them. If you wear the inner pin diameter, you start cutting sears smaller than I like to see. Splitting hairs of course.
Initial feedback has been very illuminating as to sear quality out there. There will be an updated, Pro version, at an obviously higher cost. at some point in time, just not yet. I have not gotten enough feedback yet. I really enjoy the ideas and thinking going into all this.
Jolly Rogers wrote:
I set up my Powers jig to as close to 45 degrees as I could determine with
trig and the release angle and radiused sear face are sure pretty.
Something to consider on the release angle... as Log said somewhere, the angle itself is arbitrary. I grind the angle to adjust the amount of engagement I need. + or -. I don't care what the angle itself is. The Behlert hammer of yore, allowed for engagement adjustment on the hammer body, as does many other systems. But the standard 1911 is done at the escape angle. The difficulty lies in determining where and how much, for those with basic tools... a microscope and or comparator are almost a necessity to get it perfect.. The Behlert hammer, which is essentially a High Standard concept, was, in my opinion the answer to the 1911 as far as target quality systems. But it never really caught on. The best bullseye trigger jobs I have ever seen, where Behlert hammers. I have one brand new, original, but I am saving it for posterity. :)
Jerry, could you post a pic of a Behlert hammer?
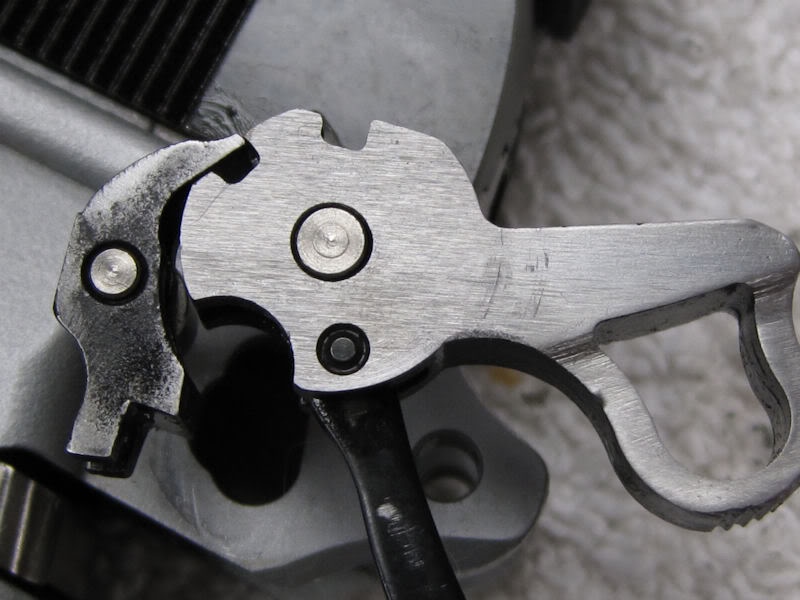
This is an early Para hammer and sear, the Behlert was similar. Note the hammer body sets the sear engagement depth. However if you want less, you still must use the relief cut.
quote:
Jerry, could you post a pic of a Behlert hammer?

These two pictures to compare bring up the hook face plane I have mentioned in the past. The Behlert hammer is more aggressive than the Para, a good thing. To understand my meaning, take a straight edge, credit card works, and hold against the screen, and align with the hook face and see where it is in relation to the pivot center. The Behlert is higher, and this will allow it to work better with a light pull than the Para which is pretty much in line with the center.
That will be a hard hammer to ever let go of Jerry, great to have new old unobtainable pieces of history. I believe PW has one as well.
log man wrote:
That will be a hard hammer to ever let go of Jerry, great to have new old
unobtainable pieces of history. I believe PW has one as well.
I'll bet George has more than a few stashed away, too!
Point out to the viewers, the under cut at the base of the hammer face, to ease the cocking / cycling force. The exact opposite to todays trend of minimal firing pin stop radius. I am working on a system right now that is going back to that, to test its application with todays fitting style. The old timers shot some very good scores back in the day, often with components inferior to todays... worth another look at frame mounts, and such.
Chuck Warner wrote:
Jolly. Thats a pretty cool adaptation. My only concern is removing the wear
from the outer disc edges to the much smaller pin surfaces. If you wear a spot
on the outer edges of the discs, move them. If you wear the inner pin
diameter, you start cutting sears smaller than I like to see. Splitting hairs
of course.
Initial feedback has been very illuminating as to sear quality out there. There will be an updated, Pro version, at an obviously higher cost. at some point in time, just not yet. I have not gotten enough feedback yet. I really enjoy the ideas and thinking going into all this.
I consider that a compliment Chuck! I use a dummy shaft to load the tool, just a sear pin with the flange removed, and oil the assembly prior to loading the tool/sear/jig. With the amount of use my jig will see in the forseeable future, I am not worried about wear on the I.D. of the tool. Professional applications will require a rethink I believe. I still think the jig as a rolling guide seemed to work well.
This is a prototype of the TR BHP Hammer incorporating exactly what Jerry is refering to. Has a lot of advantages in certain applications. The 1911 will have one similar as well.


I finally got a chance to go to the range and try out then True Radius sear you installed on my USFA SAA 45 colt. For starters, the guys at USFA do a pretty good job with the triggers they ship standard on their revolvers. The trigger was about 3.5 lbs out of the box with a fair amount of creep. With a little spring work the trigger lightened up a bit and cocking was made easier too. The trigger now broke at just under 3 lbs. but the creep still bother me to the point of wanting to send it out for some work. Up next was a short over night trip to Chuck to work up a True Radius sear for the Colt clone. A short time later the little 45 Colt was back in my hands. A quick chamber check and pulling back the hammer produce the familiar smooth 4 click C, O , L , T . Upon pulling the trigger, I immediately noticed that the pull of the trigger was lighter and smother. The trigger no longer cocked the hammer further as the trigger was being pulled. The trigger now broke @ 2 lbs. But If I concentrate I can still feel a little creep... (more on this latter)
As of this post I have not opened the gun up to see what all was done to her. This is the FIRST time this has ever happened for me. While I will eventually want to do a little exploring to see what is what... after shooting a box or two of 45 long Colts, I need take no action but to shoot and enjoy. The new 2lb trigger has a very slight roll break. Can you have a roll and clean crisp break? A roll snap? But that is how it is... I am sure there is full sear /hammer engagement and the 2lb trigger is very manageable. No scary "hair trigger" some are afraid of here and the little bit of creep I noted above while examining the gun for the first time was not even noticed by the people shooting the gun (even me).
I feel the True Radius Trigger is going to do big things in the gun world. I for one will be looking at getting a 1911 jig and a Hi power sear with my next order and with talks of a matching hammer I will get the set for sure. I think just about any single action could benefit from a True Radius sear...
Chuck, I've been watching this since you started and have thought about the headaches with wanting a different length and incorporating it into the jig.
Would this be a workable solution? Instead of working the jig, how about a stone holder or clamp? It would run the edge of the jig and suspend the stone. Having a few feeler guages trimmed to work, lay the stone on them then clamp the stone down. When you pick up the holder the stone is now running .002, .004" high and keeps the proper radius. Holding the stone secure without damage is will take a little work though.
That would work, but starts to get away from simplicity. On the table now are possibly different sizes. Maybe a set of three with corresponding pins to allow a variance of up to .006. Master set maybe or available seperately. Deviating from the original simplicity is hard. Expanding on it is not. Once I have things streamlined I will add based on demand. There are a plethora of good ideas being tossed about, but from a business and quality standpoint, I want it to be very simple. I am currently refining hammers and a hammer jig, but time is limited lately. I am currently very happy with the quality as delivered to me and will not deviate until a little long term feedback is received.
I am wholeheartedly listening though!
Chuck Warner wrote:
This is a prototype of the TR BHP hammer incorporating exactly what Jerry is
referring to.
I can see the point of this modification on a target pistol shooting mid-range loads, but it doesn't seem appropriate on a service pistol. I'm surprised that someone hasn't come out with a square-corner firing pin stop for the Hi-Power for folks running 9x19mm +P and .40 S&W. Likewise, I would think that folks building hard-use M1911 would also want to get away from the Gold Cup-style repositioning of the hammer strut pin. FN also repositioned the hammer strut pin on the BHP's hammer somewhere along the way, but I can't remember if this was to make cocking easier or harder.
The square corner FPS is on the way I think. The hammer above will be for a firing pin stop, hammer/sear combo.
The hammer face relief is used in a few blowback pistols, to facilitate easier cocking, and as Jerry's picture shows, most notably, by Behlert.
My sets will be purpose built for a couple of applications and will have optimized geometry and surfaces for the TR sears.
And the first hammer jig is in process... This is the first prototype..


Did my first trigger job with the TR jig. Previously, I've been using an old Tom Wilson jig and more recently the Power Series 1. The TR was very easy to use and the results were excellent. Once the radius was established and the escape/relief cut, I prepped the hammer as I normally do. Playing with the sear spring I was able to easily get a clean, crisp break with anything from 5# down to 3# with no issues. I haven't tried anything less than that yet. I think it's a winner.
Something that came up recently with a gunsmith out of Ohio was pretty interesting and I thought I would share it...
I get asked alot to explain how a TR prepped sear feels. There is really nothing to compare it to, but the best explanation came from Mr. Cavill out of Ohio.
His observation was that with a standard trigger job, whether a roll trigger or not, the trigger weight and feel are progressive until the trigger breaks. With a TR prepped sear the weight is the same throughout the pull. This is not always noticeable but it was a good definition of the "feel"
I really appreciate all the feedback and hope to have the hammer and hammer Jig ready before the end of the year.
The testing I'm doing now, shows some promising stuff for improvements to hammer geometry. Nothing too earthshaking, but noticably improved.
I received the TR Sear Jig from Chuck last week. I first put it to use on my personal Open Division race gun. This is a competition gun and the trigger is adjusted to be very light already. I'm using a Koenig hammer and EGW sear. I measured the trigger after cleaning everything and it was at 2lb 2oz average of 5 pulls.
I setup the TR jig and stoned the EGW sear. No other changes. I just cleaned and reinstalled everything and the pull averaged 1lb 10oz. The feel was slightly different, but it feels better. I get trigger freeze if the pull isn't over 2lbs and I tweaked the spring to bring the pull up to 2lb 6oz and it feels great. I shot my first match with it on Thursday and it worked flawlessly. Chuck has a real winner with this one. I've used it on two other guns with the same result.
I would be curious as to whether that was the old hammer or new. I'd be curious as to your set up as well.
The only changes I made were stoning the radius on the sear and a couple light passes on the hammer hooks. The hammer hooks really didn't need it, but I thought it would be good to have a virgin surface for the newly cut sear to mate to. The hammer is the original from when I built the gun and has about 15,000 rounds on it. It is a stock EGW Koenig hammer except the engagement surfaces are polished with a 900 grit stone and the sharp corner on the hammer hooks is slightly beveled. I'm using 17lb ISMI mainspring, EGW Titanium Mainspring Cap, EGW sear and hammer pins, STI Titanium Hammer strut.
I chuck the mainspring cap in my Foredom and use a stone to smooth the inside and remove the machine marks. I also take the hammer strut and completely round the bottom and then polish on my buffer.
I have been using a sear jig from Les Bengtson Arms. It is really simple to use and setup and I have been very satisfied with the results. I will continue to use it to cut the secondary angle on the sear. Here is a link to the jig I was using before.
http://www.custompistols.com/bengtson/tooling/searjig.htm
Thats a neat Jig. I'm using my old Marvel for the secondaries. Thanks for publicly sharing the info. I am trying to keep track of what works.
I have been messing around with a ball head strut and radiused cup for the struts. Smooth, but I am not sure how practical.
I'm glad to help. What do you mean about it being practical? If you are saying that it might be overkill I agree, but it doesn't take me much time and it helps eliminate any appreciable wear on the strut or cap. I always hate seeing scratches left from the strut on the mainspring cap. When they are smoothed and kept lubricated the rounded strut doesn't leave any marks on the cap. I've seen a few caps with really deep grooves cut from a sharp cornered strut.
I also have an idea that the mainspring cap rotates as it is compressed and released. If everything is smooth that might allow for the cap to rotate (if it does) more easily. I'm sold on the TR sear with an EGW hammer. I haven't used it with any other hammers yet, but I will be in the next week. I'll let you know how it goes.
I was not referring to your method on the strut, sorry. I have a couple with ball bearings on the end and the cup machined accordingly. Nice but I don't know if its practical. Thats what I was referring to. As Jerry has found in the extreme pursuit of accuracy, everything matters... I do the polishing and rounding like you, and on a whim cut a few struts and added a very small precision ball on the end. My idea was to have a ball shaped cup, like a ball headed disconnector, and a ball on the strut, all for continuous alignment and smooth feel.
No worries. I just wanted to make sure I understood. Now I'm going to have to get some ball bearings to try. I like that idea. Maybe silver solder or TIG with a steel strut?
I silver soldered. Keep the bearing intact. Tig burned one up...
Chuck, FWIW I found that if I used a gauge block that just fit inside the sear I was using, that I could clamp it in the mill vise without deforming it and cut the secondary angle true across the sear.
Great idea Don.
donw wrote:
Chuck, FWIW I found that if I used a gauge block that just fit inside the
sear I was using, that I could clamp it in the mill vise without deforming it
and cut the secondary angle true across the sear.
I agree with the machine cut. Although, I am a three angle guy...:) I cut the primary, a secondary 45 degrees off the primary, and third angle 45 degrees off the secondary, which would be 90 degrees off the primary... :? I use the third angle to control my engagement. The secondary is too steep to control engagement, as it reduces the primary by too much if more engagment is needed.