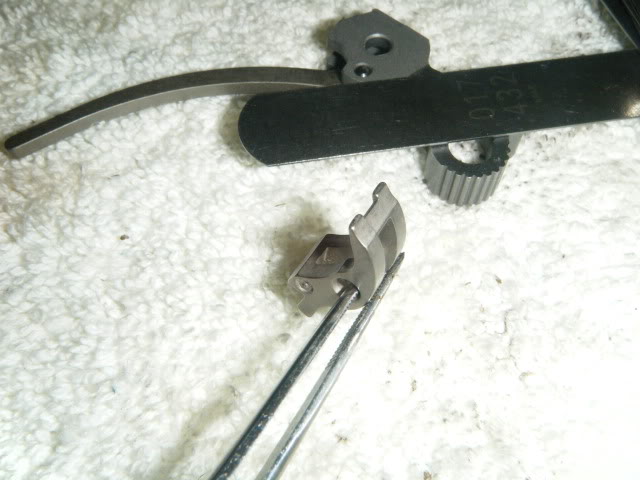
Does this sear look right to you?
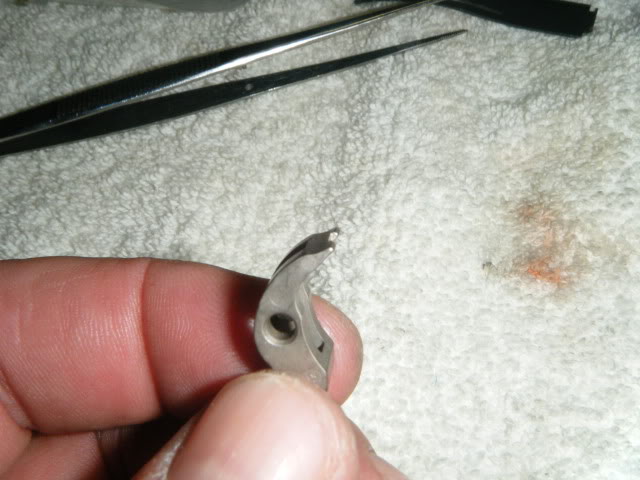
This is out of my factory new Colt Gold Cup.
Still unfired.
I detail stripped to clean, inspect and lube a little bit ago.
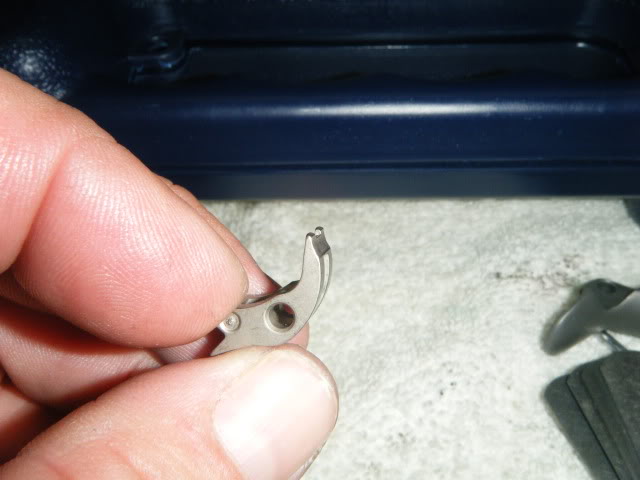
The edges on this sear look round to me.
Or at least they don't look clean, flat, square face like on all my other 1911 sears.
Hammer hooks are square and measure .017.
Other than feeling the 80 series levers engage plunger on take up, there is no creep and it breaks clean at 5 pounds.
I had to do some minor fitting on the thumb safety.
You can see in pic two where it was rubbing fairly hard on the sear and took way too much force to fully engage.
My concern is the sear... does it look right to you?
I guess Colt is "improving" things.
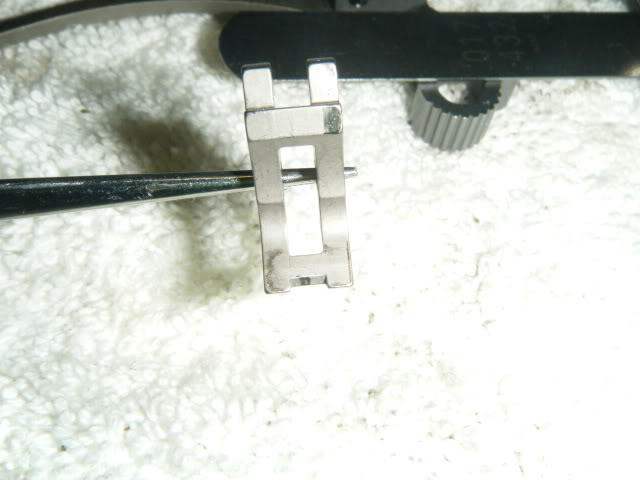
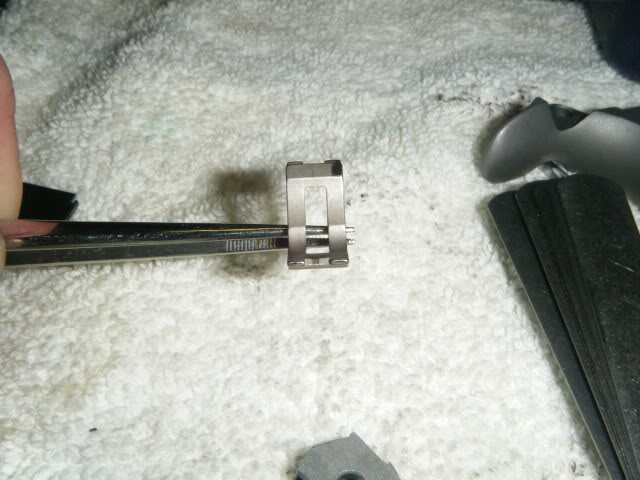
I can't tell from the picture if the top sear surface is flat or not. You know, the surface that contacts the hammer hooks. If you see consistent polish marks on top flat surface that drags across the hammer hooks then I say OK because you can dress the .020 break edge at the bottom of the sear to be sharp.
Since no one else has chimed in your stuck with me for now...
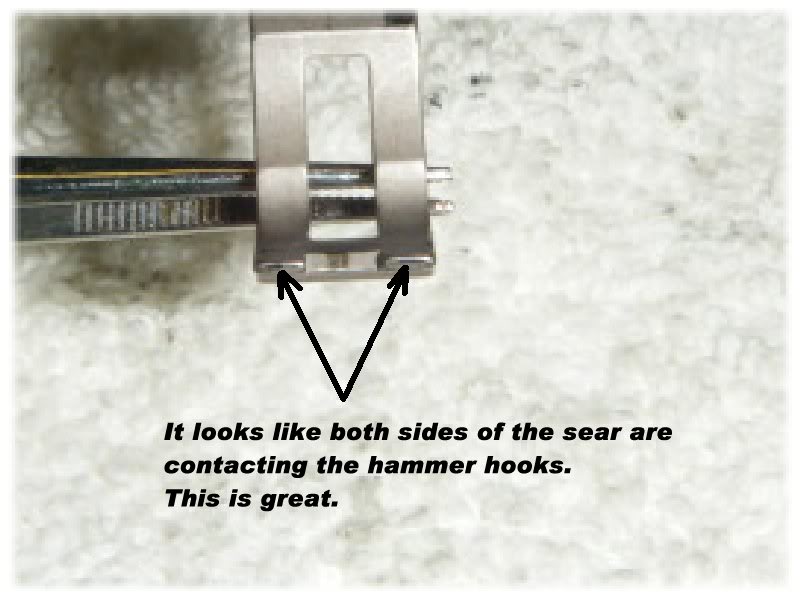
I looked closer at your pictures and see that the sear is contacting both hammer hooks. This is great. You may want to dress the bottom corner a little with a .020 feeler gage and a stone.
Obviously questionable based on known specifications, but probably works fine. One of the best feeling triggers out of the box was the original Detonics, but they really look bad on inspection, sear noses where round, I have one and refuse to touch it just to have it as a benchmark. That said I would on a gun like this that will probably shot a lot more replace the MIM sear with an EGW. You can file the center down to match the Gold Cup design if you like also and leave the original untouched.
Thanks Eric.
But not sure I know how to do that.
You can find how out to dress the lower corner in our tech section here:
http://www.m1911.org/technic20.htm
Here are the specific words:
Lay the sear on the stone with the convex curve facing up, so that the backside of the primary angle is on the stone. Place the .020 feeler gauge under the legs, and push the sear along the stone from bottom to top to create a light breakaway angle on the back of the sear. Be careful to keep the legs on the feeler gauge. When the dressed line on the back of the sear is roughly 1/4th the width of the primary angle... stop.
+1 for what BigJon said about great triggers looking awful. In the grand scheme of things it probably matters little what the parts look like. If you close your eyes, put out of your mind what the sear looks like, dry fire it and say "Dang, that's a niiiiice trigger!" - all you can probably do by tinkering is goof it up.
My Petunia's got sort of the same problem - except it's the hammer hooks that look awful. But everybody who's tried it says "Dang, that's a niiiiice trigger!"
I am familiar with that now that I see it in print form the the "poor man's trigger job"
I have it printed out
Thanks Jon and Niemi.
Guess if it ain't broke...
Good photos of the sear tip. From your pictures, the tips do look rounded, but that is not necessarily a bad thing. Since trigger questions are posted all the time, it would be great if the gunsmithing regulars could agree that trigger safety is the highest priority. Not trigger pull weight, not creep, etc.
Specifically, the trigger and hammer should be either assembled in the gun with no springs, or placed on a jig. With the parts in the cocked position, the hammer should be gently pushed forward. The engagement should hold. If the engagement does not hold, you have a safety issue on your hands that needs to be fixed right away. This test should always be performed first, before any further tweaking or speculation.
If the engagement holds and is safe, then we can evaluate further, such as whether the sear bears on both hammer hooks, trigger pull weight, creep and all the rest. I'll point out again that there is no such thing as a safe sear or a safe hammer. It is the combination of the 2 specific parts in one particular gun that determines safe or unsafe - and the other trigger pull qualities as well. Cutting parts at recommended angles and depths will usually get you close to satisfactory, but is no guarantee of safety. Each trigger has to be examined individually. There just isn't any other way to do it right.
One more thing - disclaimer: my personal opinion - the so-called poor man's trigger job should be renamed the risky man's trigger job. Dabbing toothpaste on the engagement and dry firing the gun won't make a safe trigger unsafe, but it also won't fix a trigger that is unsafe to begin with.
If it is not generally understood what the term unsafe trigger means: an unsafe trigger engagement will allow the gun to fire without pulling the trigger. That definitely gets my attention.
A final observation: a hammer hook measuring .017" is getting scary in my book. Even though lots of target triggers use even less than this, the parts have to be replaced on a regular basis because the material strength is not great enough to handle the stress. Target pistol only.
Quote:
Good photos of the sear tip. From your pictures, the tips do look rounded,
but that is not necessarily a bad thing. Since trigger questions are posted
all the time, it would be great if the gunsmithing regulars could agree that
trigger safety is the highest priority. Not trigger pull weight, not creep,
etc.
All the points you made in your response to Cap's pictures were right on. I did notice that the bottom edge of the Colt sear was rounded. Do you think that breaking this round a liitle will actually improve sear to hook engagement?
You are welcome. I wanted to add that the only time I might be concerned about MIM parts might be in your situation with a very small hammer hook depth. In any case, it is good to keep a close eye on the hooks to make sure they are not being battered and changing shape with use. If they are changing shape, then your engagement is changing too, and it never changes toward more safe...
The firing pin safety plunger in many Colts is a source of headaches because the lift is not sufficient, or just barely. As a good starting point, you should see at least .100" of lift from the top lever. Naturally if any trigger part is changed, the safety levers also have to be readjusted.
Yesterday I ran 150 rounds rounds of all different variety from powder puff to factory ball to HP... all without a hitch.
I used one Wilson 47D and one Chip McCormick 10 rnd Powermag