I've been working on my milspec again, and I have a few problems.
I'm been using a Marvel Hammer & Sear jig, and gazing forlornly through a Yavapai jig at the results.
I have three problems.
My first problem is this: after carefully stoning the hammer hooks in the jig, mating the sear angle to it with the Marvel, the sear doesn't want to drop all the way into the hooks.
It almost feels like there's some kind of tiny debris in the way- I can push the sear into the hooks, and it will go, but as soon as I release pressure, it springs back out.
In frustration, I took the hammer and sear out of my loaded model, and put it under the microscope. Not the same. That hammer and sear drop happily together, and stay there.
So I've done something wrong with my new hammer and sear. Somehow, the angle of the hooks or the angle of the sear is holding them apart, and, of course, without proper engagement, the hammer follows when you drop the slide from slide lock.
Working the sear and the hooks together on dykem blue shows that both hammer hooks are hitting the sear.
The second problem is that the Yavapai jig only allows the microscope to observe one side of the engagement, and I would dearly love to flip the hammer and sear over, and look at the other side, to see if the other end of the angle is hitting before the side I see makes contact. How do you look at both sides?
I have a set of pins to install on the frame, and while I can look at both sides that way, I can't use the microscope on them, and I see things under the microscope that I'd never see without it.
The third problem I have is I don't see how to adjust the angle of the sear primary engagement face relative to the sear pin- if it needs to be something other than parallel, I don't see how to adjust that with accuracy. I have the same problem with the hammer hooks- if the Marvel jig is cutting them at some angle other than parallel to the hammer pin, how would you know, and how would you correct it?
And finally, I now have the Marvel jig, the Brown sear jig, the pin set and the Yavapai jig. After screwing around with them for a couple days, I like the Marvel jig for cutting the hammer hooks (mainly because I have no other way of doing them) and the system it has for setting the primary angle on the sear relative to the hammer is great, but I like the Yavapai jig for tuning it- for two reasons. One, there is no substitute for gazing though the microscope, it really makes it easy to see, as far as it goes. Furthermore, it leaves both your hands free, so you can beat your fists on the bench and swear loudly at the same time, and that's becoming very important to me.
And two, on the Yavapai, you don't lose the angle when you take the sear out of the jig. In the Marvel, as soon as you take the sear out of the jig, it has to be set up again from scratch to work on it, and there's no way to set it up relative to your last setting- your last setting is lost. With the Yavapai, you just turn the set screw out a half turn, and you have a new angle, a little shallower or deeper than the one the microscope is telling you didn't work.
Of course, that means I spent an hour and a half last night patiently adjusting the angle THE WRONG WAY, but that's why it's so important to be able to beat on the bench and swear.
There is an inherent flaw in the Marvel jig that the creator wasn't allowed to correct. Big 'inside' story about it, but he is not associated with that jig, it just carries his name. He is coming out with a new one. This probably accounts for your difficulty. I could never get it to work correctly either and tossed mine long ago.
Let's start with the hammer hooks. What are you cutting them with? A file, stones, what? I suspect you have a radius in the bottom or the hooks, and/or the hooks are cut at a wrong angle. If you must practice (and you should) buy some cheap(er) investment cast hammers and sears. They may or may not be any good, but they are great to practice on.
Photographers used to use something called a "light box" to inspect transparencies or negatives with a 30x loupe. They make a great way to inspect a hammer or sear because you get a sharp, black silhouette, and you can flip the parts over to see both sides.
Another trick is to take a square lathe bit, put one flat against the flat on the hammer behind the hooks, push it up against the hooks, and see if you notice any light between the rear face of the hooks and the front face of the tool. This presumes of course that you didn’t alter that flat on the bottom of the hammer.
You shouldn't have to adjust the hooks that come on better quality hammers these days. If you advance the face of the hooks forward it changes the relationship between the sear and hammer so far as the sear's primary angle is concerned. When you use a fixture on the primary angle you lower the sear, and in so doing you effect the arc, and that effects the hammer/sear angle relationship. Always remember both the hammer and sear are rotating in an arc, and when the sear nose is lowered or the hammer hooks advanced the angle relationship also changes.
Old Fuff, I'm cutting them with set of ceramic stones from Brownell's. The stones supposed to be square, and looking through the microscope, the hooks do indeed appear to be square, and I'm a carpenter. My eye is pretty well calibrated to square.
However, that's one of the sources of my frustration- I can only see the hammer and the sear on one side. I can flip the hammer over, and see it without the sear, and while the hooks both appear square, I don't have a way to see if the sear is hitting one but not the other by looking at them- I have to rely on dykem blue and witness marks.
I may have to give some thought to your light box idea- that would solve the problem of seeing both sides. Since I already own the Yavapai jig, I may just glue together a second stand for the microscope portion of it, so I can use it on a set of pins in the side of the weapon.
This is a McCormick hammer. I returned the first one I bought, because I could see that the hooks weren't square when I got it home and looked at it through the microscope. The second one, however, had square hooks, but the bottom of the cut was rounded, and needed to be cleaned out, and that's what led me to buy the Marvel jig. I don't think I moved the hooks, I think all I did was clean out the angle, but I could be wrong about that.
The Marvel jig comes with a machined block that I've been presuming was square, since you're supposed to use it to set up the hammer in the jig, and I'm going to try your trick tomorrow- that's one of those "why didn't I think of that?" things.
I've been thinking that the hooks are pretty clean, because the sear from my other weapon drops straight into them without any muss or fuss. That's why I've been thinking the problem is with my new sear.
So, does anyone want to buy a slightly used sear?
Bill, if your jig didn't work, how do you get around it?
I have my hammer hooks trued on a mill along with an improved safety shelf depending on the hammer and usually use a Brown jig that I'm not totally thrilled with but make work. Am waiting to see Bob's new jig and have already had discussions with him at Shot! about doing a class with them when they become available. We're down for 12 to 14 copies of them pending availability and pricing.
Hammer notches are cut at the factory with a very sharp mill. I don't know of any hand tool or stone that will recut them and not leave at least a small radius.
I have the Brown jig. I went to the others primarily because I can introduce so much error into the Brown jig.
It occurs to me that part of the error possible in the Brown jig is because of the pin, and I'm not sure how I'll compensate for that.
I'm not going to buy a mill. It needs to be possible to do this by hand. I learned to use a hand saw before I learned to use a skillsaw, I learned to multiply long before I saw a calculator, and in surveying, I learned to draw R.O.S.'s on a drafting board with a T-square before I learned CAD, and the principle has always served me well.
I've told apprentices that "that isn't even close" while they assured me that it has to be so, because that's what the calculator says. But because I can do it by hand, I can tell when you've dropped a digit.
I can just hear it. "They're square. They have to be. We cut them on a mill!"
Power tools are not compentency. They make a competent carpenter faster, but the skill remains in the carpenter. I think that at this point, a mill would simply make it possible for me to ruin more sears per hour.
Brownells hammer squaring file will take care of getting the hooks back to square if they are really bad, and then finish with a stone that has sharp corners on it. Do you have any relief angle on your sear? If not the sear will hit in the corner of the hammer hooks. I'm not convinced you want a strict right angle at the junction of the hammer hooks, would be a good place for it to fail. I always use some color on the sear and assemble the pistol to check if I have full contact with the hammer hooks. Testing on a jig is fine but it's gonna be used in that particular frame and should be tested there. Even pins on the outside don't tell the whole truth. Also I've had more than one sear the the pin hole and the sear surface didn't run parallel
I'm agreeing that a milling machine will make a nice square cut, but someone skilled can do it by hand and a surface grinder is even nicer. Did ya know how they true up the ways on the best milling machines? By hand! But if I can do something on a machine it's my first choice.
A couple of possibilities with the hammer hooks or the sear... but a little explanation is in order first. Think... "Geometry."
Hammer hook geometry can be in three basic configurations... all of which affect the way the sear grabs'em... and the way the group behaves.
All these descriptions assume that the primary sear angle agrees with... or matches the hook angle. If it doesn't, everything changes.
Undersquare, or captive engagement angle... The hooks catch the sear in such a way as to pull it into engagement. This angle is usually about a half degree under dead square to the face... but it can be much more. This is where your heavy triggers come from because pulling the trigger is actually overcocking the hammer a little. Also has been called a "Positive Engagement."
Square... or neutral engagement angle. This is the angle that triggersmiths work toward when a clean, crisp trigger is desired...no matter what the let- off weight is. With square hooks, the primary angle on the sear can be massaged a little to provide either the proverbial "Glass Rod" break... or a rollout break.
Oversquare... or negative engagement. This may be what Jammer is experiencing.
The tension on the hammer hooks actually works to squirt the sear away from the hammer... out of engagement. Again, a dial indicator will tell the tale.
This is the one that lends itself to the full-auto experience if other factors are present.
To see what you have...
Clamp the pistol lightly in a vise. Zero a dial indicator on the point of the hammer spur. Slowly pull the trigger and watch the indicator. If the needle moves toward the positive side of the dial... the engagement angle is positive, or captive. If it moves toward the negative side of the dial... it's negative. If it doesn't move, it's neutral... or square.
Again... All this assumes that the sear primary angle is in agreement with whatever hook angle you have.
Now, to touch on the sear.
Assuming that you have a positive, or undersquare angle on the hooks... and you want to make it square. You set up your mill to cut the hooks... but you go just a wee bit too far with your pass, and cut past the corner, toward the top of the hammer. Even though they're dead square and true... the hooks don't sit on the sear in quite the same way because the effect is much the same as making the sear shorter from the pinhole centerline to the face of the primary. When the distances change, the engagement angles change, because... as Fuff noted... both parts move in an arc. It's also akin to stoning the rear face of the sear... where it hits the flat face of the hammer at the bottom of the hooks. When you alter the face of that abutment, you allow the sear to move farther back on that arc... and the primary engagement surface no longer agrees with the hammer hook angle, and the hooks no longer sit flat on the sear primary. Adjustment of the sear primary is needed to bring them back into agreement.
This is why that we cut the breakaway angle... or escape angle... AFTER the engagement angles are set... and we do it with a feeler gauge under the sear so that the sear's abutment at the bottom of the hooks doesn't change.
The sear doesn't rotate further toward the bottom of the hooks, and the engagement stays the same.
Geeze, for a few bucks you can send it off to the right guy and have him do it right the first time without all of the fuss. Once the hammer hooks are square, you fit the sear, at least you'll have a point to reach. If it still presents a problem, then you may have issues with the pin placement on the frame, which unfortunately isn't too uncommon for a Springer, then you'll either have a choice of working it out or sending the wholething off.
First things first, get the hooks squared.
Okay, after screwing around all afternoon with this new round thingie, here's what I found out:
Clamp weapon in drill press vise, clamp vice to table saw. Turn the magnet thingie on, which locks dial indicator to tablesaw. Line up push thingie with hammer. Re-position magnet thingie. Re-position weapon in vice. Drop weapon. Pick weapon up, examine it for damage. Drop magnetic thingie. Throw up hands in despair, go get a cup of coffee.
After a long, painful procedure of getting everything set up, and eliminating at least four ways that don't work, what I found was this: it does both.
I had the plunger positioned on the face of the hammer, at the very tip, at 90 degrees to the face of the hammer, where it would slip off as soon as the weapon fired. The tip of the hammer is also where I figured that most movement would occur.
As I squeeze the trigger, first the hammer would move towards un-cocking, about one thousandth, (or, anyway, one of those little marks on the dial. I assumed they're thousandths.) then it would move back past zero to almost two of those little marks towards over-cocking. Then it would fire.
The results are completely reproducible, but the test has to be set up every time- as soon as the weapon fires, the hammer shoves the dial indicator out of the way, and knocks it all higglety-pigglety.
I have no explanation for these results, but now I have a dial indicator, and now I think I have proof that the hammer hooks aren't square. I'm just not sure which WAY they're not square...
I should I do next?
I sure wish I had your money ...
Anyway, with all of the stoning and polishing you've done I wouldn't make any bets but -
It has been my experience that when you are dealing with quality parts you will find that the hooks come with the correct angles and are square and perpendicular to the hammer's sides. That's because they are milled that way.
However the hole for the hammer pin may be off, and if I suspect something I check with a drill blank and a small square. If the square is held flat against the hammer's side and pushed up against the drill blank you shouldn't see light between the square and pin.
You want to be sure the sear nose is the correct length from the hole to the upper tip end. Assuming that it is, you can lay it on a piece of heavy plate glass and slide your square up against the tip. Again you shouldn't see daylight. If the end of the sear is square, and the hammer hooks the same, you probably don't want to change them. If you stone the end of the sear, be sure that the fixture or jig is holding it so that you will maintain the original primary angle. And the less stoning you do the better. You do not have to get it baby-butt smooth.
The same is true of the hammer hooks. A little goes a long way, and if you don't go off of the deep end the hooks will remain square and true, and you won't get a radius in the bottom corner (with the hammer upside down).
But if you go stoning the daylights out of the hooks and sear it won't take long to get into serious trouble. I have on occasion replaced a hammer, or sear, or both on a carry gun without doing any polishing or stoning - just cutting a break-away angle on the back of the sear. The resulting pull(s) were between 5 to 5-1/2 pounds, which I prefer on anything used as a weapon. As the pull is burnished by use it will usually drop between 1/4 to 1/2 pounds. Of course this is way too heavy for some folks, but to each his own I always say -
I think what your dial indicator was trying to tell you are that the hooks have been advanced (moved forward) and the angle on at least one side in no longer a true 90 degrees. The primary angle on the sear likely no longer matches the hooks so as you pull the trigger the hammer moves through a cycle of plus and minus. Not sure what to tell you except that I depend on high- magnification observing and highly limiting how many times I rub something with a stone.
Last but not least, less expensive poorer quality parts are still fine to use for practice. Few people get it right the first time.
My head hurts... Without knowin' any more than what I read.... my best guess is that the hammer hooks are square or slightly undersquare... maybe 30 minutes of a degree... and the sear doesn't agree with'em. The tip of the hook doesn't touch the hooks until the trigger pull begins and as the hooks roll off the side opposite of the tip of the sear, the hammer falls forward slightly...which explains the initial indicator movement. As the sear rotates, the tip comes into contact with the hooks... and because they're square or slightly undersquare, the sear tip... moving in an arc... pushes upward on the hooks as it rolls out, and moves the indicator back to zero and beyond.
Remember... The sear tip follows an arc. The tip will tend to lift the hooks as it moves. Getting the sear primary angle to agree with the hammer hooks will probably eliminate the sear rotation when the hammer is cocked. A breakaway angle will reduce or eliminate the overcocking of the hammer after trigger pull begins. In stoning the breakaway... use a .020 shim under the sear legs and keep the primary angle as wide as possible. I like to see the primary at least twice as wide as the breakaway, though match-type trigger jobs often have the two angles the same width. For my own personal carry guns, I do a very narrow breakaway... usually just enough to break the sharp corner of the tip all the way across.
Put a set of pins in the frame that allow you to check the hammer and sear relationship. It doesn't matter what they look like in a jig unless the jig has exactly the same pin to pin distance as your pistol. With them held together as would be if the gun was cocked look at what you have thru a microscope. If you can take a good macro picture of the hammer and sear on the frame and post it we could help . Otherwise everyone is just guessing without enough information. Trying to set up a dial indicator when you don't have a clue what hammer and sear relationship you have is not proving anything. In your first post you said the hammer and sear wouldn't stay together that they would spring apart, that tells me that you are way out to start with. You need to at least get in the ballpark before moving on to the more advanced tests. Trigger work on 1911's gets complicated because they're so many factors you have to deal with and all have to be right and every gun can be different.
Oh, damn...
'Tuner, that exactly matches what I see under the microscope.
Under the 'scope, the sear nose isn't touching the hammer hooks until and unless you put a little pressure on everything.
'Fuff, now I have three sets of "cheap" parts- the hammer/sear that came with the weapon, the one I put in when I put the beavertail on, and the one I probably just ruined. The second set, I don't think I did anything to the engagement except touch it with the finest stone, just like you're talking about.
So now I'm going to make one of them work. By hand.
This dial indicator is actually a pretty cool tool. I'm a carpenter by trade, and I just used this thing to true up my tablesaw fence. At least, it's true by carpentry standards. We use 32nds, at the most, and the most exacting of cabinet makers uses 64ths, or so, and that's more than ten times the size of a thousandth.
So now I have the most accurate table saw in the city, by our standards. When you're working with a material that shrinks and expands more than an eighth of an inch over the course of a year, accuracy of .002" isn't just impossible, it's irrelevant.
So here's the plan: tomorrow, I'm going to glue together some pieces of walnut I happen to have lying around, and I'm going to create a stand that will take the Yavapai microscope so I can gaze forlornly at the sear/hammer engagement when it's on pins on the outside of BOTH sides of the weapon.
Then I'll make another post, and you can all tell me what I should do next.
Send the hammer to Don Williams to have it trued and squared, then play with an entire bag full of sears if you like. You have to have a true starting point. There's no you can tell if the frame is off until you have a true constant. Whether it is or not, get the hammer right and then adjust from there. Consider the hammer hooks the foundation of your trigger work, the sear your load bearing walls. Once you have them adjusted, there is still a lot of work to do, but you are not going anywhere untl the 'inspector' signs off on the foundation.
I'm almost certain it's the hooks.
I started looking for error in the jig, and the main error I found was easy to correct, and after a few minutes of stoning, the sear is falling further into the hooks.
It's not done, yet, by a long shot, and it's still going to be a junk hammer when it's done, but it proves the theory.
Make a U-turn and go back to Jump Street. Get the hooks squared up and adjust your sear jig to stone the primary angle to match. Cut a light breakaway and check for both hooks standing on the sear.
Okay, I'll do it.
I have a hammer file on the way, the one made for squaring up hammer hooks.
I'll make the hooks square, and start over.
On another note, how long does it take a set of the ceramic "hammer stones" from Brownell's to dull?
I've heard people say that they don't use them for anything but hammers, and last night I heard a reasonably reliable source say that they're only good for two or three hammers before they're dull.
Be real, REAL careful with that file, Jammer... Gentle touches. Matter of fact... I think I'd suggest the stones to square up the hooks. Good quality aftermarket "Trigger Job" hammers should have pretty decent hooks. Can't offer any information on the ceramic stones because I've never used'em. I use a 3/8ths lathe blank and 600-grit lap to clean up the rough spots, and a second blank custom ground to one degree undersquare on one side. See... I don't do these kinds of trigger jobs, and prefer to just stick to smoothin' things up a little. If you want a 3-pound, glass-rod trigger, you'll need to talk to somebody who does that... and expect to kill a few parts during the learning curve.
I give up. Squaring the hooks is about a 10 or 15 dollar job and they would be perfect. I'm glad John sees the wisdom in getting them right first, but that squaring file you just wasted your money on is a joke.
No stone is going to hold a true square for long. The ceramic stones are better used to polish the hooks after they are cut correctly. If you use them to cut the hooks, you will grind the corner off slightly and not have a true cut on the bottom corner of your hooks.
Sounds to me like you'll have several hundred dollars in this trigger job before long.
Tuner, come on you use 600 grit and a lathe blank and don't do 3lb glass rod triggers? I think you're being too modest there.
The squaring file is for when you are trying to save very messed up hooks and don't have access to a surface grinder to do it the easy way. It's a last resort kind of thing but with some skill and patience you can get the hooks back to square with one, I've done it. Then you have to follow up with stones and then if you really want it nice with Tuners lathe blank and 600 grit. It's doesn't hurt if the bottom of the hooks have a small radius, if you look at most of them under a high power microscope you'll see that they do. If you have any kind of break away angle cut into the sear it's never going to touch that radius. Stones require maintance, keep them clean and oiled and they last, you can square them back up when you need to. Ceramic stones seem to last for me but I only use the very fine ones, and you can square them back up too when you need to.
The quality hammers usually come with nice square hooks but you can't take that for granted.
Nope, I've bought two McCormick hammers, now, and neither one of them had square hooks when I bought them. That said, they weren't $50 hammers- the hammer and the sear together were fifty bucks, so it's possible that a more expensive hammer could come square, but I'll never believe it. So far, the only other new-in-the-package hammer I've looked at under the scope was a Brown, and the hooks on it definitely weren't square, either.
I suppose that the thought that they come square could be comforting, but you probably better not look at them under magnification if you want to believe that. I know I'll never again believe that the hooks are square until I look at them...
'Tuner, the stones are what I've been using. The reason I didn't start out with the file is because I figured I could do less damage with the stones. That turns out to be way wrong... I can do lots of damage regardless of what system I'm using.
That's why I asked if it's true the stones wear out, and if so, how soon. Now it occurs to me to wonder how you would tell- if the stones are worn, and aren't cutting at 90 degrees, how would you know?
Lathe blank. Huh. I may have to look into that. That has to be smoother than the file.
Ross, how do you re-true the stones?
Bill, now I see why you send your hammers out.
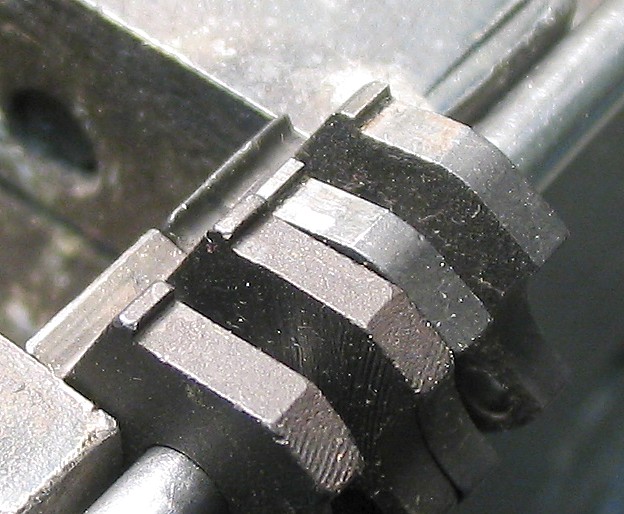
It is said that a picture is worth a thousand words. Maybe – maybe not. But I am posting several images of 1911 pistol hammers that show the hooks in different shapes and conditions. All came out of this or that gun.
I invite all of you to use these in your discussions. If they prove to be popular I can do more. Please notice some of the more horrible things that can happen when someone gets carried away with a stone or file. Perhaps we can all learn or profit in some ways from the experience.
In this first picture the angle is wrong and there is a small radius in the bottom corner.
PICTURE 404
Next picture. This hook is almost perfect.
PICTURE 404
And the last pictures.
PICTURE 404
PICTURE 404
PICTURE 404
PICTURE 404
Going left to right, the first pictures shows what happens when someone tries to stone the hooks with a too-soft stone that rounded on the corner. Notice the radius in the hook's corner.
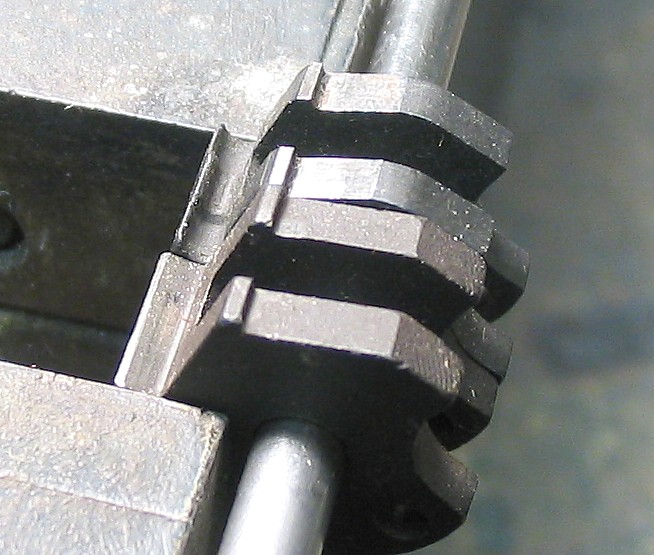
In the next picture the hooks were lowered too far, and there is a small radius in the corner. When it was matched with a sear with too much of a break-away angle the hammer fell and the half-cock notch was chipped off.
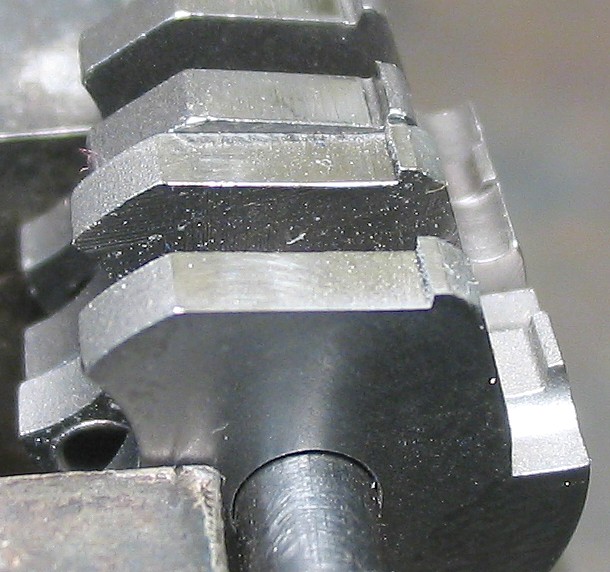
In the last picture the hooks are about as good as you can get.
Comments?
In that middle picture in the post with three pictures, what's the purpose of the relief on top of the hooks?
Let me rephrase that: I think I see. It was ground down too far, and then broken.
Jammer, you said McCormick hammers, I didn't see that before. They are supposed to be drop in parts and from what I've heard they work pretty well that way on some guns at least, I don't use them so I can't give first hand info. I believe Chip uses a little different geometry on his hammers and sears, I talked to him when he first came out with them and IIRC that's what he told me. If you stuck them in a jig and started stoning I can see what happened. I would give McCormick a call and ask them.
I do trigger jobs from under 1lb on some specialty competition guns to carry type trigger jobs. I don't believe in drop in trigger jobs although lots of people have told me they dropped in some parts and have a great trigger. I spend a lot of time on trigger jobs, nothing has ever dropped in for me. There is a steep learning curve to learning how to properly set up a 1911 trigger, I've been doing them for 30 years and am still learning. I have developed a method that works for me, other gunsmiths go at it a different way and have success, there is more than one way to skin a cat. This is why you get different information from different smiths and it all could be correct but it may not all work inconjunction with each other. Some guys seem to be emotionaly attached to their methods and will attack anyone who does it different. I can understand that in a way, you pay a pretty good price to learn how to do it right but I try to stay open to any good ideas. It's hard from my perspective to encourage folks to do their own, if they really are dedicated and will learn enough to do it right I'm all for it. Most seem to just want to save the few bucks us gunsmiths make on a trigger job, that's the ones that worry me. We have a saying around my shop " to the amateur everything seems easy ".
Fuff, that last photo does look pretty nice but I see some editing in there, one of my hobbies is photoshop. So how much touching up did ya do? I still don't think that square corner is neccessary but like I said if it works for you good on ya.
Some of the really good hammers are made of S7, real tough stuff. You better have a rigid mill and some really sharp cutters if your going after the hammer hooks on one of these babies. I got digital and it's nice but I can still mess up if I try hard enough!! The C&S hammers I get in are pretty nice right out of the package, not seen one yet that had bad hooks, not saying I don't do some prep work on them.
Concerning the picture you cited (I need to find a way to number them). Thay came out of a pistol where the owner had someone do a trigger job (maybe the owner himself, but if so he wouldn't admit it). Anyway, when those hooks were matched with a sear with too much break-away on the back the sear bounced and the hammer fell. The result was a damaged sear nose and the half-cock notch lip chipped off.
If people can't make out the important details I may resubmit the pictures and do a better job of showing just the hooks.
Ross, I didn't buy McCormick because they were drop in, I bought them because they were cheap. I actually bought the first set to learn on, as 'Fuff is suggesting, but when I got it done, they lasted for more than 10,000 rounds.
Now I'm wanting to do exactly what you're talking about: get my method laid out. The cheap way out is definitely to use a gunsmith in the first place. I knew that going in, and made the decision to do this based on other criteria. If I were out to do things the cheap, easy way, I'd just follow Bill's advice, or take Sample's class, and be done with it.
So how do you true up stones, and how do you tell if they're square or not?
Now ya' got me thinking...
Concerning that square corner...
How much it matters depends on how the sear is set up. It was very important in Browning's original design because the sears didn't have any relief at the back (what we now call the break-away angle). If any part of the sear can engage that radius one can end up with a very strange trigger pull. If the sear can't (or doesn't) touch it for whatever reason it becomes a moot point.
Later-day Browning Hi-Powers use a sear without any break-away angle, and they're hooks are cut with a thin cutter or cutoff wheel that cuts a little notch and eliminates any possibility of a radius and insures full engagement by the sear. I've sometimes wondered why 1911 hammers are not made that way.
Many of the 'trick' aftermarket hammers today exhibit the altered geometry spoken about by CCW.
The hooks are still at 90 degrees to the floor in front of them, but both the hooks and the floor have been rotated to the rear by about 8 degrees.
This was done to facilitate 'drop-in' trigger jobs.
I do not use hammers with this modification as I can not achieve the dead crisp break that I need.
I don't know how the hammer is located in the jig that Jammer is using, but suspect this difference in geometries is complicating his situation.
The first two pics illustrate a McCormick hammer and an old GI spec hammer.
This next pic is a Wilson 'ultralight' compared to an STI.
So out of the package, not only are the hooks not square, but the hammers themselves vary in geometry!
Thank you very much, Chuck, those pictures make the point quite clear. Hammers are different from manufacturer to manufacturer.
I could probably think about this for the weekend, and come up with a couple conclusions, but I'd miss something.
Right off the bat, the only thing I see is that the hammer travels farther on each shot before locking up when the hooks are rotated that way, but I'm not sure what that means. Shorter hammer/sear life, maybe?
What gains are there to such geometry?
And what brand is closest to original specifications?
I realize this next question is going to throw gasoline on the fire, but which geometry do you guys prefer, and why?
No. The hammer face location/rotation is identical on the altered geometry hammers.
I prefer stock Colt hammers of recent vintage or the bar-stock Wilson hammers. The Wilson's have the original geometry hook wise, but a
'Gold-Cup' like strut pin hole location. Not as radical as a GC hammer, maybe 2/3rd's of the way.
The bar-stock Wilson hammers come with .021" hammer hook height at a very nice 90 degrees. They should receive light stoning to the faces to minimize a small radius at the hook root, and to improve surface finish.
I also like to stone a small radius at the top of the hooks.
A stock Wilson #337:
PICTURE 404
A stock STI of older vintage. Note the large "furrow" at the root of the hooks. Purpose is to eliminate the radius created by the wire EDM process.
PICTURE 404
A pic of nicely prepped hooks on a Wilson #337. The radius on the top of the hooks is of a much nicer surface finish than the picture suggests. They are showing reflections of objects in the background.
PICTURE 404
Wow! Thanks, Chuck!
Now I know where I'd mail my hammers, if I were going to mail them anywhere...
That finish can't be a machine finish. You did this by hand?
Stones? Lap? Magic?
Chuck's Quote:
The hooks are still at 90 degrees to the floor in front of them, but both
the hooks and the floor have been rotated to the rear by about 8 degrees. This
was done to facilitate 'drop-in' trigger jobs.
So they're actually making hammers that are out of spec... on purpose... in order to allow the Tinkerin' Tyro to do what really shouldn't be done in the first place...
Help me, Hannah...
Fuff, I was just pulling your chain on the pictures, I don't believe you altered the important part in any way, sorry if I offended you it was unintentional. Wow, Chuck you did a great job explaining the difference with some great pics. I was going to recommend to Jammer to get a Wilson hammer and sear to play with because of the reasons you already gave. he should've told us sooner he was cutting on McCormick. Jammer you may as well trash those, I don't think you can bring them back now. Changing the position of the strut pin hole takes some pressure off the sear while the gun is cocked, it kinda takes the hammer overcenter, when the hammer is released it rotates thru the overcock and gets the full whammy of the mainspring. The other geometry changes were done to let the sear rotate without further cocking the hammer as it does. You can't get a light trigger if your cocking the hammer as you pull the trigger. Ok it would be very difficult to.
The way I restore the sharp edges on my stones is with a lot of elbow grease and something that will cut the stones and a flat surface. You figure it out from there.
It takes a lot to get the Fuff offended, and you haven't even come close. This is the first time I've tried to upload pictures of this kind and I'm going through a learning curve. I don't have Photoshop and haven't ever used it. So, I thought, "he knows something about this that I don't and maybe should." I see no objection to cleaning up the background or other details so long as the important parts of the image aren't changed to make them illustrate something that isn't true. The trouble is I don't really know how to do it.
Like Tuner, I have always worked with Colt commercial or USGI parts, and for my own purposes it's going to stay that way. Obviously if one is going to use these "altered from standard" hammers they should probably be matched to a sear from the same maker. Unless otherwise specified I would expect any jigs or fixtures to be based on the standard Colt parts.
I don't consider a trigger pull job to be a "drop in" matter any way you cut it. (No pun intended). I have seen far to many "basement jobs" that were flat- out unsafe. My experience is that someone reads a "how to do it" article, does it, messes up, and then brings me the results with the expectation that I can fix it with no additional parts or labor charge - because working on the gun is so much fun...
Chuck Roger's comment about making a radius at the top corner of the hooks (hammer held upside down) interested me because for a time Colt assemblers (or at least some of them) did somewhat the same thing, but I think in a different context. If anyone is interested I can post a picture of this. They however didn't use a break-away angle on the sear, and the radius or bevel was slightly larger. I always thought they're way was an open invatation for the sear to catch the half-cock notch, but so far as I know this never happened. The hook's depth by the way, wasn't lowered.
Before you do any more stoning on ANY hammer hooks I want you to take a good hard look at some of the pictures I posted. The reason for those radiuses in the bottom corner is because someone tried to polish the hooks, or make them bear evenly on both sides. As the stone advanced the hooks it left the radius.
If you are setting up a service pistol (read that to mean a personal pistol that is carried as, or intended to be otherwise used as a weapon) stoning the hooks on a standard Colt or USGI hammer can be counter productive. The procedures and methods that are used to make the "ideal" trigger pull on a target or combat game guns are different. Service pistol armorers never altered hammers and sears in the manner perscribed for MTU (bullseye) match gun builders. The 90 degrees hooks/break-away angled sears systems were originally developed during the late 1950/early 1960 by the military match armorers, and remain the basis for what is generally used today on most custom 1911 pistols. It is interesting to note that during this early period the military match gun builders had a special "match grade sear" but no match grade hammers. Instead they used regular service hammers and altered them for their own use. It was emphasized that it was absolutely necessary to maintain the 90 degree angle with a sharp corner in the bottom, and they were very careful to be sure that was done.
Howdy CCW. Not bein' modest at all... and nope again. I don't do 3-pound triggers. Not even on slow-fire Bullseye guns... which I don't fool with too much either. Just not my interest. The lathe blanks... both square and ground undersquare... are used for smoothing up the surface a little. I leave the hooks long, the breakaway is very small, the primary is wide, and the trigger pull stays above 5 pounds. The thing is, that if the trigger pull is smooth, the finger thinks 4 pounds while the gauge reads 5 or 6. Think of it as more of a well-seasoned stock trigger without havin' to shoot the gun loose to get it.
Makes for a nice, serviceable trigger that doesn't require concentration to keep from touchin' off a shot before you really want it to.
Also... a sharp corner at the bottom of the hooks isn't what I like to see either. Sharp corners lead to cracks. A tiny radius or fillet in the corner takes care of that.
Oh! BillZ... Don't knock the denim trick 'til ya give it a chance. Use your finger to work in a tiny bit of J&B or 5 micron lap and buff briskly... 'til you cause heat from the friction. If ya had a tiny little head, you could see your reflection in it.
I only see a radius on the top of the hooks in the bottom picture.
Do you guys mean a radius on the back of the hooks? I don't see how that can affect anything, except that on the bottom picture, I think I see a radius from the engagement surface of the hooks to the top of the hooks.
This is the first time I've seen or heard of such a radius. It's not in any of the books I've read.
If I'm seeing it correctly, it looks tiny.
Any more if you get a good quality matched sear/hammer set, you won't have this problem.
I match up Browns Hardcore barstock hammer with either their perfection sear or Nowlind pro match. The same with using Nowlin hammers, use a Nowlin sear, and very little fitting is needed...
As for the sear... I'm off to put on my 800 grit blue jeans!
Sorry for not being more specific, Jammer.
Sharp, square corners at the bottom of the hooks isn't good. You always want a slight fillet to prevent stress-risers and cracks.
Tuner, sounds like you do some mighty fine trigger work, did you know that Cylinder and Slide sells a kit that consists of basically a lathe blank and some very very fine paper to hone with? They call it their Micro-Hone kit. I got one from Bill at the Shot show but I hate to admit I haven't tried it yet.
The 1911 pistol has been with us for about 94 years. I'm not sure who did the first trigger pull "adjustment." But I'm sure it happened shortly after the pistol's introduction.
From that time on, smiths at Colt did it their way, and later others did it differently. In examining a large number of pistols - new and old - and including several original pre-war Colt National Match pistols I have identified a least 5 different methods and variations. The most common one today was originally developed at Springfield Armory (the government one, not the current company) during the late 1950s and early '60s for the purpose of tuning the pull on bullseye target pistols, and at that time the technique had nothing to do with pistols carried or used as weapons.
At Colt, excluding the target pistols of the 1930s, trigger pulls were usually done on the basis of special requests from customers buying what were presumed would be service pistols. Those guns were done following the general outline of what I will call the "Tuner Method." The results were appropriate for pistols that were carried rather then shot at targets. However by the middle 1960s and thereafter they followed the "Springfield Method" on target pistols such as the Gold Cup in its original version, but used a different way on setting the pulls on production guns.
All of this has led you into a morass of confusion of conflicting views about what should or shouldn't be done, and/or how to do it. Unfortunately a sense of what happened and why, isn't something one learns overnight. It comes from study and experience over a long time.
There is no one "best way" that covers any and all situations. You have to decide from the outset, what are you trying too accomplish, for what purpose (target, combat game, personal weapon, etc.) and what are your expectations?
If I wanted a weapon I would follow Tuner's advice. He knows the 1911 pistol as a weapon, both from an armorer's and user's perspective. He has been there and done that, and in his field he is unsurpassed.
If I were interested in participating in any number of various and interesting shooting games I would listen to BillZ and CCW1911 as well as others. From what I have seen they are well versed in doing trigger pull adjustments for those and other similar purposes.
While the 1911 pistol has proved to be very adaptable, it was originally designed to be a military service pistol. When it is adapted to be something else the adaptations should match the purpose, and that includes the way, or procedure, by which the trigger pull is set up.
Clear as mud?
CCW said:
Did you know that Cylinder and Slide sells a kit that consists of basically
a lathe blank and some very very fine paper to hone with?
For real? Didn't know that. My uncle showed me that little trick in 1965 or '66... Can't remember exactly. He told me that he had been using it since about the time Bataan fell... when he signed on with the Navy... so I'd say that it's been around for awhile. The undersquared blank was my own idea, and I use it more than the square one.
I wouldn't say that I do "Mighty Fine" trigger work, since it mainly consists of smoothing up engagement surfaces instead of altering them... and getting both hooks onto the sear. The results have been pretty good, though Jim Tosco acts like it strains his hand to make the hammer fall on my pistols. Jim's been spoiled by Abernathy's 2.5-pound triggers... I leave that sort of work to the masters of the craft.
I like Chuck's radius at the top of the hooks, since it looks like it would make for a nice rollout break... especially if used in conjunction with a light breakaway at 40-45 degrees to the primary. I remember seeing an old- timer's variation to that with a sort of "escape" angle on the hooks that appeared to be at about 20 degrees, with the top edges stoned flat and just touched with a stone to dress any burrs that might have been kicked up.
Yup, muddy clear.
Actually, things are starting to take shape.
I already know how to use a credit card and the postal service, I wouldn't pay very much for someone to teach me that. Professionally, I run a long list of subcontractors, I'm very good at it, and quite frankly, it bores me.
What I'm after is skill, and I agree, skill is the most expensive thing you can buy, because there's only one coin that will buy it.
It turns out that there aren't very many people who are qualified to teach what I'm seeking, but the very act of seeking it out has been extremely instructive. I've been able to eliminate a couple posers at our range, based on what I've learned in this quest to date, and that has merely been a by- product of the (extremely small) accumulation of knowledge I've developed so far.
Extremely small, but genuine. It'll do, for tonight. Tomorrow, I'll begin again.
I just wish it weren't triggers.
The people who really know what I'm seeking are fairly reluctant to talk about them, witness 'Tuner and his famous views on liability. I'm not particularly surprised, I just wish the liability were lower, so people would be more willing to discuss it.
Speaking of discussing it, my squaring file showed up today, and after my first run at my hammer with it, I'm going to have to figure out a new way. That file simply won't work with the jig I have, at least not in my hands. There's no support for the file, and there's no way to make sure I'm holding it parallel to the pin holes. In fact, there's no way to tell if the pin holes are parallel to the jig other than shimming, and that's a trial & error process at best.
I may end up building a jig of my own, while I see that this is clearly a skilled issue, I also don't see how even the most skilled hand could hold steady enough to polish hooks without some kind of jig.
I first noticed the practice of putting an angle or radius at the top of the hooks (hammer upside down) on Colt "adjusted" trigger pulls. Few know it today, but they also did something similar on double-action revolver hammers when adjusting the pulls. In both cases it lessened the area of contact between the sear or trigger and hammer as they rotated out of contact with each other. In the case of 1911 pistols it also served to "kick" the sear clear of the half-cock notch.
OK, I'll say it. Tuner does "Mighty Fine" trigger work. He's smoothed out creepy, long pulls and brought reason to "baby's breath" pulls. He's also fixed other "pistolsmith's" mistakes. I still don't know how he can make a 5 lb pull feel like 4 lb tho... but it works.
At any rate, I was already playing with the idea that .020 was thin - I've been listening to 'Tuner preach it, and Kuhnhausen says that .018 -.020 is for match guns, while service weapons should be .025 -.030.
I'm coming to see that there's a lot more to be gained in the land of Smooth, than in simply chopping down the hooks.
At any rate, what I'm driving at is this: the hammers I've seen so far come with hooks that are about .020 or .022 high. I haven't seen anything more than that.
Does one start grinding away on that base, to make the hooks higher? Doesn't that alter the geometry?
And when you guys are talking about that radius, are you talking about that little, tiny, barely present radius at the top of the hooks? The one where it's more of a really dull edge than a radius?
USGI and older (regular spur and original Commander) Colt Commercial hammers had hook depths of around .027-.030" I just checked one I had at about .028" to .029" (give or take a half mile).
The new "Elongated Commander" hammers that are made to match up with duck- butt grip safety's generally have shallow hooks because the gamers want light, crisp trigger pulls above all else.
Generally, you shouldn't start grinding, filing or whatever at the base. That what you locate and work off of, and if you change that surface you have no way to keep the hooks at 90 degrees (or undercut as the case may be.) in relation to that flat.
I'll try to post another picture tomorrow that shows the radius or angle on the top of the hooks.
Jammer... The secret is to use a light touch and to go s-l-o-w...
Keep in mind that keeping parallel to the pin hole is an exercise in futility unless the holes in the frame are drilled perfectly straight... which few are. The goal is to get both hooks bearing squarely and evenly on the sear... which usually requires that one hook be adjusted independently of the other. Not sure how far you want to go to pick up the skills, but a suggestion is to enroll in a machinist's course. Most community colleges offer an evening class that offers just the Machine Shop Theory and Practice part of the course without having to take on the whole vocational diploma stuff. Explain what you want to get from it, and the instructor will likely work with you to that end. What you want to gain is a few basic toolmaking skills.
Also... Most aftermarket hammers have those shortened hooks... by reason of supply and demand. So much has been made of match-grade triggers, that it's come to be expected. The shooting public demands it, and the manufacturers will supply it... Simple as that. I'm not completely sure... since I've never used a Cylinder & Slide prepped hammer... but I believe they're offered with .023 hooks. About the only option that you have if you want'em longer is to special order or search for unaltered USGI or Colt hammers. If you can find pre-Series 80 take-offs, you're good to go. Otherwise, Series 80 hammers don't have the captive half-cock notch that I like, but they're workable if you can live without that. There is a drawback if you plan on carrying the gun cocked and locked without the Series 80 safety parts. More on that later.
A little trick that'll tell you whether both hooks are on the sear is to boost the hammer lightly by inserting the tip of a medium-sized screwdriver between the hammer and grip safety tang. Don't exert pressure on the tool, but let just its weight apply the levering force. Pick a screwdriver that's long enough to depress the grip safety. Pull the trigger. If the force needed to drop the hammer is more than just a tiny bit heavier that the normal trigger pull.... maybe a half pound heavier... you've only got one hook on the sear.
This one brings me back to a couple of theories and conclusions that I've made mention of in the past... and drew some heavy fire. For reasons of a different perspective, I'll go back out on the same limb and see if any of it makes sense to anybody except me.
I've often said if one studies a design long enough, that he can determine the intent of the designer...or at least come up with some viable reasons for WHY something was designed that way.
Bear this in mind while contemplating the post:
Browning, in his infinite wisdom and understanding of the mass-production process... knew that perfectly square hammer hooks and perfectly matching sear primary angles would be coincidental rather than the norm.
He designed the hooks to be long enough to maintain contact with the sear in the event of an oversquare hook engagement... one in which the mainspring tension on the hammer would tend to kick the sear out of engagement or in the event that dulled tooling wouldn't let the sear engage the bottoms of the hooks for full depth of engagement.
The long hooks are also a hedge against the oft-mentioned "bounce" and the resulting hammer followdown. There's enough length to recapture the sear before it escapes from the hooks. Actually, the hammer bounces very little, if any..assuming that the mainspring has adequate tension to keep the hammer in contact with the sear. The hammer bounce isn't the primary reason for hammer follow anyway... The main culprit is the trigger nudging the disconnect. What little the hammer actually bounces only makes a followdown more likely because it reduces load on the sear and makes full use of the trigger's "nudge."
These shortened hooks are done mainly for the elimination of creep... or discernable trigger movement between the beginning of pressure on the trigger to the break. Highly desirable in a match gun, but unnecessary or even undesireable in a service pistol. In a gunfight, we won't be taking a helluva lotta time to get the perfect sight picture. Minute of thorax is generally the rule there.
When we shorten the hammer hooks below allowable tolerances, everything becomes more critical. Hook geometry (squareness)...Sear spring tension... Mainspring tension... Sear primary angle agreement with the hooks... Everything becomes more critical over just a few thousandths of material.
I don't even believe that both hammer hooks bearing evenly on the sear is a critical point except with a match-type trigger job... in which the hooks are shortened beyond those design parameters... and it may even be detrimental.
With only one hook bearing the load... only one hook is being worn while the other is loafing. By the time the primary wears enough to allow equalization of both hooks to begin, the trigger pull is getting pretty smooth. At this point, the secondary hook is starting to make contact, and is beginning a smoothing process of its own under very light pressure... making its influence go largely unnoticed. Its "polishing" is a gradual step. As the primary hook allows more engagement, the secondary hook gets smoother... gradually... and they eventually equalize. Now you have a very smooth trigger pull, and one that is still unlikely to produce a hammer followdown because the secondary hook geometry largely unaltered... Only the engagement surface is smoothed through the light wear that it was subjected to. In time... both hooks are sitting evenly on the sear, but because of the self-polishing effect of the two parts engaging one another...the trigger has become what we know as "sweet." Any Smith & Wesson wheelgun buff can describe how sweet the trigger action gets with use, and it explains why very old, original 1911s have such surprisingly smooth triggers. Yes... There's a bit of trigger creep in those old, well-used guns... but it's so smooth that it feels like it was done purposely... like Chuck's "Rollout Break."
Even if the hook to sear geometry isn't precisely done... the trigger action can be pretty sweet with just a little prep, if one isn't overly concerned with an action in which no trigger movement is felt between the pressure and the break. A tiny bit of creep... as long as it's smooth... won't have any practical effect on the serviceability of the gun that is carried as a defensive tool.
See to the rough surfaces... Keep your hooks at a reasonable length... Keep your escape angle a reasonable width... no more than a third of the width of the primary angle instead of the "Half-and-Half" stuff. Forget the "Match Grade" mentality that seems to have taken over the scene, and you won't have to be anal-retentive over perfectly square hooks and perfectly mated sear engagement angles.
Hmmmm, I have always fouind that when the sear and the hooks don't bear the load together that there is a great difficulty in boosting the hammer. It readly shows itself and one or two passes with the stone remedy it. I've just never began so far off that even considering leaving the hooks and sear bearing uneven pressure has been contemplated. I guess that must be okay though since that is what most factory triggers are like out of the box, of course, that's what I get called upon to correct and it's what Lyle is attempting to improve on.
Could this new tecchnique you are describing be called a 'stealth' triggerjob? You know, where you do a trigger job, but it just doesn't really feel like it?
My Colt had one hammer hook bearing @90% of the load when new.
Now it appears to be @60% on one and 40% on the other hammer hook.
The trigger pull is better than you might expect, but not match grade. Put a little grease on the hooks and it might surprise you on how good it feels for target use.
I know this is a radical thing too do, but the Old Fuff lacking adult guidance and supervision has gone and looked at the blueprint -
To be specific, "Hammer; Drawing No. D5503838, Department of the Army, Rock Island Arsenal."
In the usual convoluted Army way they dimension the depth of the hooks by measuring from the center of the hammer-pin hole to:
Base of the hooks = .268" +0/-003"
Top of the hooks = .298" +0/-003"
So the nominal hook depth would be .030".
They also call for a radius in the bottom (sharp) corner = .005" (max).
Last but not least, there is an interesting note that reads, "Break corner to obtain required trigger pull," with an arrow pointing to the top corner of the hooks.
Now this means absolutely nothing when it comes to the current crop of aftermarket hammers, "drop-in" or otherwise. As Tuner previously pointed out they are made to entirely different specifications and dimensions for today's gun builders - both individual and professional who have a different way of doing things. However it is better to go back to the beginning and come forward then to start in the middle. Also, as Tuner has pointed out before, the Army/Colt way may be better when it comes to weapons, then what has become today's common practice.
Oh, and if anyone wants to see what Browning really thought a good hook/sear engagement should be go look at a hammer from a 1903 Colt Pocket Automatic.
I have a pre 70 series spur hammer, out of a commercial, that the hooks are at .032! I couldn't believe it, but there certainly wasn't much chance of it doubling or anything, in fact, the trigger pull was 'kid proof'. On another note, I just took in a 38 Super Commander and they were .21 from the factory and rough as a cobb, but had a decent trigger pull, go figure.
I think one thing we can all agree on is that there is a certain amount of 'feel' for this work, and for every job that goes easy there are ten, that even if you do everything right, will give you a fit and eat up your time before you get it right.
When it's all said and done, the hammer and sear relationship is just the beginning of the entire job, not the end of it. Sometimes it's the easiest part of the job, but once it's done, there are a dozen other surfaces that need attention to finish the job.
Bill asked:
Could this new tecchnique you are describing be called a 'stealth'
triggerjob? You know, where you do a trigger job, but it just doesn't really
feel like it?
Nothin' "new" about it... or at least not any newer than the design itself. It's called: "Let the parts wear in and square themselves up." It's worked for a long time. 'Course, that assumes that the pin holes are drilled straight... and for the 437th time, I... don't... do... trigger jobs. At least, not by today's custom standards.
For me, A Colt .45 Auto with .018 hammer hooks and a 3-pound trigger pull is like a '65 389 Tri-Power GTO... All engine and little-bitty brakes.
Seriously, that blonde handled Colt, one of Tuner' "orange beaters" was one of the sweetest 1911(A1s) I've ever handled. I shot it for a while and didn't miss once! It's an example of the parts wearing together to perfection, better than new.
I've seen hammer/sear engagement surfaces polished on blue jeans and even brown paper grocery bags. Smooth is the key. Short is not.
Ok. .005" max fillet radius as found on the RIA prints means zero to .005" max fillet radius in the hammer hook root. So ZERO radius is within print.
The nominal hook height is .030" but a hook height of .027 is indeed within specification.
The print indicates a radius on top of the hooks to suit. A very moderate radius of .006" leaves us with an effective hook height of .021". Just what the hi-performance hammers offer. Not too far from what we might have found from the Colt custom shop of the 30's.
Just as modern automobiles have superior brakes, today's 1911's can have superior triggers. With no ill effects if set-up by a competent pistolsmith.
A very nice trigger is superior to an adequate trigger. Todays technicians have indeed improved on the original, as issued, 1911's.
When we 'improve' on a mechanical assembly we normally refine materials and techniques, in any industry.
True, a poorly smithed 5-1/2lb trigger is inherently safer than a poorly smithed 4 lb trigger.
BUT, a 4lb trigger from an experienced and time proven smith, is a thing of beauty and joy!
I don't want to fire 10k rds to smooth out a trigger, my customers do not want that either.
There is an alternative, a competent trigger job by an experienced and wise 1911 smith. Please do not get so wrapped up in one line of thought, to deny the existance of this.
No argument on those points. A fine triggered pistol is a wonder to behold and a joy to shoot. I've handled a couple of Abernathy's pistols with his special treatment, 2-pound triggers... and they're righteous. A carry gun with usch a trigger would be a mite ticklish, though. The effects of an adrenalin surge is hard to predict, and would vary a lot from situation to situation, and from shooter to shooter. It would be a little like a cop cocking a double- action revolver during a potentially hostile entry.
Just my own viewpoint, understand... but I don't want a gun that only requires a "baby's breath" on the trigger to drop the hammer... For a target pistol, I do appreciate a really light, crisp trigger, but men who are both skilled and disciplined enough to be efficient with such a gun on the street are few and far between. I'm not knocking such trigger work... just trying to point out the fact that just because so much is made of it, that many will believe that a 3.5 or 4 pound trigger is just what they need... for a defensive pistol... and find out too late that it's a liability rather than an asset. Simply put... just another aspect to ponder on before making a choice. Such things should be carefully considered before making that choice.
Again... A civilian/citizen defensive action with a sidearm is more likely to occur at less than 10 feet in about 3 seconds from start to finish. There probably won't be time for more than a flash sight picture assuming that there's enough light to even see the sights...much less align them perfectly... so the difference between a 4-pound trigger and a 6-pound trigger isn't going to make a whit of difference on the outcome.
Just FWIW... Unless there are serious issues with the pin holes... it doesn't take 10,000 rounds for a lightly prepped trigger group to settle in and smooth out. Uneven hooks generally equalize with 3-4 light boosts and 500 rounds.
One of our other moderators... P95Carry can attest to that fact. Ask him about the trigger on his Sistema. I spent all of 30 minutes prepping his parts.
The attached images show one method of adjusting trigger pulls that used to be used at Colt, and also by U.S. military armorers, judging by a note on an Army blueprint (D5503839) of the 1911-A1 pistol's hammer. The note reads, "break corner to obtain required trigger pull" with an arrow pointing to the hook's upper corner when the hammer is held upside down.
As can be seen in the illustrations the hooks were radiused or beveled along the leading edge to facilitate the sear's early release. In the process the sear is kicked forward and so clears the half-cock notch. Within limits the amount of bevel or radius determines how much of the sear is engaged, and the sear nose has little or no break-away angle. The images show a hammer I removed from a gun after its owner went a bit too far. However it makes it easier to show what was done.
While this resulted in some improvement over an unmodified hook/sear set-up, and was something that could be done quickly, the resulting trigger pull was not up to target standards, and in fact it wasn't meant to be. It may have been the only modification that armorers and arsenal workers were permitted to make on one of Uncle Sam's pistols. It is unclear if this system originated at Colt or within the military services, but is was probably the first system that was employed other then simply polishing the bearing surfaces.
I've been busy, but I wanted to write this post right.
I want to say a genuine Thank You! to you guys, in particular Chuck Rogers, 'Tuner and Old Fuff.
I've paid attention to everything everyone said, and I learned something from all of you.
Now, in the "Above And Beyond" category, I want to say Thank You! specifically to Chuck Rogers.
Two days ago, I sent an email to Chuck, asking a couple questions, and he sent me one answer- he said "call me."
So I did, and he graciously spent a half an hour taking me step by step through the process he uses to prep hammers and sears.
It is indeed a skill, and a touch/feel/experience issue, and there is still only one way to get the skill, but halfway through his explanation, the light came on, and I recognized at least one mistake I was making, and when we were done I was confident of the method. Now the only thing that remains is practice, and I'll let you know in twenty years how that's turning out.
I returned to the basement, and used what Chuck taught me to straighten out my existing hammer and sear, and it now functions correctly. It passes all safety checks, and the original problem, following when dropping the slide from lock, is gone.
That said, the pull is very heavy. I have no idea what it is, I only have the 4-3/4 pound weight set, but it's more than that.
So I'm going to sacrifice this set to the gods of practice, and when I'm confident I can do so, replace them with a new set, polished in with Chuck's method.
'Fuff, those are great pictures- I was completely unaware of the break on hammer tips, or of the break between the primary and secondary angles, until Chuck told me about them, and I can see how you could adjust the pull that way.
Since I now have a couple sets of junk to play around with, I'm going to do some experimenting.
This has been a great project, and the help I've received so far has opened my eyes in more ways than one.
If you really want to know how to set up a 1911 trigger, my advice is to call Chuck and post here- you'll get everything you need to know, complete with pictures.
Excellent! Congratulations and good on ya, Raja! I've got some takeoff sears around here. If ya want a few to practice on, let me know. I THINK I've got a stainless Colt Series 80 rowel hammer with .026 hooks too. It was in an XSE... If I can locate it, I'll donate it to your continuing education.
More practice is better!
For the future, because I can predict how this is going to go...
I'm going to do a bunch of practice runs on trashed hammers and sears. Then I'll buy a Real Hammer and Real Sear- original geometry, the correct hardness, everything.
Then I'll do that set very carefully, and put it in my beloved milspec, and pet everything until everything likes everybody and plays together nicely.
Then I'll go shooting. And because I bought good parts, I'll be able to shoot for a long time. Years. Long enough to forget all of this.
So just think, ten years from now, we get to do all of this all over again!
One of the advantages of such a short memory is that you get to watch good movies over and over again.
I have my Beloved Milspec back together, and it passes all the tests.
It doesn't follow anymore, which was the original problem.
You can see reflections in the primary sear angle and the hammer hooks.
The hooks are a nice, conservative .023.
It passes all the tests listed in Kuhnhausen.
My brand new dial indicator says the hammer doesn't move when pressure is applied to the trigger with the thumb safety locked on.
Time to leave for the range, right?
Oh, no, not yet.
There's one more test, the S.A.M. (Super Anal Marine) test, and it fails that.
The dial indicator says the hammer uncocks by just over a thousandth before it fires.
I checked this set straight out of the package, before I touched anything, and it uncocked by just under a thousandth when it was brand new- it wasn't straight, then, either.
Then I screwed around with it, and when I got it nice and pretty, it didn't follow, but it would uncock by almost five thousandths before it fired.
That was a long time ago, and I've done it six or seven times since then, and I got it back to where it was when I bought it, but it's polished, now.
If I had learned from SOMEONE ELSE, and I didn't know about your damned dial indicator test, I'd be done now! I shoot bullets, not dial indicators!
But no. I had to come here, and learn from you guys, so I'm not done. I know, I know, some noise about just because it's working doesn't mean it's working right. Yeah, yeah, yeah.
I'll play with it tomorrow. If I have to break it down one more time tonight, I'm going to melt it into a puddle, take the puddle to the range, hang it down range, rent a Glock, and blow holes in it.
I swear, between Bragg and this happy dance, I wish I'd never heard of North Carolina.
I will say that I'm starting to see how you have to hold your mouth when you stone the hooks, though...
Now ya understand why I... don't... do... TRIGGERJOBS! I can be happy as a duck with about 6 pounds as long as it's smooth.
Go shoot it. That .001 inch of motion may be due to the tips of the hooks if you put Chuck's radius on'em. If the hammer doesn't follow and the gun don't go burp... you're probably good to go. Remember to load a few mags with two rounds for the test-fire.
Don't get me started on Bragg. I gotta lotta memories of Hay Street and most of'em are a blur...
I don't remember having all of these problems...
If you are still working with the original hammer the hooks by now may be advanced forward enough to give you what you're getting. Same thing with lowering the sear nose while "correcting" the primary angle. The hook's 90 degree angle (more or less) changes in relationship to the sear because both are pivoting from fixed points. If you are satisfied with the trigger pull, the safety lock's function isn't compromised, and the hammer isn't following down I wouldn't worry about the rest.
The trick is not to have a 4 pound pull. It's to have a 6 pound one that feels like four...
Oh, no, Fuff, this isn't the original set.
That would have been way too CHEAP!
This is like the third set. Or something. I lost track.
Back from the range, after succesfully separating 100 bullets from their brass.
No malfunctions.
Field stripped and cleaned, of course, but I'm too tired to detail strip it tonight- I'll leave that for tomorrow, and I'll examine the hammer and sear then.
The pull measures between four and a quarter and four and a half, and I like it a lot.
What I really like about it, of course, is that I could probably do it again.
Notes after detail stripping and cleaning following 100 rounds.
Pre-testing pull: Between 4 lbs. and 4.25 lbs.
Post-testing, pre-cleaning pull: Between 3.75 lbs. and 4 lbs.
Post cleaning pull: between 4 lbs. and 4.25 lbs.
The smoke on the sear and the hammer show clearly that both hooks are bearing evenly, however, it also shows that the half cock notch is striking the sear. As the hammer is a McCormick, the half cock notch is only striking the center of the sear, but it shouldn't be striking the sear at all.
On the dial indicator, locking the thumb safety on overcocks the hammer by three thousandths, and unlocking it de-cocks it by three thousandths. This has changed, it wasn't the case before going to the range.
Pulling the trigger slowly on the dial indicator, there is now two thousandths movement before the hammer drops- twice what there was before the range.
Dropping the slide from slide lock, it follows once or twice out of ten times.
The lesson I learned was that the angles only work in the weapon- they don't work on any of the jigs. The hammer and sear need to be judged on pins or installed. Cutting them to the jig just doesn' work.
Of course, now I get to do it all again...
quote:
The lesson I learned was that the angles only work in the weapon - they
don't work on any of the jigs. The hammer and sear need to be judged on pins
or installed. Cutting them to the jig just doesn't work.
Get the frame pin set from Brownells so you can mount your hammer and sear on the outside of the frame...
I think it has to be the negative angle. It's the only thing that wasn't right when I left for the range.
'Tuner, that pin set is the only way I got it done- the hammer and sear don't go together on any jig, but they fit right together on those pins, and that brings up another question- if the holes weren't square, isn't that exactly the way it would show up? You'd need an angle that matched the holes in the frame, right?
Well, I'm ready for the big leagues!
I'm done screwing around with cheap practice sets, I'm going to ruin a REAL set now!
First, I'm going to re-ruin one of my trashed sets, and I bet I can convince a pair of them to "work" for a hundred rounds.
Then I'm going to follow Chuck's advice and get a Wilson 337. That way, if I screw it up, at least I'll be screwing up a REAL set.
And that reminds me: this set was a set of what Brownell's calls "Wilson Value Line", but they are identical, in every way, to McCormicks. Even the same cast marks (or whatever you call them) in the same places. The same marking everywhere, the same dimensions, everything is identical. Now that Chuck told me what to look for, angle wise, when you line them up on a hammer pin, they have exactly the same rotation back to the hammer hooks.
They call them Wilson Value Line, but they're McCormicks in a different color package. And now you know.
Yep... That's part of why I don't do trigger jobs... at least not in the conventional sense. Too dang nerve-wrackin'. I've been tryin' to eliminate stress since I retired in '91. Stress is one of those things that'll kill ya.
My trigger work now consists of a little prep and polish... and fixin' other people's hammer follow issues.
The reason that the Value Line and the McCormick hammers look the same is probably because they ARE the same... Came from the same unknown vendor.
Sorry I missed your call. Try again, anytime. It's a pleasure to chat with a mechanically competent individual with a good ear.
I CANNOT get a dead crisp 4lb. pull using ANY of the 'altered geometry' hammers that will not result in the ocassional 'hammer fall' on a 'slide drop'. 'roll type', yes. 5lb, yes. But neither are what my customers want.
I think you are making too much about the indicator results. I would disregard anything less than .004" or so, but there are other ways of evaluating a trigger job.
I prefer stock Colt or 'premium' Wilson hammers. I use a sear angle identical to a current Colt sear.
I'd recommend trying the above combo and boosting the hammer with finger strength only. You'll notice an increase in pull weight while you boost, but it seems to 'level out' at mebbe 2lbs heavier during the boost. The true weight is usually unchanged by the boosting.
It's a 'touchy/feely' thing.
That 'feel' is what I look for. Of course along with equal contact on sear to hammer hooks.
After that point, I incrementally increase the break-away sear angle until the trigger is acceptably crisp.
Then the sear spring is adjusted for both take-up pressure and final pull weight. I usually like about 20oz of take-up weight minimum for a positive trigger reset.
Now for the brutality. 6 minimum, hard as you can do it, slide drops. With no hammer follow. I flinch each time as this is no good for the gun!
I like the Wolff sear springs as they require a good effort to adjust. This buys room with heavy-handed customers when they strip their guns. Less likely to alter the adjustment inadvertently.
This is a decent thread due to the professionalism of those involved.
I'd be an easy customer for ya, Raja... I like a 5 and a half or 6 pound rollout break. Now, a crisp 3-pound trigger on a bolt-rifle is my cuppa tea... and 2 pounds'll do if I don't anticipate havin' to work the bolt fast and hard.
Jammer... I found a couple Colt hammers and 4 or 5 sears for ya... Origin unknown. Some are MIM and some are steel. I THINK I've got an old stock pre- Series 80 Gold Cup hammer here somewhere. That one oughta give ya what you're lookin' for if I can find it. I should be able to have it on the way tomorrow.
So, for us "mentally challenged", a rolling trigger pull might be one with a sear with no secondary angle cut, that you can 'feel' move away from the hammer hooks? As opposed to the quicker "break" of the "crisp" trigger?
I think mine is a rolling trigger type and not by design.
Okay, after practicing on 'Tuner's takeoffs, (Thanks, 'Tuner!) my Wilson 337 and A2 sear arrived today.
I also replaced the sear pin and hammer pin, and smoked up the hammer and sear, and dry fired it a few times.
I have a new problem. (You just KNEW that was coming, didn't you?)
The hammer appears to be bearing on both hooks, it looks pretty good under magnification, but the hammer won't over-cock far enough to let the slide cycle.
What should I look at now?
You have another problem? Well I just knew you would...
My first thought is that the bottom/back of the hammer spur is hitting the the grip safety. Remove the grip safety and then see if the slide cycles O.K. If so, reinstall the grip safety, and then smoke the tang to see where the hammer is hitting. Once you know you can decide how to fix it.
Thanks, 'Fuff!
It cycles without the grip safety. So next I'll mark everything up, and try to figure out where it's hitting.
I'm not sure how I'll do that, the 337 is a Commander style hammer, and the grip safety is a beavertail, but I'll look it over, and try to see where it looks like it MIGHT be hitting.
Right now, though, it's Wednesday night, and I have to go shoot in one of the leagues I belong to.
It's so HARD when you HAVE to shoot as much as I do...
Put a little grease on the bottom/back of the hammer spur and cock the hammer by hand if the slide won't cycle. A grease smear on the grip safety will tell all. I think you may end up modifying the hammer spur, but you can't come up with a solution until you define what's causing the problem.
My best friend for finding the spot where two pieces are unhappily rubbing together is a Sharpie pen. Mark up the suspect areas, assemble and go for it. You can usually see pretty clearly where it has been rubbed.
Okay, I put a very light coat of grease on the inside of the "cup" in the grip safety, and ran the slide back.
There was no evidence of grease on the hammer.
Furthermore, removing the slide and attempting to overcock the hammer with my thumb also didn't put any grease on the hammer.
My conclusion is that the hammer simply isn't touching the grip safety, after all.
I ran these tests with the thumb safety pin through the hole, but with the thumb safety hanging behind the grip, because I haven't fit it yet, and it binds, and is very difficult to remove once you get it in.
Something inside is hanging up, but it's the grip safety, because without the grip safety, the hammer over-cocks happily.
What's the next step?
I think you're going to have to fit the grip safety to the frame before you can go any further. Depending on the particular safety (Beavertail, Duck-butt, what?) you probably will have to recontour the back of the frame, and the best way too do this is with a little guide/fixture that (of course) Brownells sell. Remove all of the lockwork, and determine from the safety's manufacturer's instructions if any frame alterations are necessary.
Just for grins, reinstall the original grip safety and see if you get any interference with the hammer. If not you know the problem is in the new safety. (I suppose you know this anyway). Compare the two safeties and see if you notice any obvious differences (besides the shape at the back).
See Kuhnhausen's Manual, Book II, p. 151 for more information.
Brownells/Ed Brown Beavertail Jig = #087 145 886
Brownells/Wilson Beavertail Jig = #965 402 000
You want the Jig that matches your particular brand of safety.
Another thought: Are you sure the hammer isn't hitting the grip safety at the base of the spur where the bottom/rear of the hammer is curves out into a radius?
Take out the pin and pull the grip safety straight back about .060" and then see if the hammer will cock.
I already did all the filing to fit the beavertail to the frame, 'Fuff.
I wrote all about it here.
I noticed that the parkerizing is marked at the bottom of the spur, but I watched it very carefully, and it doesn't touch the beavertail.
I'll try pulling the beavertail straight back some, but the hammer isn't hitting the beavertail anywhere that I can see.
OK Jammer, where in the hell are you? You can't be that far away from me.
If you want I'll be glad to drop by to take a look and see if my eyes can help you out.
I admit that Blues Bear is closer to you then I am, and a different set of eyes might spot something.
Try another trick: Remove the recoil spring, safety lock (manual safety) and grip safety. Pull the slide back far enough to over-cock the hammer. Then see if you can assemble the grip safety by slipping it back in while going straight forward. Maybe it will go far enough to give you a hint about where it is hitting.
If that won't work coat the entire hammer with dye and then reassemble everything. Then cock the hammer as far as it will go, 15 or 20 times and then disassemble it and look for marks in the dye - anywhere. Something has to show up.
Sure sounds like a hammer strut or mainspring problem.
BluesBear was over this afternoon, with his Old Lady, Lady 45.
He took one look, and pointed out where the Wilson hammer was hitting the S&A grip safety.
[sigh]
'Bear, you could have at least made it LOOK difficult...
I filed it down, and now it appears to cycle correctly.
More later, and thank you, BluesBear!
It did have me baffled for a little while. It was just one of those subtle things that's easy to miss.
We need to go convert some cash into noise someday soon.
Hey I learned something today to. I learned that some Wilson hammers don't like some S&A grip safeties.
And at least now your hammer struts are out of danger.
Okay, another question.
If you have a hammer that has hooks that are right at .020, how would you go about making them higher by hand?
What happens if you lay a file with a safe edge on the large flat, and take it down, increasing the height of the hooks to where you want it?
How can you make the hooks .023 or .025 by hand?
You will probably get a radius in the corner because the file is only cutting on one face. However if you go for less then .003" or so, it may not matter.
Quote:
increasing the height of the hooks to where you want it?
As I understand it that would work just fine.
However the sear would then rotate just a little more to achieve full engagement.
This could lead to a little slop in the sear/safety alignment.
Which means that if the trigger is pulled with the safety on you would probably get some noticable sear movement, since the sear would actually be moving the .003"-.005" you increased the hooks.
But the bright side is that it would decrease some the take up on the trigger pull.
It my understanding correct?
Bear, I think you got it.
I think you're right, too, the thumb safety would need to be re-fit.
Do these neutral angles follow? I always make my hammer shelves slightly positive so jarring from firing doesn't cause the sear bouncing of the sear shelf. Yes it does move the hammer slightly further into cocked position but doesn't bounce out. Mirror surfaces, positive engagement, correct relief on sear and correct breakaway angles are the secret of not following. 4.5 lb trigger is a great trigger 5 lb is better and less is an accident waiting to happen. Properly done a customer will swear its a 2 lb trigger till you show him the trigger pull gage is at 5 lbs.
Don't forget that several other things affect trigger pull ie: trigger friction, safety rubbing on trigger, hammer rubbing on slide, sides of all components rough need polishing. pins rough need polishing without doing these things you couldn't even tell if you had improved or made unsafe.
Quote:
Do these neutral angles follow?
If also used with short hammer hooks... less than .023 inch... and heavy steel triggers? Usually... sooner or later.
Like you, I much prefer a captive hammer hook angle that tends to pull the sear back in should the trigger bump the disconnect or... if for some reason the trigger is pulled with the safety engaged and the safety lug doesn't positively block all sear movement.
And, you're spot on. Correctly done, a 5-pound trigger is deceptively light.