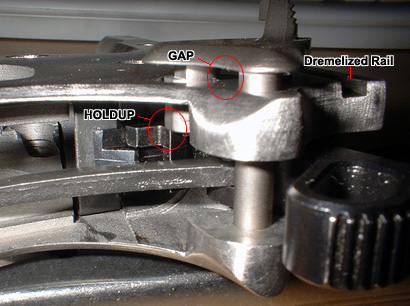
I'm having a problem with the thumb safety not going all the way in. I just finished a 1911 project and am fine tuning the trigger pull and other things, however when the sear/hammer is in, I can't for the life of me get the thumb safety to go all the way in (it stops with about 1/8" space between the frame).
I'm having a hard time determining where the problem is, but I've got a hunch that it's hitting against the corner of the middle shoulder of the sear (right below the pin hole). Has anyone ever experienced a problem such as this and if so, what should I do?
I'm going to buy some layout blue today to determine exactly where it's hitting, but from the looks of it, I may have to take a little off the sear. I'm just hoping this won't affect the performance in any way.
Let me make sure i understand.
The safety will seat in the frame but won't swing up all the way to enguage the saftey? is this correct?
If it's not seating than either the hammer is not cocked all the way or the plunger is not depressed enough to let the safety seat down - both should be easy to fix.
It it's not enguaging...
This is not uncommon when doing trigger jobs.
Any time you replace the sear - you'll have to fit a new safety to that sear. It's a tedious process that must be done with a file by hand, don't Dremel or grind - this is something that can be ruined with literally a few strokes of a file by hand.
Color the leg & see where it it making contact as you indicated you were planning to do - then take a bit of material off, re-dye, reassemble & try again. repeat until safety functions properly, don't get impatient as too much filing can render that ts useless!
Yes, the safety does seat in the frame, but does not go all the way in. It seats in the frame but with a small gap between the safety and the frame. It seems to be held up by the sear as illustrated:

Keep in mind that the plunger isn't installed yet, it's just the sear, disconnector, hammer and now I'm trying to get the thumb safety in there. I've also tried doing it with the msh and beavertail in there (w/sear spring) and even just a standard GI thumb safety but still the same problem. It's not hitting on the leg of the sear at all, but on the shoulder (protrusion above the legs) area instead.
I'm using all CMC parts in this one.
You have a classic symptom of thumb safety (TS) must be fit to sear syndrome. The first step to fitting a TS is remove all parts on your lower and insert TS and ensure it seats fully and will swing up enough to engage slot in slide, and swing down enough to allow slide to move back and forth.
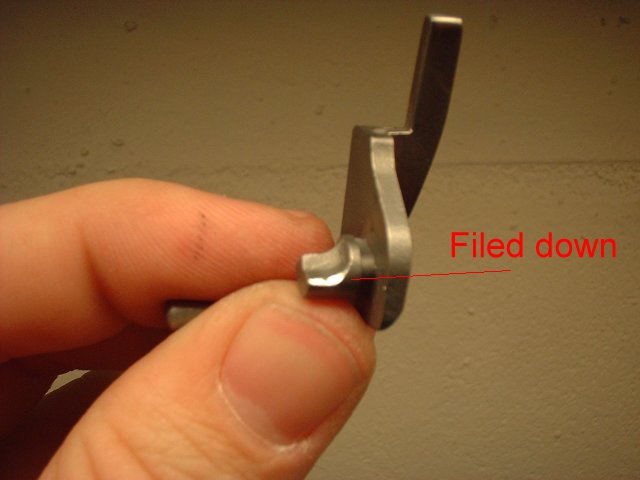
OK, once this is done then you now know that the frame will accept the part, next install all lower components except the beavertail and with hammer cocked attempt to install TS, A new part should not go in and display the characteristics in your photo. What you will have to do next is file the part of the nubbin that is hitting the sear. The best thing to do is compare a used part with a new part to see exactly where to remove metal.
In your photo it looks like their is not a sear spring in there, you can not fit the TS without the sear spring installed and the hammer cocked. Go slow here or you will ruin your TS, Also do not file on your sear!
Blindhogg, as usual, is correct; I had the same thing happen when putting a new thumb safety on my 1911. I used layout blue on the contact areas of the safety and tapped very lightly with a hammer to force the offending part to remove some layout blue. In my case it was the edge of the safety "peg" that contacted the sear. It needed about 15 minutes of filing and fitting before it would fully insert into the frame. Like he says, take your time; this is no job for a Dremel.
Also this is a very common occurrence, almost a given, with a set of new "gunsmith fit" parts.
I'm sorry if I used bad wording - DO NOT FILE ON THE SEAR! FILE THE SAFETY ONLY. THIS PIC SHOULD HELP:

That's the exact spot! I just layout blued the thing and am getting ready to file as pictured. Once again, thanks to all for the input; I wasn't sure if I was supossed to file the thumb safety or the sear.
Well gang, I got it fixed and good to go. I do however have another question associated with this.
When the hammer and sear pins are in, they stick out a wee tiny bit since they have heads. Now because of that the thumb safety only sits as far on the frame as the heads of the pin. That has become a problem for myself since the safety doesn't engage at all due to that little space. When I put the pins in from the other side just to check, the safety is flush with the frame and it then works fine.
Here's what I'm wondering... are the heads of the pins supposed to rest on the frame that way, or are their holes supposed to be slightly countersunk to compensate for the pin heads? On my first build, I simply filed their heads down a little which worked fine that way, but I'd like to know the proper way it should be done.
According to the (Tanneryshop) prints for the 1911 frame, 6 of the frame holes are supposed to be countersunk 60 degrees, +/- 5 deg, .020 to .030 deep on the left side of the frame only. The tanneryshop print doesn't specify which holes get countersunk, it just says to cs 6 places. The PDF print in the library shows 5 holes needing to be countersunk, those being for the slide stop, plunger tube pins, the sear pin and hammer pin.
After looking at Kuhnhausen it looks to me like the thumb safety pin hole should be c-sunk as well, to accommodate the .025 radius that's supposed to exist between the thumb safety latch and its pin... (I assume that the thumb safety hole on the right side of the frame should also be c-sunk when using an ambi safety.)
The same situation exists on the slide stop pin. The hammer pin has a head on it that must be accommodated, as does the sear pin. There is a radius where the plunger tube pins attach to the plunger tube body, that's why those holes need to be c-sunk as well.
As Marvkaye mentions both the sear pin and the hammer pin hole should have a 60 countersink on them. I use a countersink cutter in my drill press and go deep enough to allow the pin to sit flush or slightly less than flush.
quote: That has become a problem for myself since the safety doesn't engage at all due to that little space.
OK if your saying that your TS has dropped in flush with the frame and it will not rotate up then it sounds like you must still remove a hair more metal from the nubbin. WORKS like this you remove metal from your new TS and it drops in but will not go up, next remove more metal TS rotates halfway up to engage the slot in slide, remove more metal and viola TS can move its full range of motion and your done.
SEE the higher you want the TS to rotate up the more it cams the Nubbin against the sear therefore more of it must be removed. I stop removing metal when TS goes all the way up and stops against the engagement slot in the slide, I shoot for it getting tight right at the top of its movement meaning it is jamming tight against the sear and will not allow for it to move at all.
To do a test, with pistol together minus Beavertail pull trigger hard and see if sear moves at all, if not assemble pistol complete and engage beavertail and push up TS and pull trigger hard several times, now lower TS and see if hammer falls to half-cock if so you filed off to much of TS and must replace it and start over.
If hammer does not fall to half cock slowly pull back hammer with thumb and listen to pisol by putting to ear if you hear a small click that is the sear re-engaging the hammer hooks because they were moved slightly when pulling trigger and that is bad as TS was poorly fit.
PS TX400:
Great pic that makes it very clear where to file on part. I one day need to
finish my TS fitting article.