I have no machinist's tools to speak of, just general homeowner tools like a spirit level, plumb line, half a brain, and a vise.
I also have a Commander size Norinco that absolutely refuses to feed with acceptable reliability. Different mags, lip profile, ammunition (which isn't easy to come by), followers, etc. have not cured its wayward ways.
Ken Crawley fitted an aftermarket barrel. Still no joy. I am going nuts.
So, before I enter into a conversation with another 'Smith and jump through the FedEx/UPS/FFL transfer hoops, I'd like to be able to measure the ramp angle and depth.
Suggestions about tools, set up, technique, etc., appreciated. Photos would help.
Out of curiosity, have you checked to see if the frame abutment that stops the slide is in the proper place (set back by about .1" compared to a government model)?
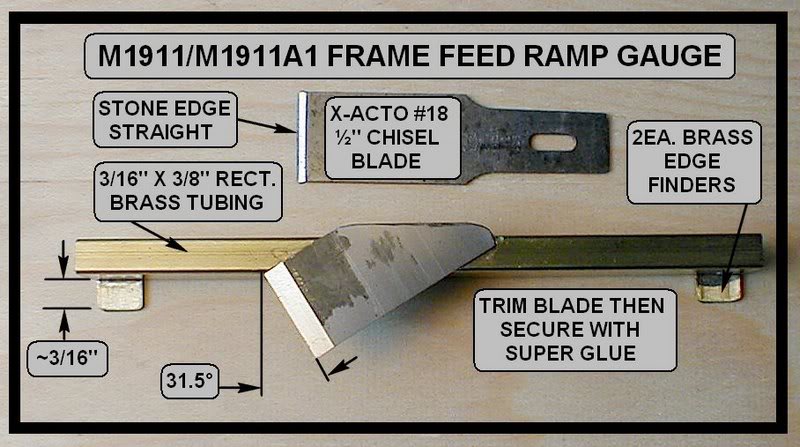
Have heard some tell of measuring the angle with a small, modified protractor. Here's what I use:

It's not a protractor, per se, but a home-made fixed gauge at the proper angle.
For the length I just use a depth micrometer to get the vertical distaces from the frame top down to the top & bottom ramp corners and compare to this:
PICTURE 404
The length can also be picked off with a pair of dividers and the dividers measured with a rule.
Scribe a line 31.5 from horizontal on a fabricated piece of something that'l fit in the mag well. Got it.
How to measure the existing angle, be it more than or less than the 31.5, I don't understand?
How to stabilize the workpiece in the magazine tunnel and measure the angle above the horizontal rails I don't understand?
'Swinging Arm' test indicates that rear of barrel lower lug contacts the frame Vertical Impact Area.
With barrel and pin installed, no slide, and barrel held to the rear, a folded piece of newsprint will slide with slight drag from barrel/frame bed area.
Hopefully, I explained well enough, but I wouldn't want to bet on it.
Quote:
How to measure the existing angle, be it more than or less than the 31.5, I
don't understand?
The gauge in the pic will just tell you if the ramp angle is different from (more or less than) 31.5 deg. With the gauge, I just estimate the difference from 31.5 deg based on the size of the gap between the chisel blade and the top or bottom corner of the ramp.
If you want or need to measure it directly, you'd need to fabricate a special-purpose protractor or modify an existing one. But all I ever needed or wanted to do was see how close or far off from 31.5 deg the ramp was. The gauge does that.
Quote:
How to stabilize the workpiece in the magazine tunnel and measure the angle
above the horizontal rails I don't understand?
The gauge in the pic has two stabilizing feet that orient the rectangular tubing parallel to the top of the frame. The 3/8" width of brass shape along with the 2 little "ears" leeps the gauge's base parallel to the frame top and running down its centerline.
A special protractor would need the same sort of thing.
I've tried using a carpenters bevel gage and a protractor to check the angle of the ramp but the trouble I have is being able to see the silly works through my bifocals!
I suppose you could modify a little protractor such as this one to do the job. Something to properly orient the head on the top of the frame and a shorter arm. Had thought about it once, but the ones I have are stainless steel - and not the easiest stuff to work with.
But for all I know, there might be a ready-made one in the Brownells catalog!
That's the exact protractor I use. I bought it at Home Depot and used a dremel to cut the arm short enough to measure the feed ramp.
If it is to be accurate, the base would have to truly horizontal, no?
How do you find and hold the horizontal Tom?
Can't use the rails that I can imagine.
Still no insight as how to measure the feed ramp angle.
If I'm doing it right, it seems that the ramp is about .030 deeper than the line drwg illustrated in post #3. .081 from rail top to bottom of the bed. What measures .366 in the line drawing reads .395 in the wayward Norinco. Is 'about' .030 more depth that critical?
I've thrown what is for me, a significant amt of money at the Nork Cmbt Cmdr to date trying to get it play nice. Starting with extractor, through various mags, ammo, followers, etc. up through having an aftermarket barredl/bushing fitted, I have been overcome with limited success. Its driving me nuts.
The only culprit remaining seems to feed ramp depth and angle.
Suggestions/comments appreciated.
Quote:
Still no insight as how to measure the feed ramp angle.
Either the gauge shown in Post #3 or Tom's idea in Post #8.
Quote:
If I'm doing it right, it seems that the ramp is about .030 deeper than the
line drwg illustrated in post #3. .081 from rail top to bottom of the bed.
What measures .366 in the line drawing reads .395 in the wayward Nork. Is
'about' .030 more depth that critical?
That 0.030" could be critical, but to get the ramp angle by that method requires the measurement of the horizontal distances of the ramp's top & bottom corners from some reference point, such as the slide stop pin hole - not easy measurements.
The vertical measurements alone won't tell whether the ramp's greater height is due to the angle being less than 31.5 deg or the ramp being cut too far forward - or a little of each!
Because horizontal measurements are kind of hard to get, the measurements from the top and bottom corners of the ramp back to the magazine well top, aft corner can be used to calculate the angle:
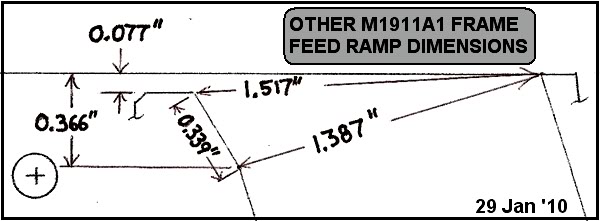
If the tips of the ID nibs of your calipers can reach down to the bottom corner, get those measurements. If your trigonometry's a little rusty, post those measurements and I'll figure the ramp angle.
Just make sure both of those longer measurements are taken using the very tips of the caliper's ID nibs.
About Tom's post, # 8, I can't figure out how to get and hold a horizontal. I mentioned that in post # 9. I bought the protractor, but can't get past how to find the horizontal platform for the base. The leg hasn't been cut yet.
Its doubtful that I am doing this correctly, so the following two measurements are an 'average' of four attempts...
What appears in the line drawing, Post 11, as 1.517 measures an AVERAGE of 1.502.
What appears in the line drawing, Post 11, as 1.387 measures an AVERAGE of 1.334.
Using the vertical distances of 0.081" and 0.395" inch you gave in Post #10, the ramp angle works out to 35.7 deg and the length works out to 0.387". Both are off quite far.
Just for grins, retake the 0.081" and 0.395" measurements and get back to me.
FWIW, just applied this same method to my target 1911 and the ramp angle worked out to (ta-da) 31.49 deg.
Using two pair of readers and holding a Mini-Mag between my teeth the .081 now reads .079. The .395 now looks like it'd be closer to .400.
I'm trying to measure part of a curve with the recangular tip of a depth gauge.
Thats abaout as good as I can see.
Yes, those certainly are difficult measurements to get with any degree of accuracy.
The new numbers give an angle of 35.3 deg and a length of 0.393". The angle's almost 4 deg off and as the length is 0.054" above average. This tends to indicate the top corner of the ramp is too far forward. How close is the VIS-to-top corner distance to the 0.260" in the drawing?
If it's pretty close to 0.260" it points to some problems with the previous measurements. If so, maybe it's time to fabricate some feet for your protractor head (to keep it parallel to the top of the frame) and shorten the arm. Or, fabricate the gauge.
What exactly are the problems the pistol is having with feeding. What has been changed? Did the pistol ever feed properly?
Oh, not knowing what you have on hand, but if you really want to measure the angle; tape two flat pieces across the rails to set the protractor on. You will have to find something out of your scrap bin or toolbox. How about two coins of similar thicknesses.
I don't see a .260 distance in either drawing?
The 'bed' (if that is the correct terminology) is .393 from VIS to ramp. I guess I don't understand the question or I am getting tripped up with terminology.
If you ever find yourself about to pass through the DFW Metro-mess, I'd be proud to spring for a decent meal and the beverage (s) of your choice.
Quote:
I don't see a .260 distance in either drawing?
Oh jeez, sorry 'bout that. Here's one with it:
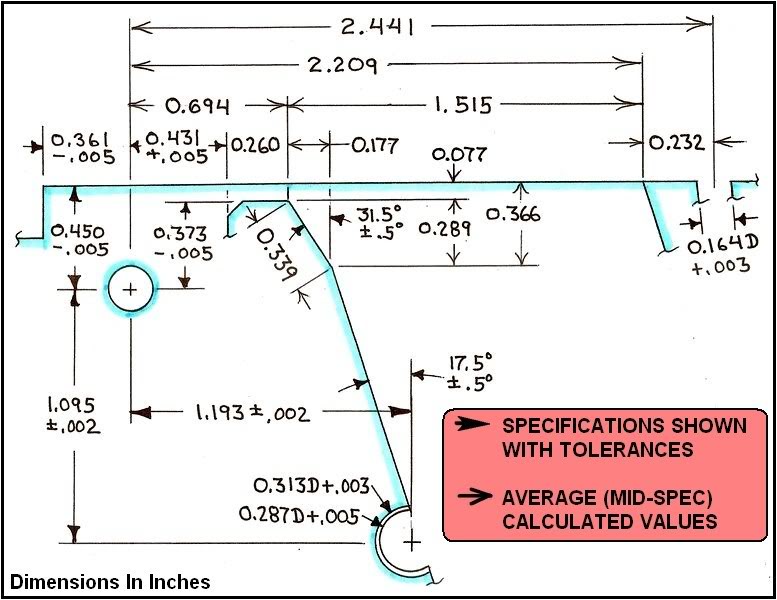
It's the horizontal measurement from the VIS to the top corner of the ramp.
Quote:
The 'bed' (if that is the correct terminology) is .393 from VIS to ramp. I
guess I don't understand the question or I am getting tripped up with
terminology.
No, your terminology sounds OK. But if the bed's really 0.393" instead of the 0.260" shown above maybe . Commanders are way different in this area than 5" Gov't Models. All my drawings are based on Army Ordnance Gov't Model blueprint data. And I'm not familiar with Commanders or their dimensions.
Thanx for the invite - will keep it in mind.
YOO-HOO: Anybody know if Norinco Commanders are like Gov't Models in this area?
I feel like a fool. You are trying very hard to help, and I can't even read.
Back to the two pair of readers and the Mini Mag light...
Try .273.
I have about the thickness of a penny seperating the frame ramp from the start of the barrel ramp. Slide stop cross pin is inserted, barrel held down and pushed aft.
Quote:
Try .273.
That's more like it. A little above the average, but not too terribly bad. But, by being a little more than normal it seems to indicate the top of the ramp is not too much forward of where it should be. This casts serious doubts on the angle previously calculated.
Something doesn't jive and the only way I see to resolve it is to whack off that little protractor's arm and measure the angle directly.
And Bob_W's suggestion about two coins the same thickness under the protractor head sounds like a good, easy way to get the head parallel to the frame top.
Quote:
I have about the thickness of a penny seperating the frame ramp from the
start of the barrel ramp.
That's about 1/16" which is plenty of clearance. Most folks call for 1/32", but I don't think a little more is any problem.
The angle and depth was derived from information provided by me. I did something wrong. Don't know what it was though.
Maybe I can figure out where or how in the morning.
Some sleep, caffene, a clean sheet of paper, and the morning sun has improved my outlook some. But, this morning's measurement don't show any gross differencies from those of last evening.
Maybe my skills at taking measurements are just as pitiful as my skill in taking photos.
It has been 'smithed on and I can't un-ring that bell. Apparently I'm stuck with a Combat Commander size Hardball gun.
Maybe we're barkin' up the wrong tree with all this ramp angle stuff: what does your wayward Norinco do when it doesn't feed reliably? Oh, never mind. I dug up this thread about it: http://forum.m1911.org/showthread.p...66&page=1&pp=50
JHP feeding problem, huh? Wunnerful. All I ever use in a 1911 are 200gn LSWCs!
Ranger 230gn JHP +P ammunition (Post #50). Clue? Lotsa recoil. Clew? Slide whacking back smartly. Kloo? Top round in magazine moving forward in magazine. Klew? Maybe far enough forward in magazine to... to... do whatever top rounds do when they get too far forward in the magazine?
Q: Do the jams occur more often with the last or first rounds in the magazine, or is it a random thing?
Q: Does the gun jam with other types of ammunition too?
I'm still wondering about the frame abutment that the recoil spring plug rests on. Do Norincos have that in the right place? I've seen that mentioned as a cause of trouble before, although I'm not sure what you'd do about it if it wasn't.
Quote:
I'm still wondering about the frame abutment that the recoil spring plug
rests on. Do Norcs have that in the right place? I've seen that mentioned as a
cause of trouble before, although I'm not sure what you'd do about it if it
wasn't.
If Salty's Norinco Commander's is supposed to be set back 0.1", that would put it about 0.260" in front of the SS pin hole center.
Wonder what Salty's is.
Yoo-hoo, Saaaaltyyyy!
Back to the Nork Commander...
The recoil spring guide abutment in the dust cover channel is 2.080 from the end of the dust cover.
By contrast, the recoil spring guide abutment in the dust cover channel is 2.043 from the end of the dust coven in a Baer Commander size Commanche.
And 2.275 in std 5" Nork.
Had you rather have measurements from VIS to recoil spring guide abutment?
I'd have trouble accurately measuring from the center of the slide stop hole. Maybe I could install the slide stop and measure from the aft of cross pin on the slide stop to the recoil spring guide abutment. In the Nork Cmdr, its .365. That help?
I believe the Baer Commanche is known for having it in the wrong place, that is in the "government" location, which has caused problems for some owners. But, I could also be remembering wrong.
The SS pin hole is the place to measure from, though, because that's where everything is measured from on the blueprints.
I'll leave it to Niemei's calculational genius to tell you if that's what it should be. I'm just trying to get over this cough.
I don't know how to measure from the center of an empty hole to the start of where the flange of the recoil spring guide rests, but the jaws of the dial caliper allow me to measure from the back of the slide stop cross pin.
Salty standing by and looking for the coffee pot.
quote:
Q: Do the jams occur more often with the last or first rounds in the
magazine, or is it a random thing?
Mid ammo stack. It looks like I would imagine a 3 point would look. No live rounds on the ground.
quote:
Q: Does the gun jam with other types of ammunition too?
With ammunition in short supply, I haven't fired a bunch of anything much lately. I have fired enough of mixed JHP through CM Hybrid and GI mags to determine that the aftermarket Bar-Sto and the tweeks performed Mr. Crawley haven't helped reliability.
Seems OK with Fiocchi Ball/CM GI mag through. Thats why I said that maybe I'd have to settle for a Commander size Ball Gun.
On a full-sized 1911 frame, the distance from the impact abutment (where the guide rod flange rests) back to the VIS is 0.792 +/- 0.005 inch.
If a Commander abutment's supposed to be 0.1" farther back (which I too recall hearing before) the distance would be 0.692 +/- 0.005 inch.
I tried to post an response a bit earlier, but the 'puter took a notion to go into its 'dog chasing its tail' mode.
Again,
The distance from the end of the dust cover to the VIS is 2.789.
The distance from the end of the dust cover to the machined area where the flange would rest seems to be 2.096.
That area is not machined 'square' in the tunnel. The measurement was taken from the wear area(s) where the flange actually rests.
If my math is right, the diff is .693.
Sound right?
So that's probably not the problem, then...
It should be about 0.692" and...
Quote:
If my math is right, the diff is .693. Sound right?
Sound right? Does Elmer Fudd have trouble with his R's?
Back to the ramp angle: Your measurements indicated the ramp was not steep enough. If the ramp's not steep enough I'd venture a guess that the bullet might not glance up and off of the ramp so well on it's way to the chamber. If it doesn't glance up so well, maybe there's a possibility the bullet's making contact with the lower part of the barrel ramp.
This would tend to lift up the back of the barrel and lead to a 3 point jam.
How to tell if this is what's happening - or not. Hmm-m-m. If you can get the gun to jam when chambering a round from slidelock, try this:
* Clean the frame & barrel ramps
* Put a nice coat of soot on them using the flame from a butane lighter or candle
* Fill the magazine to where you think it'll have the best chance of jamming and chamber a round
* If the gun jams, remove the magazine, carefully remove the jammed round round and examine the bullet nose tracks in the soot for evidence of barrel ramp contact. (I like using soot for this because the bullet wipes it off cleanly and easily)
If the gun won't jam on you from slidelock - well - fiddlesticks!
Quote:
It should be about 0.692" and... Sound right? Does Elmer Fudd have trouble
with his R's?
Whoop! I finally did something right. I may need a note to show my bride.
Back to the ramp angle: Your measurements indicated the ramp was not steep enough. If the ramp's not steep enough I'd venture a guess that the bullet might not glance up and off of the ramp so well on it's way to the chamber. If it doesn't glance up so well, maybe there's a possibility the bullet's making contact with the lower part of the barrel ramp.
This would tend to lift up the back of the barrel and lead to a 3 point jam.
Don't know. From what I understand, a '3-point' is sorta terminal. No fixes w/o messing with arcane voodoo like VIS movement. Besides, its been to a reputable 'smith
How to tell if this is what's happening - or not. Hmm-m-m. If you can get the gun to jam when chambering a round from slidelock, try this:
* Clean the frame & barrel ramps
Not exactly dirty, just Dykem
* Put a nice coat of soot on them using the flame from a butane lighter or candle
* Fill the magazine to where you think it'll have the best chance of jamming and chamber a round
I can, and will, do that. It will take a couple of days thoughto do it at a rnage. Gotta mention that I'm not a large fan of cycling live stuffin the house. Can do in the back yard though, ammo 'pops' aren't uncommon, even in daylight in my neighborhood these days.
What will successful, or not, cycling determine?
* If the gun jams, remove the magazine, carefully remove the jammed round round and examine the bullet nose tracks in the soot for evidence of barrel ramp contact. (I like using soot for this because the bullet wipes it off cleanly and easily)
Sounds like a plan. Gonna do it at the range with Live Fire though... OK? Ex BE shooter will have Calcium Carbide in 35mm film can.
If the gun won't jam on you from slidelock - well - fiddlesticks!
In the past, it has not locked up from slide lock or slingshot with JHP or Ball from any magazine than I remember.
Using Dykem, not soot... from slide lock using the slide lock/release lever to chamber... 1, 2, 3, 4, 5 230 JHPs from CM Hybrid/GI 'dimpled' follower, there were no 'smears' of the Dykem on Bar-Sto barrel ramp. Despite 'kerchunks', there were no failure to feed issues now, or in the past from slide lock.
Same stuff EXCEPT 230 Fiocchi Ball, Dykem wiped clean slightly before where ' breakover' might happen... no 'kerchunks' and sounded 'slicker' as rounds were depleted in ammunition stack.
That's about how I'd expect a normal 1911 to behave & sound. Your gun "likes" ball better than JHP bullets - just like almost everybody elses!
Did the first HP's fed from the magazine get set back much?
Dunno, didn't measure before/after length. Will edit in a coupla mnts.
edit... Quick trip to the back yard. Before reads 1.214-after reads 1.209... Just two rounds measured.
Again, no smear of the Dykem on barrel ramp, just the 'breakover' 2nd ramp if you wanna call it that.
Quote:
Before reads 1.214-after reads 1.209
That's not much setback at all - hardly worth a trip to the back yard!
Truth be told, it was more of a short beer run than a road trip. I did have to pass by the ice box and I did have a free hand and it is after 1500 hrs.
Any thoughts re the lack of Dykem smear of the barrel ramp?
Quote:
Any thoughts re the lack of Dykem smear of the barrel ramp?
Smear? The Dykem I've got won't smear once it's dried - it'll just come off. Unless the Dykem you used is like a Prussian Blue which doesn't dry (it's like lipstick).
Which type did you use and where was it applied?
Poor choice of words, my bad. Its Dykem, not Revlon. I should have said 'removal'.
edit... That was on the barrel ramp(s). Dunno if the breakover area is another ramp, or not. It is different though.
I picked up a set of dividers. Using those and the Dykem, it looks like the JHPs are whacking the frame feed ramp somewhere between .250 and .280 from the bed. Kinda depends on the position of the round in the 1X7 ammo stack.
edit... That was on the frame feed ramp.
Quote:
I picked up a set of dividers. Using those and the Dykem, it looks like the
JHPs are whacking the frame feed ramp somewhere between .250 and .280 from the
bed. Kinda depends on the position of the round in the 1X7 ammo stack.
While I've got no hollowpoint information, here's where 230gn JRN hits for me as the top round in a full 7 round magazine:
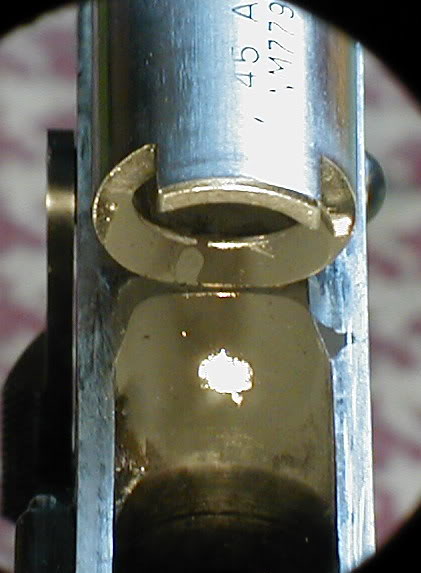
IIRC, the bottom of the cleaned-off spot was about .25 inch down, but that's in a 5" gun. Don't know if the shorter 1911's hit farther down, but can't see why they would. It's kind of neat: the fuller the magazine, the farther down they hit.
Anyhow, I'm kind of at the end of my rope on this one - with the exception of the frame ramp angle. Considering how difficult it is to measure some of those distances to get the angle, it sure would be nice to get a more direct measurement of it.
Maybe it's time to whack on that little protractor?
I'm still going to mess with it some. Occasionally I need a lesson in humility or is it frustration? I forget.
Not going to mess with it too much though. Ammunition is expensive, when it can be found.
I thank you for your time, patience and insight.
The info already given in this thread plus that in your PM shows the ramp is not steep enough by several degrees. Fixed a ramp like that a few years ago using the simple hand tools shown here:
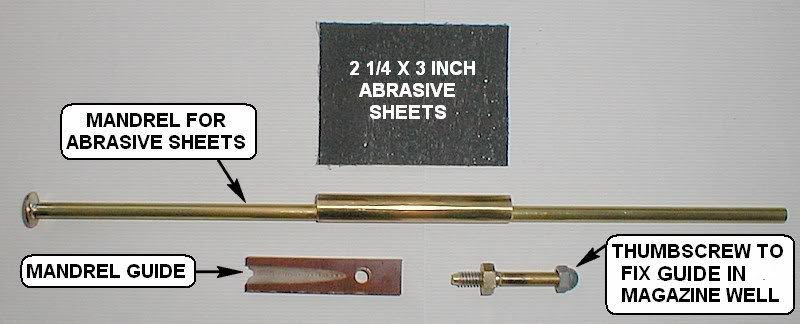
This stuff's all packed for mailing in the morning and will PM you to confirm it's been sent. Included are 7 different grades of abrasive cloth & paper ranging from coarse emery cloth down to 400 grit wet-or-dry silicon carbide paper.
Prepare the frame by removing everything but the grip screw bushings, plunger tube and ejector. Then clean and degrease it to prevent the abrasive particles and metal dust from accumulating.
The mandrel guide gets secured in the magazine well like this, using fingers only to tighten the thumbscrew:
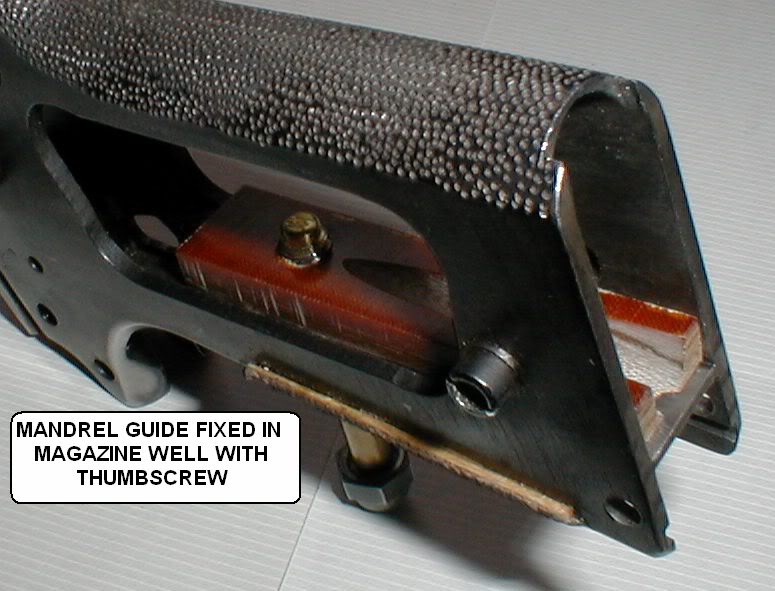
Here's this same view with the mandrel for the abrasives inserted:
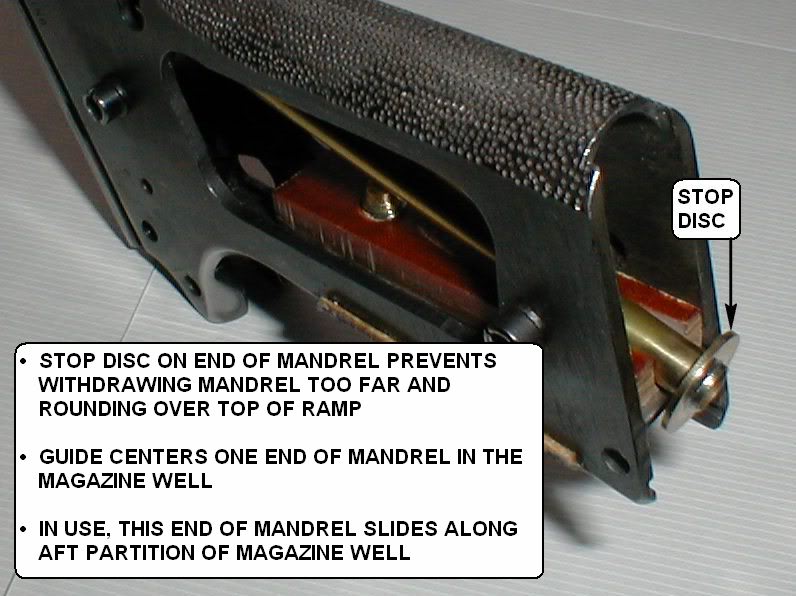
And this sort of shows how to make it all work:
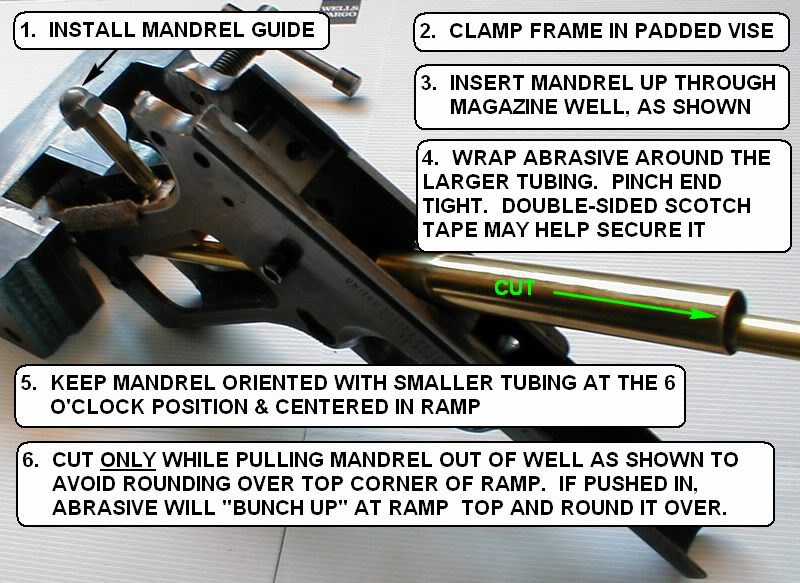
A competent 1911 'smith/machinist could probably steepen your ramp in a half hour. This method will take the better part of a day.
OK -fire away with the questions, anyone welcome!
While I have access to a Bridgeport and all the accessories, your method is quite innovative and very well thought out. Congrats and thanks for sharing!
Thanx for the kind word. That "...in a half hour." was just a wild guess. Was I even close?
Hi Saltydog:
Just reviewed all the measurements you'd previously given and there's one that I'm suspicious of. In your Post #12 you said you got 1.334" for the 1.387" dimension in my drawing.
That 1.387" dimension on the drawing is essentially (within 0.001" of) the width of the average, mid-spec magazine well. The minimum spec for the mag well width is 1.381" and the minimum spec for the mag tube width is 1.366".
A 1.366" wide magazine wouldn't fit into a 1.334" wide well. Hence my suspicion.
Anyhoo, please remeasure either that 1.387" dimension in the drawing or just the mag well width at its bottom (at 90° to the front & back surfaces) and get back. [Edited: But if the bottom of the ramp and the mag well don't meet in a nicely defined corner - like when bubba'd over with a Dremel - forget trying to get that measurement.]
The feed ramp/mag tube ID has been polished and my measuring skills aren't great, but I can read a dial caliper... at least, I thought I could.
That does not explain how I could have possibly gotten an AVERAGE of 1.334. I've looked back over my notes and could'nt find a hint of where/how I messed up.
I do have some consolation in that the 1.502 measurements proved to be same as previously reported. YIPPIE.
The bottom of the mag well opening is 1.445.
Well, why don't we just wait until the package arrives. When it does, clean & Dykem the area between the barrel bed and about 1/2 to 3/4 inch down from there. Then, with the mandrel & guide installed, give the area a test swipe with a piece of abrasive paper to see where the cutting will begin.
I'm thinking the Dykem will be removed at the bottom of the ramp.
Will take a pic of a recommended position for the frame in the vise. I found it's best with the mandrel close to level. You'll see.
To avoid crushing the magazine well, recommend using a little support jack like this (didn't remember it until after the other stuff was mailed):
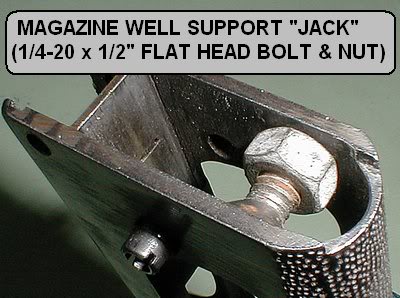
And here's about how I clamp it (not too hard) in my small woodworking bench vise for the actual work:
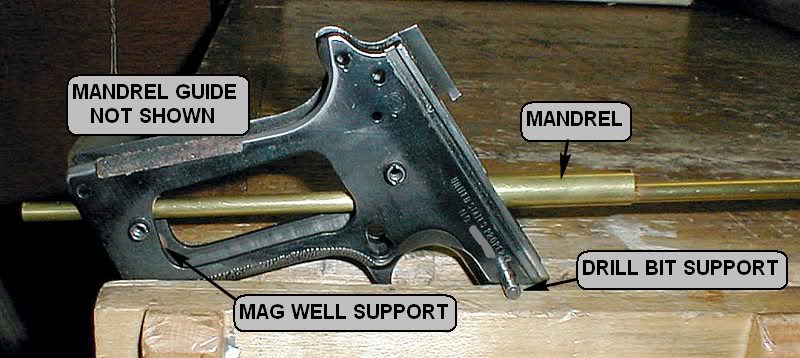
A comfortable working height while sitting on something is important - you'll be at this for hours!
I've no idea what your ramp really looks like, but here's what this thing did to a pre-Kahr AO a few years ago:
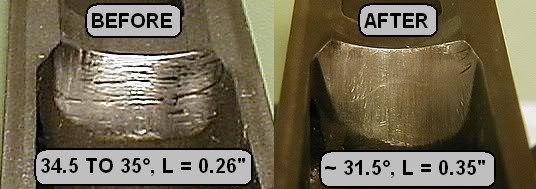
Because the mandrel has nothing to fix its lateral position in the vicinity of the ramp, only careful hand control can keep it centered. This one looks a bit off-center in the "after" shot, but I think some of that's due to the shape of the front of the magazine well.
The ramp length's a bit longer than the average 1911 because I moved its top corner forward just enough to get rid of some of deeper wrinkles up there. A couple of remnants can be seen at the top right corner.
Getting antsy yet?
Kinda a mix of 'antsy' and 'skeered'. I am looking forward to this.
There are a couple of things that might be of some help to others that may be worth mentioning are:
A suggestion was made earlier in the thread about using coins taped to rails to help establish a horizontal platform for the protractor. Using wooden skewer sticks (like you might use to grill shrimp) and rubber bands to hold the sticks in place works mucho better. Tried popsicle sticks also, but the rounded skewers were better.
There is enough room from the top of the frame feed ramp to the bottom of the barrel ramp to move the ramp fwd a tad. There is a little less than the thickness of a penny there, so moving the ramp fwd a bit will still (I hope) leave The Golden 1/32" clearance.
I am not good at measureing stuff. The tools don't lie, but my technique could stand a bit more refinement. I think that I got the depth and angle measurements 'right'. We'll see.
I finally shortened the arm of a little protractor but was having a very difficult time obtaining a measurement I felt confident in until this was tried:
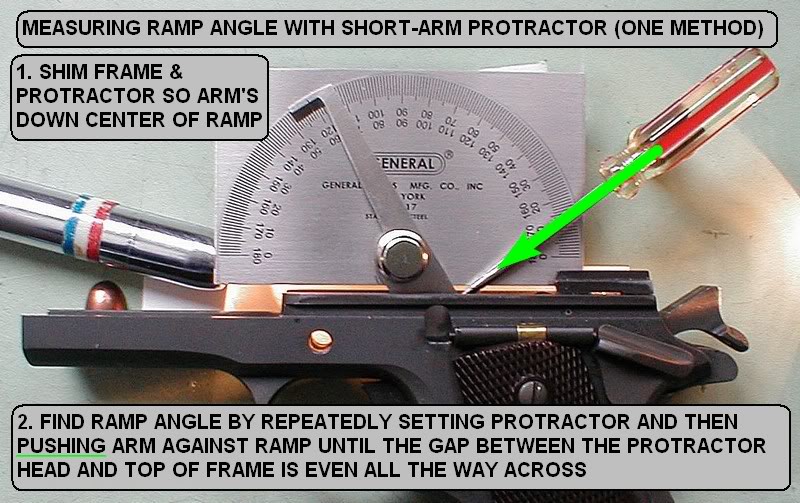
The gap shown in the pic is 3 to 4 times wider than when actually measuring.
There may be better ways of using a protractor such as this, but measuring by this method gives me a warm & fuzzy feeling - and not because the measurement's 31.5°. It's because I sense the measurement was properly taken (can feel when the protractor arm is fully against the ramp).
And you verified full, even contact on the ramp by the arm by looking at soot/dykem removal?
Maybe I don't guite understand.
Quote:
There is enough room from the top of the frame feed ramp to the bottom of
the barrel ramp to move the ramp fwd a tad. There is a little less than the
thickness of a penny there, so moving the ramp fwd a bit will still (I hope)
leave The Golden 1/32" clearance.
From all indications, your ramp is not steep enough. This means material needs to be removed from the bottom of the ramp to steepen it.
If the top corner (where it meets the bed) is nice and sharp, there'll be no need to move the top corner forward at all.
Quote:
And you verified full, even contact on the ramp by the arm by looking at
soot/dykem removal?
No soot or Dykem at all.
By holding the protractor head gently and pushing with the screwdriver in various places on its tightened-down arm, I could make the arm (and head) teeter on the top corner and then teeter on the bottom corner of the ramp.
In between teetering on the top corner and teetering on the bottom corner the arm was flat against the ramp. Too hard for me to see down inside there to see what was going on.
After all the teetering if the gap was uneven, the protractor was adjusted and the proocess repeated until the gap was even (and the head was parallel to the frame top).
Cool. I know that I am slow. If life were a race, I'd have been laped by the Pace Car long ago.
Package rec'd.
I only have about a dozen or three questions.
The position of the wood guide in the MSH/Grip safety area would seem to have an effect on the angle that will be cut on the frame.? I can slide it up or down a bit before I snug it into place. Where is the proper place to afix the wood guide?
Quote:
Where is the proper place to afix the wood guide?
Down far enough to keep the brass tubing laterally centered in the magazine well, but not so far down that it lifts the tubing off of the mag well's aft partition.
The angle's set by the tubing being in contact with and sliding along the bottom, aft part of the mag well as shown in the pic in Post #44.
First blush with 400 grit paper on the ramp shows Dykem removal kinda close to the top of the ramp.
Using divider, the lowest point of removal is .310 as measured from the bottom of the 'bed'. Still using the 'bed' bottom as a reference, the top is only .080 down.
Using eyeball, the Dykem removal is pretty much 'wall-to-wall' in the horizontal.
Hmmm-m-m-m. That's just the opposite of what I'd anticipated.
The standard magazine for this gun is a 7-rounder, isn't it?
Yessir, preferably new CM. I got a few dozen back in an almost failed 'group buy'.
And when the swipe with the 400 grit paper was being done, was the mandrel in constant contact with the bottom of the mag well?
This asked because if contact is lost down there, the mandrel will touch down lower on the ramp.
If I understand you correctly, yes.
The frame is in a woodworkers vise, dust cover down and ejector up in the air. Wooden guide as close to the butt of the frame as possible, and snugged down.
The cutting stroke is short, one way, slight pressure 'up' at the rear and 'down' at the front.
Quote:
Yessir, preferably new CM.
Good. The mandrel's disigned for a full or Commander sized gun. (Whew!)
Switch to one of the coarser grits to start. Here's where it gets hard to work in cyberspace, as I can't see what you're doing. What you basically want to do is go to finer and finer grits as the sandpapered area gets closer to the top corner of the ramp. And it's a touchy-feely-lookee kind of thing.
Staying with the 400 grit might mean taking much, much longer than necessary. And using a coarse grit for too long may not leave enough at the top to sand off with finer grits.
And it's best to not skip using a grit - you'll just have to work longer at it.
You dint (Southern for didn't) tell me that this was gonna be so much fun.
Quote:
Wooden guide as close to the butt of the frame as possible, and snugged
down.
But is the brass tubing in contact with the bottom aft corner of the mag well?
Is the guide snugged down as shown in the second pic in Post #44 so the brass can slide along the metal?
Quote:
The cutting stroke is short, one way, slight pressure 'up' at the rear and
'down' at the front.
Perfect technique!
I guess I should stop when the junction of the feed ramp and 'bed' get kinda sharp?
Quote:
I guess I should stop when the junction of the feed ramp and 'bed' get
kinda sharp?
Yes.
Are you getting close to the top already?
IIRC, you said you had a penny thickness gap between the frame and barrel ramps. If this was with the barrel back against the VIS, you have about 0.050" of gap (just measured a penny).
This means you could sand the top corner down about 0.020" and still have about enough gap.
# 67, Yes, I think so. I'll shorten the thumb screw a bit or leave a marker to see if the screw is keeping the brass mandrel off of the butt.
# 69, Nope, still rounded.
Quote:
I'll shorten the thumb screw a bit or leave a marker to see if the screw is
keeping the brass mandrel off of the butt.
If the guide's down too far it will do the same thing. Make sure the guide's bottom is about 1/16" up into the mag well - just like in the second pic in Post #44.
Here's a summary of how the mandrel must be positioned - should have posted this earlier:
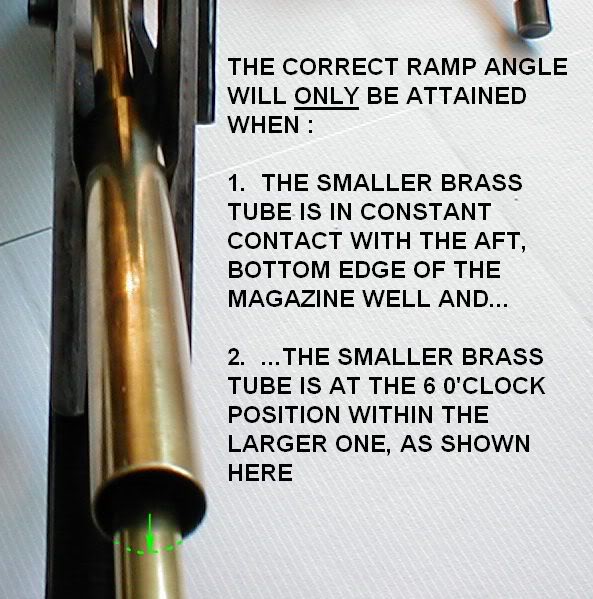
Your finger cramps should be setting in pretty soon.
IIRC, the finest sandpaper sent was 400 grit. If you want it smoother, the common finer grits are 600, 800, 1000, 1200 and 1500. Best found in a car parts place that has automotive paints for the repair shops. FWIW, there's a red-colored stuff called Crocus Cloth which usually doesn't have any grit size marked on it, but I've seen either 400 or 600 on its bulk pack boxes. It's abrasive is a form of rust and is quite soft.
There's a real temptation to skip a grit, but it's false economy - especially with the real fine stuff. F'rinstance, going from 400 straight to, say, 1000 grit might save about $3 in sandpaper, but it'll add hours to the job!
P.S.: And if you really wanted to go nuts on the ramp, silicon carbide wet- or-dry sandpaper is available in 3000 grit!
I think that I am about through with the tool. As best I can measure, using Dykem/soot removal, the depth is about .4 and the angle is consistently between 57.5-58.5. I can't see or hold any better than that.
I have some 600, 1000, and 2000 grit paper but have not used it yet. Since the scratches in the metal are vertical, it would seem to whats left of my brain cells that some coarseness might not be a bad thing. I still have a bit of room remaining before I get to 1/32".
Using live ammunition, hand chambering in the back yard, the 'new' ramp sounds slicker than it did a few days ago. I have not been to the range yet. That should happen Mon-Tues.
Keep the tool as long as you think it might be needed, like until after at least a few range trips. If the last grit used was the 400, those little vertical marks shouldn't hurt a thing. I think anything finer than 600 grit is a waste of time and sandpaper.
Glad to hear it seems to feed smoother, but some of that might be because you just want it to.
Does it look any better than before?
I think the most severe feeding test would be with the worst-feeding ammunition you have (HP's or SWC's, probably), the top round from your highest-capacity magazine when it's filled to capacity. And probably when it's fed from slide-lock with the gun held loosely.
I'm just hopng it's not worse than it was before!
Quote:
Does it look any better than before?
Could be my imagination... we'll see. I 'think' my vehicle runs better after it has had a bath and oil change.
After the strip down but before starting with the abrasive, I laid down a couple layers of cold blue in the mag well feed ramp. Its all well defined now and, while not mirror polished, has a definite starting point. I didn't see any need for a mirror finish, 'specially if I need to scratch it up a bit more. The area where the feed ramp terminates at the 'bed', although not exactly sharp, isn't rounded as before. I can move the ramp fwd a bit more if needed.
I only have three flavors of JHP. None in any meaningful guantity. Since all of this mess started with Ranger SXT about a year or so ago when you and 1911Tuner weighed in on my post, Ranger SXT is where I'll start.
Now I just need some range time.
If your JHP stuff is running low, consider taking some JRN and filing the bullet noses flat to match the SXT's length. In other words, whack on the JRN until it'll be as hard to feed as the JHP.
May sound like a goofy idea, but with limited ammo and range time...
Up-date, kinda limited though...
Using soot, dividers, and a short steel rule...
From a 7 rd Checkmate Hybrid mag, fully filled, the Winchester 230 SXT shows soot removal in the the feed ramp that start as far down as 17/64". The soot removal track is in the shape of a cresent, much like a cliped fingernail.
The twin 'horns' of the cresent removed soot as far up the ramp as the beginning of the 'bed'.
edit: On the barrel ramp, any soot/Dykem removal, live fire or hand chambered, Ball or JHP, through the Checkmate mag, happened only on what I'd call the 'breakover' area.
same edit: The top rounds were chambered with slide lock/release lever from slide lock.
The chambered rounds sounded 'slicker' but, as niemi reminded me, some of that may be wishful thinking. Dunno.
Live fire... I only had about 75 rds of the STX. They went down range w/o a problem.
Time, and more ammunition (hopefully at less than $ 1.00 ea.) will tell. So far, my wayward Nork with its new feed ramp, plays nice with JHP through a full 7 rd Checkmate mag and is looking good.