I was originally planning on getting a 1911 jig from OSI, but found out he was in prison. I am know planning on using a dremel rotary tool and the dremel router table to cut the slides. Does anyone know how well the table secures the dremel tool to it? When it turns on does it shake out of place?
There are 2 or 3 places that show dremel builds and I don't think I have seen any thing on the dremel tool coming loose. Go to www.footpounds.com, click the 1911 gunco build, it shows the set up,and how he did it.
quote
You can also still get a jig from KT Ordnance if you want to go that route.
I got a small angle plate from Wholesale Tool for $12 it does the same thing as the KT jig and cost a lot less. I can't see paying $200 for a angle plate. I have done 2 builds with my angle plate, works great.
the link for Wholesale Tool is www.wttool.com go to setup tooling angle plate item 2128-0005, 4 1/2x3 1/2x3, $12.75.
I used a mini-mill to cut my rails, I tried using a crossfeed vise with a drill press to mill a small part one time, I could not get the chuck to stay on the spindle, it finally came off and bent the shaft of the drill press. Maybe if Loctite is used on the taper it would stay on, just a thought. I indicated the angle plate on the mill bed,then bolted the frame to the angle plate so the top of the frame was above the plate, so I could cut both sides of the frame with out having to take the frame off the plate. I used a rail cutter I got from Frank. I think the cheapest way to cut the rails is with a dremel and router table. The router table is about $30 you would need a rail file from Brownells, again $30. That's all you would need except some valve lapping compound to lap in the rails
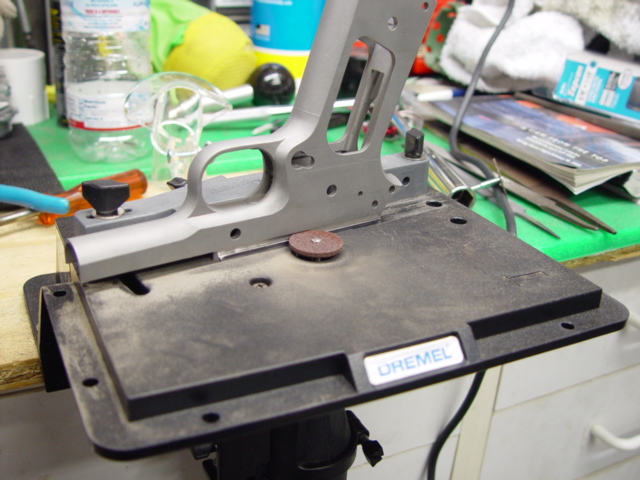
Hey thanks a lot for posting the pics. This was exactly what I was looking
for. If my eyes will tell me the truth it looks like you used 4 cut-off disks
to cut the rails, right? Does the table hold the rotary tool securely to
ensure a "true" cut. Did you start out with one disk and make a cut then move
your way to 4 disks? I truely appreciate the post, Thanks! Oh ya how are
William's frames, quality?
The table is pretty stable. I scribed the frame first to have lines to work
in then I started with 1 disk and made a bottom and top cut. not very deep
just enough to have a good mark. also as stated I didn't go to exact spec with
the dremel but I went close, then switched to the file. also to note, is the
disks, as you can see are not flush to each other so keep checking the depth.
Is was a pain to get out those ridges. Be sure to mic the disked when you
have them stacked together. I was not able to a cutting disk to fit by itself.
that is why I stacked them.Also you can use the Dremel fence to control the
depth cut, It worked well.
As I said be sure to check your specs early and often. Feel free to ask for
advise if you have any questions. Keep us posted And make sure you post pic's.
Also used the exact same method & it came out great. Just go slow & easy &
like 3tow said check depth often. The only other advice I can give is after
you've cut the first line... let's say its on the right side of the reciever...
take it off & check for correct dims, & if its o.k. turn the reciever around
to do the left side, so the lines will perfectly match on both sides. Then
just continue switching sides as you go, so youll get the same depth on both
sides & good parralel lines.
If you can't get the right thickness combination of disks go smaller for the
majority of the cutting. Then go back and move the tool and disk up and down
to get what is left.
Remember, Remember this tool is NOT, repeat Not persecution. Just use the
tool to remove the bulk.
Now, Once you have most of the material removed, use 1 or 2 disk on the tool
to do a little "fine" cleaning up before moving on to the file. Put 1 or 2
disks on and position the tool to remove very, very small amounts of material
on each edge. I use 2 disks because they flex less than 1. The filling is the
most important of the job. Go really slow with the filling and you should do
fine.
Alright, I found out that (3) Dremel #420 cut-off disks stacked together are
the perfect size to cut the slide rails. Once cut, should I leave, say, 2 to 3
mm. of room just to file, cut, and square off to get the best slide rails,
possible for the build? Once again, if there is about 1 mm. or less of room
for "wiggling room", it is not the end of the world, right, because the barrel
lock up to the frame?
1mm (0.0393) is right at 1/3 of the entire cut, with 3mm being 0.1181. I
think I would shoot for a bit less slack if possible.
Gunseeker
Oct 31 2005
3towedsloth
Oct 31 2005
rusty
Nov 03 2005
3towedsloth
Nov 22 2005
Gunseeler
Dec 03 2005
jkilroy
Dec 19 2005
Return to 1911 Archive