I purchased an oversized firing stop so I can used a smaller radius on the bottom portion to reduce the perceived recoil.
As I was fitting the FPS, it dawned on me that this forum has quit a few experienced gunsmiths and armourers. So I am asking, is there any preferred method of fitting or any tips, secrets that may help me?
Go slow, that's my number one tip. You can always file off a little more, but if you file off too much... oh, well.
I use the EGW gauge on the slide and a caliper on the stop to see how far I have to go & when I'm getting close.
Basic sequence is:
* Fit the width for a slip fit in the bare slide
* If the side tabs need thinning to fit into the slide grooves, remove material from the aft surfaces of the tabs - not the entire front surface
* If the installed FPS hangs down below the disconnector rail, dress it flush
* Dress (taper) the central, aft surface of the FPS to the hammer face for zero gap at the bottom
* Dress aft end of firing pin to re-establish proper protrusion
* Re-check extractor tension
* Add bottom radius (which can be virtually zero)
Thank you for the detail information... what the heck is aft?
aft=rear
Fit the stop to the slide first, then fit the extractor to the stop.
When fitting the stop, a good micrometer is needed.
The reason is that in fitting, the same amount needs to be taken off each side to keep the hole for the firing pin centered. I'm a little picky about this.
Measure the width of the stop before starting. In fitting two blued EGW stops for Series 70 type pistols a month ago, I needed to do nothing other than narrow the width of the stop. Nothing needed to be taken off the tab thickness...but YMMV.
Starting with the width measured stop, remove a small amount, only a half thou or so at most, on one side. Measure the width again. Take a similar amount off the other side. Remeasure.
Continue until it fits. Make sure to try it in the slide after each removal of metal per side. I used a medium Arkansas stone to accomplish this.
My measurements of the EGW stops:
Width 0.4825"
Right tab 0.0997 to 0.1007"
Left tab 0.0997 to 0.1002" (Tab thickness varies slightly from top to bottom).
Thickness at firing pin hole 0.1312"
Now, compare to my original Series 70 stop, which I was replacing:
Width 0.4771"
Right tab 0.098"
Left tab 0.0989"
Thickness at firing pin hole 0.1349" (actually thicker than the EGW replacement).
The original stop width subtracted from the EGW stop width, which is the most likely area to need reduction:
0.4825" - 0.4771 = 0.0054". So the EGW stop was a mere hair over five thousandths of an inch wider... and it would not fit as received. Final width on this particular pistol for which I have notes resulted in a measurement of just around 0.4798 inch in width fitting very snugly. The stop will not drop out when the pistol is inverted and shaken hard.
The stop is hard enough that it takes considerable patience with a Arkansas stone to remove metal from each side, and my fingers were a little sore from the work, but I got a very snug fit, which is what I wanted.
Very slow work is much better than fast and careless. Sneak up on the width that fits, checking frequently after each removal of metal.
Cut the radius carefully and slowly, being sure to check for evenness of radius along the width of the stop to avoid unevenly loading the hammer as the slide moves back and transfers its energy.
I cut a rather small radius myself, as I like to shoot a fair amount of ball equivalent ammo. With a 16 lb. recoil spring and stock Colt mainspring, cases land at most 4 to 5 feet away. Makes them a lot easier to find.
These pistols have unlowered and unflared ejection ports.
Ok, I worked on the FPS today. I fiitted it to the slide. It is a little looser than I wanted but tighter than the orginal. It is flushed at the top, the firing pin hole is aligned. I need to trim the bottom a whee bit. However, the ejector is hitting the FPS both on the top of the ejector and to the right as you look at the FPS. I will do that tomorrow.
I took my time as you suggested using a very fine file, fine sandpaper and stoning. One the fitting is completly done it should work. However, I am going to order another oversized FP so I can reach the pinnacle of skill in fitting firing pins... lol.
Also, I notice that refitting my firing pin in the hole is an exercise in patience. I have to keep turning it as I press until it goes down. Is this the fault of the hole?
Quote:
Is this the fault of the hole?
My guess is that your firing pin is either bent or lacks the proper corner radius where it steps up to its largest diameter. See the blueprints in our Tech Issues section, 14th link down.
Quote:
My guess is that your firing pin is either bent or lacks the proper corner
radius where it steps up to its largest diameter.
I read the OP to mean the hole in the slide, when trying to push the pin in for the stop to slide in, not the stop hole.
The firing pin as you notice has several diameters and it has to be really straight, concentric to slide in, but once in should feel free.
I will look into it today. Well it is finished, actually took me some time to do. It looks nice but I could have it a bit more snug I think. It is tighter than the orginal but... oh well, never satisfied.
The lower tab is a little skinnier than the orginal but the ejector just clears so I think it is ok. The Commander hammer is also a little wider than the lower tab so I am wondering what the effectg of impact will be. However, I noticed that the hammer is a little wider on the orginal too.
I think I will order another one just to see if I can close that it it up about 1/64. All-all it looks 98% factory.
I took my RIA 38 super to the range. It shot well, no problems experience; shot fast, shot slow.
As advertised it seems to affect the perceived recoil and reduce flip. However, I put a buffer in also and am not sure if the flip reduction originates from the buffer or the FPS or both. I did noticed that the recoil action seemed to be more drawn out making it more of a push. I did have some slide problems though. It took two tries to return the slide to battery when a fresh mag was inserted. I attribute this to the buffer. I will research this further.
Although the FPS is functioning without problems, I did ordered another oversized firing pin stop to see if I can reduce the tolerance.
I'd recommend taking out the buffer. With factory loads, there really is no need for a shock buffer. If you are loading the Super up to the old IPSC/USPSA major power factor, then a buffer is a good idea, but otherwise they can induce more problems than they solve.
Quote:
It is tighter than the orginal but... oh well, never satisfied.
You want it a little snug, unless you have to pry it out, I'd leave it be.
Quote:
otherwise they can induce more problems than they solve.
Thanks, what other problems are you talking about?
Quote:
You want it a little snug, unless you have to pry it out, I'd leave it
be.
Thank you. Thats what I am shooting for... a twinny whinny tighter fit. It is passable and adequate now but... I want to see if I can fit it better.
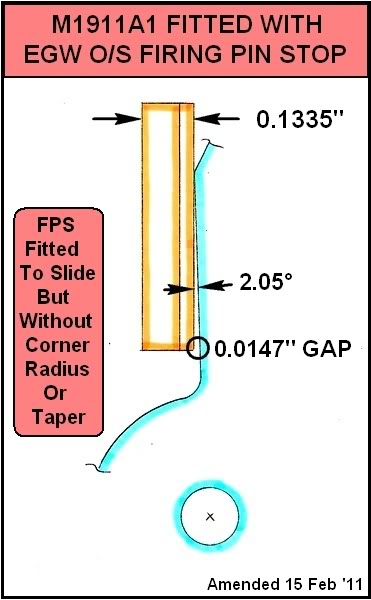
Those who are looking to get the greatest benefit from the reduced radius often miss this:
* Dress (taper) the central, aft surface of the FPS to the hammer face for zero gap at the bottom
You must test to see if the face of the hammer is resting squarely on the face of the FPS; if it's not, the radius at the heel of the FPS won't matter. I spent a couple of hours filing and stoning my FPS to a distinct wedge shape, as the hammer was contacting the FPS right at the top of the firing pin hole. Some of my guns needed no such adjustment, but the gun in question is being modified to .45 Super, and I really want the contact point of the hammer and FPS to be at the very bottom of the latter.
If you are interested in a really good fit use the EGW Series 70 stop, then the notches can be filed to match the slide rail. I never use the EGW Series 80 stop regardless, due to the over cut notch.
Quote:
Dress (taper) the central, aft surface of the FPS to the hammer face for
zero gap at the bottom
This is the gap RickB is referring to, and shows the average M1911A1:
Maybe the objective is to keep the extractor from wiggling around in its tunnel.
Instructions that require constant, level tolerences of .0015 might be a bit difficult for us file and vice guys.
Make sure the stop fits in its slot in the extractor. Make sure the stop moves into position in the slide with some encouragement. Make sure the firing pin can enter and retract from the hole in the stop. (A dremel helps to bevel the hole, but don't tell anyone.)
No disagrement with anything thats been said, just understand that not many people have access to machinery that can accurately remove metal from the rear, side, and base. Perfection exists, just not everywhere.
Quote:
Thanks, what other problems are you talking about?
One of the biggest issues with installing a shock buffer is that it reduces the distance the slide travels. This can cause ejection problems and sometimes feeding problems. The other issue is that it can reduce reliability in chambering a fresh round from slide lock. Pulling the slide back may not fully deactivate the slide lock and the shorter distance the slide travels before contacting the rim of the round in the mag means the slide has less momentum during loading.
Ejection issues can often be corrected with an extended ejector. The feed problems can be much harder to correct. I never corrected the feed problems with my home built Commander, but it runs perfect without the buffer.
Thanks for the picture... a picture is indeed worth a thousand words. Rick, thank you for advice. I did check it before I tested the pistol today and it seemed parallel but now, after seeing how small the gap can be, I am going to recheck to make sure.
This shows what may be the best way to tell if there is a gap and also to measure it.
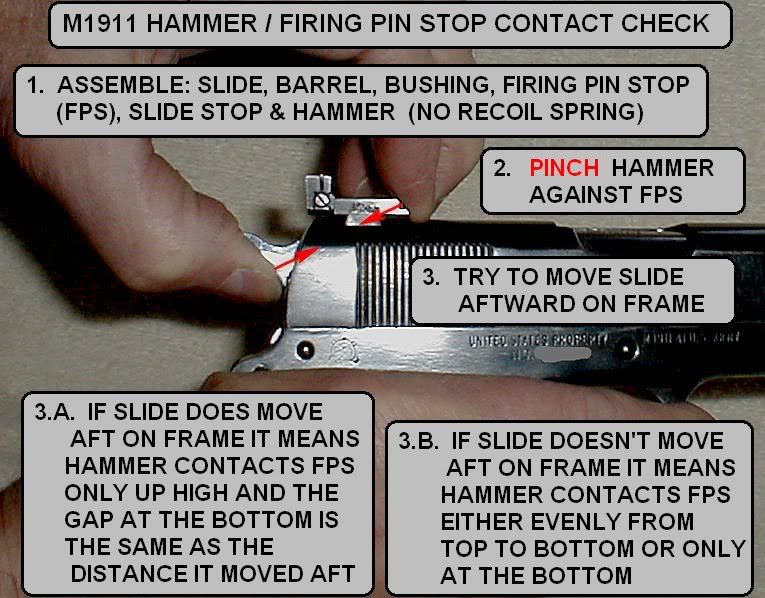
If the gun is built to Ordnance specifications and there is no gap, something is out of spec.
OK, I re-checked the alignment of the hammer face to the FPS as suggested. All is well. Took out the buffer completely. I did add a 16lb. wolf recoil spring, (replacing the original factory 14 lb.).
The final results of all this is a perceived recoil reduction estimated between 18-20 percent, a marked reduction of the "flipping to the right" upon firing. Subsequently, follow-up shots are easier and more accurate and recoil control is better. Thanks for all your help.