Hi, this is probably a stupid question, but I'm sure people here will have no trouble answering it. I'm building a 1911, and I'm just about done. I purchased an ejector and ejector pin from ReddogAlaskan, but I think he sent me an ejector and a barrel link pin instead (the pin I received is identical to a barrel link pin.)
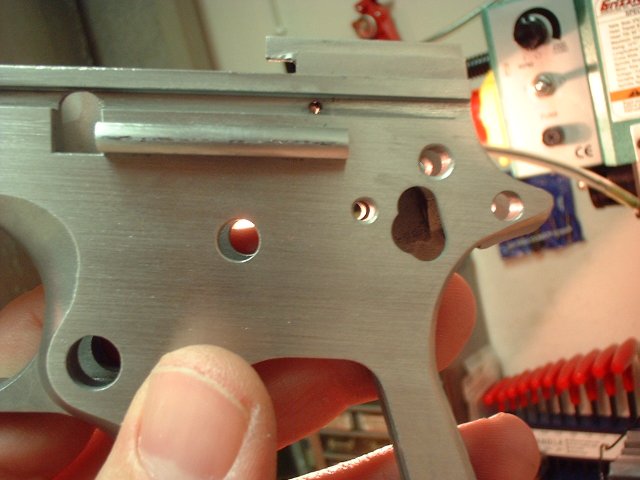
I was wondering then, where does the ejector pin go, and what does it to. I have a KT frame, and I do not see where I could possibly add the ejector pin if I had it. I looked at my Colt 1911, and I too do not see where the ejector pin could possibly be. I bought the Colt used, perhaps someone lost the pin.
Either way, I would appreciate it if you could let me know where it is and what it does.
OK, not a stupid question.
The ejector pin will hold the ejector in place and keep it from being pulled off of the frame with the slide off. The reason you don't see where it goes on the KT frame is because it's not there! He leaves those off as part the remaining 20% of the work. Now if you have a pin that is identical to your barrel link pin, then you definitely have the wrong pin. The ejector pin is one of the smallest pins in the gun, it's a 1/16" dia. pin that's about .75" long and is usually the only roll pin in a kit (for 1911).
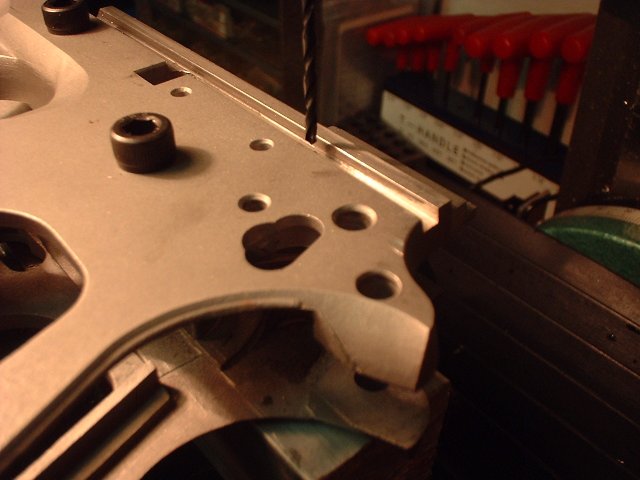
Here is a picture of one installed
Now why you don't have one on your Colt I can't explain - maybe you just didn't know where to look?
Anyway you'll likely have to drill one for that kt frame to install the pin if you choose to do so
The good news here is that it's not too important to even have the pin (depending on the intended purpose for that gun) a lot of people (myself included) don't pin the ejectors in at all! Just use a few drops of Loctite on the legs and tap it in place - the slide holds it in place when fully assembled anyway, and the loctite is more than strong enough to hold it in the frame during cleaning. Some people don't even use the Loctite if the plan on swapping slides to convert to different calibers.
Read pvt. ryan's write-up on his 80% commander project (click progress) for more details and photo's on fitting the ejector.
I looked on my old Colt, and it's there. For my KT frame, I'll just use Loctite instead.
Quote:
Does anyone recommend using Loctite to glue the plunger tube down?
Sorry,that won't work! Too bad too,it would be a lot easier and save on buying or making a tool.
What should I do with the plunger tube, in that case?
Plunger tube staking requires some special tools. Brownells sells them and I beleive someone on this board also makes a homemade one for sale hopefully he jumps in and says HI.
Plunger tube staking is not something to shortcut, IE the Loctite idea. It might work for awhile but when it did fail it would most likely lock up your firearm by keeping the thumb safety in the up position and therefore disabling your firearm.
PS some in the past have staked it and also silver soldered it for extra insurance.
I agree, do not Loctite the plunger tube - it needs to be properly staked. if you desire to locktite the ejector in place, I'd use 271.
Graham Cracker used to sell a plunger tube staking tool of his own manufacture.
I have one and it is an incredibly worthwhile item to have; six perfect stakings thusfar and no sign of wear.
Perhaps he is still selling them...
What exactly needs to be done to stake it? Would I really need a tool, or could I do the job with a small screwdriver and some pliars?
Hi, I am still selling these upon request. The price is $15 shipped.
You can make a tool yourself if you like, it's not too difficult.
Here's a copy of the instruction sheet I include with the tool.
Using the Plunger Staking Tool
Frame Preparation
The inside of the plunger tube holes in the frame should be relieved somewhat to allow room for the plunger tube legs to ?flare?. Using a small ball-end burr in a Dremel tool, slightly countersink the plunger tube holes from inside the magazine well.
If the frame is to be polished, it is recommended that the polishing be completed before staking the plunger tube, since an installed plunger tube can be rather awkward to work around.
Plunger Tube Preparation
It is a good idea to use a drill bit shank to support the plunger tube while it is being staked. The anvil is designed to help prevent crushing the plunger tube, but an internal support is still recommended. A #36 drill bit will fit inside the plunger tube, and should protrude toward the rear of the frame when the plunger tube is in its correct orientation (staking the tube on backwards is not only possible but a fairly common mistake!;)
Staking
Place the aluminum anvil over the plunger tube and adjust the C-clamp so that the adjustable point can be inserted into the hollow end of the plunger tube leg. Carefully tighten the clamp incrementally until the leg is fully staked. Since it can be difficult to tell when it?s fully staked, you may wish to tighten a little at a time and try to pull the plunger tube free after each attempt. You may also wish to use Loctite on the legs prior to staking to provide an additional bond.
Troubleshooting
If the plunger tube should need to be removed for any reason, it can be done by passing a length of wire of the appropriate gauge through the plunger tube, twisting the ends together, and pulling the wire with pliers away from the 1911 frame. The staking may require removal with a ball end Dremel bit or similar tool.
The staking point is hardened, so it should hold up indefinitely. However, if the point breaks or needs to be adjusted or replaced, it can be removed with a hex key. It is secured in position with blue Loctite. The point is made from a #10-24 5/16? set screw available from most hardware stores.
That seems fairly easy to do, I'll try it when the plunger tube arrives. I'll add loctite to the legs, to ensure a better hold between the frame and the plunger tube.
That is a nice tool as I have one of Grahams also. I will say that I have been buying Rock River and Caspian plunger tubes and they are a very tight and very flat fit. Which has made me wonder how long they'd last locktited as they are extremely tight unstaked.
I think it all depends on how hot it gets right there. If you have a .001" slip fit or less and use one of the green "press fit" Loctites, I don't think you'd ever have a problem with it.