I picked up an EGW "carry bevel" match bushing from Midway and I'm in the middle of installing it. The ID is now fit to the barrel (haven't measured the clearance yet), and i need to turn down the rather beefy OD a few thou. I don't have a mill or lathe, or even a drill press, and it's not too easy to get to my buddy who DOES have all the nice shop machines.
My method for doing the ID was simple: wrap the butt of a 1/2" drill bit with enough tape to allow the bushing to be crammed on to it with a piece of sandpaper, then turn the bushing by hand while holding the bottom of the sandpaper.
I'm thinking of something similar to turn the OD: wrap the bit and cram the bushing on, but without sandpaper, then clamp a hand drill and turn the bushing against a sanding block. Is this reasonable? Is there an easier way?
Lightning round bonus question: when must a recoil spring plug be replaced? After 2000ish rounds mine is fairly battered from the bushing, but it doesn't seem warped, cracked, or uneven. I'm probably going to pick up a new plug just for cosmetic reasons, but i'm curious.
One cool thing about upgrading a bushing is that you can compare them easily by swapping them at the range. Looking forward to it!
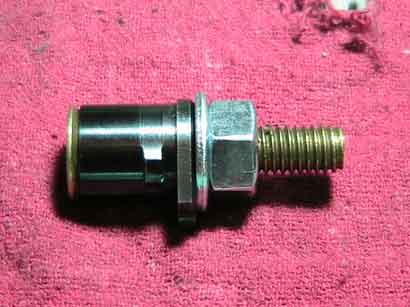
An easy way to hold a bushing and spin it in a drill press or hand drill is to make a mandrel of a 3/8 flat head bolt, nut and washer. The taper of the flat head will center the bushing.
Quote:
...when must a recoil spring plug be replaced?
When it can't be found after launching it out in the deep weeds at an outdoor range.
Excellent suggestion, log man! I'll be rolling to the hardware store after work to pick up the bits. Pictures forthcoming, no doubt.
LOL Niemi! I thought that was when you pick up some spent brass and find out if an old .45 case really does work as a spring plug...
I used the dowel/masking tape/cordless drill method to spin the brass against some emery cloth until the rim was gone. I don't know if the brass is good for the long haul but it works good as a temp.
On log man's advice i picked up a 3/8 flat-head bolt, a couple 3/8 nuts, and a 5/16 washer (which fit closer around the bolt than the 3/8) from OSH. They have brass bolts, so i figured that'd be the best with no washer between the bushing and countersink taper.
Bolt, bushing, washer, nut. It looked like this:
I bought a "heavy" nut and a lock nut, but didn't end up using the lock nut because I thought it would be too much of a pain to take off and on for fitting. Turns out it was too much of a pain when the nut would loosen a bit while I was putting pressure on the tool! If I do it again, for a buddy's gun, I'll turn down the head of the bolt enough to allow the bushing to be installed with the jig assembled, then use the lock nut (that would probably work well for polishing, too).
This was chucked in to a drill clamped up in a vise. I checked for concentricity whenever i re-chucked the jig: just spin the drill and look for any wobble. This is less critical for the sandpaper, but very critical for filing, and was a bit of a pain in the butt because the drill chuck's jaws would sink in to the brass threads unevenly. I ended up tightening the chuck a bit, jiggling it to settle it in to the jaw's previous dents, then thwacking it straight down with a plastic mallet. The closing chuck would push the jig up slightly, so hitting it downward would level the bottom of the nut against the top of the chuck. Thwack, tighten, thwack, tighten, etc.
My plan was to skinny it down from .702" to .700", which should give me a really snug press fit and then polish down to hand-movable. I used 220 grit sandpaper at first, but that was too slow. I switched to a narrow fine swiss- cut file which worked nicely, then back to 220, 500, and 1000 grit. I had to switch back to the file a couple times to take down some uneven rings, but nothing catastrophic. Once it had a firm press fit, I loaded the bushing with polishing compound, from a Dremel kit, and a bit of oil, and worked it in the slide with a bushing wrench. This worked fantastically, and with a bit extra filing on a couple strips I had a great fit.
The fitting went slower than I thought it would, but it is - with some humbleness - a pretty dang good fit. There's no perceptible movement in the slide but it takes little pressure to turn and it's easily removable by hand. ID clearance in battery is about .0015" total; OD fit is around .001-002" (it tapers slightly to the back). It will definitely improve accuracy, and it shouldn't change the point of impact if i did the ID evenly.
here's what she looks like:
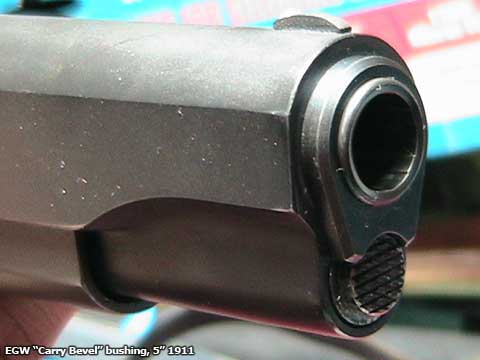
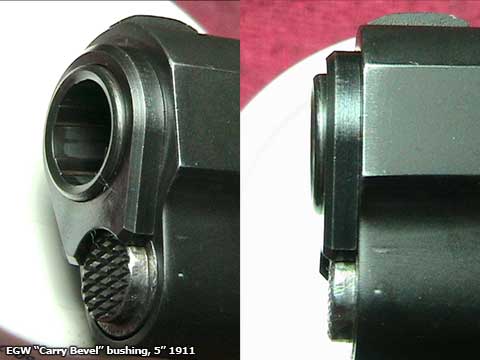
I love the thick-bushing look. The bevel is what gives it the thickness; the base of the bevel is about where the stock bushing comes to (see comparison to the stock spring plug). Along with looking cooler, it definitely puts more supporting surface against the barrel. You can really see what about 2500 rounds has done to that spring plug - I think the EGW "Thick Flange" spring plug, at .125", comes to the face of the bushing and would be sturdier than stock.
This was a great buy for $20! We'll see how she does on paper, hopefully Sunday...
Now you need one of EGW's spring plugs to match the bushing.
Quote:
Now you need one of EGW's spring plugs to match the bushing.
d'oh! I tried to say that at the end of my post, but I swapped the terms, LOL! It was "I think the EGW "Thick Flange" bushing, at .125", comes to the face of the spring plug" when I meant spring plug/bushing. Fixed it.
But yeah, I want to get one of those and maybe checker it or cut some rings on a lathe.
Yep, you did say that. To be honest... I didn't read the post; I only looked at the pictures.