Retrieved: 11/01/11
Last Post: 09/28/08
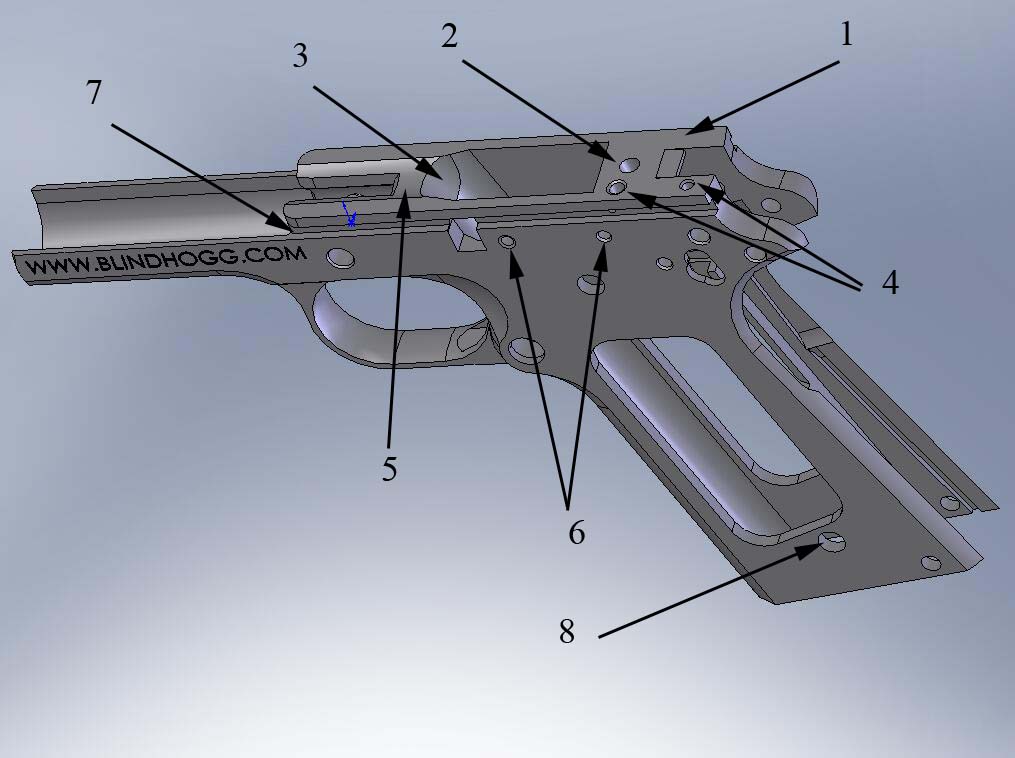
Well there is quite a few of these 80% 1911's around and quite a few guys are asking me some advice on how to build one. While I dont mind giving advice, I would hate to give bad advice so I decided I needed to really look this frame over to see what it needed. Since I am too lazy to go out and take photos at this time you will have to do with a cad drawing to start with. Below I numbered what needs to be done to the Stainless Sarco frames in order to finish them.

1. Machine down the top deck about .015
2. Drill the disconnector hole
3. Machine the frames feedramp at 31degrees
4. Drill the two disconnector holes
5. Machine the frames bed
6. Drill the two plunger tube holes
7. Machine the two rails (one on both sides)
8. Tap the 4 grip screw bushing holes

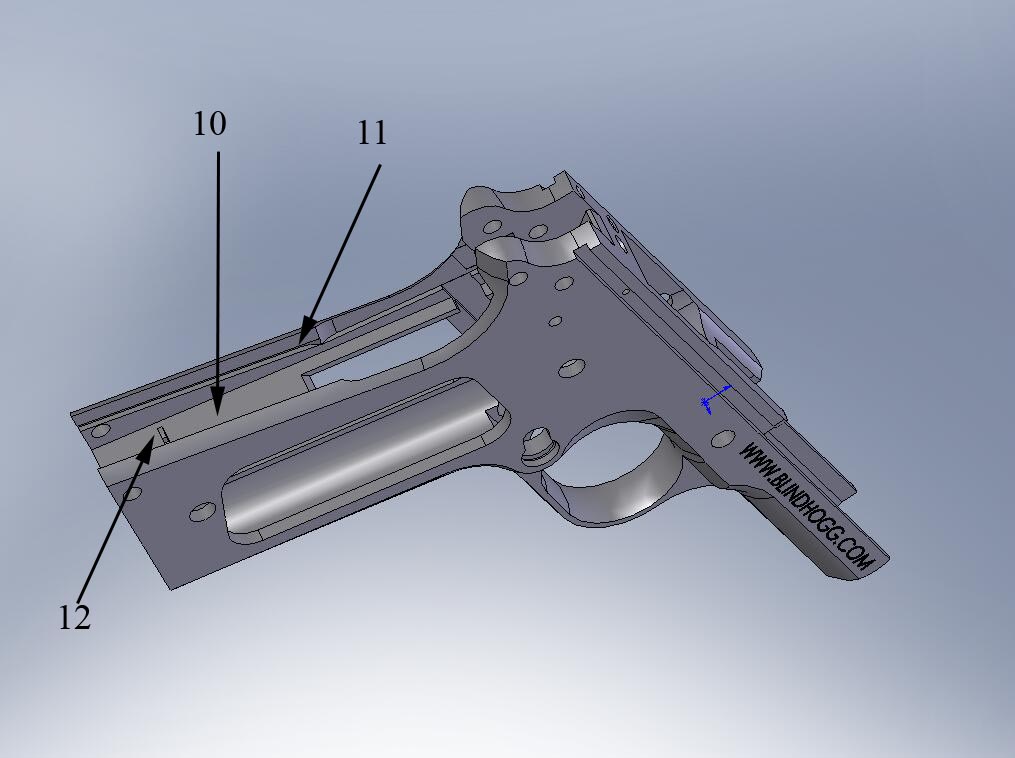
10. Machine down this surface by .050
11. Machine these two grooves for the mainspring housing
12. Machine this groove for the sear spring
Well we are about to start, fire up the mill and lets get to cutting.
I am going to tackle issue #10 at this time.
Photo below shows me dial indicating the surface to get it parallel with the cutter. I really should be going off of a piece of metal running through the magwell to remove the chance of the wall being at a slant compared to the inside of the magwell. But close enough is good for me.
I am showing the two ways I used to get the frame squared up as I machined more than one frame this day and got too lazy to use the dial indicator and then went to the machinist level. I had to remove approx about .050, I was shooting for a wall thickness of about .100 you can see in the last photo a machined frame and an unmachined frame. I used a 3/8 four flute carbide cutter spinning about 1100 RPM.
Oh almost forgot I opened up the width of that slot by about .010 I did not measure I just had a mainspring housing in my hand to use as a reference, When it would drop in I knew I got it wide enough.


Tackling issue #1 at this time, I am taking down the top deck. I beleive the print says the top deck of the 1911 should be .450 from the center of the slide stop pin hole.
I broke out the acurate machinists level for this one, or you could dial indicate the top of the frame.
Caution I really should have clamped the frame to a angle plate as this much unsupported steel above the jaws can cause vibration. I needed to remove .015 from the top of the frame so I took it in .003 passes and vibration was not bad at all and surface finish was quite nice. I used a cutter that was wider than the top of the frame, in my instance a 7/8 cutter. A good fly cutter would have worked also.
Last image is one of frame machined compared to a un machined one.


Blindhogg when you begin again could you please show how you make the cut for the main spring housing (MSH).
I have different angles from different prints plus I've measured a couple of different MSH and the angles are different.
The flat backed MSH are different than the rounded MSH, yet there both full size housings.
I would like to see how the frame is set-up for this cut.
From what I can tell the slot should be .078 wide.
I'm also curious about the disconnecter hole one measurement that I have is 2.500 inches measured from the slide stop hole then drilled at a 6* angle.
I have 3 different prints Browning, 1911 government print from 1939 and one from only God knows because i cant remember.
Theres a good chance I'm making a mountain out of a mole hill but if I get to build a 1911 it will probably be a one shot deal so I don't want to mess up.
Placement of the slots for the mainspring housing is not clearly shown in the couple drawings that I have... I notice that where the MSH 'rides' substantially affects the grip safety. So I would like to see a clear drawing that shows exactly where it should be. I have cut three of them so far and all different and all work okay but would like to know how to do it 'zactly right...
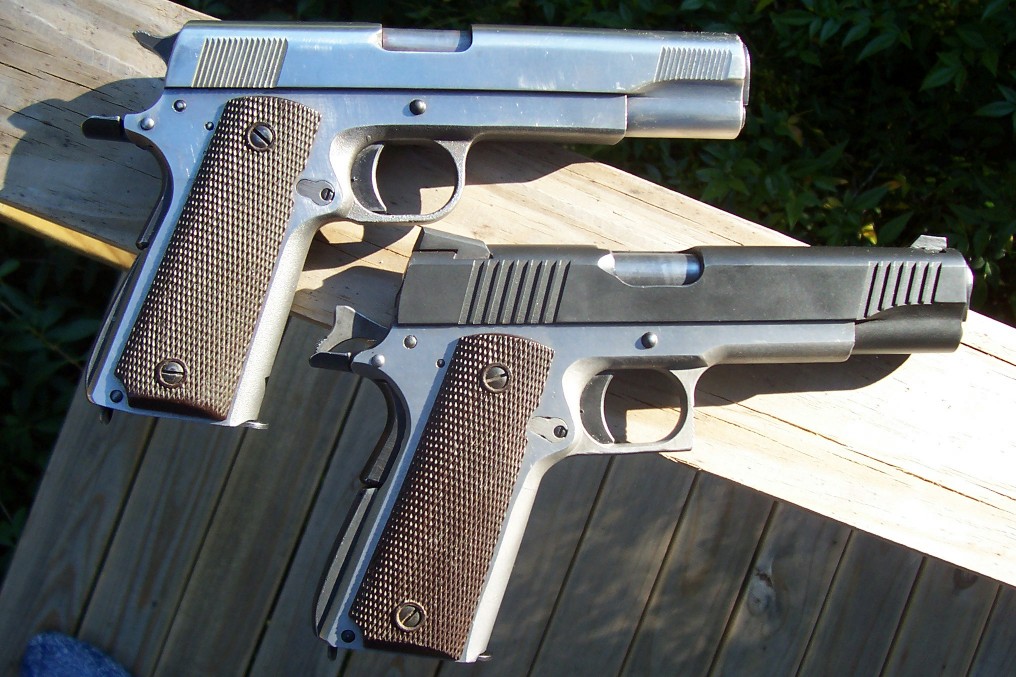
Ohhhh.. .and I machined that raw cast slide from Sarco and have that gun running right... It isn't a job that a newb machinist could easily accomplish... It had me on the ropes a coupla times. Its the stainless slide without sights in this picture... Both those guns are shooting properly in my back yard. Will take them to a range once they both completely finished.

You welded on one of your frames Swat. Any problems? I have several welds and all went fine but reading Kuhnhausen's book he states that there are additives put in the melt to help the metal flow in the mold and then later if you weld it the crap might pool and spoil the weld.
Yeah I'd like to cut down one to see if I could do it and make it work. I read that the short slides can be unreliable because there is less time to load and extract... I dunno.