Since I'm green at this 1911 stuff (from a gunsmith perspective) I am always trying to find a better way. Sometimes it ain't better. I have tried a few different ways to cut perfectly square lower lugs. I've used hand files, a Brownells lower lug cutter, and a mill. I like the mill the best. I was going to make some kind of barrel holder, like a Wiegand for instance, when I had a simple idea.
I have a pin gauge set (everybody should have one of these) and I found a .154" pin was a tight, very snug fit in the link hole on a new Kart. I also have a Starrett 196B back plunger dial indicator. I mounted the barrel in my vise (after it was indicted in of course) using my V-blocks. I then used the indicator to vertically -0- in the gauge pin. This cut excellent lower lugs, getting me to within .002" of where I needed to be. I did the final fit by hand. Just thought I would share this simple method that is working well for me.
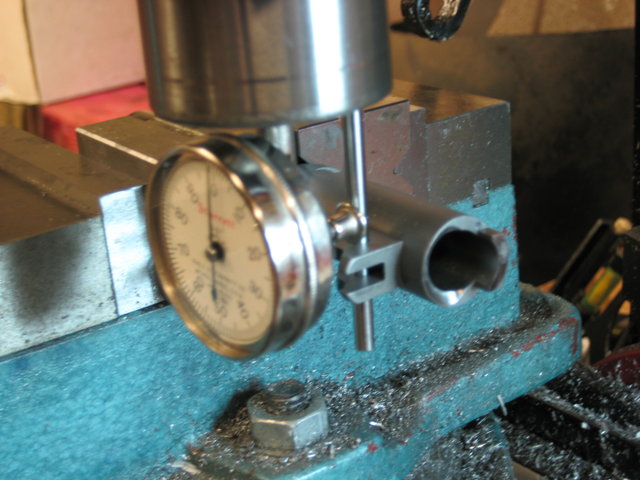
Lastly, I have found Zig Zag rolling papers (no I don't do that anymore) to be perfect for setting up prior to a cut. I slip the paper between the milling cutter and the surface to be cut. I move the appropriate axis until I feel drag on the paper, then dial in the cut. Here's a pic of the set-up:
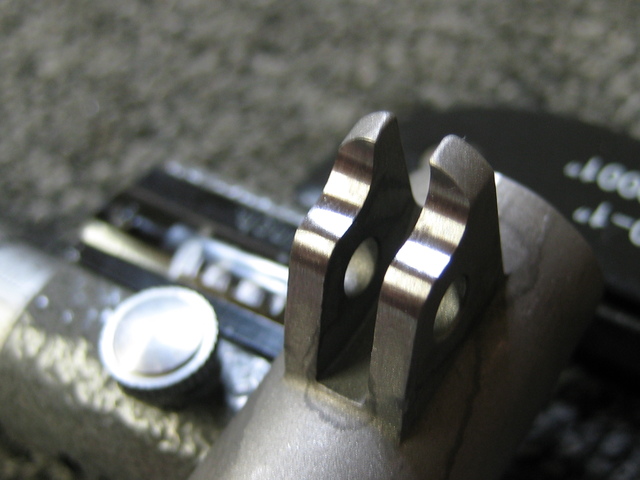
Here's a pic of the lugs after cleaning them up, prior to final fitting:
Not bad, but. This method will allow a parallel cut of the lower lugs provided the slide stop pin is parallel too. How are you indicating the lower lug height. If you use the hand cut method in the end what insures that the hand work will be true? Most smiths want to eliminate hand cutting, not because it is hard. But because it is not repeatable. The Weigand jig should be updated. Maybe Al Marvel, Jerry Keefer or George at EGW are up to the task.
I use a die marker on the lower lugs to do the final fitting. I look for even contact on both sides of the lugs all the way to the rear of the lug feet.
I'm posting this hoping some experts may show me a better way.
How are you accounting for the barrel lockup angle? Shouldn't the barrel be held at the same angle in your V Blocks?
I take a light cut off the lugs with the lug cutter. This gives me a surface to indicate from, that is extremely close to the slide/frame/slide stop pin relationship for that particular gun. As Greg has pointed out, your lug axis is now parallel to the link pin hole axis, but is the link pin hole axis parallel to the slide stop pin axis? Not likely. I use a 5mm high helix carbide end mill. If you are very careful, you will not have to touch the lugs by hand and the finish will be mirror like... As Greg says, it's impossible to do perfect work by hand. I use Jack Weigand's fixture. It has an angle built into it to give an approximation of the barrel angle. I have modified Jack's fixture to enable the use of the surface grinder, to grind the lower lugs, using a special contoured radiused wheel. It works extremely well, and the grinder is far more senitive and more accurate than the mill.
You just took my 5 watt brain bulb up to around 15 watts (on a 100 watt scale). I see exactly what you're referring to, making the initial cut with the lug cutter; this should square the link hole parallel with the lugs for a given pistol.
I did the final fitting of a Kart barrel using the process and it turned out better than any lower lug fitting process I have used in the past. I wound up with excellent slide stop pin/lower lug contact all the way to the vertical lower lug area.
I wanted to respond to a great point made by Gregg about the link pin hole being parallel with the lugs. After I used the gauge pin to vertically -0- the link pin hole, I used the Zig Zag paper to determine how far out the lugs were, if any. In this case, I got equal drag on each lug and the milling cutter. I know this isn't perfect, but it seems to be really close.
I do like Gregg's excellent previous suggestion of using the lug cutter first, but you have to have one on hand, which fortunately I do.
Maybe I missed it, but how are you determining the proper distance to position the cutter (i.e., the "height" of the lugs) ?
Are you starting a cut with the hand lug cutter in the gun, and then pulling out the barrel and extending it with the mill?
Legitimate question. I have pin gauge set. I insert pins until I get a solid lock-up and subtract the difference for my initial lug cut.
Example: with virgin lower lugs, a .193 pin produced solid lower lug support. My slide stop pin mic'ed at .200, therefore .200-.193= .007. This means I would have to remove .007 from the lower lug to have good support with a .200 slide stop.
My initial cut was a conservative .004, then I re-gauged with a thicker pin to make certain my cut was precise. So after the first .004 cut was done, I found a .197 gauge pin was perfect. Bingo, the cut I dialed was on the money. Then you proceed from there until you remove the last .003.
Hope this makes sense.
I am editing to add that this set-up is repeatable, but the drawback is having to re-zero the vertical each time you remove the barrel. Takes me about 5 minutes or less.
I follow you; just wondered what measurement you were going by. Thanks!
Quote:
Lots of learning potential in this thread! Jerry, can you post pics and
expanations of your modifications/setup with the Weigand fixture (separate
thread to keep this one on track)? I've got one I've never used and would like
to put it to work.
Here are a few photos of the modified fixture. It is attached to a sine plate, which enables grinding the lugs to an angle.
PICTURES 404
All good ideas and input.
This brings up more questions?
Is the link pin hole perpendicular to the bottom lugs?
If it is, great, but chances are the slide stop hole in the frame is not perpendicular. Or the barrel is slightly off center, or the barrel foot cut in the frame is slightly off.
Can you guys agree on a lock up deminsion. Ok an average? measured at the front of the chamber openign in the slide. Simple Trig to figure out the angle based on the thousands per inch for the distance to the bushing.
You could apply this to the vise by rotating and indicating it (swivel base). But it will not account for being off from side to side, rotation off side to side etc.
How about mounting an indicator that clamps over the slide and using a .195 gauge pin you fit up the lugs but don't finish. than moving the slide back and fourth verify that it does not climb or fall as it rides over the link pin. If your hood is tight it will be hard to read movement on the indicator though.
Like the lug cutter, the dykum blue, the gage pin and tight hood, slide into battery, read marks, diamond file high spots and repeat as necessary, a bunch of times.
You could indicate what Kart uses on his ez fit barrels, I am sure he has spend time on it and see what his answer is.
geo - www.egwguns.com
Aren't Kart's (and others) barrels cut on modern CNC equipment? I would assume manufacturers strive to locate off/from the best possible barrel location to ensure a relatively high degree of consistency, centering, parallelism, and concentricity?
I realize there is tolerance stacking, +/- variables, wear of cutters, and human error, but based on how I did this Kart barrel using my crude, backyard method, I am most impressed with the quality of Kart's product.
I find it difficult to fathom a quality parts maker would rely on someone else to ensure their product was made correctly, and that others would have to be the final word in QA/QC. It seems to me drilling a link pin hole parallel with a lug cut is not that difficult to do, just as an example. I also realize were dealing with a myriad of 1911 manufacturers with subsequent variables in frame consistencies.
As the guy at the circus says, "pick a barrel, any barrel"..
Set it up in your lathe, fixtures, etc., measure/check all you mention above... concentricity, chamber/bore C/Ls, upper lug positions, radii, etc.
I am willing to bet, the results will be different than you imagine.
It seems to me drilling a link pin hole parallel with a lug cut is not that difficult to do.
I agree, it is very simple, but as George has mentioned, it has very little, if any, application on the over fit of the barrel. When machining a barrel, the link pin hole is the last operation, and I put it where I want it, for that particular fit.
Just revisited your picture and here is a thought.
Indicate the pin like you are doing.
Then indicate the bottom lugs were the link rides (nice finish by the way in your pic)
Than indicate the bottom lug from the barrel across and see how true the three are?
NOTHING against Kart. You will need to spot, drill and ream the hole holding it perfectly true. Easier in a Live tool lathe where the spindle is your index and you know your datum points. You can Spot, drill, ream with an endmill to true up than ream through to hold size but since there is a second hole lower it is not easy to put the holes exactly across.
And at the End of the Day as Jerry says, the relationship to everything else matters too.
When you make a frame drilling the slide stop hole not only across but the second hole starts in a radius. Keeping that one true is a job too. Add another one in, is the bore in the slide centered compared to the rails?
At this level each gun is hand fitted for a reason. Close is not acceptable at this level of fitment. That is not to say installing an ez fit Kart will not yield great results! Often it does. But Probably not the under 1" 50 yd taking home the plastic (and hopefully some dead presidents) level of things.
We did a set up that was interesting.
Take a Collet block. indicate in a chuck. than install an emergency collet and bore to the barrel diameter. (pick one) Than we did a relief cut for the bottom feet so they enter the collet also and act as an index. Even the simplistic is the bottom foot in the middle of the barrel became an issue. We made a checker gauge that fit the foot and you take a feeler gauge and see if the gap on each side is even?
The fixture would need to be ajustable and a way to indicate it built in would go a long way in aiding set up.
Me thinks you still need to finish by hand. taking the gun apart many times and checking as you use larger and larger gauge pins on the way to the much coveted Goosh into battery.
I've fitted quite a few EZ fits and have kind of settled on one method. Fit it until full lockup requires a bit more than a thumb push on a .197 pin gauge and then lap it using a Brownells barrel holder and then a 18lb recoil spring. You are going to have the rotate and / or move the pin gauge alot because lapping removes material from both the barel and pin gauge. Once a perfect flat is established and the gun will go into battery with a 10lb recoil spring, and the wear marks are even, I'll try one of your slide stop pins. I've tried others, but EGW's are the most consistently sized. If going into battery is still too difficult, I'll step up to the next sized gauge pin. Finally, I'll mate / lap the slide stop pin to the lugs, if needed. Again, your slide stop pins are on the money almost 100% of the time. I imagine that this could be done with Standard gunsmith fit barrels. Beware the lapping compound or JB Bore paste! It can spread to other areas you dont want it to be!
Quote:
Me thinks you still need to finish by hand. taking the gun apart many
times and checking as you use larger and larger gauge pins on the way to the
much coveted Goosh into battery.
That's my take. That's why I get within .002-.003", assessing the final fitment with gauge pins and dye marking until I find the sweet spot, obviously based on my slide stop pin OD.
I really appreciate everyone's input. I think I'll continue to use vertical gauge pin set-up since it worked pretty well on this go-round.
I know this thread is about the lower lugs but doesn't anyone use a lug file for the upper lugs for the final .002" to .004"?