First you will have to decide which barrel to use, there are many to choose from and after installing a few dozen and talking to other pistolsmiths. I have come to the conclusion, there really is not a bad one. I personally prefer a Kart barrel though, because for the money it is the best buy. The Kart barrel is a carbon steel barrel and must be blued when completed, if you desire a stainless barrel you will have to pick another brand.
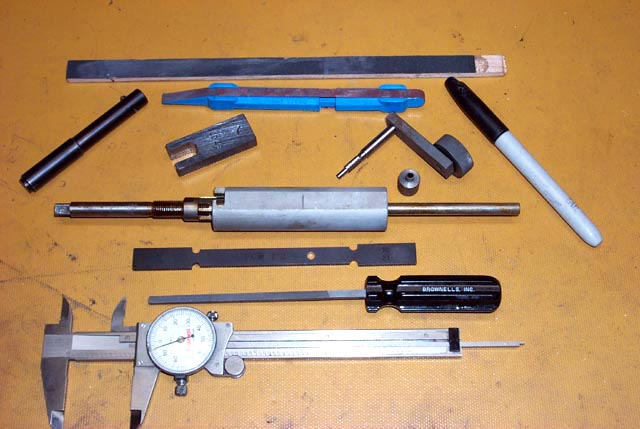
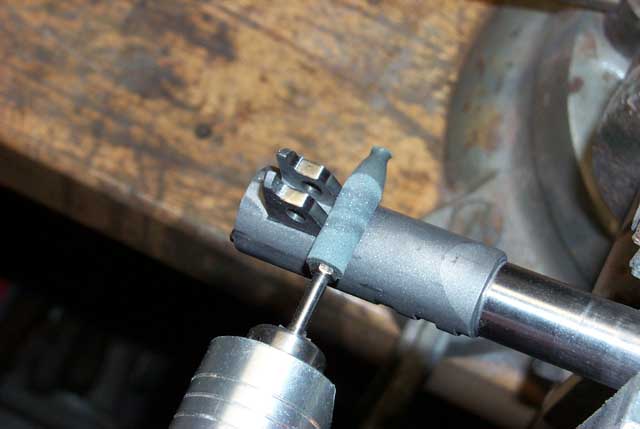
You can see in (Fig-1) a photo of the hand tools that I use to fit a new oversized match barrel.
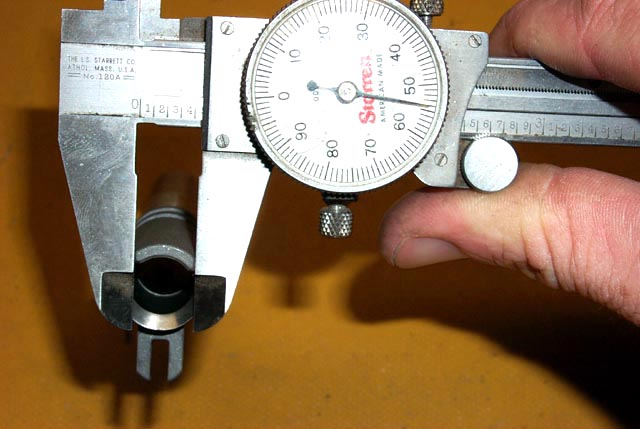
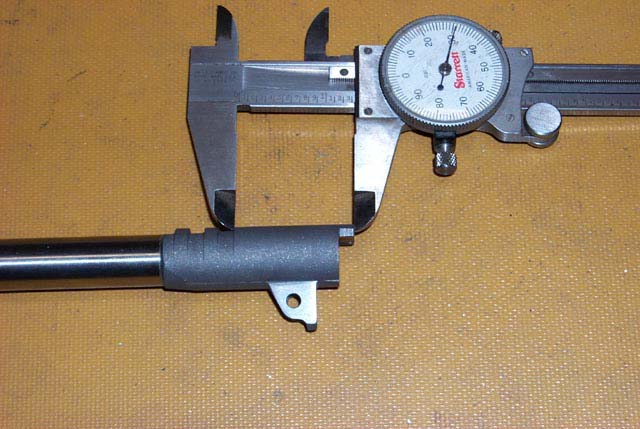
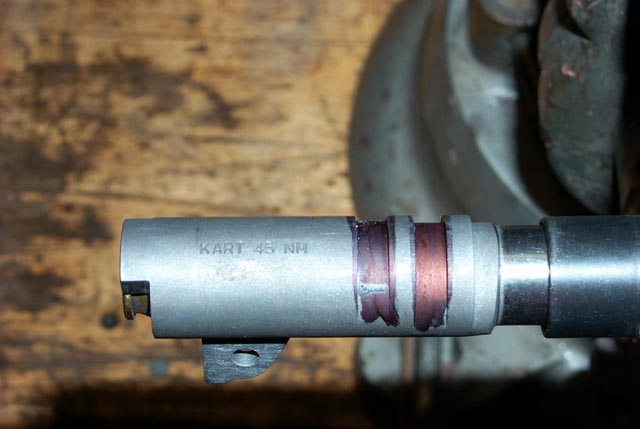
The first step in fitting your new barrel is to check the width and length of the new barrel hood, refer to (Fig-2) and (Fig-3).
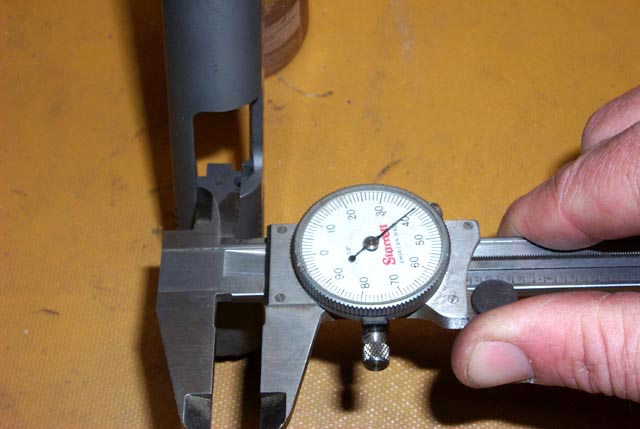
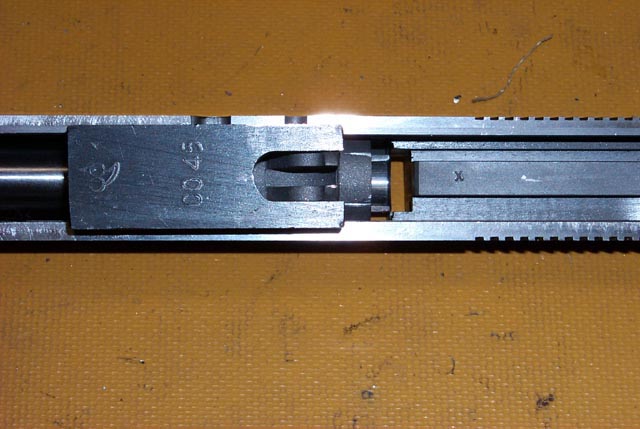
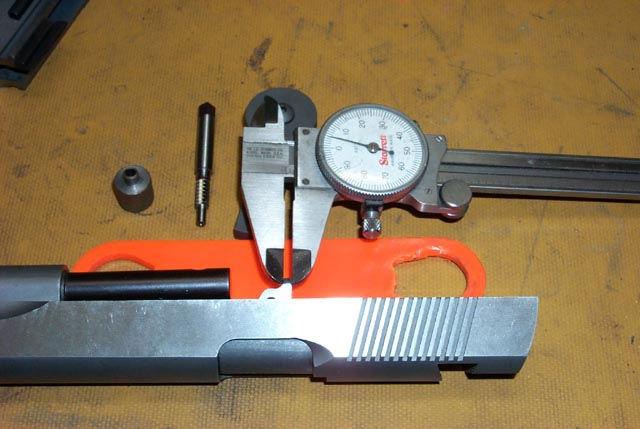
Next I check the width of the slide's barrel hood opening (Fig-4).
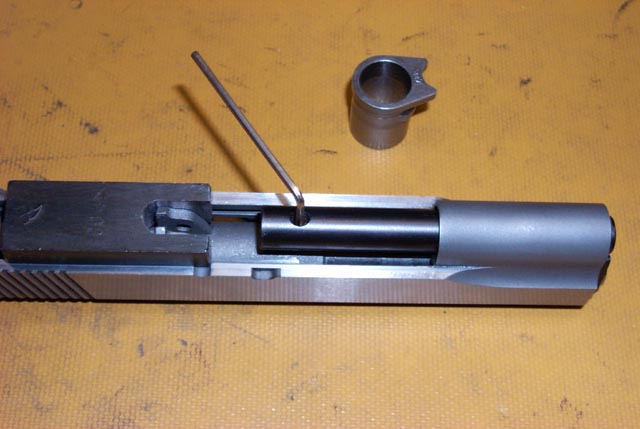
I also check to see how long the barrel hood must be, this is not easily done with a micrometer, so EGW (Evolution Gun Works) has made a tool to help us, it can be seen in the center of (Fig-1). It is a clever gauge that will tell you how long your barrel hood should be. In (Fig-5) I have installed it in the slide to gauge how long my barrel hood should be from the first lug to the hood extension.
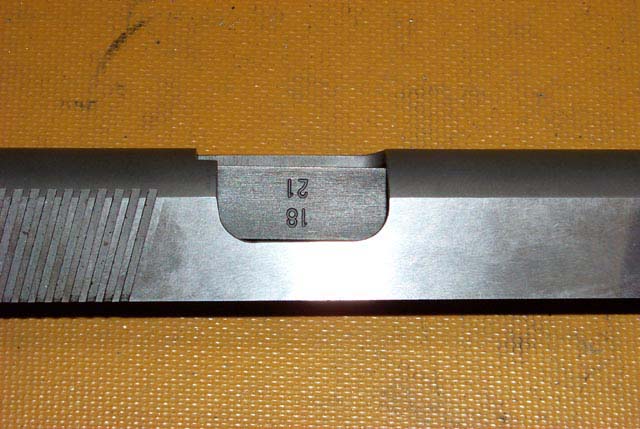
Ok Lets see, I have measured the barrel hoods width and length, which is as follows Width=.454 Length=1.330 the slide is Width. 440 Length=1.321 . As you can see the barrel is larger than the slide that will accomodate it, in a match barrel that is so it can be fit by you. The first thing I do after I see that the barrel is larger than the slide, is to smooth out the breech face, ensure you do this before you fit the barrel otherwise the barrel will not fit as tightly. You can see me just starting to polish the breechface in (Fig-6).
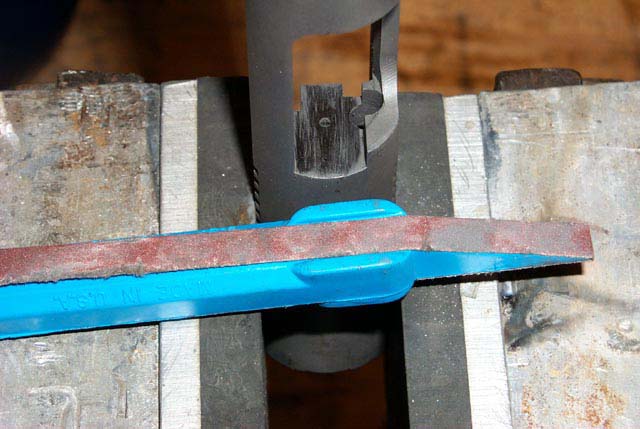
I use a sanding stick I purchased from a machining catalogue, it works very well and has progressivly finer belts untill the breech face is dead baby smooth. Before I used the sanding stick I used to use balsa wood with sandpaper glued to it narrowed to fit the breech face opening. The first real step to fitting your new barrel is to narrow the width of the barrel hood until it just fits in your slide. After taking measurements above I know I must remove .014 from the sides of the barrel hood before the barrel will fit into the slide. I next acquire a scrap barrel bushing and install barrel and bushing in slide and with a special jig that centers the barrel in the slide, I can see from which side I should remove the material from (Fig-7). The jig seen in (Fig-7) will allow you to decide which side of the barrel hood the material must be removed from in order to keep the barrels lower lugs centered.
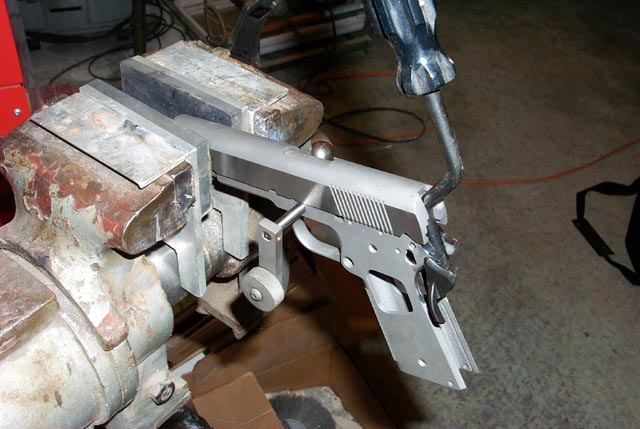
Next with your barrel in a padded bench vise as seen in (Fig-8) remove metal from the sides of the barrels hood with a narrow file.
I just take several strokes from both sides in the beginning, it pays to have good sharp files in this step. I personally use a Brownells hammer squaring file in this step because it is very narrow and it has safe sides. I also do what I can to keep the sides of the hood parallel to the bottom lugs. Next place barrel back in the slide with junk bushing and with the centering jig (Fig-7) to see how you are doing, as you are getting close you will see if you need to stop removing from one side and just concentrate on the other side. The goal for me is to keep the fit as tight as I possibly can make it. Keep working on the width of the barrel hood until it will just fit into the slide all the way to the breech face with the feet centered. Once barrel hood has been narrowed properly I next polish the two surfaces with a polishing stick which is nothing more than a stick of balsa wood with 600 grit sandpaper glued to it. The next thing to do is work on the length, the barrel hood will be slightly too long to allow the barrel to link up yet. Next file hood length untill barrel will just link up, ensure you go very slowly and be patient. You can check your progress with your micrometer untill you get within .002 then attempt to trial fit after several strokes of your file, ensure you keep the hood length even. Once you are close check it in the slide often until it very tightly fits and links up. Once it will tightly link up I will next with a fine polishing stick, polish the end of the barrel hood to remove scratches, otherwise they will be transferred to the breechface. Next acquire a fired case with the primer removed, put it in the new barrel and place the barrel in your slide and link up. I next attempt to look through the firing pin hole, with firing pin removed of course, to see if flash hole in brass is high or low. If the flash hole is still slightly low then the barrel must be recessed in bottom of the first locking lug to accomadate a higher link up. You will see in (Fig-9) where with a nylon faced hammer I carefully hit the bottom of the barrel lugs to have the slide print the area where there is contact.
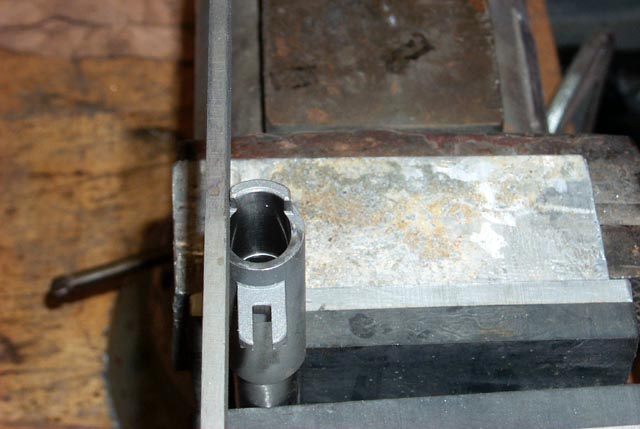
I will next with the same file that I used to narrow the barrel hood carefully remove material to allow the barrel to link up higher. Once I have removed material from both sides of barrel I will mark with a black marker and replace back in slide to look through firing pin tunnel again. If primer hole still looks low I hit lower lugs with nylon faced hammer again and repeat removing metal with file until barrel links up with full lug contact or the firing pin hole is centered. Once the barrel links up properly the last thing to do is to cut the lower lugs. To cut the lower lugs I use the Wilsons lug cutter with the .196 cutter, do not waste your money on the .187 cutter as it is way to small a diameter to be worthwhile. To cut the barrel's lower lugs I next put barrel, junk barrel bushing and guide rod link up tool in slide as seen in (Fig-10).
This tool links up the barrel and keeps it linked up while the lower lugs are being cut. Place your slide on your frame, if there is any resistance it is because the barrels lower lugs are not in the center or they are slightly too wide to accomadate the frame. Once slide is on frame and hanging about 1/2 inch to the rear of the frame, install the Wilson lug cutter with a slight amount of cutting oil through the slide stop hole. Next with a slide pusher I attempt to push the slide forward while turning the lug cutter to cut the barrel feet (Fig-11).
Ensuring I turn the lug cutter in the right direction (clockwise), spinning the wrong direction and applying pressure to the carbide cutter will ruin it. I should slowly see the slide creep forward as the lower lugs are clearanced for the slide stop/cutter, I usually have to pull the cutter several times and clean it with a shop towel and re-lubricate it. Ideally I should stop cutting when the rear of the slide is flush with the rear of the frame, but I check before I get that close to ensure my barrel lower lugs do not get to narrow. There are two schools of thought on cutting the lower lugs, many stop cutting them when rear of frame is flush with rear of slide, which might possibly leave your lower lugs slightly thin and weak. I stop cutting when the lower lugs are .100 thick even though the slide might possibly be hanging off the rear of the frame (Fig-12), which I will just dress down later to mate with frame.
I have only seen the above Phenomenon happen on Caspian Frames & Slides, stock pistols usually do not display the above characteristics. Now that your lower lugs are cut to mate up with a .196 slide stop, because that was the size of the cutter you just used, measure your slide stop to see its diameter. Most aftermarket slide stops are .200 so therefore you will still have to remove a small amount (.001-.002) of material from lower lugs to facilitate linkup. I usually use my dremel tool with cratex bits to polish and slightly lower the lower lugs (Fig-14).
Next I will need to decide on which link to use in this new barrel. I only use Wilson's links as they seem to be very well made and are numbered 1-5. It is usually necessary to ream the link pin hole on NM barrels before you can put in a link pin. I use a .154 or .156 reamer available from Brownells (Fig-13).

When choosing a link I usually start with a #4 from Wilsons and when link is in barrel ensure that it is not so tall that it does not allow slide stop to bear down evenly on both barrel lugs when linked up and then linking down. If it is slightly to tall move to a smaller one. If you are at a point that the one is to large and one is to small then I usually get the one that is too small and slightly enlarge the far end of the large hole. Refer to Fig * for a photo of a proper linked up barrel. The next thing I do to see if I have properly clearanced the barrel lugs for the slide stop is insert link and link pin in barrel and place in slide with junk barrel bushing, place on frame without guide rod, guide rod plug or spring. Insert slide stop in frame and pass through link pin and hand cycle the slide to see if you are able to link barrel up and down fully. If you still have bind it will be due to one of two things, either your link is to tall not allowing the link pin to bear evenly on both lower lugs or the lower lugs still need another .001 -.002 removed from them because your slide stop was larger than the diameter of your lug cutter which clearanced the lugs. Once you have fixed your problem, your barrel should link up and down easily with above test. Well you have almost successfully fit your barrel at this time, the last thing to check is to see how much gap you have from the end of the barrels ramp to the start of the frames feedramp. Ideally you want a 1/32 gap or .030 (Fig-15).
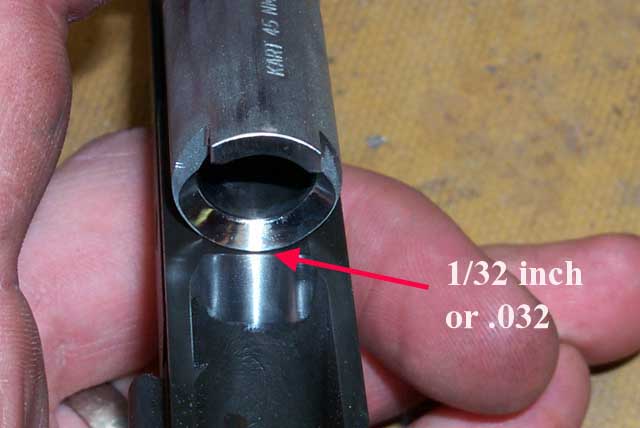
If there is no gap at all or your barrel is hanging off the frames feedramp, you must redress the rear of the barrels ramp with a file. Once you shorten the ramp to acquire the necessary gap between the frames feedramp and the barrels you must now reshape the ramp to eliminate the flat you created with a file. I use a dremel but do not extend the top of the ramp deeper into the chamber area. Next with your dremel and cratex bits polish up your barrels ramp and just break the top sharp corner where the transition line from ramp to chamber is. Now you do not want to unsupport your brass here just break the sharp corner and do not go overboard. The last thing to do is place in the chamber a Go- gauge and see if your gun will lock up completely. If not then your barrel is shortchambered, it will need to be finishe reamed with a finish reamer until the pistol will lock up with a go gauge in place. The last thing I will mention is how to check to see if the barrel is being stopped by the frame when linked down. The frame bed should stop the barrels rearward movement not the link, the link is merely a hinge for the barrel. To check the to see if the barrel is stopping on the frames vertical frame bridge place your barrel with link and pin in the slide along with your barrel bushing leaving out your recoil spring and plug place your slide on your frame and install your slide stop in your frame and through the barrel link and then let it hang straight down (Fig-16). Next with slide about halfway back place the muzzle end against a wooden block or table and place forward pressure and see if the slide stop is tensioned or will not move freely. If slide stop will not move freely then the link and slide stop are stopping the rearward movement of the barrel which is not a good thing as it will eventually break the link. It is possible to open up the far end of the large hole in your link to allow the barrel to get slightly farther to the rear. Doing so slightly changes the timing of when your barrel unlocks though