
Well I received my 1911 parts from woob the other day and decided to put this one at the top of my to build list. These are the parts from the skeet shoot and I believe are all from Sarco.
The frame is a raw stainless forging/casting and partially done for a ramped barrel. It also has the rather squarish dust guard that has the little sag that I've read about these having in em.
The slide is about 90% done and needs the firing pin hole drilled, and retaining plate slots and barrel bushing lug cut out to be milled. It does fit really nicely on a SA that I already have.
Pic of frame and slide.
I got started on the frame last night and took a bunch of pics as I went. Wake up this morning and all but 2 are gone from my phone. (#)
I started off by welding up the channel for the ramped barrel. Then used a rotary surface grinder to do the sides. It then went to the mill to square up the top. Put it on its side and started drilling most of the holes. I took like 20 pics of all the set ups and operations and POOF, gone!
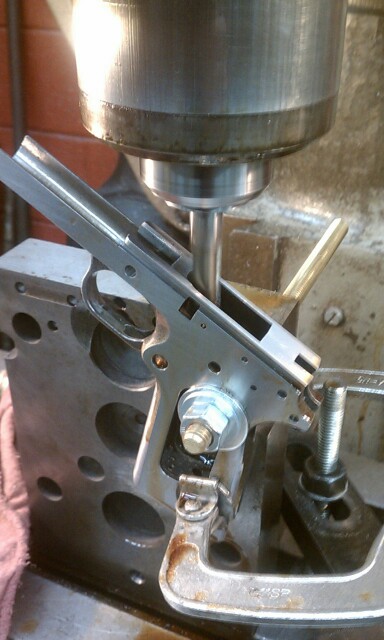
Milling out inside of the dust guard. I know this isn't the best set up to do this but the angle plate and clamps weren't cooperating so I just used the mill vise. Plunge cutting with an end mill this long is not fun. Between the flex of the cutter and the flex of the part made for some interesting sounding noises. Infeeding .005 side ways then plunging down to depth it takes quite a while to move that mill over .2.
When inside was to specs I ran the mill around the outside to finish the guide rod seat and finish off the rest of the dust guard.
Here it is as of now. I wish I hadn't lost the pics of this area from before for a comparison, as there was a lot of material removed here.

Worked on milling out the area for the main spring housing. Nothin fancy, easy work here.
Done except for the slots for MSH and sear spring.
I need to wait until after I cut the rails to do these because the keyseat cutter will need to be ground down to work.
I know I'm kind of bouncing all over this thing but this IS my first rodeo. I've never built a 1911 before this.

This was one of the operations I was a little worried about but it actually wasn't a problem.
Rails almost done, slide almost wants to go on.
So I skin another thou off and have my first problem. The slide now goes tight, great, done, time to start with the lapping compound.
I can get the slide on all the way on backwards but only 3/4 of the way forwards so I know I'm getting close. Had enough for tonight so I'll save the rest of the lapping for another day.
Where it sits now, lets see who can make the funniest joke about this picture.
I then milled the lugway in the slide for the barrel bushing using the same cutter as the rails.

I wanted to use a rotary indexer to do this but could not fit both it and the angle plate in the mill. I ended up using just an angle plate and doing the radius freehand until bushing fit.

After I got the bushing fit I could then work on the barrel seat area of the frame. First I used a .125 end mill to cut the barrel link clearance channel. Then used a .25 cutter for the barrel legs area, and finished the square part at the rear with files. The shallow radiused recess for barrel was roughed with an end mill then finished with sandpaper wrapped around bar stock.
Have been working on this almost every day, usually between running 2 CNC's at work. I only get about 2 minutes at a time between cycles and the mill is 30 yards away from the machines. Load #1, load #2, then book on down to the other end of the shop to do one pass on the mill on whatever operation I'm doing on the 1911, then get back to the machines before they're done. Lots if walking and i'm definitely getting exercise. What should be 20 minutes of work on the 1911 ends up taking me about 3 hours.
The hardest part is remembering to take pictures.
Anyways...
Got the barrel fitting done. Next I wanted to do the slots for the MSG. I thinned down the keyseat cutter that I used to cut the rails. I put it between centers in a tool grinder to take about .015 off.

the center section is the original thickness, the shiny area is what I ground away.
MSG now fits in frame.

Next I cut the slot for the triple spring. I used a unaltered dremmel bit from the hardware store for this. It is bit #199 if I remember right.

This bit is more of a burr and is designed for a higher RPM than my mill is capable of. I had to go extremely slow and use lots of cutting oil with this but it worked.


The tool grinder was tied up at the time so I used 2 dremmels. One in a vise with grinding wheel and the other had my bit in it.
Here it is, 2 Dremels bumpin' uglies.

And their offspring.

Now I could start on the magazine catch. Not much to explain, just drilling.


Then I went in with my newly made little cutter for the retainer slot.

Here it is with catch installed and fully functional.

With that being done I could now deck the bottom of frame.

I then used a chamber mill to bevel the mag well.

Next I think I'll start on making a cutter for the hammer/sear area. This calls for a 3" diameter x.312 cutter with a .5 shank.